Table of Contents
Advertisement
Advertisement
Table of Contents

Related Manuals for Healthstream Opal


Summary of Contents for Healthstream Opal
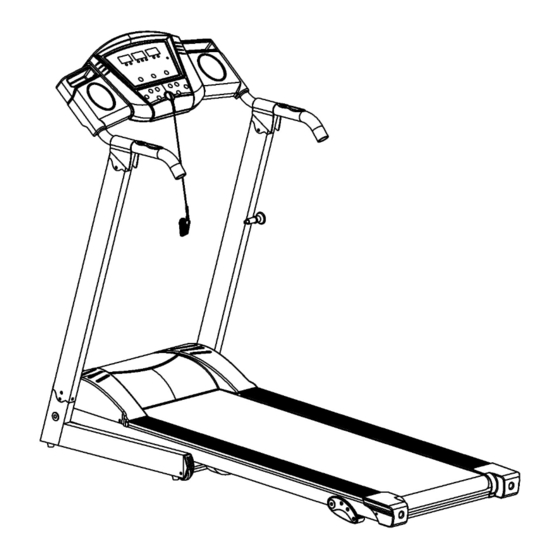
- Page 1 OPAL TREADMILL www.evofitness.net.au...
-
Page 2: Important Safety Instructions
IMPORTANT SAFETY INSTRUCTIONS Important-: Please read all instructions carefully before use your treadmill. Retain this owner’s manual for your future reference: WARNING: 1. Position the treadmill on a clear level surface. Do not place the treadmill on thick carpet as it may interfere with proper ventilation. -
Page 3: Assembly Instructions
ASSEMBLY INSTRUCTIONS TOOLS: 5# ALLEN WRENCH 5mm 1pcs WRENCH W/SCREW DRIVERS=13, 14, 15 1pcs Note: Do not plug into the mains power before completing the assembly ASSEMBLY STEP ONE: Open the carton and remove all foam and cardboard packaging. Place the treadmill on the ground as per diagram ASSEMBLY STEP TWO: Lift up the computer section and... -
Page 4: Assembly Step
ASSEMBLY STEP 4: Slide right upright (4) onto MAIN FRAME (1) To attach the upright posts (4) to the frame use bolt (41) and lock washer (60) using the 5# Allen wrench Note: Support the right upright with your hand to avoid injury. ASSEMBLY STEP 5: Take bolt (41) and lock washer (60) and insert them into R&L upright (3,... -
Page 5: Folding Instruction
FOLDING INSTRUCTION Folding: Hold onto area (A) with your hand, and then pull up as per the arrow in the diagram until the knob (13) springs into block (88) Lowering: Pull knob (13) out with one hand and lightly pull down with the other hand. -
Page 6: Technical Information
TECHNICAL INFORMATION 1600*730*1370 POWER 240 V BUILT UP SIZE(mm) 700*730*1530 SPEED RANGE 1.0-16KM/h FOLDABLE SIZE(mm) RUNNING BOARD 1255*420 55KG NET WEIGHT SIZE(mm) 120KG MAX USER WEIGHT SPEED TIME DISTANCE CALORIES PULSE 3LED DISPLAY www.evofitness.net.au... -
Page 7: Window Display
OPERATION GUIDE WINDOW DISPLAY: 1. “CAL /PULSE” window: Displays the user’s calories and pulse. When the calories are shown, the count will be from 10 to 999, with a restart at 10; when calories count down, it will count down from set data to 0, then the machine will stop smoothly and show ‘End’. -
Page 8: Start-Up Quickly (Manual)
START-UP QUICKLY (MANUAL) 1. Switch the unit on, and attach the safety cord on magnetic connection. 2. Press STATR/STOP button, the system will enter into 3 seconds count down, the unit will beep and the time window display count down, the speed will run 1.0km/hour after 3 seconds. 3. - Page 9 Program exercise chart Each program will divide into 10 grades for the exercise time and each time sect has the speed accordingly. TIME INTERVAL MODE TIME SPEED SPEED SPEED SPEED SPEED SPEED SPEED SPEED SPEED Range of program PROGRAM BEGIN SET UP RANGE DISPLAY RANGE TIME(MIN:SECOND) 0:00...
-
Page 10: Exercise Instructions
Safety lock function: If you pull out the safety cord the treadmill will stop immediately. All the windows display “―――” the buzzer will make a beep sound. To commence, re attach the safety key. Save on power function: The system has a saving function. If the treadmill is not used for 10 minutes the system will automatically turn off. - Page 11 2. The Exercise Phase This is the stage where you put the effort in. After regular use, the muscles in your legs will become stronger. It is very important to maintain a steady tempo throughout. The rate of work should be sufficient to raise your heart beat into the target zone shown on the graph below.
-
Page 12: Maintenance Instructions
MAINTENANCE INSTRUCTIONS WALKING BELT CENTERING AND TENSION ADJUSTMENT DO NOT OVERTIGHTEN the walking belt. This may cause reduced motor performance and excessive roller wear. TO CENTER WALKING BELT: ● Place treadmill on a level surface ● Run treadmill at approximately 5KPH ●... -
Page 13: Walking Belt And Deck Lubrication
This treadmill is equipped with a pre-lubricated, low maintenance deck system. The belt/ deck friction may play a major role in the function and life of your treadmill, thus requiring periodic lubrication. We recommend a periodic inspection of the deck with Healthstream Treadmill lubricant. We recommend lubrication of the deck according to the following timetable: ... -
Page 14: Exploded Drawing
EXPLODED DRAWING www.evofitness.net.au... -
Page 15: Parts List
PARTS LIST DESCRIPTION DESCRIPTION REMARK REMARK MAIN FRAME FIXING BOLT BASE FRAME LOCK NUT LEFT UPRIGHT LOCK NUT RIGHT UPRIGHT BOLT M8*16 COMPUTER BRACKET BOLT M8*25 L15 MOTOR BRACKET SCREW ST4.2*16 BASE FRAME TURN BOLT M8*40 L20 AXES FRONT ROLLER BOLT M8*50 L20 REAR ROLLER... - Page 16 WIRE SAFETY KEY SPRING PULE WITH SWITCH BALL UP WIRE PULSE SPEED UP INNER END CAP WIRE FOAM LABLE SAFETY KEY TRANSFORMER POWER WIRE SWITCH OVERLOAD PROTECTER DC MOTOR RUNNING BOARD MAGNETIC CORE MAGNETIC RING AC SINGLE LINE AC SINGLE LINE AC SINGLE LINE MOTOR BOTTOM COVER...
-
Page 17: Troubleshooting Guide
TROUBLESHOOTING GUIDE 1. Probable reason for the computer not working: The wire from computer to bottom control board is not correctly connected. Check the each wire from computer to control board, make sure they are connected well. If the wire is destroyed, change it. If the above can not fix the problem call our service centre on: 1300 796 636.
Need help?
Do you have a question about the Opal and is the answer not in the manual?
Questions and answers