
Related Manuals for CYP AU-D160


Summary of Contents for CYP AU-D160
- Page 1 AU-D160 Professional USB Digital Audio Converter (DAC) with Integrated Headphone Amplifier OPERATION MANUAL...
-
Page 2: Safety Precautions
Safety Precautions Please read all instructions before attempting to unpack or install or operate this equipment, and before connecting the power supply. Please keep the following in mind as you unpack and install this equipment: Always follow basic safety precautions to reduce the risk of fire, electrical shock and injury to persons. -
Page 3: Table Of Contents
Table of Contents 1. Introduction .................. 1 2. Applications ................. 1 3. Package Contents ..............1 4. System Requirement ..............1 5. Features ..................1 6. Specifications ................2 7. Operation Controls and Functions ..........3 7.1 Top Panel ................3 7.2 Left Side Panel .............. -
Page 4: Introduction
1. Introduction The USB HD Audio Converter Pro is compliant with USB audio 2.0 which is able to accept high resolution digital/analog audio up to 192K and a high bit rate resolution of 24-bits. This device allows PC audio signals to be output to an amplifier active speakers for users to enjoy the original true sound. -
Page 5: Specifications
• LED indicators 1. Power on / streaming (Illuminate/Flash) 2. Sample-rate : 44.1K 3. Sample-rate : 48K 4. Sample-rate : 88.2K 5. Sample-rate : 96K 6. Sample-rate : 176.4K 7. Sample-rate : 192K 6. Specifications Input port USB Audio Class 2.0 Output port 6.3mm Headphone, L/R and Optical L/R Output... -
Page 6: Operation Controls And Functions
7. Operation Controls and Functions The following sections describe the hardware components of the unit. 7.1 Top Panel . Power/Streaming LED: When the Mini USB port has been detected the the system is performing the audio. . 44.1K/48K/88.2K/96K/176.4K/192K LED: The system will automatically detect the audio sampling rates and LED will illuminate as it is. -
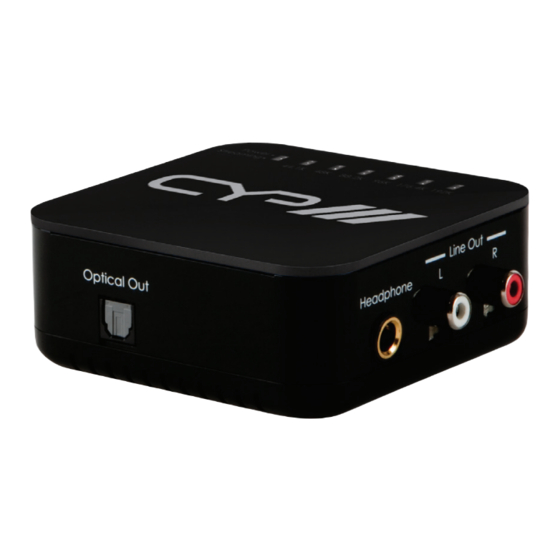
Page 7: Right Side Panel
7.3 Right Side Panel . Headphone output: This slot is where you connect 6.3mm Headphone to the system which can listen the audio from PC. The package will included 6.3mm to 3.5mm phone jack for user to convert 3.5mm phone jack to 6.3mm phone jack. . -
Page 8: Software Installation
8. Software Installation 8.1 Window Installation Process Insert the CD driver included in the package on PC/laptop source device and the driver will Autorun the setup. Connect the USB HD Audio Converter Pro along with the source device. Click on “Next” to start the setup. Make sure the “Destination Folder”... - Page 9 While the installation may take sometimes, message appeared in between like above click “Continue Anyway” to continue the installation. During the setup the hardware device must be connect to your PC/laptop source device and when the message appear to ask for disconnect and reconnect, follow the instruction and when finish doing so click on “OK”.
- Page 10 The installation will continue and message appeared like above again click “Continue Anyway” to continue the installation. When the installation is complete click on “Next”...
- Page 11 Go to the Control Panel from “start” and click on “Sounds, Speech, and Audio Devices”. Then click on “Sound and Audio Devices”...
-
Page 12: Mac Installation Process
Select Audio and choose “Cypress Tech Audio 2.0 Output” from the Sound playback’s Default device. Then click “Ok” to start using USB HD Audio Converter Pro. 8.2 Mac Installation Process There is no installation require for Mac system however, a simple setting is require in order to allow the USB HD Audio to be active. - Page 13 Simply click on “System preferences” and select “Sound”. When the sound window appear click on “Output” and select “USB”.
-
Page 14: Sampling Rate Selection
8.3 Sampling Rate Selection 8.3.1 Window 7 Sampling rate is only selectable from Window 7 version other Window versions are not supported with this function. Output sound quality depending on the original source audio signal may have different performance therefore, the selection of the sampling rate may support better sound on some of the audio signal. -
Page 15: Mac System
Select Advanced and click on the ▼arrow next to Test and select the desire sampling rate. Click on OK to confirm the selection and the sampling rate selection is complete. 8.3.2 Mac System Sampling Rate is selectable in all Mac System and again the output sound quality depending on the original source audio signal may have different performance therefore, the selection of the sampling rate may support better sound on some of the audio signal. - Page 16 Click on Go and select Utilities. Select the Built-in Output and then go to format. Click on the ▼arrow to select the desire sample rate.
-
Page 17: Uninstall The Device Driver
9. Uninstall the Device Driver Follow the steps below to uninstall the Cypress Technology DCT-16’s driver. Step 1: Open the Control Panel from START and double click on the Control Panel then select Add or Remove Programs. Step 2: Select Cypress Technology DCT-16 and click Remove. Step 3: Click Yes to confirm the removal and click Yes again to restart the computer in order to remove the software completely. -
Page 18: Foobar2000 Asio Installation
10. Foobar2000 ASIO installation 1. Enter into the website: http://www.foobar2000.org to download the latest Foobar2000 and complete the installation. 2. Click on Components and search for ASIO and click on ASIO support 1.2.7 or the latest version of ASIO support to enter into the link. - Page 19 3. Double click on Download to download the ASIO software.. 4. Click Open/Save to open or save the ASIO software. If click on Save user must remember the saving direction.
- Page 20 5. Unzip the ”foo_out_asio.dll” file 6. Copy the ”foo_out_asio.dll” file to Foobar2000 under the Components’ file with enter of ”C:\Program Files\foobar2000\components” or the Saved direction...
- Page 21 7. Restart the Foobar2000 click on Library → Configure 8. Enter into Playback and click on → Output → ASIO Virtual Devices...
- Page 22 9. Click on the “▼” arrow of Driver and select ”Cypress DCT-16 ASIO Driver”. Then press OK. 10. Confirm the ”Cypress DCT-16 ASIO Driver” is in the ”ASIO Virtual Devices” list.
- Page 23 11. Enter into Playback again and click on Output. Click on the ▼ arrow of Devices and select “ASIO : Cypress DCT-16 ASIO Driver” then click on OK. Then the installation is completed.
-
Page 24: Connection And Installation
11. Connection and Installation... -
Page 25: Acronyms
Acronyms Acronym Complete Term Intermodulation Distortion Signal-to-noise Ration Total Harmonic Distortion with Noise... - Page 27 www.cypeurope.com...
- Page 28 CYPRESS TECHNOLOGY CO., LTD. Home page: http://www.cypress.com.tw MPM-DCT16...
Need help?
Do you have a question about the AU-D160 and is the answer not in the manual?
Questions and answers