Table of Contents
Advertisement
Quick Links
Advertisement
Table of Contents

Related Manuals for CYP AU-D250


Summary of Contents for CYP AU-D250
- Page 1 AU-D250 Advanced DAC with HDMI Bypass and Audio Breakout OPERATIONS MANUAL...
-
Page 3: Copyright Notice
DISCLAIMERS The information in this manual has been carefully checked and is believed to be accurate. CYP (UK) Ltd assumes no responsibility for any infringements of patents or other rights of third parties which may result from its use. CYP (UK) Ltd assumes no responsibility for any inaccuracies that may be contained in this document. -
Page 4: Safety Precautions
SAFETY PRECAUTIONS Please read all instructions before attempting to unpack, install or operate this equipment and before connecting the power supply. Please keep the following in mind as you unpack and install this equipment: • Always follow basic safety precautions to reduce the risk of fire, electrical shock and injury to persons. -
Page 5: Table Of Contents
CONTENTS 1. Introduction ...........6 2. Applications ...........6 3. Package Contents ........6 4. System Requirements ......6 5. Features ..........7 6. Operation Controls and Functions ..9 6.1 Front Panel ........... 9 6.2 Rear Panel ...........10 6.3 Top Panel ............11 6.4 Remote Control ........11 6.5 OLED Menu ..........12 7. -
Page 6: Introduction
44.1kHz to 192kHz (24 bit). With HDMI connectivity, allowing the user to embed or de-embed audio within the HDMI signal path, the AU-D250 not only provides a truly enhanced listening experience, but also the flexibility to manage all audio signals in your AV system. -
Page 7: Features
5. FEATURES Main 6 Input, 6 Output Advanced DAC 4 Digital Inputs, 2 Analogue Inputs 3 Digital Outputs, 2 Analogue Outputs and Headphone Output Full system control from IR remote or main control dial via OLED display. Digital HDMI, USB, Optical and Coaxial digital audio inputs support LPCM stereo HDMI input supports LPCM stereo in all modes but can pass surround sound signal whilst in bypass mode... - Page 8 Misc IR Remote with direct source, power and mute buttons HDMI audio embedding or de-embedding Volume control of analogue and headphone outputs or just headphone output via remote or main control dial Direct power and mute button on unit High viewing angle OLED display Headphone output fades in after system is muted 6.3mm headphone output (3.5mm mini-jack adaptor supplied)
-
Page 9: Operation Controls And Functions
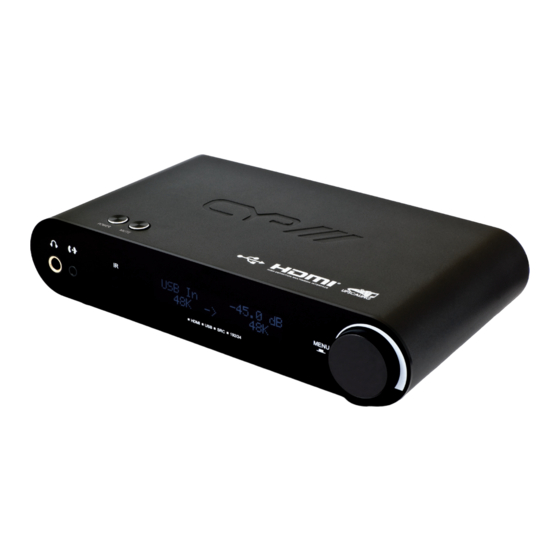
6. OPERATION CONTROLS AND FUNCTIONS 6.1 Front Panel MENU MENU 6.5mm Headphone Jack: Connect to a 6.5mm professional headphone set for the user to enjoy the individual professional audio sound. 3.5mm Front IN: Connect with 3.5mm mini-jack cable from any audio equipment for stereo audio input. -
Page 10: Rear Panel
6.2 Rear Panel COAX. COAX. HDMI OUT HDMI OUT DC 5V DC 5V OPT. OPT. XLR OUT XLR OUT XLR OUT XLR OUT HDMI IN HDMI IN DC 5V: Plug the 5V DC power supply into the unit and connect the adaptor to an AC outlet. -
Page 11: Top Panel
6.3 Top Panel POWER: Press this button to switch on the device or set to standby mode. MUTE: Press this button to mute or unmute the audio volume instantly. 6.4 Remote Control POWER: Press this button to turn On or to set the device in standby mode. -
Page 12: Oled Menu
6.5 OLED Menu 1ST LAYER FULL NAME 2ND LAYER Source In Source Selection HDMI In USB In Optical In Coaxial In Line In (L/R In) Front In Return SRC Set Bypass Sampling Rate Conversion Setup 192 kHz 176.4 kHz 96 kHz 88.2 kHz 48 kHz 44.1 kHz... -
Page 13: Connection Diagram
7. CONNECTION DIAGRAM Headphones Headphone Output FRONT MENU MENU Line-level Input Smartphone or MP3 Player Display Mac PC Set-top Box CD Player Stereo Analogue Input Digital Audio Input Input HDMI Output REAR COAX. COAX. HDMI OUT HDMI OUT DC 5V DC 5V Power OPT. -
Page 14: Specifications
8. SPECIFICATIONS Input Ports 1×HDMI, 1×USB (Type B), 1×Coaxial, 1×Optical, 1×L/R (Analogue Stereo 2RCA), 1×3.5mm Phone Jack (L/R) Output Ports 1×HDMI, 1×Coaxial, 1×Optical, 1×L/R (Analogue Stereo 2RCA), 1×XLR (Balanced Analogue Stereo), 1×6.3mm Phone Jack (Headphone) Digital Audio I/O Support LPCM 2CH Stereo Audio I/O Level 2 Vrms ±0.2 XLR Blanced I/O Level... -
Page 15: Acronyms
9. ACRONYMS ACRONYM COMPLETE TERM COAX Coaxial High Definition HDMI High-Definition Multimedia Interface OLED Organic Light-Emitting Diode Optical Phase Locked Loop Sample Rate Conversion Total Harmonic Distortion... - Page 16 CYP (UK) Ltd., Unit 7, Shepperton Business Park, Govett Avenue, Shepperton, Middlesex, TW17 8BA Tel: +44 (0) 20 3137 9180 | Fax: +44 (0) 20 3137 6279 Email: sales@cypeurope.com www.cypeurope.com v1.01...
Need help?
Do you have a question about the AU-D250 and is the answer not in the manual?
Questions and answers