Intermec CK30 User Manual
Hide thumbs
Also See for CK30:
- Programmer's manual (448 pages) ,
- User manual (210 pages) ,
- Service manual (113 pages)
Table of Contents
Advertisement
Quick Links
Advertisement
Table of Contents

Related Manuals for Intermec CK30


Summary of Contents for Intermec CK30
- Page 1 User's Manual CK30 Handheld Computer...
- Page 2 Intermec. Information and specifications contained in this document are subject to change without prior notice and do not represent a commitment on the part of Intermec Technologies Corporation. 2003 by Intermec Technologies Corporation. All rights reserved.
-
Page 3: Table Of Contents
Patent Information ..................xi Other Copyright Information..............xi Using the CK30 Handheld Computer ..........1 Introducing the CK30 Handheld Computer.............. 2 Using the Battery....................... 5 Charging and Installing the Battery ............. 5 Maximizing Battery Life ................7 Checking the Battery Status................. 7 Using the Keypad ...................... - Page 4 Developing Applications for the CK30 ..............58 Developing a New Application for the CK30 ..........58 Developing a Web-Based Application............59 Converting a Trakker Antares Application to a CK30 Application..... 59 Installing Applications on the CK30 ................ 60 Installing Applications Using ActiveSync ........... 61 Installing Applications Using Your SD Card..........
- Page 5 Copying a File With File Manager............. 73 Viewing the Properties of a File With File Manager........73 Managing Applications on the CK30............... 74 Viewing All Applications Currently Running on the CK30 ....... 74 Closing an Application ................75 Switching Between Applications ..............75 Viewing the Properties of an Application...........
- Page 6 Problems While Scanning Bar Codes............100 Booting the CK30 ....................102 Warm Booting the CK30 ................ 103 Cold Booting the CK30 ................103 Cleaning the Scanner Window and CK30 Screen ..........104 Appendix ....................... 105 Physical and Environmental Specifications............. 106 Accessories for the CK30 ..................
-
Page 7: Before You Begin
Your safety is extremely important. Read and follow all warnings and cautions in this document before handling and operating Intermec equipment. You can be seriously injured, and equipment and data can be damaged if you do not follow the safety warnings and cautions. -
Page 8: Safety Icons
Note: Notes either provide extra information about a topic or contain special instructions for handling a particular condition or set of circumstances. viii CK30 Handheld Computer User’s Manual... -
Page 9: Global Services And Support
Before You Begin Global Services and Support Warranty Information To understand the warranty for your Intermec product, visit the Intermec web site at http://www.intermec.com and click Service & Support > Service & Support. The Intermec Global Sales & Service page appears. From the Service & Support menu, move your pointer over Support, and then click Warranty. -
Page 10: Who Should Read This Document
IP address. The CK30 Command Reference Manual is included with this manual on a CD or is available as a download from the Intermec web site. Please refer to this manual for help configuring your CK30. -
Page 11: Related Documents
Related Documents The Intermec web site at http://www.intermec.com contains our documents that you can download in PDF format. To order printed versions of the Intermec manuals, contact your local Intermec representative or distributor. Patent Information Product is covered by one or more of the following patents: 4,455,523;... - Page 12 Dr John Maddock makes no representations about the suitability of this software for any purpose. It is provided “as is” without express or implied warranty. CK30 Handheld Computer User’s Manual...
-
Page 13: Using The Ck30 Handheld Computer
Using the CK30 Handheld Computer Use this chapter to familiarize yourself with the CK30 Handheld Computer. In this chapter you will find these sections: • Introducing the CK30 Handheld Computer • Using the Battery • Using the Keypad • Using the Screen •... -
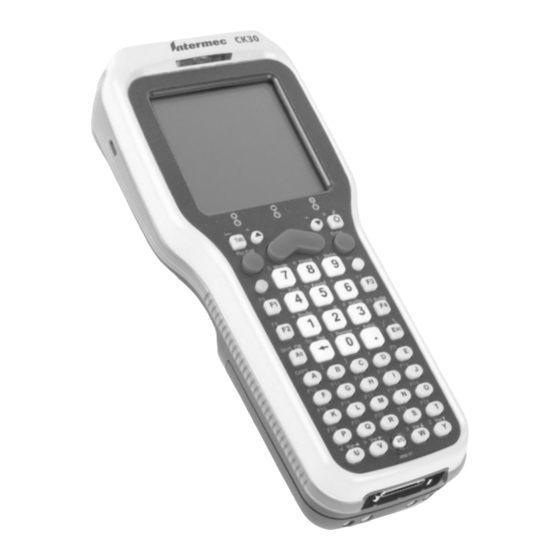
Page 14: Introducing The Ck30 Handheld Computer
802.11b/g wireless LAN devices. The CK30 computer is available in three different models that offer several options. To find out which model of the CK30 you have, locate the configuration label on the back of the computer. The first five characters of the configuration number indicate the model of CK30 you ordered. - Page 15 Chapter 1 — Using the CK30 Handheld Computer CK30AA0301000 Configuration number Configuration Label: The label in this illustration is for a CK30 Model A (CK30A). Features Included With the Different Models of the CK30 Feature CK30A CK30B CK30C Ethernet (optional) 802.11b/g radio...
- Page 16 • 2D area imager Use this manual to understand how to use the features and options available on the CK30. For additional help using terminal emulation, see the appropriate TE 2000 guide: • TE 2000 VT/ANSI Terminal Emulation Programmer’s Guide (P/N 977-055-005) •...
-
Page 17: Using The Battery
Chapter 1 — Using the CK30 Handheld Computer Using the Battery The CK30 uses an AB1 lithium-ion battery as its main power source. You must fully charge the main battery before you can use the CK30. When you change the battery, a backup battery maintains your status, memory, and real-time clock for at least 10 minutes. - Page 18 Chapter 1 — Using the CK30 Handheld Computer To charge the battery • Either insert the battery into the AC1 4-slot battery charger or place the CK30 with battery installed in the AC2, AD1, or AD2. For more information on these accessories, see page 109.
-
Page 19: Maximizing Battery Life
Battery is critically low. You need to replace the battery now. You can also check the battery status by looking at the Battery Status light on the front of the CK30 or by using the battery diagnostics screen. For help using the Battery Status light, see “Understanding the Status Lights”... -
Page 20: Using The Keypad
Keypad” on page 111. The CK30 supports TE 2000 VT100/220/320/340 and ANSI, TE 2000 5250, and TE 2000 3270. When you order the CK30 with a TE 2000 application, you must order the corresponding keypad overlay. Use the TE 2000 keypad overlays to enter the same keys that you can enter on a VT/ANSI keyboard, an IBM 5250 keyboard, or an IBM 3270 keyboard. -
Page 21: The 42-Key Large Numeric And Function Keypad
Chapter 1 — Using the CK30 Handheld Computer The 42-Key Large Numeric and Function Keypad Backlight T ab Scan E nter E nter button Green Orange I ns CAPS S hift E sc H ome & D el A lt... -
Page 22: The 50-Key Full Alphanumeric Keypad
Chapter 1 — Using the CK30 Handheld Computer The 50-Key Full Alphanumeric Keypad Backlight Power ¦ H ome ‘ “ Green D el CAPS Orange S pace I ns A lt PROG 50-key full alphanumeric keypad: This keypad is designed for applications that enter mainly numeric data (0-9) and that may need to enter the entire alphabet. -
Page 23: The 52-Key Full Alphanumeric Keypad
Chapter 1 — Using the CK30 Handheld Computer The 52-Key Full Alphanumeric Keypad Backlight Scan button Orange Green Power 52-key full alphanumeric keypad: This keypad is designed for applications that enter mainly numeric data (0-9) and that may need to enter the entire alphabet. -
Page 24: Using The Color-Coded Keys
There are two color-coded modifier keys on the CK30: the orange B key and the green C key. -
Page 25: Capitalizing All Characters
Chapter 1 — Using the CK30 Handheld Computer Capitalizing All Characters To type all alphabetic characters as uppercase letters, you can enable the Caps Lock feature on the CK30 keypad. To enable Caps Lock 1 Press the orange key. The icon appears on the status bar. -
Page 26: Using The Power (I) Key
Chapter 1 — Using the CK30 Handheld Computer Using the Power (I) Key When you press the I key to turn off the CK30, you actually put the CK30 in Suspend mode. In Suspend mode, the CK30 continues to supply power to all memory, but turns off power to most hardware. -
Page 27: Understanding The Screen Icons
Shift key is enabled. Caps Lock key is enabled. Alpha key is enabled. The CK30 is buffering (storing) data. You are in the password-protected area of the CK30. The CK30 is connected using ActiveSync. Mouse pointer is turned on. No UDP Plus connection. -
Page 28: Using The Mouse Pointer
Chapter 1 — Using the CK30 Handheld Computer Using the Mouse Pointer If you need to use a mouse to perform an action, you can use the mouse pointer on your CK30. To turn on the mouse pointer Press Alt and then •... -
Page 29: Repositioning A Window
Chapter 1 — Using the CK30 Handheld Computer To click and drag an item on the screen 1 Position the mouse pointer on the part of the window you want to move. 2 Press the key for the left mouse button and then press 0 (zero). -
Page 30: Understanding The Status Lights
Chapter 1 — Using the CK30 Handheld Computer Understanding the Status Lights The status lights on the CK30 turn on to indicate the status of the battery, a successful decode of a bar code, or a user-defined function. System Status... -
Page 31: Understanding The Beeps
Chapter 1 — Using the CK30 Handheld Computer Understanding the Beeps The CK30 uses beeps to provide you with audio feedback when it performs some functions. For example, you hear a beep each time you scan a valid bar code. -
Page 32: Scanning Bar Codes
The CK30 supports the scanning of 1D linear bar codes and 2D images depending on your model of CK30. Plus, if you are using an integrated handle or a tethered scanner, the way you scan bar codes is different. -
Page 33: Scanning With The Integrated Laser Scanner And 1D Linear Imager
Chapter 1 — Using the CK30 Handheld Computer Scanning With the Integrated Laser Scanner and 1D Linear Imager If the CK30 has a laser scanner or 1D linear imager, use the following procedure to practice how to scan a bar code. The... -
Page 34: Scanning With The 2D Area Imager
2D bar code symbologies and supports omni- directional (360°) scanning. Omni-directional scanning means that you can position the CK30 in any orientation to scan a bar code label. Using the 2D area imager is very similar to taking a picture with a digital camera. -
Page 35: Attaching A Tethered Scanner
Good Read light turns on briefly. 4 Release the Scan button. Attaching a Tethered Scanner You can use a tethered scanner with the CK30 if you ordered it with a 10-pin tethered scanner port in place of the integrated scanner. - Page 36 Scanner port To scanner 3 Configure the Scanner Model command and select the tethered device connected to the CK30. There are several ways to configure the scanner model: • Use the Configuration Utility. From the System Main Menu, choose Configuration Utility > Scanners, Symbologies >...
-
Page 37: Using The Sd Card
You can use a Secure Digital (SD) card to increase file storage and install software. The CK30 currently supports SanDisk SD cards only. The SD card slot is located on the top of the CK30 just above the laser scanner window. - Page 38 Chapter 1 — Using the CK30 Handheld Computer 7 Press I to turn on the CK30. To remove the SD card 1 Press I to turn off the CK30. 2 Remove the two screws on the SD card slot door and remove the door.
-
Page 39: Configuring The Ck30
Configuring the CK30 Use this chapter to understand how to configure the CK30 to communicate in your network. In this chapter, you will find these sections: • How to Configure the CK30 Parameters • Configuring the CK30 for Your Network •... -
Page 40: How To Configure The Ck30 Parameters
Chapter 2 — Configuring the CK30 How to Configure the CK30 Parameters You can configure many parameters on the CK30, such as the bar code symbologies it decodes or the network settings. These characteristics are controlled by configuration parameters. The values you set for these configuration parameters determine how the computer operates. -
Page 41: Configuring The Ck30 With The Setup Assistant
Chapter 2 — Configuring the CK30 Configuring the CK30 With the Setup Assistant When first setting up the CK30, use the Setup Assistant to set or enable basic network parameters and connect your CK30 to the network. The Setup Assistant guides you through setting the following basic network parameters: •... -
Page 42: Configuring The Ck30 With The Configuration Utility
Chapter 2 — Configuring the CK30 Configuring the CK30 With the Configuration Utility Use the menu-driven Configuration Utility to configure the CK30 and view system information. You can access the Configuration Utility while running any application. To open the Configuration Utility 1 Press C and then B. - Page 43 Use the following diagram to find the commands you need to use to configure your CK30s. These screens are do not represent the exact information you will see on your CK30. They have been modified to show you how the information is structured.
- Page 44 Communications Set up network settings including the 802.11b/g radio and the Bluetooth radio. CK30 Settings Configure settings specific to the CK30 such as the date, time, beeper volume, and backlight timeout. Summary View a summary of all settings for the Scanners, Symbologies menu, the Communications menu, and the CK30 Settings menu.
- Page 45 Chapter 2 — Configuring the CK30 Restoring Default Settings You can restore the CK30 to factory default settings from the Configuration Utility. For a complete list of the default settings, see “Default Configuration” on page 114. Note: Using the Restore Defaults option resets all network parameters.
-
Page 46: Configuring The Ck30 By Scanning Bar Codes
Configuration Utility or send commands through the network to your CK30. You can print and scan the bar code labels from the CK30 Command Reference Manual or you can create your own bar code labels. For help, see the CK30 Command Reference Manual. -
Page 47: Configuring The Ck30 Through The Network
Configuring the CK30 in a UDP Plus Network You can use the host computer to configure a CK30 in your wireless or Ethernet network. To send and receive configuration data or files, you need to write a host application that can communicate with the Intermec Gateway or DCS 30X. - Page 48 DCS 30X or Intermec Gateway. To set up the application • Prepare and write a host application that can communicate with the DCS 30X or Intermec Gateway and send transactions to and receive transactions from the CK30 in this format: transaction header TMF field...
- Page 49 CK30 to the host. commands are the reader and configuration commands that you want to set on the CK30 or the current value you want to retrieve from the CK30. To save configuration changes in flash memory, send the reader command .+1 as the last command.
- Page 50 CK30 to the host. commands are the reader and configuration commands that you want to set on the CK30 or the current value you want to retrieve from the CK30. To save configuration changes in flash memory, send the reader command .+1 as the last command.
-
Page 51: Configuring The Ck30 For Your Network
• Bluetooth™ radio communications Configuring Serial Communications The CK30 has a serial port to transfer data to and receive data from another device via RS-232 communications. You can also insert the CK30 into a communications dock to transmit data to and receive data from a host computer or PC using RS-232 communications. - Page 52 2 Connect the CK30 to the serial port of another device. You can do this in one of the following ways: • Connect the CK30 serial port to the serial port of the other device using the AA1 (26-pin to DB9-pin) serial cable adapter and a female-to-female null modem RS-232 cable.
-
Page 53: Configuring 802.11B/G Radio Communications
électrique, faute de quoi vous risquez d’endommager votre installation. The wireless CK30 has an internal 802.11b/g radio to transfer data using wireless communications. This section of the manual assumes that you have already set up your wireless communications network including your access points. - Page 54 Access point CK30s CK30 in a TCP/IP Direct Connect Network To use wireless communications in a TCP/IP network 1 Configure these network parameters on each CK30 in the network: • Network Name (SSID) • Host IP Address • IP Settings (if not using DHCP) •...
- Page 55 “Configuring the CK30 With the Configuration Utility” on page 30. Configuring the Network Parameters for a UDP Plus Network In a UDP Plus network, the CK30 communicates with a host computer through the Intermec Gateway or the DCS 30X. Host...
-
Page 56: Configuring Ethernet Communications
With the Configuration Utility” on page 30. Configuring Ethernet Communications You can use the CK30 directly in an Ethernet network if you have ordered the Ethernet option on your CK30A and you insert it into an AD1 or AD2 Communications Dock. The... - Page 57 CK30 CK30 CK30s in an Ethernet Network To use the CK30 in an Ethernet network 1 Configure these network parameters on each CK30 in the network: • Network Name (SSID) • Host IP Address • IP Settings (if not using DHCP) •...
-
Page 58: Configuring Bluetooth Radio Communications
Bluetooth qualified module by Socket Communications. The Bluetooth technology uses short-range radio links and allows for communications over a 5-meter (16.4 ft) range. To configure the CK30 for wireless printing 1 Go to Configuration Utility > Communications > Bluetooth. The Bluetooth menu appears: 2 Select Set Printer (Device Discovery) to start the Bluetooth device discovery. - Page 59 Connectable commands. If you do not select Apply Bluetooth changes, the changes are made the next time you turn the CK30 off and on or perform a warm boot. For more information on using Bluetooth communications, see the Wireless Printing Development Guide available on the Intermec Developer’s Library CD (P/N 235-114-001) or the...
-
Page 60: Configuring Security
• WEP Use the next sections to understand how to configure each type of security on your wireless CK30. If you choose not to use security, see “Disabling Security” on page 54 for help. If you are using 802.1x security, this section also assumes that your authentication server and access points are properly configured. -
Page 61: Configuring Wpa Security
WLAN. In PSK mode, WPA provides user authentication using a shared key between the access point and the CK30. WPA-PSK is a good solution for small offices or home offices that do not want to use an authentication server. - Page 62 1.80 or later as an authentication server. For help, see the MobileLAN access System Manual (P/N 067150). • An access point with an 802.11b/g radio that supports WPA • CK30 with the 802.11b/g radio and the 802.1x/WPA security option To enable WPA security on your CK30 1 Make sure you have configured the communications and radio parameters on your CK30.
- Page 63 Press Enter. You return to the Communications menu. 7 Exit the Configuration Utility. To enable WPA-PSK security on your CK30 1 Press C and then B to open the System Main Menu. 2 Choose Configuration Utility > Communications > 802.11 Radio >...
-
Page 64: Configuring 802.1X Security
1.80 or later as an authentication server. For help, see the MobileLAN access System Manual (P/N 067150). • An access point with an 802.11b/g radio • A CK30 with an 802.11b/g radio and the 802.1x/WPA security option To enable 802.1x security on your CK30 1 Press C and then B to open the System Main Menu. -
Page 65: Configuring Static Wep Security
6 For Network Key Setting, choose Automatic. 7 Exit the Configuration Utility. Configuring Static WEP Security The CK30 uses the Wired Equivalent Privacy (WEP) protocol to provide your wireless networks the same level of protection as a comparable wired network. WEP adds security to wireless local area networks (WLANs) based on the 802.11b standard. -
Page 66: Disabling Security
9 Exit the Configuration Utility. Disabling Security If you choose not to use security with your WLAN, you need to disable it on the CK30. By default, static WEP is enabled. Intermec recommends that you always set security in your network. - Page 67 3 Press Enter. An hourglass appears while the CK30 is saving your settings to flash. When the CK30 is done saving your changes, it returns you to the Configuration Utility menu. 4 Press Esc to return to the System Main Menu.
- Page 68 Chapter 2 — Configuring the CK30 CK30 Handheld Computer User’s Manual...
-
Page 69: Developing And Installing Applications
In this chapter you will find these sections: • Developing Applications for the CK30 • Installing Applications on the CK30 • Launching Your Application Automatically • Customizing How Applications Load on the CK30... -
Page 70: Developing Applications For The Ck30
Developing a New Application for the CK30 Use the Intermec SDK to develop new applications to run on the CK30. The Intermec SDK is a library of C++ language functions you can use to create applications for the CK30. See the SDK online user’s manual for help developing your application. -
Page 71: Developing A Web-Based Application
If you have an existing Trakker Antares application that you would like to run on the CK30, you can use the PSK to convert it. The CK30 PSK is a set of libraries and tools that you use to convert your existing Trakker Antares C applications into C++ applications for use on the CK30 Handheld Computer. -
Page 72: Installing Applications On The Ck30
Intermec web site at www.intermec.com. Installing Applications on the CK30 There are several ways you can install applications on the CK30: • You can package your application as a cabinet (CAB) file. • If you have a simple application, you may only need to deliver the EXE file. -
Page 73: Installing Applications Using Activesync
CK30: • The SDMMC Disk folder • The CK_FFS folder If you have an SD card inserted in your CK30, it appears as the SDMMC Disk folder. This folder is the recommended location for placing your application install files. - Page 74 2 Connect the AD1 to your PC with the USB or serial cable. 3 If you are using a serial cable, from the CK30 System Main Menu, select Programs > ActiveSync Serial. The default setting for ActiveSync on the CK30 is USB.
- Page 75 Next. 8 In the Setup Complete dialog box, click Finish. When the partnership has been established, the following screen appears on your PC showing the device name of your CK30 and the Connected status. The Microsoft ActiveSync Screen...
- Page 76 Chapter 3 — Developing and Installing Applications Using ActiveSync to Copy Files and Install Applications You can use ActiveSync to copy files to the CK30 and to install applications. Use the following procedures to learn how to copy files and install applications on the CK30 using ActiveSync.
-
Page 77: Installing Applications Using Your Sd Card
After your application is installed, you can run it from the Programs menu in the System Main Menu. Installing Applications Using Your SD Card If you have an SD card for your CK30, this is the best place for you to install applications. To install applications using the SD card 1 If you are using an SD card reader, remove the SD card from the CK30 and place it in the reader. -
Page 78: Installing Applications Using Wavelink Avalanche
Customizing How Applications Load on the CK30 If you have several processes that you need to have run in a specific order as the CK30 turns on, you can use the AutoRun system to customize the way applications load. For compatibility with other Intermec computers, you can place a copy of AutoRun.exe in the same folder as your AutoRun.dat file but it... - Page 79 During every boot, the system scans for AutoRun.dat in the \2577 folder on first the SDMMC Disk and then the CK_FFS folder. The CK30 executes the first AutoRun.dat file that it finds. Here is a sample AutoRun.dat file that runs a dialer application, connects to a VPN, and establishes a TE 2000 session: EXEC “\Program Files\My Dialer\Dialer.exe”...
- Page 80 Chapter 3 — Developing and Installing Applications CK30 Handheld Computer User’s Manual...
-
Page 81: Managing The Ck30
Managing the CK30 Use this chapter to understand how to manage information on the CK30. In this chapter, you will find these sections: • Accessing the System Main Menu • Managing Files on the CK30 • Managing Applications on the CK30 •... -
Page 82: Accessing The System Main Menu
Accessing the System Main Menu You need to access the System Main Menu to be able to use most of the tools for managing the CK30, such as File Manager and the Configuration Utility. You can set a password to protect access to the System Main Menu. -
Page 83: Managing Files On The Ck30
Chapter 4 — Managing the CK30 Managing Files on the CK30 You use File Manager to manage files on the CK30. File Manager not only lets you view all of the folders and files located on your CK30, it also lets you: •... -
Page 84: Deleting A File With File Manager
Note: You can also include parameters following the application name. Deleting a File With File Manager You can use the File Manager to delete files from your CK30. To delete a file 1 Navigate to the folder containing the file you want to delete. -
Page 85: Copying A File With File Manager
Chapter 4 — Managing the CK30 The file is deleted and you remain in the selected folder. Copying a File With File Manager You can use File Manager to make a copy of a file and place it in a different folder. -
Page 86: Managing Applications On The Ck30
Managing Applications on the CK30 Task Manager provides information about applications running on the CK30. You do not need to use the System Main Menu to access Task Manager – you can access Task Manager at any time. If you have set a password to protect using the System Main Menu, you will not be able to close an application or view the properties of an application without logging in. -
Page 87: Closing An Application
Chapter 4 — Managing the CK30 The Task Manager dialog box appears with the active application or task selected. Closing an Application You can use the Task Manager to close an application at any time. You can close the application you are currently using or another application that is running in the background. -
Page 88: Viewing The Properties Of An Application
3 Press Enter to close the Task Properties dialog box. Setting or Changing the System Main Menu Password When you initially start the CK30, there is no password to protect access to the System Main Menu. Anyone can view and use powerful tools such as the Configuration Utility, File Manager, and Diagnostics. - Page 89 Chapter 4 — Managing the CK30 To set a password 1 Press C and then B. The System Main Menu appears. 2 From the System Main Menu, select Main Menu Password. The Set Menu Password dialog box appears. 3 Press Tab to move to the New Password field.
-
Page 90: Backing Up Your Files
Menu. Backing Up Your Files The CK30 makes it easy for you to make a backup copy of all files you have installed or modified on the computer that are not already located in the SDMMC Disk or CK_FFS folders. When you make a backup copy of the file system, the CK30 saves the file system to a folder called Persistent Copy. -
Page 91: Upgrading The Operating System
Intermec web site at www.intermec.com. You can use any file transfer method (ActiveSync, FTP server, and so on) to copy the ZIP file to your SD card. Intermec recommends using an SD card reader. Note: If you are using an SD card reader to copy files to your SD card, see “Using the SD Card”... - Page 92 4 Copy all of the files to your SD card. If you are using ActiveSync, an FTP server, or Wavelink Avalanche to copy the files to your CK30, place the files in the SDMMC Disk folder. 5 If you are using an SD card reader, insert the SD card into the CK30.
-
Page 93: Running Diagnostics
Running Diagnostics Use the diagnostics on the CK30 to help analyze software and firmware problems, fix application problems, and view system information. Diagnostic Test Page Number Battery Information Bluetooth Console Bootcode Version Contrast Test Display Test Hardware Configuration Table Installed Fonts... -
Page 94: Using Diagnostics On The Ck30
• Hardware Diagnostics • Software Diagnostics • System Diagnostics Use the Hardware Diagnostics menu to run tests on the CK30 or view system information. For example, you can run an LED test to determine if your CK30 lights are working correctly or you can view how much of a charge you have left in your main battery. -
Page 95: Understanding The Diagnostics Screens
1 Press Esc until you return to the System Main Menu. 2 From the System Main Menu, press Esc. 3 When the Exit Main Menu screen appears, press Enter. When you exit the System Main Menu, the CK30 resumes the application you were running when you opened the diagnostics menu. -
Page 96: Bluetooth Console
L2CAP connection between two Bluetooth devices. For more information on using the Bluetooth Console (or BDTC), visit the Microsoft web site. From the System Main Menu: • Go to Diagnostics > System Diagnostics > Bluetooth Console Sample Screen CK30 Handheld Computer User’s Manual... -
Page 97: Bootcode Version
Sample Screen Contrast Test Use the Contrast Test to make sure the different contrast settings are working correctly on your CK30. The test will run through all of the settings and return you to your original setting. When you start the contrast test, the screen gradually gets darker until it is almost black and then it goes to the lightest setting which is almost white. -
Page 98: Display Test
Sample Screen Display Test Use the Display Test to make sure that every pixel on the CK30 screen is working correctly. For example, you may want to test the screen if you do not see complete characters on the screen. -
Page 99: Installed Fonts
• Go to Diagnostics > Hardware Diagnostics > HW Config Table Sample Screen Installed Fonts Use this screen to view all of the fonts installed on your CK30. From the System Main Menu • Go to Diagnostics > Software Diagnostics > Installed Fonts Sample Screen CK30 Handheld Computer User’s Manual... -
Page 100: Intermec Value Add Information
Chapter 5 — Running Diagnostics Intermec Value Add Information Use this screen to see the versions of Intermec Value Add (IVA) products on your CK30. From the System Main Menu: • Go to Diagnostics > Software Diagnostics > IVA Info... -
Page 101: Led Test
• Go to Diagnostics > Hardware Diagnostics > LED Test Memory Information Use the Memory Info diagnostic to see how much RAM and flash memory is available on the CK30. You can also see the Flash Part ID. From the System Main Menu: •... -
Page 102: Network Interface Information
Sample Screen Network Interface Information Use the Net Interface Information diagnostic screen to view the DHCP server IP address, the CK30 device address, and the MAC address. From the System Main Menu: • Go to Diagnostics > System Diagnostics > Net Interface... -
Page 103: Operating System Version
Use the OS Version diagnostic screen to view the operating system software version and whether you have the Standard or Premium version loaded on the CK30. From the System Main Menu: • Go to Diagnostics > Software Diagnostics > OS Version... -
Page 104: Psc Utility
Radio SSI Utility The radio signal strength indicator (SSI) utility displays the radio signal quality being received by the CK30. You can use this diagnostic tool to perform a site survey and determine the best locations for placing access points. -
Page 105: Read Cpu Registers
The Sound Test can also help you choose a beeper volume and frequency that you can hear in your working environment. When you select the test, the CK30 sounds a series of beeps from the default beep through the entire range of quiet to loud beeps. - Page 106 Chapter 5 — Running Diagnostics CK30 Handheld Computer User’s Manual...
-
Page 107: Troubleshooting And Maintaining The Ck30
Use this chapter to solve problems you may encounter while using the CK30. You will also find information on booting the computer and routine maintenance. If you have any problems using the CK30, look in this chapter to find a possible solution. This chapter consists of the following sections:... -
Page 108: Problems And Solutions
DCS 30X or Intermec Gateway or the host, it ignores any input from the keypad or scanner. • Press I to turn off the CK30 and then press I again to turn on the CK30. • Press and hold the I button for five seconds to warm boot the CK30. -
Page 109: Problems While Configuring The Ck30
You may have accidentally locked a modifier key on the keypad or you can only type keypad. Check the CK30 status bar to see if it contains an uppercase or lowercase letters. icon with a locked symbol. Press the necessary key sequence to unlock the key. - Page 110 Make sure that the network name on the CK30 is the same as the network name of the access point that you are trying to communicate with. The default network name is “INTERMEC.”...
-
Page 111: Problems With Wireless Connectivity
You CK30 is not communicating with the may also be using the CK30 out of range of an access access point. point. Try moving closer to an access point to re- establish communications. -
Page 112: Problems Transmitting Data Through The Serial Port
• Make sure the CK30 is connected to the PC, host computer, or RS-232 serial device using the appropriate cable adapter and null modem cable. • If the CK30 is in a communications dock, make sure that the communications dock is connected to the serial device using the appropriate cable. - Page 113 You may not be using an input device that is supported CK30 and it cannot read any bar codes. with the CK30. Make sure you are using one of the supported input devices and that you have selected the correct scanner model using the Configuration Utility.
-
Page 114: Booting The Ck30
CK30 settings with the scanner. settings on your 1551E or 1553. Booting the CK30 You seldom need to warm or cold boot the CK30. The CK30 uses the configuration currently saved in flash memory during the boot process. -
Page 115: Warm Booting The Ck30
To warm boot the CK30 • Press and hold I for 5 seconds. The CK30 tells you it is performing a warm boot and the screen comes back up to the start screen. -
Page 116: Cleaning The Scanner Window And Ck30 Screen
à zéro le bouton. 3 Replace the battery. The battery light on the CK30 blinks three times and the CK30 starts the power on sequence. Note: Date and time settings are not saved through a cold boot. -
Page 117: Appendix
Appendix... -
Page 118: Physical And Environmental Specifications
Appendix A Physical and Environmental Specifications Use this section to locate technical information about the CK30 and its available features and options. Physical Dimensions Length: 20.3 cm (8.0 in) Width: 8.9 cm (3.5 in) Depth: 5.5 cm (2.15 in) with standard case, 6.2 cm (2.45 in) with wide case... - Page 119 55 mil code 19.1 to 126 cm 7.5 to 49.0 in 55 mil code, retroreflective 105 to 151 cm 41.0 to 59.0 in 100 mil code, retroreflective 113 to 227 cm 44.0 to 89.0 in CK30 Handheld Computer User’s Manual...
- Page 120 100% contrast contrast 0,33 mm/ 13 mils/ contrast contrast Reading distances on the 2D line Symbology Density Density (mm) (mil) (mm) (mm) (inch) (inch) Code 39 0.125 0,33 mm/ 13 mils/ 100% 100% contrast contrast CK30 Handheld Computer User’s Manual...
-
Page 121: Accessories For The Ck30
AC2 4-Bay Battery Charging Dock Use the AC2 to charge up to four AB1 batteries without having to remove them from the CK30. You can insert up to four CK30s with batteries installed making it easy to remember to charge your batteries overnight. - Page 122 The holster and belt provide an easy way for you to carry the CK30 while not using it. The holster and belt support either right or left-handed use and you can use it to carry a CK30 with or without a handle. You can only use this accessory with a CK30 that has either the 1D linear imager or the 2D imager.
-
Page 123: Typing Characters Not Printed On The Keypad
Appendix A AV1 Vehicle Cradle Use the AV1 vehicle to attach your CK30 to a vehicle, such as a forklift. The vehicle cradle provides protection from vibrations that exceed the level the CK30 can withstand alone. 073573 Power Supply Provides power to all of the communication docks and chargers. - Page 124 C and then C key and then O C and then C and then P Not applicable C and then Q Not applicable C and then R Not hidden C and then T Not applicable CK30 Handheld Computer User’s Manual...
- Page 125 Press This Key Sequence on the 42-Key Keypad C and then 5 C and then Alpha C and then Tab < B and then > B and then B and then B and then Enter Right Enter CK30 Handheld Computer User’s Manual...
- Page 126 Default Configuration Use the following tables to see the default configuration settings of the CK30. If you restore the CK30 to factory default settings, it will use these values. The tables are organized according to the options in the Configuration Utility. The options you see on your CK30 depend on which decode algorithm you have enabled.
-
Page 127: Default Configuration
Aimer LED Duration 0 ms Sticky Aimer LED Duration 0 ms Decode Security Settings Default Value Decode Security Moderate Scanner Redundancy None Consecutive Data Validation Identical Consecutive Timeout 300 ms Different Consecutive Timeout 0 ms CK30 Handheld Computer User’s Manual... - Page 128 Network Key Index Key 1 802.1x Authentication Disabled Radio Power Management Maximum RTS Threshold 2347 octets Wireless Extensions Settings Default Value Receive Window Size 8192 bytes Initial Round Trip Time 3000 ms Delayed ACK Time 200 ms CK30 Handheld Computer User’s Manual...
- Page 129 UDP Plus Settings Default Value UDP Plus Activate Disable Controller IP 0.0.0.0 Controller Port 5555 Ack Delay Upper Limit 5000 ms Ack Delay Lower Limit 300 ms Retries Send Timer 20 s Receive Timer 45 s CK30 Handheld Computer User’s Manual...
- Page 130 Low Beep 100 ms High beep 150 ms Beeper Frequency Good Read Beep 1950 Hz Low Beep 512 Hz High beep 1950 Hz Backlight Timeout 1 minute Display Contrast Level 3 Auto Shutoff 3 minutes CK30 Handheld Computer User’s Manual...
-
Page 131: Index
Index... - Page 132 AB1 battery running from File Manager, 71 described, 109 running from the Command Line, 72 using, 5 storing on the CK30, 61 AC1 4-slot battery charger accessory, switching between, 75 described, 109 viewing all currently running, 74 AC2 4-bay battery charging dock...
- Page 133 111 remaining, 83 charging dock, 4-bay battery, 109 bar codes charging times, battery, 6 scanning, 20 CK_FFS folder, using to store to configure the CK30, 34 applications, 61 troubleshooting, 100 CK30 supported symbologies, 107 Command Reference Manual, symbologies, default, 20...
- Page 134 Trakker Antares disabling security, 54 application, 59 Display Test, diagnostics screen, 86 copy files dock, communications to CK30 using ActiveSync, 64 AD1, described, 110 using File Manager, 73 AD2, described, 110 copyright information, xi CK30 Handheld Computer User’s Manual...
- Page 135 8 gun. See CK30 typing hidden characters, 111 handle, AH1 accessory, 110 using, 8–14 handstrap, AL2 accessory, 110 using color-coded keys, 12 Hardware Configuration Table, Keypad Test, diagnostic screen, 88 diagnostics screen, 86 CK30 Handheld Computer User’s Manual...
- Page 136 89 programs. See applications protocols supported, 41 properties using to send configuration viewing applications, 76 commands, 35 viewing file, 73 no network connection icon, Protected Extensible Authentication troubleshooting, 99 Protocol (PEAP), described, 52 CK30 Handheld Computer User’s Manual...
- Page 137 Index protective boot, AG2 accessory, 110 bar codes to configure the CK30, 34 protective case, AG1 accessory, 110 laser scanner, 21 PSC Utility, diagnostics screen, 92 screen PSK, using to convert Trakker Antares cleaning, 104 applications, 59 specifications, 106 understanding icons, 15...
- Page 138 TKIP, using with WPA, 49 checking battery, 7 TMF field, defined, 37, 38 lights, understanding, 18 Trakker Antares application, storing your application on the CK30, 61 converting, 59 support, calling Intermec, x transaction header, defined, 36 switch, reset, 103 transaction ID, creating, 35...
- Page 139 15 characters, 113 printing, configuring, 46 warm booting, 103 work area of screen, 14 warranty information, ix WPA security, configuring, 49 Wavelink, Avalanche. See Avalanche WPA-PSK security, configuring, 49 web-based application, developing, 59 CK30 Handheld Computer User’s Manual...
- Page 140 Index CK30 Handheld Computer User’s Manual...
- Page 142 Corporate Headquarters 6001 36th Avenue West Everett, Washington 98203 U.S.A. tel 425.348.2600 fax 425.355.9551 www.intermec.com CK30 Handheld Computer User's Manual *073528-001* P/N 073528-001...
Need help?
Do you have a question about the CK30 and is the answer not in the manual?
Questions and answers