
Related Manuals for Extron electronics HDMI 201


Summary of Contents for Extron electronics HDMI 201
- Page 1 User Guide DVI & HDMI Extenders HDMI 201 HDMI Twisted Pair Extender 68-1375-01 Rev. D 04 10...
- Page 2 Safety Instructions • English Warning Power sources • This equipment should be operated only from the power source indicated on the product. This This symbol is intended to alert the user of important operating and mainte- equipment is intended to be used with a main power system with a grounded (neutral) conductor. The third nance (servicing) instructions in the literature provided with the equipment.
- Page 3 FCC Class A Notice This equipment has been tested and found to comply with the limits for a Class A digital device, pursuant to part 15 of the FCC Rules. Operation is subject to the following two conditions: This device may not cause harmful interference. This device must accept any interference received, including interference that may cause undesired operation.
-
Page 4: Table Of Contents
Technical Points for Digital Video and Content Protection Encryption ....27 About this Manual ........... 1 Troubleshooting ..........28 About the HDMI 201 Transmitter and Receiver . 1 Application Examples ........28 TP Cable Advantages ........3 Audio Conversion ........28 Transmission Distance ........ -
Page 5: Introduction
An HDMI 201 system consists of a transmitter (Tx) and a receiver (Rx). The pair can handle a single link of HDMI digital video and a bidirectional RS-232 link. The HDMI 201 A D also converts a computer audio input into balanced or unbalanced stereo audio output. - Page 6 NOTE: The non-Decora models do not input, transmit, receive, or output audio. • HDMI 201 A D Tx/Rx — These units are housed in enclosures that can be mounted in UL standard wall boxes with Decora -style face plates. These units also convert ®...
-
Page 7: Tp Cable Advantages
Skew-free A/V cable was designed for most Extron TP transmitter/receiver applications, but the HDMI 201 Tx/Rx does not work properly with this cable. Control Communications The RS-232 or infrared (IR) communications are pass-through only; the transmitter and receiver do not generate or respond to these signals. -
Page 8: Features
HDMI signal, so that the remote display can be controlled without the need for additional cabling. Audio routing — The HDMI 201 A D Tx/Rx also routes unbalanced stereo audio when both units are the Decora form factor. -
Page 9: Installation And Operation
Installation and Operation This section describes the installation and the operation of the HDMI 201, including: • Mounting the Transmitter or Receiver • Connections • Operation • Technical Points for Digital Video and Content Protection Encryption • Troubleshooting • Application Examples Mounting the Transmitter or Receiver CAUTION: Installation and service must be performed by authorized personnel only. -
Page 10: Ul Guidelines For Rack Mounting
UL guidelines for rack mounting The following Underwriters Laboratories (UL) guidelines pertain to the installation of an HDMI 201 unit onto a rack. Elevated operating ambient — If installed in a closed or multi-unit rack assembly, the operating ambient temperature of the rack environment may be greater than room ambient. - Page 11 (part #70-077-01). Mount the unit under a desk or table as follows: Remove feet from the bottom of the HDMI 201 unit if installed. Secure the under-desk mounting brackets to the transmitter or receiver with the four machine screws provided in the mounting kit (figure 4).
- Page 12 If the screws are inaccessible to a screwdriver: Mark the location of the brackets relative to the screws. Remove the transmitter or receiver from inside the furniture. Tighten the screws. Replace the unit inside the surface (step 5). HDMI 201 • Installation and Operation...
-
Page 13: Projector Mounting
On the front mounting plate, the device is typically mounted on the inside of the bracket. If the power supply is connected to the receiver, use the two included tie wraps to strap the power supply to one of the brackets. HDMI 201 • Installation and Operation... - Page 14 NOTE: The supplied U-bolt fits a typical (1.5 inch to 2.0 inch diameter) ceiling pole. HDMI 201 • Installation and Operation...
- Page 15 NOTE: The supplied U-bolt fits a typical (1.5-inch to 2.0-inch diameter) ceiling pole. Mount Plate Flange Contoured Base U-bolt L-shaped Bracket Slotted Hole in PMK Tray L-shaped Bracket Screws Ceiling Pole Figure 9. Hanging the Tray on the Pole HDMI 201 • Installation and Operation...
- Page 16 Secure the front and rear plates to the mounting tray with four of the included #6 screws. If desired, choose one of the provided four sizes of self-adhesive cover sheets, and apply it to the underside of the mounting tray. HDMI 201 • Installation and Operation...
-
Page 17: Decora Unit Mounting
Decora Unit Mounting The HDMI 201 A D (Decora) transmitter and receiver can be installed in a one-gang electrical wall box with a Decora wall plate cover (supplied). The installation must conform to national and local electrical codes and to the size requirements of the wall plate. - Page 18 Connect front panel devices (see Connections, later in this manual, for connector details), restore the power supply, and test the transmitter/receiver system. Make any cabling adjustments before final installation, as the cables will be inaccessible afterwards. HDMI 201 • Installation and Operation...
- Page 19 -2 3 D IO edge of box. Extron HDMI 201 A D Figure 12. Mounting the Transmitter or Receiver At the power outlet, reconnect the power supply. This powers up both units. HDMI 201 • Installation and Operation...
-
Page 20: Connections
Figure 14, on the next page, Figure 13 shows the front panel of the HDMI 201 A D Tx. shows the rear panel of both HDMI 201 Tx models. HDMI 201 A D Tx Front Panel INPUT... -
Page 21: Power Supply Wiring
TO LAN Figure 14. HDMI 201 Tx Rear Panel Connectors Input Audio (HDMI 201 A D Tx [Decora] only) connectors — Plug an unbalanced stereo audio input into this pair, left and right, of female RCA connectors (figure 15). Tip (Signal) - Page 22 5-wire audio cable to this 3.5 mm, 5-pole direct insertion connector. Connect the free end of the same cable from the transmitter to any compatibly wired unit, such as a switcher, an amplifier, or an HDMI 201 A D Rx (Decora) receiver (item on page 21).
-
Page 23: Receiver Connections
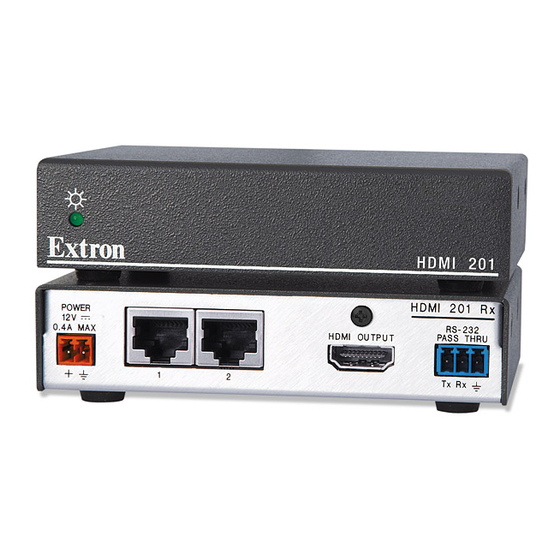
UL standard wall boxes with Decora-style face plates. Figure 17 shows the rear panel of both HDMI 201 Rx models. Figure 18, on the next page, shows the front panel of the HDMI 201 A D Rx (Decora) receiver. - Page 24 RS-232 PASS THRU AUDIO-L Figure 18. HDMI 201 A D Rx Front Panel Connectors Receiver input ports — Connect one end of the two separate TP cables from the transmitter output connectors (item on page 18) to these RJ-45 female connectors.
-
Page 25: Pin Assignments And Wiring
5-wire audio cable to this 3.5 mm, 5-pole direct insertion connector. Connect the free end of the same cable to any compatibly wired audio source unit, such as a output of a switcher or a HDMI 201 A D Tx (Decora) transmitter (item page 18). -
Page 26: Tp Cable Termination
A/V UTP cable to link the transmitter and receiver. Skew-free A/V cable was designed for most Extron TP transmitter/receiver applications, but the HDMI 201 Tx/Rx does not work properly with this cable. • In order to fit in the junction box, the TP cables and RJ-45 connectors should not have a boot installed. - Page 27 Feed each individual wire into the appropriate slot of the RJ-45 connector and crimp the cable in the normal manner, folding the tangs at the end of the connector over the shielded tape (figure 24). Crimped Connector Figure 24. Crimped RJ-45 Connector HDMI 201 • Installation and Operation...
-
Page 28: Power Supply Wiring
Shorter wires are not as secure in the connectors and could be pulled out. NOTE: Do not tin the power supply leads before installing them in the direct insertion connector. Tinned wires are not as secure in the connectors and could be pulled out. HDMI 201 • Installation and Operation... - Page 29 Tinned wires are not as secure in the connectors and could be pulled out. • The RS-232 connector can also transmit one-way modulated infrared (IR) signals. See Modulated IR Pass Through Application. HDMI 201 • Installation and Operation...
-
Page 30: Operation
HDMI 201 Tx (non-Decora) — This front panel LED lights green to indicate that the unit is receiving power: HDMI 201 A D Tx (Decora) — This two-color front panel LED lights to indicate signal and power status as follows: Amber —... -
Page 31: System Operation
With passive adapters, the HDMI format is backward compatible with the DVI format. • With Extron adapters, cables, or both, the HDMI 201 fully supports either format, regardless of the connector type on the video source and display. See Reference Information for part numbers. -
Page 32: Troubleshooting
Audio Conversion Figure 28 shows a standard installation with HDMI video and an audio input. The HDMI 201 A D Tx converts the video input into two proprietary TP outputs. The Tx outputs the audio directly on a captive screw connector. -
Page 33: Modulated Ir Pass Through Application
TP 1 HDMI 201 Rx System POWER RS-232 0.4A MAX HDMI OUTPUT PASS THRU Tx Rx TP 2 Modulated IR HDMI 201 Rx HDMI 201 A D Tx Figure 29. Installation Routing Modulated IR HDMI 201 • Installation and Operation... -
Page 34: Reference Information
Decora Template Dimensions Specifications NOTES: • This product consists of a transmitter (HDMI 201 Tx or HDMI 201 A D Tx) and a receiver (HDMI 201 Rx or HDMI 201 A D Rx) with twisted pair cables linking the transmitter and receiver. - Page 35 Connectors HDMI 201 A D Tx 1 pair female RCA jacks (tip, ring) HDMI 201 A D Rx (1) 3 5 mm captive screw connector, 5 pole Impedance HDMI 201 A D Tx >10k ohms unbalanced, DC coupled HDMI 201 A D Rx >18k ohms unbalanced, 24k ohms balanced, DC coupled...
- Page 36 -style opening Enclosure type Metal Enclosure dimensions HDMI 201 Tx, HDMI 201 Rx 1 0" H x 4 3" W x 3 0" D (quarter rack wide) (2 5 cm H x 10 9 cm W x 7 6 cm D) (Depth excludes connectors ) HDMI 201 A D Tx, HDMI 201 A D Rx Faceplate 2 6"...
-
Page 37: Part Numbers
60-864-12, -13 HDMI 201 A D Rx receiver, black, white 60-864-22, -23 Included Parts These items are included in each order for an HDMI 201 transmitter or receiver: Included parts Part number HDMI M-M Pro/6 HDMI male-to-male, 6' (1.8 m) cable... -
Page 38: Mounting Accessories
DTP26P/1000 digital TP cable, plenum, 1000’ (300 m) 22-215-03 DTP RJ-45 Plug (qty. 10) 101-005-01 Adapters Adaptor Part number HDMIF-DVIDM 26-616-01 HDMI female to DVI-D male adapter HDMIM-DVIDF 26-617-01 HDMI male to DVI-D female adapter HDMI 201 • Reference Information... -
Page 39: Decora Template Dimensions
2.79" (7.09 cm) Panel 1.9" (4.83 cm) 4.50" To install a (11.43 cm) 1-gang HDMI 201 A D Tx or HDMI 201 A D Rx SURFACE CUT-OUT directly into AREA FOR furniture or FURNITURE MOUNT wall, cut along this line. - Page 40 Extron Warranty Extron Electronics warrants this product against defects in materials and workmanship for a period of three years from the date of purchase. In the event of malfunction during the warranty period attributable directly to faulty workmanship and/or materials, Extron Electronics will, at its option, repair or replace said products or components, to whatever extent it shall deem necessary to restore said product to proper operating condition, provided that it is returned within the warranty period, with proof of purchase and description of malfunction to: USA, Canada, South America,...
Need help?
Do you have a question about the HDMI 201 and is the answer not in the manual?
Questions and answers