HP 900 Reference Manual
Hewlett-packard omnibook reference guide
Hide thumbs
Also See for 900:
- Service information manual (198 pages) ,
- Quick setup sheet (1 page) ,
- User manual (76 pages)
Table of Contents
Advertisement
Quick Links
Advertisement
Table of Contents

Related Manuals for HP 900


Summary of Contents for HP 900
- Page 1 HP OmniBook 900 Reference Guide...
- Page 2 Notice This manual and any examples contained herein are provided “as is” and are subject to change without notice. Hewlett-Packard Company makes no warranty of any kind with regard to this manual, including, but not limited to, the implied warranties of merchantability and fitness for a particular purpose.
- Page 3 CD-ROM: (i) The product Recovery CD-ROM and/or support utility software may only be used for restoring the hard disk of the HP computer with which the product Recovery CD-ROM was originally provided. (ii) The use of any operating system software by Microsoft contained in any such product Recovery CD-ROM shall be governed by the Microsoft End User License Agreement (EULA).
-
Page 4: Edition History
Transfer of Rights in Software. Customer may transfer rights in the software to a third party only as part of the transfer of all rights and only if Customer obtains the prior agreement of the third party to be bound by the terms of this License Agreement. Upon such a transfer, Customer agrees that his/her rights in the software are terminated and that he/she will either destroy his/her copies and adaptations or deliver them to the third party. -
Page 5: Table Of Contents
To use the embedded keypad ... 33 To use the ALT GR key ... 34 Working in Comfort ... 35 About Repetitive Strain Injury ... 35 Preparing Your Work Environment ... 37 Setting Up Your HP Computing Equipment... 39 Reference Guide... - Page 6 Comfort and Safety Checklist ... 44 Your HP OmniBook Computer ... 46 Taking Care of Your OmniBook... 48 Managing Battery Power... 49 How Power is Managed ... 50 Monitoring Battery Power... 51 To install APM for Windows NT 4.0... 51 To check the battery status ...
- Page 7 To recover the factory installation of Windows... 118 To create a Support Utility Disk... 119 To update the OmniBook BIOS ... 120 To replace a damaged Recovery CD ... 120 Support and Service... 121 Getting HP OmniBook Assistance... 122 Reference Guide...
- Page 8 Support Assistance ... 122 Electronic Support Services ... 122 Repair Assistance ... 123 Customer Support Centers... 123 Hewlett-Packard Limited Warranty Statement ... 125 Specifications and Regulatory Information... 127 Hardware Specifications... 128 Software System Resources ... 131 Safety Information... 134 Power Cords... 134 Ergonomics ...
-
Page 9: Introducing The Omnibook
Introducing the OmniBook Reference Guide... -
Page 10: Getting More Information
This is shipped with your OmniBook and contains information about using the manual standard features of the version of Microsoft Windows shipped with your computer. OmniBook website http://www.hp.com/omnibook. http://www.europe.hp.com/omnibook (European mirror). HP Customer Care http://www.hp.com/cposupport/eschome.html. website Corporate This provides information about installing alternate operating systems, as well as Evaluator’s Guide... -
Page 11: Taking Inventory
Taking Inventory The HP OmniBook 900 represents a category of HP notebook computers for highly mobile professionals who want a notebook PC with the performance and expansion for everyday use, as well as the portability to take it everywhere. Included in the OmniBook box HP OmniBook 900. -
Page 12: To Buy Omnibook Accessories
Buy OmniBook accessories online! For the latest accessories and options, visit us at http://www.hp.com/omnibook. As new accessories become available, you’ll find them listed here. At the time of this printing, HP offers a variety of docking solutions, plug-in modules, and other accessories, including the following: Docking system and monitor stand. -
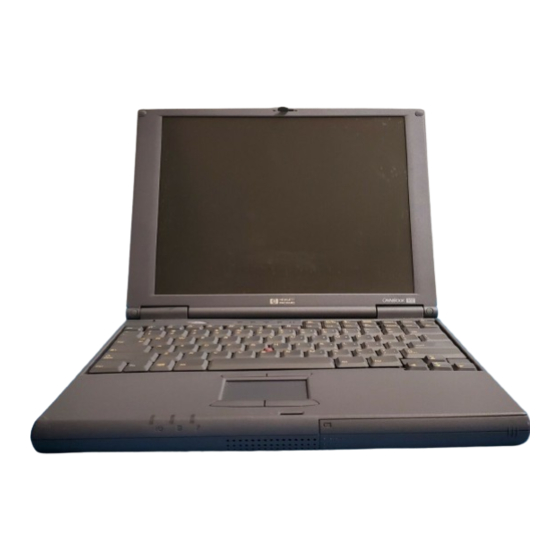
Page 13: Omnibook Features
OmniBook Features OmniBook—Front View 1. Built-in microphone. 2. Keyboard lights (left to right: caps lock, keypad lock, num lock, scroll lock). 3. Blue power button. Turns the OmniBook on and off. 4. Pointing stick (pointing device). 5. Touch pad (pointing device). 6. -
Page 14: Omnibook-Side View
Introducing the OmniBook OmniBook Features OmniBook—Side View 12. PS/2 keyboard or PS/2 mouse port (supports Y adapter). 13. System-off button. 14. Infrared port. Windows NT 4.0 does not support infrared communication. Use this port for wireless data transmission between the OmniBook and another computer or a printer with an infrared port. -
Page 15: Omnibook-Back View
OmniBook—Back View 20. Kensington lock slot (security connector). 21. Serial port (COM1). 22. Parallel port (LPT1). OmniBook—External Module Bay 26. External module bay. Introducing the OmniBook OmniBook Features 23. External monitor port. 24. Universal Serial Bus (USB) port. 25. Docking port (for the port replicator or docking system). -
Page 16: Setting Up For The First Time
To set up the OmniBook and Windows CAUTION Use only the HP adapter shipped with the OmniBook (or other approved adapter). Using any other ac adapter could damage the OmniBook and may void your warranty. Refer to the warranty statement for your product. - Page 17 Year 2000 Hewlett-Packard makes no representation or warranty about the Year 2000 readiness of non-HP products including pre-installed operating systems or application software. Customer should contact the software manufacturer directly to determine if any additional actions by Customer are necessary to ensure compliance.
-
Page 18: To Connect The Floppy Disk Drive
Introducing the OmniBook Setting Up for the First Time To connect the floppy disk drive 1. Insert the floppy disk drive into the external module bay. If this is your only plug-in module, you can leave it in the module bay. 2. -
Page 19: Operating The Omnibook
Operating the OmniBook Reference Guide... -
Page 20: Starting And Stopping The Omnibook
Operating the OmniBook Starting and Stopping the OmniBook Starting and Stopping the OmniBook You can easily start and stop your OmniBook using the blue power button. However, at certain times, you may want to use other methods for starting and stopping your OmniBook—depending on power considerations, types of active connections, and start- up time. -
Page 21: To Reset The Omnibook
3. After the computer shuts down, press the blue power button to turn it on. Hint To boot from a CD-ROM or DVD drive in the external module bay, press ESC two times during reboot when you see the HP logo. Then select the CD-ROM/DVD drive as the temporary boot device. Operating the OmniBook... -
Page 22: Checking The Status Of The Omnibook
Operating the OmniBook Checking the Status of the OmniBook Checking the Status of the OmniBook To check power status and drive activity The OmniBook has status lights that report power status and drive activity. When the floppy disk drive is installed in the external module bay, the following lights are present on the front of the OmniBook and the external module bay. -
Page 23: To Check The Keyboard Status
To check the keyboard status The keyboard status lights, located above the keyboard, indicate the states of the keyboard locks. 1. Caps Lock. Caps Lock is active. 2. Keypad Lock. The embedded keypad is active (Fn+F8). Num Lock must also be on for the numeric keys—otherwise, cursor control is active. -
Page 24: Using The Omnibook Pointing Devices
Operating the OmniBook Using the OmniBook Pointing Devices Using the OmniBook Pointing Devices Two pointing devices (pointing stick and touch pad) are built into your OmniBook. 1. Pointing stick (pressure-sensitive pointing device). 2. Touch pad (touch-sensitive pointing device). 3. Click buttons (two above and two below the touch pad). Both pointing devices use these click buttons, which work like the right and left buttons on a standard mouse. -
Page 25: To Use The Built-In Pointing Devices
Under Windows 2000, enhanced features for the pointing stick and touch pad are not available at this time. Check the Customer Care website (http://www.hp.com/cposupport/eschome.html) for PS/2 TrackPoint and touch pad device drivers for Windows 2000. The default pointing device driver is the standard PS/2 Compatible Mouse driver. -
Page 26: To Activate Full Touch Pad Capabilities
Disable the pointing stick 1. From the Start menu, shut down, then restart the OmniBook. 2. When you see the HP logo, press F2 to enter the BIOS Setup utility. 3. Select the System Devices menu. 4. Highlight Internal Pointing Devices and select Touch Pad. -
Page 27: To Activate Full Pointing Stick Capabilities
Enable the pointing stick 1. From the Start menu, shut down, then restart the OmniBook. 2. When you see the HP logo, press F2 to enter the BIOS Setup utility. 3. Select the System Devices menu. 4. Highlight Internal Pointing Devices and select Pointing Stick. (Choose Both if you want basic touch pad features available.) -
Page 28: To Disable The Touch Pad Or Pointing Stick
1. From the Start menu, shut down, then restart the OmniBook. 2. When you see the HP logo, press F2 to enter the BIOS Setup utility. 3. Select the System Devices menu. 4. Highlight Internal Pointing Devices and select only the pointing device you want to use. -
Page 29: Using The Omnibook Display
Using the OmniBook Display To adjust the display brightness The OmniBook uses special key combinations, called hot keys, to control brightness. Press Fn+F1 to decrease the brightness. Press Fn+F2 to increase the brightness. Hint To maximize your battery operating time, set the brightness to the lowest comfortable setting, so that the internal light uses less power. -
Page 30: To Suspend The Omnibook When Closing The Display
OmniBook when you close the display lid. 1. Close all applications, then shut down Windows and restart the OmniBook. 2. When you see the HP logo, press F2 to enter the BIOS Setup utility. 3. From the Power menu, choose Lid Switch Mode. -
Page 31: Adjusting The Audio System
Adjusting the Audio System The OmniBook supports Sound Blaster Pro-compatible sound and the Microsoft Windows Sound System. To adjust the volume On the Keyboard To increase the volume, press Fn+UP-ARROW. To decrease the volume, press Fn+DOWN-ARROW. To temporarily silence the speaker without changing the volume setting, press Fn+F7. Press Fn+F7 again to restore the audio. -
Page 32: Using The Omnibook Keyboard
For information about reducing your risk, see Working in Comfort in the online OmniBook Library, or visit our ergonomics website, http://www.hp.com/ergo. If you are using your portable computer as your primary computer, or using it for extended periods, you should use it with a full-size keyboard, monitor, and mouse. -
Page 33: To Use The Windows Keys
To use the Windows keys There are two Windows keys on the keyboard. The one next to the Fn key brings up the Windows Start menu. The one at the top center of the keyboard brings up the shortcut menu for the current application. -
Page 34: To Use The Alt Gr Key
Operating the OmniBook Using the OmniBook Keyboard To use the ALT GR key Non-U.S. keyboards have an ALT GR key to the right of the spacebar. This is a shift key providing access to certain keyboard characters. For a character in the lower-right corner of a key, press and hold ALT GR to type the character. -
Page 35: Working In Comfort
Thank you for selecting HP computing equipment. To optimize your comfort and productivity, it is important that you set up your work area correctly and use your HP equipment properly. With that in mind, we have developed some set-up and use recommendations for you to follow based on established ergonomic principles. - Page 36 Operating the OmniBook Working in Comfort RSI has been a reported problem for those who perform repetitive tasks such as assembly line work, meatpacking, sewing, playing musical instruments, and computer work. RSI also has been observed in those who frequently engage in activities such as carpentry, knitting, housework, gardening, tennis, windsurfing and lifting children.
-
Page 37: Preparing Your Work Environment
Preparing Your Work Environment When using HP computing equipment, it is important that your work environment contribute to your comfort and productivity. Your Chair It’s very important that your chair provides a comfortable sitting position and offers the following features: A stable base, such as five legs with casters. - Page 38 Operating the OmniBook Working in Comfort A curved seat edge. The front of the seat should be curved and finished in a “waterfall” edge. An adjustable back support in both height and forward and backward tilt. It is important that the backrest correctly supports the lower part, or lumbar curve, of the back.
-
Page 39: Setting Up Your Hp Computing Equipment
Overall: Change your position frequently and take regular breaks to avoid fatigue. Setting Up Your HP Computing Equipment Make sure that all the elements of your HP computer system—monitor, document holder, keyboard, mice and other input devices, and headphones and speakers—are optimally arranged and adjusted to meet your personal requirements. - Page 40 Operating the OmniBook Working in Comfort The top of your monitor screen should be at or slightly below eye level. Most HP monitors come with a tilt-and-swivel feature that makes it easy to adjust the screen position. To avoid obscuring your view, the screen should be positioned perpendicular to your line of sight;...
- Page 41 Your HP Keyboard The proper positioning and use of your HP keyboard is important when using HP computing equipment. Be sure to observe the following recommendations to optimize your comfort and safety:...
- Page 42 We recommend you place your keyboard in front of the screen or document holder, whichever is viewed the most. Your HP keyboard has long cables so you can place it in the position that is most comfortable for you while you are using your system.
- Page 43 Operating the OmniBook Working in Comfort As with the keyboard, try to keep your hand, wrist, and forearm in a neutral position while using your mouse or other input device. When using a stylus or light pen with a graphics tablet, don’t grip the stylus tightly. Keep your hand and fingers relaxed and try to maintain a neutral posture in your hand, wrist and forearm.
-
Page 44: Comfort And Safety Checklist
Listening to loud sounds for prolonged periods may permanently damage your hearing. To avoid discomfort from unexpected noise, always turn down the volume before connecting headphones or speakers to your HP equipment. When you put on the headphones, slowly increase the volume until you find a comfortable listening level, then leave the volume control in that position. - Page 45 Working in Comfort, which is preloaded on the hard disk of your HP computing equipment.
-
Page 46: Your Hp Omnibook Computer
HP port replicators offer quick, easy connections to these devices. More information on how to prepare your workspace environment and set up your HP equipment is available in other sections of Working in Comfort, which is preloaded on the hard disk of your HP computing equipment. - Page 47 Operating the OmniBook Working in Comfort Portable computers weigh between approximately 1.4 and 3.7 kilos (3 and 8 pounds). When traveling, be sure to carry your computer properly to minimize strain on your body. Shift the bag containing your notebook equipment frequently between your left and right hands and shoulders.
-
Page 48: Taking Care Of Your Omnibook
Operating the OmniBook Taking Care of Your OmniBook Taking Care of Your OmniBook Protect your OmniBook from damage Observe the temperature limits and other specifications listed in “Hardware Specifications” on page 128. Do not use the OmniBook outside in the rain or snow (inclement weather). -
Page 49: Managing Battery Power
Managing Battery Power Reference Guide... -
Page 50: How Power Is Managed
Managing Battery Power How Power is Managed How Power is Managed The OmniBook conserves power by using software that controls battery charging and power drain. If you’re using Windows 95 or Windows 98, Advanced Power Management (APM) is preinstalled on the OmniBook. If you’re using Windows NT 4.0, look for a Power icon in the taskbar. -
Page 51: Monitoring Battery Power
Monitoring Battery Power The primary source of power for the OmniBook is its rechargeable battery pack. You can use the ac adapter to recharge the battery—or to run on ac power to preserve the battery. Important Running external connections is a power-intensive operation that significantly shortens the length of a battery session. -
Page 52: To Check The Battery Status
Managing Battery Power Monitoring Battery Power To check the battery status From the Windows Taskbar Move the pointer onto the power icon at the right end of the taskbar. If you are using Windows NT 4.0, you’ll need to install Advanced Power Management to display the power icon (see “To install APM for Windows NT 4.0”... -
Page 53: To Respond To A Low-Battery Warning
To respond to a low-battery warning When battery power is critically low, you are alerted by one or more of the following: The computer emits a warning beep. This reminds you to save your work. If the OmniBook has been off, you will not be able to turn it on. As an emergency measure, the OmniBook automatically hibernates to preserve your current session. - Page 54 Managing Battery Power Monitoring Battery Power Charging time Charging the battery takes about 1.5-2 hours to fully charge. Battery life When the computer is in use, typical battery life can last up to 3-4 hours or more, depending on your level of use, your power management settings, and your computer model.
-
Page 55: To Replace The Battery
To replace the battery CAUTION If you have any unsaved data, it (and your current work session) will be lost when you remove the battery unless the computer is connected to ac power. Also, you should wait at least 3 seconds after inserting the battery before you unplug the ac adapter. - Page 56 Managing Battery Power Monitoring Battery Power 6. Slide the battery’s front panel to the left. WARNING Do not mutilate, puncture, or dispose of batteries in fire. A battery can burst or explode, releasing hazardous chemicals. A rechargeable battery must be recycled or disposed of properly.
-
Page 57: Conserving Battery Power
Set the automatic time-out settings to emphasize saving power (see “To set power time-outs” on page 58). For a model with “900 B” after the serial number, use Smart CPU mode. The default settings conserve battery power. If you work with an application that uses the serial port or a PC Card, exit the application when you are done using it. -
Page 58: To Set Power Time-Outs
1. From the Start menu, shut down then restart the OmniBook. 2. When you see the HP logo, press F2 to enter the BIOS Setup utility. Active keys are described along the bottom of the screen. (The pointing devices are not active in the BIOS Setup utility.) Help information for the highlighted item appears in the right-... -
Page 59: To Get The Most From Your Battery
To get the most from your battery The following are some further suggestions for the best management of your OmniBook batteries. Do not leave batteries unused for long periods of time. If you have more than one, rotate them. If you normally use ac power, make a practice of at least once a week using the battery as your power source. -
Page 61: Expanding The Omnibook
Expanding the OmniBook Reference Guide... -
Page 62: Using The External Module Bay
The Agaté Tioman hot-swap software lets you disconnect most modules in the plug-in bay without shutting down the computer and rebooting. (This software does not support Windows NT.) Click Start, Programs, Agaté Tioman for HP, Setup, then follow the onscreen instructions. Reference Guide... -
Page 63: To Remove Or Install The Bay Or Module
To remove or install the bay or module For Windows 95 or Windows 98, if Agaté Tioman hot-swap software is installed, a plug- in module icon appears at the right end of the taskbar. This software lets you disconnect most plug-in modules without shutting down the computer. For a hard drive module, you must shut down the computer. - Page 64 Expanding the OmniBook Using the External Module Bay Windows 95 or 98 with “hot-swap” Removing Before you remove the 1. Close files on the cable or plug-in module. module drive. (The order doesn’t 2. Right-click the plug- matter.) in module icon in the taskbar, then click Remove Device.
-
Page 65: To Connect The Floppy Disk Drive To The Parallel Port
If you have a CD-ROM drive or other module in the external module bay, you can connect the floppy disk drive to the parallel port. 1. Buy a floppy drive cable, HP accessory F1473A. 2. Connect the cable directly to the floppy drive and to the OmniBook parallel port. -
Page 66: Connecting External Devices
Expanding the OmniBook Connecting External Devices Connecting External Devices You can expand the OmniBook’s capabilities by connecting other devices. Note Before you connect any device, check the documentation that came with the equipment to see if you need to make any settings or adjustments to the equipment before using it. This might include setting switches to configure the equipment so that it will operate properly with the OmniBook and the software you plan to use. -
Page 67: To Connect An External Monitor
You can connect a VGA, SVGA, XGA, or SXGA monitor to your OmniBook—or UXGA for a computer with “900 B” after the serial number. A 12-inch internal display supports standard SVGA mode (800 by 600 pixels), and a 13-inch display supports XGA mode (1024 by 768 pixels). -
Page 68: To Use An External Monitor
Expanding the OmniBook Connecting External Devices 4. Press ENTER to view choices. 5. Select Auto (to automatically detect and select the external display) or Both (to select both displays). 6. Similarly, highlight Primary Video Adapter. Select Auto (to automatically switch to an external video adapter in a docking system) or Internal (to reserve the external display for special use, such as multiple displays in Windows 98). -
Page 69: To Connect An External Keyboard Or Ps/2 Mouse
2. Plug the mouse or keyboard PS/2 cable into the PS/2 port on the OmniBook. To connect both a mouse and keyboard, use the HP F1469A Y adapter. To connect a device that has a PC-type jack, first connect its cable to an adapter cable with a PS/2 jack. -
Page 70: To Connect A Serial Device
Expanding the OmniBook Connecting External Devices To connect a serial device The OmniBook’s serial port uses a standard 9-pin serial port. Serial connections typically are to external modems and fax modems. The OmniBook has one serial port. Its address can be set in the BIOS Setup utility. Connect the serial cable to the serial port. -
Page 71: To Connect Audio Devices
to the OmniBook in series with other USB devices—this is called a “daisy-chain” connection. Note If you have problems making this connection, contact the vendor of the peripheral device, as well as the OmniBook website, for the latest versions of the USB drivers. The USB technology is dynamic and continues to develop. -
Page 72: To Make An Infrared Connection
Expanding the OmniBook Connecting External Devices To make an infrared connection Note Windows NT 4.0 does not support infrared communication. By default, the infrared port is not enabled. For Windows 95. Enable the infrared port in the BIOS Setup utility and then install the infrared driver. - Page 73 Expanding the OmniBook Connecting External Devices Transferring Files with an Infrared Connection To transfer files in Windows 95 or Windows 98, use the built-in Direct Cable Connection software. You need to install it first. 1. From Control Panel, click Add/Remove Programs. 2.
-
Page 74: Using Pc Cards
Expanding the OmniBook Using PC Cards Using PC Cards To insert and remove a PC Card Note If you are using Windows NT 4.0, make sure Card Executive is installed (see “To install Card Executive for Windows NT” on page 75). Windows NT 4.0 does not support zoomed video. -
Page 75: To Find Tested Pc Cards
To find tested PC Cards For the latest information about compatible cards, visit our website at http://www.hp.com/omnibook and check the Accessories section. Or contact Hewlett- Packard as described in “Support Assistance” on page 122. To install Card Executive for Windows NT 4.0 If a PC Card icon is present in the taskbar, Card Executive is installed. -
Page 76: Using Docking Products
OmniBook to the dock. 1. Select the tray labeled for the OmniBook 900. If you do not have a tray for the OmniBook 900, call the number listed in “Support Assistance” on page 122 to order one. -
Page 77: To Dock The Omnibook
To dock the OmniBook 1. From the Start menu, shut down the OmniBook. If you have a plug-and-play operating system, such as Windows 95, Windows 98, or Windows 2000, you do not need to turn off the OmniBook before inserting into the dock. -
Page 78: To Undock The Omnibook
Expanding the OmniBook Using Docking Products 4. Position your fingers on the platform grips as shown below. Use your thumbs to push the computer into the dock until the computer slides into place. To undock the OmniBook 1. If you’re using Windows NT, click Start, Shut Down. 2. -
Page 79: Installing A Hard Disk Drive
Expanding the OmniBook Installing a Hard Disk Drive Installing a Hard Disk Drive To replace the hard disk drive You’ll need a small Phillips screwdriver for this procedure. 1. Unplug the ac adapter, if present, and remove the battery. 2. Turn the unit bottom side up and remove the hard drive screw. 3. -
Page 80: To Replace The Hard Disk Drive Holder
Expanding the OmniBook Installing a Hard Disk Drive Important If you are installing a new hard disk drive, you should create a Hibernate partition on the drive before loading any software. See “To recover the factory installation of Windows” on page 118. To replace the hard disk drive holder If you are installing a new hard drive that does not have a cover, you can remove the cover parts from the old hard drive. -
Page 81: Installing A Ram Expansion Module
Installing a RAM Expansion Module The OmniBook has 32 MB of memory (RAM) built in (64 MB for a model with “900 B” after the serial number), and it has one slot for installing additional RAM. You have to remove the computer keyboard to add or remove a RAM module. - Page 82 Expanding the OmniBook Installing a RAM Expansion Module 5. Lift up the keyboard tab above the F1 key about 10 mm (1/2 inch), then free the snap at the center of the back edge. 6. Slide the keyboard toward the display about 5 mm (1/4 inch), then fold the keyboard forward onto the front of the case.
-
Page 83: To Remove A Ram Expansion Module
10. Lower the plastic panel about 3 mm (1/8 inch) from its normal position. Hold down both ends and slide it closed to the right. 11. Insert the battery and slide its front panel to the left. To remove a RAM expansion module You may want to remove a RAM module so you can install a larger one. -
Page 85: Configuring The Omnibook
Configuring the OmniBook Reference Guide... -
Page 86: Using Bios Setup
1. Close all applications, then shut down Windows and restart the OmniBook. 2. When you see the HP logo, press F2 to enter the BIOS Setup utility. 3. The pointing devices are not active in the BIOS Setup utility. Press the RIGHT and LEFT arrow keys to move among menus. - Page 87 Main Menu Setting Description Language Sets the language for this utility and for BIOS messages. BIOS Revision Shows the current BIOS version. System Time Sets the time using 24-hour format. Values set take effect immediately. System Date Sets the date using dd/mm/yy format (except English, which is mm/dd/yy format).
- Page 88 Configuring the OmniBook Using BIOS Setup System Devices Menu Setting Description PS/2 Pointing Devices Disables the internal pointing devices when an external PS/2 mouse is connected. This is required for the scroll wheel on a PS/2 mouse to function. Internal Pointing Enables one or both built-in PS/2 devices.
- Page 89 Security Menu Setting Description User Password Is Shows if a user password is set. Administrator Password Shows if an administrator password is set. Set User Password Press ENTER to set, change, or clear user password. Password length can be no longer than 8 characters, 0-9, A- Z, and cannot include special or accented characters.
- Page 90 Absence of keyboard, mouse, and hard disk activity could cause slower CPU response. For a model without “900 B” after the serial number, this should normally be Off to avoid interfering with time sensitive operations— and this setting applies on both battery and ac power.
- Page 91 Boot Menu Setting +Removable Device +Hard Disk CD-ROM/DVD Drive Exit Menu Setting Save Changes and Exit Discard Changes and Exit Get Default Values Load Previous Values Save Changes Description Shows the order of boot devices. Move the entries to change the order. If the computer has more than one device in one of the “+”categories, you can select the one that’s scanned.
-
Page 92: Using Toptools
To run TopTools locally, click Start, Programs, HP TopTools for Notebooks, HP TopTools. To get more information about TopTools For information on HP TopTools, compatible HP computers, and how they lower PC operating costs, see the HP website at http://www.hp.com/toptools. Reference Guide... -
Page 93: Configuring Security Options
1. From the Start menu, shut down, then restart the OmniBook. 2. When you see the HP logo, press F2 to enter the BIOS Setup utility. 3. Select the Security menu. 4. Select Set Administrator Password, then press ENTER. -
Page 94: To Delete An Omnibook Password
1. From the Start menu, shut down, then restart the OmniBook. 2. When you see the HP logo, press F2 to enter the BIOS Setup utility. 3. Select the Security menu. 4. Select Set Administrator Password, then press ENTER. -
Page 95: To Attach A Security Cable
You must have administrator password authority to set a PC identification number. 1. If you have not already installed HP TopTools, do so now (see “To install TopTools” on page 92). 2. Click Start, Programs, HP TopTools for Notebooks, HP TopTools. -
Page 96: To Enable Hard Disk Drive Lock
Packard. 1. From the Start menu, shut down, then restart the OmniBook. 2. When you see the HP logo, press F2 to enter the BIOS Setup utility. 3. From the Security menu, enable Password Required To Boot. 4. From the Security menu, enable Hard Disk Drive Lock. -
Page 97: Troubleshooting
Troubleshooting Reference Guide... -
Page 98: Solving Problems
For information about system addresses, interrupts, or memory, see “Software System Resources” on page 131. Find technical tips and software updates for the OmniBook at the HP Customer Care website (http://www.hp.com/cposupport/eschome.html). Test your OmniBook by running the DiagTools test program. See “To run the diagnostic test”... - Page 99 If you always want to boot from a CD, check the boot order in BIOS Setup. 1. From the Start menu, shut down, then restart the OmniBook. 2. When you see the HP logo, press F2 to enter the BIOS Setup utility. 3. Open the Boot menu. The default boot order is...
-
Page 100: Audio Problems
Fn+F7 to mute or un-mute sound. Press Fn+UP-ARROW to increase the volume. For a model without “900” after the serial number, check settings in BIOS Setup. 1. From the Start menu, shut down, then restart the OmniBook. 2. When you see the HP logo, press F2 to enter the BIOS Setup utility. -
Page 101: Display Problems
Display Problems If the OmniBook is on, but the screen is blank Press the space bar or move the pointer to see if the computer is in Standby mode. Press Fn+F1 or Fn+F2 to adjust the display brightness. If you are using an external keyboard, Fn=left CTRL + left ALT. -
Page 102: Hard Disk Drive Problems
Troubleshooting Solving Problems Use a monitor or projector that matches the resolution of the OmniBook display. If multiple display support doesn’t work in Windows 98 In Windows 98, the computer supports multiple independent displays using the built-in display and an external monitor connected to the monitor port. You can also add an independent display using a video adapter in a docking system. -
Page 103: Infrared Problems
Infrared Monitor. Check settings in BIOS Setup utility. 1. From the Start menu, shut down, then restart the OmniBook. 2. When you see the HP logo, press F2 to enter the BIOS Setup utility. Troubleshooting Solving Problems... -
Page 104: Keyboard And Pointing Device Problems
Make sure the touch pad or pointing stick is enabled in the BIOS Setup utility. 1. From the Start menu, shut down, then restart the OmniBook. 2. When you see the HP logo, press F2 to enter the BIOS Setup utility. 3. From the System Devices menu, check Internal Pointing Devices. - Page 105 Reset the OmniBook. See “To reset the OmniBook” on page 21. If the embedded numeric keypad doesn’t work Make sure the embedded Keypad Lock (Fn+F8) is on—or that you press and hold the Fn key to temporarily access the embedded keypad. To type numbers, make sure Num Lock is on.
-
Page 106: Memory Problems
If you are having memory problems running MS-DOS programs, in Windows click Start, Help and use the MS-DOS Troubleshooter. Not all 3rd party memory cards have been tested with the OmniBook. Please check the OmniBook website (http://www.hp.com/omnibook) for a list of approved and tested memory cards. Reference Guide... -
Page 107: Pc Card (Pcmcia) Problems
If memory doesn’t increase after adding RAM Use the correct type of memory (RAM) modules for your computer. For a model with “900 B” after the serial number, use only PC-100 modules. PC Card (PCMCIA) Problems If the OmniBook doesn’t recognize a PC Card For Windows NT, make sure Card Executive is installed. -
Page 108: Performance Problems
Check the BIOS Setup settings. 1. From the Start menu, shut down, then restart the OmniBook. 2. When you see the HP logo, press F2 to enter the BIOS Setup utility. 3. From the Power menu, set the Power Management Mode to Max. Performance. -
Page 109: Power And Battery Problems
1. From the Start menu, shut down, then restart the OmniBook. 2. When you see the HP logo, press F2 to enter the BIOS Setup utility. 3. From the Power menu, make sure the Power Management Mode is set to Maximum Power Savings. - Page 110 Troubleshooting Solving Problems 4. Press F10 to Save and Exit the BIOS Setup utility. For Windows 2000, check the settings in Control Panel, Power Options, on the Power Schemes tab. If the battery doesn’t charge Make sure the ac adapter is plugged into the power source. If you’re using a power strip, remove the ac adapter from the power strip and plug it directly into a wall outlet.
-
Page 111: Printing Problems
In Windows 95 or Windows 98, view the CD-ROM drive properties in Device Manager. If retail Windows NT 4.0 is installed, you must edit the Registry to change this setting: CAUTION: Incorrect editing of the Registry can make the system unbootable. 1. -
Page 112: Serial, Parallel, And Usb Problems
If the printer you are using is a 600-dpi (dots per inch) printer, try selecting a compatible printer driver for a 300-dpi printer. For example, for a 600-dpi HP LaserJet printer, try using the HP LaserJet IIIsi driver (300-dpi). Certain applications may not work properly with 600-dpi printers. -
Page 113: Startup Problems
Check settings in BIOS Setup. 1. From the Start menu, shut down, then restart the OmniBook. 2. When you see the HP logo, press F2 to enter the BIOS Setup utility. 3. From the System Devices menu, check that Parallel and Serial are enabled. - Page 114 After checking all connections, check the boot order and setup in BIOS Setup utility. 1. From the Start menu, shut down, then restart the OmniBook. 2. When you see the HP logo, press F2 to enter the BIOS Setup utility. 3. Open the Boot menu. The default boot order is...
-
Page 115: Testing The Operation
See “To create a diagnostic floppy disk” on page 116. 1. Reboot the OmniBook. When you see the HP logo and the F10 prompt, press F10 to start the diagnostic test. 2. Go through the first several screens. -
Page 116: To Create A Diagnostic Floppy Disk
Check the C:\Dmi\Hpdiags directory. If diaginst is in this directory, double-click it. –or– If HP TopTools is installed, check the DiagTools page to see if it can create the disk. On any computer with World Wide Web access, download the diagnostic software package from the HP Customer Care website (http://www.hp.com/cposupport/eschome.html), and follow the instructions. -
Page 117: Recovering Software
On the Recovery CD ROM, under \Omnibook\Drivers. On the OmniBook hard drive under C:\Omnibook\Drivers. On the HP Customer Care website at http://www.hp.com/cposupport/eschome.html. This website contains the latest updates of software drivers. Detailed instructions for installing the drivers are contained in the Drivers\Readme file. -
Page 118: To Recover The Factory Installation Of Windows
If you’re using a CD-ROM drive in the module bay, press ESC two times when you see the HP logo. Select the CD-ROM drive as the boot device. 5. When the Recovery CD dialog box appears, follow the displayed instructions. If prompted, accept the recommended partition size. -
Page 119: To Create A Support Utility Disk
To create a Support Utility Disk If you want to use the Recovery CD in a PC Card CD-ROM drive or parallel port CD- ROM drive, you’ll need a Support Utility disk for certain operations. 1. Insert a formatted floppy disk in the floppy drive. 2. -
Page 120: To Update The Omnibook Bios
If you lose or damage the Recovery CD, take your OmniBook and Certificate of Authenticity to an HP Service Center to be replaced. If you mail your OmniBook for this service, you must provide a photocopy of the Certificate of Authenticity along with payment. -
Page 121: Support And Service
Support and Service Reference Guide... -
Page 122: Getting Hp Omnibook Assistance
Support and Service Getting HP OmniBook Assistance Getting HP OmniBook Assistance Support Assistance If you need assistance with your HP OmniBook or accessory, use any of the following support services: Provider Type 1. Electronic Support Services (see below) 2. Customer Support Centers (see below) 3. -
Page 123: Repair Assistance
Customer Support Centers HP Customer Support Centers will assist you by email or telephone for free (you are responsible for the telephone charges) during the term of the warranty. During the free assistance period, HP will assist with questions about: Included applications and operating systems. - Page 124 Support and Service Getting HP OmniBook Assistance To contact the Customer Support Center by email, visit the HP Customer Care website at http://www.hp.com/cposupport/eschome.html. For the latest list of phone numbers, see the OmniBook website under Support, http://www.hp.com/omnibook. North America United States: (970) 635-1000...
-
Page 125: Hewlett-Packard Limited Warranty Statement
3. HP does not warrant that the operation of HP products will be uninterrupted or error free. If HP is unable, within a reasonable time, to repair or replace any product to a condition as warranted, you will be entitled to a refund of the purchase price upon prompt return of the product. - Page 126 Support and Service Hewlett-Packard Limited Warranty Statement EXCEPT AS INDICATED ABOVE, IN NO EVENT WILL HP OR ITS SUPPLIERS BE LIABLE FOR LOSS OF DATA OR FOR DIRECT, SPECIAL, INCIDENTAL, CONSEQUENTIAL (INCLUDING LOST PROFIT OR DATA), OR OTHER DAMAGE, WHETHER BASED IN CONTRACT, TORT, OR OTHERWISE. Some countries, states or provinces do not allow the exclusion or limitation of incidental or consequential damages, so the above limitation or exclusion may not apply to you.
-
Page 127: Specifications And Regulatory Information
Specifications and Regulatory Information Reference Guide... -
Page 128: Hardware Specifications
Models without “900” after serial number 256-bit NeoMagic MagicGraph graphics accelerator with 2.5-MB video RAM, 1x AGP graphics capability. Models with “900 B” after serial number ATI Mobility-M graphics accelerator with 4-MB video RAM, 2x AGP graphics capability. Rechargeable 6-cell lithium ion battery with LED charge-level gauge (11.1 Vdc). - Page 129 9-pin, 115,200-bps serial (16550 UART). 25-pin bi-directional ECP/EPP parallel. Video-out. (Resolution up to 1280×1024×256 colors, or up to 1600×1200×64K colors for models with “900 B” after serial number. Refresh rate 60 to 85 Hz.) PS/2 keyboard/mouse. 4-Mbps IrDA-compatible infrared port.
- Page 130 Audio: NeoMagic MagicGraph NM2200 (NMG5) and NeoMagic Audio NMA2. CardBus: TI PCI 1225. Keyboard controller: National PC87570. Super I/O: SMC 769. Models with “900 B” after serial number CPU: Intel Mobile Pentium III processor. South Bridge: PIIX4M. Video: ATI Mobility-M.
-
Page 131: Software System Resources
Numeric data processor Internal hard disk (primary IDE controller) Internal CD-ROM drive (secondary IDE controller) Unmarked models have no “900” after the serial number, “900 B” models have “900 B” after the serial number. Specifications and Regulatory Information Software System Resources... - Page 132 ** Valid uses for memory addresses CC000-DBFFF or D0000-DBFFF: Upper memory blocks (UMBs). PC card memory windows. *** Unmarked models have no “900” after the serial number, “900 B” models have “900 B” after the serial number. System Input/Output Addresses (100-3FF) 120-127 Audio (only models without “900”...
- Page 133 Sound playback Floppy drive LPT1 (ECP parallel port) Cascade Free Free Free Unmarked models have no “900” after the serial number, “900 B” models have “900 B” after the serial number. Specifications and Regulatory Information Software System Resources Reference Guide...
-
Page 134: Safety Information
250 Vac (2.5 A) 250 Vac (2.5 A) 250 Vac (2.5 A) 125 Vac (3 A) 250 Vac (2.5 A) 250 Vac (2.5 A) 250 Vac (2.5 A) 250 Vac (2.5 A) HP Part Number 8120-6313 8120-6314 8120-8699 8120-6312 8120-6316 8120-6317 8120-8367... -
Page 135: Ergonomics
When discarding a battery pack, contact your local waste disposal provider regarding local restrictions on the disposal or recycling of batteries. To obtain a replacement battery, contact your local dealer or HP sales office. Do not charge the battery pack if the ambient temperature exceeds 45 °C (113 °F). -
Page 136: Led Safety
(light-emitting diode) device according to International Standard IEC 825-1 (EN60825- 1). This device is not considered harmful, but the following precautions are recommended: If the unit requires service, contact an authorized HP service center—see “Support Assistance” on page 122. Do not attempt to make any adjustment of the unit. -
Page 137: Regulatory Information
Regulatory Information This section presents information that shows how the OmniBook complies with regulations in certain regions. Any modifications to the OmniBook not expressly approved by Hewlett-Packard could void the authority to operate the OmniBook in these regions. U.S.A. The OmniBook generates and uses radio frequency energy and may interfere with radio and television reception. -
Page 138: Canada
(415) 857-1501 declares that the product(s) Hewlett-Packard Company Trade name: HP OmniBook 900 Product name: Complies with Part 15 of the FCC Rules. Operation is subject to the following two conditions: 1. This device may not cause harmful interference, and 2. -
Page 139: International
Declaration of Conformity (according to ISO/IEC Guide 22 and EN 45014) Hewlett-Packard Company Address: Mobile Computing Division 19310 Pruneridge Ave. Cupertino, CA 95014 declares that the following product HP OmniBook 900 Product name: Options: conforms to the following product specifications IEC 950:1991+A1,A2,A3,A4 / EN 60950 (1992)+A1,A2,A3,A4,A11 Safety: GB4943-1995... -
Page 141: Index
Index ac (time-out), 58, 90 ac adapter charging battery, 53 connecting, 16, 53 jack, 13 part number, 16 accessories docking products, 76 plug-in modules, 63 troubleshooting, 98 adding RAM, 81 addresses (I/O), 132 adjusting brightness, 29 volume, 31 administrator password, 93 Advanced Power Management (APM) preinstalled for Windows 95/98,... - Page 142 (HDD), 80 hot computer, 108 hot keys, 32 hot swapping installing software, 62 swapping modules, 63 troubleshooting, 99 HP Customer Care website, 10 I/O addresses, 132 infrared port location, 14, 66 making connections, 72 mode, 88 printing, 72 safety, 136...
- Page 143 warning, 53 LPT1 port, 15, 66 Main menu (BIOS), 87 memory adding, 81 extended, 87 PC-100, 81, 107 removing, 83 system, 132 troubleshooting, 106 microphone external, 71 location, 13 mini dock, 76, 98 modes power, 20 Smart CPU, 58, 90 module bay, 18, 63 modules (plug-in), 63 monitor...
- Page 144 saving battery power, 57 Scandisk, 103 Scroll Lock, 13, 23 security hard drive lock, 96 Kensington lock, 95 passwords, 93, 94 PC identification, 95 VirusScan, 94 Security menu (BIOS), 89 selecting items, 25 serial mouse, 70 serial port connecting, 70 location, 15, 66 troubleshooting, 112 uses power, 57...
- Page 145 wireless communication, 72 working in comfort, 35 Y2K, 17 Y-adapter (PS/2), 69 zoomed video, 74 Reference Guide...
Need help?
Do you have a question about the 900 and is the answer not in the manual?
Questions and answers