Table of Contents
Advertisement
Quick Links
Advertisement
Table of Contents

Subscribe to Our Youtube Channel
Related Manuals for Vacron FULL HD Vehicle Video Recorder


Summary of Contents for Vacron FULL HD Vehicle Video Recorder
- Page 1 FULL HD Vehicle Video Recorder User Manual 2013 AUG V1.0...
-
Page 2: Safety Precautions
Vehicle Video Recorder User Manual Safety Precautions Please Take and review some testing videos initially to make sure the images were recorded correctly. Please note that manufacturer, its subsidiaries and affiliates, or its distributors are not liable for consequential damages arising from any malfunction of main device accessory, including malfunction memory card that results in the failure of recording video or recorded video ca not be read. -
Page 3: Table Of Contents
F. SD Card Installation ..............6 G. Recording / Stop Recording ............. 7 H. Remote Controller ................ 8 OSD Menu function ..............9 VACRON Viewer Player ............10 Operation icon introduction ......... 10 Capture .................. 11 Configuration ..............11 Play back ................14 File backup ................ -
Page 4: Feature Description
Vehicle Video Recorder User Manual A. Feature Description Full HD Real-time recorder (H.264 compression technology). 105° Wide-angle CMOS Lens. Record video with sound inside and outside the car. Recorded Video store in Micro SD card. Loop recording / on start recording when memory card is inserted and device is power on. -
Page 5: Specification
Vehicle Video Recorder User Manual B. Specification Item Description Sensor CMOS Sensor View Angle 105° Wide-angle Resolution Full-HD NTSC 30 fps / PAL 25 fps DC5V±5% / 1A. V / A Start voltage 4.6V or above is required. Operating tmp. -10℃~ +60℃... -
Page 6: Installation Instruction
Vehicle Video Recorder User Manual D. Installation Instruction 1. To install the device on the windshield by” Sucker-type holder “ or “Stick-Holder” Type Sticker Adhesive Spot, Sucker-type holder Stick-Holder 2. Install the device on the 3. To adjust the recording angle windshield in the best position properly 5. - Page 7 Vehicle Video Recorder User Manual 6. VVR installation instruction Caution (1). This device should be installed in the area where the Windshield will be able to be cleaned by windshield wiper. (2). Formatting SD card on the device before beginning to use. (3).
-
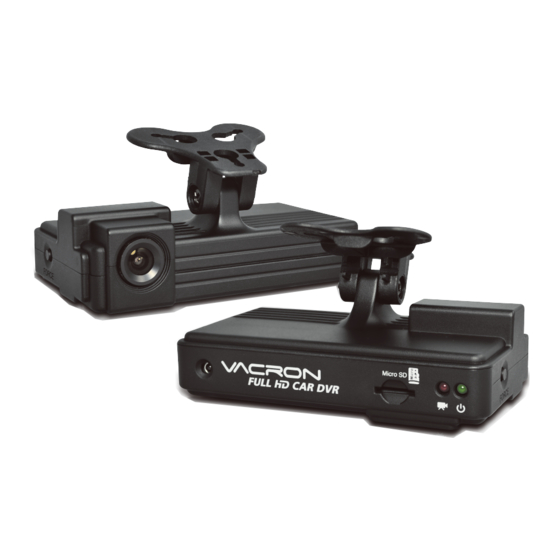
Page 8: Product Dimensions
Vehicle Video Recorder User Manual E. Product Dimensions Lens Force Record Power Indicator Cable collect slot Remote Control Receiver Recording Indicator MICRO SD Card DC5V Power input Video Out Battery for permanent calendar... -
Page 9: Sd Card Installation
Vehicle Video Recorder User Manual F. SD Card Installation (1). Format memory card; please refer to the other chapter “Formatting memory card” for more detail. Remark: Memory Card is optional Caution (1). Recommend Memory Card “SanDisk” or “Transcend” Class 10 or above Micro SD Card. (Minimum of 4GB) (2). -
Page 10: Recording / Stop Recording
Vehicle Video Recorder User Manual G. Recording / Stop Recording 1. Power On/Recording When car power on, the device start up automatically. Please wait for 30 Sec. to start recording. 2. Power Off/Stop recording When the car power off, the device will stop to record video and sound. -
Page 11: Remote Controller
Vehicle Video Recorder User Manual H. Remote Controller Force Recording Button Volume down Volume up Stop Voice Recording Mute Menu Up /Down/ Left/Right Confirm Play Stop Pause / Step √ Check the mercury cell is installed in How to check if the remote correct direction. -
Page 12: Osd Menu Function
Vehicle Video Recorder User Manual OSD Menu function Remember: Video output require connecting TV OUT line to the device. In Live view screen press on remote controler will popup OSD operation menu as follows: NTSC / PAL Calendar Firmware Version 1. -
Page 13: Vacron Viewer Player
Vehicle Video Recorder User Manual J. VACRON Viewer Player ★ DirectX 9.0 or above is required Screen Capture Playback Speed Control BAR Playback Capture Setting Sound Configure G-Sensor Data Playback Control File Operation icon introduction Back to previous file Previous image... -
Page 14: Capture
Vehicle Video Recorder User Manual Capture: Capture the current screen image You can capture the image when playing the video, click button to capture the image. The following window will be show. The image you captured will show on the right side. The default Path for saving files is /Snapshot folder, and the file type is *.bmp. - Page 15 Vehicle Video Recorder User Manual resolution of UI. Then save configuration to memory card. After above processes are completed, the Micro SD card can be insert into the device and start recording according to new setting. Video Select the video Quality: Quality High/Normal /Low Set recording frame rate for...
- Page 16 Vehicle Video Recorder User Manual This function can encrypt the memory card to prevent illegal retrieving from others, the password is under 15 characters, for example:123456789123456 After setting the password, it is required to enter password to Password access the playback file, setting, formatting memory card features.
-
Page 17: Play Back
Vehicle Video Recorder User Manual G-Sensor will detect the abnormal vibrations of the car when Vehicle is running on the road to determine if forced recording should be activated G-sensor to record the event. sensitivity Vehicle type and Gensor’s sensitivity can be adjusted. Vehicle type support: Car, Trunk, Motorcycle, Alarm. -
Page 18: File Backup
Vehicle Video Recorder User Manual File backup: Files can be backup and save as *.sd or *.avi format. Step1. Choose the source of the memory card. Step2. Choose the designated footage to backup. - Page 19 Vehicle Video Recorder User Manual Step3. Choose the target file format and start/end record time. File format Our original file format *.sd format (2)AVI File Backup(*.avi) AVI format ★ Note: G-sensor data can only be displayed on manufacturer’s player. Step 4. Set the backup folder: default is C:\BlackBox Step 5.
-
Page 20: Format
Vehicle Video Recorder User Manual Format: Format memory card/Langue setting Caution “Format / Restore” will clean all the data saved on (1). Micro SD card, Please back up the data before proceed ”Format /Restore”. Before “Format / Restore” Micro SD memory card, (2). - Page 21 Current Version Current version information will show here. You can decide if you want to upgrade to a new version base on this information. Please visit VACRON web site http://vvr.vacron.com to get information about available new firmware release.
-
Page 22: Play Bar
Vehicle Video Recorder User Manual Play BAR: You can use Mouse to drag the car icon to move footage location Play speed: 4X、8X、16X and quick playback, 1/4X、1/8X、 1/16X and slow playback. Volume control: Click +、- to adjust volume. -
Page 23: G-Sensor
Vehicle Video Recorder User Manual 10. G-SENSOR G-Sensor will detect the impact form the car, and record 1-3 minutes footage automatically. This footage will save to separate area to avoid file from being overwritten. Detect vehicle horizontal change. Detect vehicle vertical change. Detect vehicle front/back change. -
Page 24: Record Time Estimation
Vehicle Video Recorder User Manual K. Record Time Estimation The chart below is for reference only. The length of time recorded can be varied due to variation in image size may be different. Capacity Video Quality High... - Page 25 For More Information Please check VACRON Website http://www.vacron.com Made in Taiwan...
Need help?
Do you have a question about the FULL HD Vehicle Video Recorder and is the answer not in the manual?
Questions and answers