
Subscribe to Our Youtube Channel
Related Manuals for Vacron CDR-E26


Summary of Contents for Vacron CDR-E26
- Page 1 ALL IN ONE VEHICLE VIDEO RECORDER USER MANUAL TYPE A 2.9 mm Lens TYPE B / TYPEC 4 mm Lens 2011 JUN V1.0 optional TYPE C Features and operations may vary in different models.
-
Page 2: Table Of Contents
Index A. Features ....................1 B. Specifications ..................2 C. Product Appearance ................3 D. Product Dimensions ................4 E. Installation Instructions ................5 F. Start / Stop Recording ................6 G. Playback ....................7 1. Onsite Playback .................. 7 2. -
Page 3: Features
A. Features Suitable for all personal vehicles, taxi, buses, trucks and etc. Easy to install and compact size to prevent blocking the driver's view. 3. Video record on outside driving conditions and audio record inside the vehicle simultaneously. 4. TYPE A: 2.9mm lens, apx. -
Page 4: Specifications
B. Specifications Items Specification System NTSC/PAL Chipset H.264 compression chipset Sensor VGA CMOS Sensor 2.9mm lens apx. 120 degrees viewing angle. ( TYPE A ) View Angel 4mm lens apx. 90 degrees viewing angle. ( TYPE B / TYPE C ) (optional: M12 lens) Voltage 5V±5%;... -
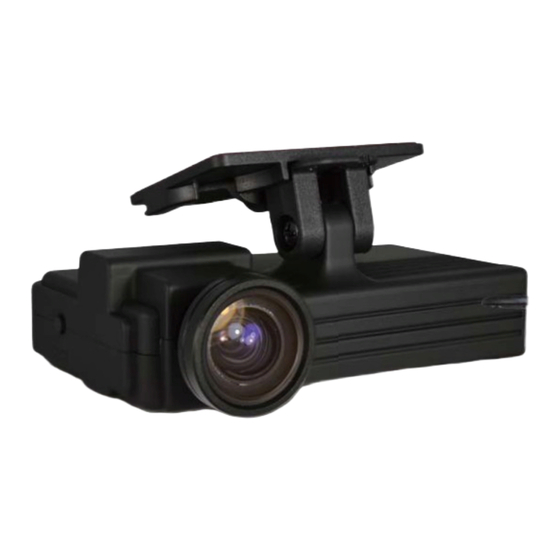
Page 5: Product Appearance
C. Product Appearance Front View TYPE A:2.9 mm lens TYPE B/TYPE C:4 mm lens Lens Lens Optional lens for selecting Aperture models Viewing angle 2.9mm-12mm Small aperture 90-120 degree 4mm-12mm Large aperture 90-105 degree Back View TYPE A / TYPE B / TYPE C Normal recording Power light MICRO SD card... -
Page 6: Product Dimensions
TYPE B / TYPE C AV output Emergency button DC5V D. Product Dimensions unit:mm TYPE A TYPE B / TYPE C Features and operations may vary in different models. -
Page 7: Installation Instructions
E. Installation Instructions Make the bracket facing upward. Assemble the suction discs and insert Micro SD card. Set up the machine in a proper Tilt to adjust the viewing angle. position. Connect the power cable. Plug in the cigarette adapter. Connect the power cable. -
Page 8: Start / Stop Recording
F. Start / Stop Recording After powering up the unit and a display device connected properly, the display will show the welcome screen as below follow up Firmware Version: XXXX. Then enter the live mode. OSD screen when Power-on ★The OSD and led lights may vary in different models. 1. -
Page 9: Playback
G. Playback Two operating methods: Onsite playback with remote controller and playback via client software on PC. 1. Onsite Playback Operating with Remote Control. a. Description of Remote Controller as below. Key Icon Function Description Upward file selection, enter password. arrow key arrow key Downward file selection, enter password. - Page 10 i. Choose to enter log-in page, choose to key-in password, select to next step. After log-in password, choose to enter playback page. ii. While exiting playback page, select to go back to LIVE view. ★ If there is no password setup for software of PC client, select to enter menu of playback page directly.
-
Page 11: Playback On Pc Client
2. Playback On PC Client Q:How to playback file of SD card after recording? Ans:Please follow the following instructions to playback records. Press and pop out the SD card. Remove the card from the machine. Insert the SDHC card into the card Connect the card reader to the USB reader (please make sure the slot on PC. - Page 12 Player i. Viewer Interface GPS direction & Coordinate G-Sensor Speed Display speed & setting Volume Setting Back to Menu Menu Setting ★TYPE C model only: GPS direction & Coordinate, Speed and Google Map should match up specific models within GPS function. ii.
- Page 13 Volume adjustment. Play previous file. Previous File Previous frame (freeze-frame). Previous Frame Playback records. Playback Key Pause play files. Pause Stop play files. Stop Play files/records. Play Next frame (freeze frame). Next Frame Select next file to play. Next File Backup files.
-
Page 14: Recording Set Up
H. Recording Set Up 1. Insert micro SD card to card reader of PC client before setting. 2. Option setting of software shown below. Detail Figure Info Functions 1. Password: encrypt micro SD card for prevention of getting any info. The string of password is limited as 15 characters. - Page 15 3. Time Zone: adjust local time by GMT. 4. Time Setting: PC client time to set up and revise current time. 5. Playback Password: playback by protection of password. Tick number After tick from 0 to 9 while setting. 6. G-Sensor sensitivity: set up by road situation, including off, lower, low, normal, high, and higher.
-
Page 16: Snapshop
I. Snapshop Q: How to use the snapshot function to get the picture from playback file on micro SD card? Ans: While playback the recorded file of SD card, click the icon then snapshot the image and save into your PC. Default message box is shown by snapshot folder of CarBox2.exe. - Page 17 Please follow the steps below: 1. Insert the SD card into card reader, then insert card reader to USB slot in PC side (refer to the charts) Notice Before formatting SD memory card, please ensure to unlock it first. If the card is unlocked but still cannot be formatted, this might be caused by Window Vista / 7 security restrictions.
- Page 18 (2) Select the location of SD card. (3) 「format」or「restore」the SD card. (3.1)「format」SD card (3.1.1) Click「Format」button, click「yes」to start formatting on the pop-up dialog window. (3.1.2) Pop-up the format finished dialog window. (3.1.3) Click「OK」and re-insert the SD card to do relative setting. ★The original settings are completely eliminated after formatting the SD card.
- Page 19 (3.2.3) Check the quick format and click "Start" to format. After formatting is complete please click "OK", then "Close" dialog window. (3.2.4) Click "OK" to finish restore SD card. ★After completion, you can use the memory card for other purposes. ...
Need help?
Do you have a question about the CDR-E26 and is the answer not in the manual?
Questions and answers