Table of Contents
Advertisement
Quick Links
Advertisement
Table of Contents

Subscribe to Our Youtube Channel
Related Manuals for StarTech.com InfoSafe UNI3510U2E


Summary of Contents for StarTech.com InfoSafe UNI3510U2E
- Page 1 UNI3510U2E / UNI3510U2EGB UNI3510U2EB / UNI3510UEBGB Instruction Manual 3.5” External Hard Drive Enclosure 3.5” eSATA/USB 2.0 to IDE/SATA External Hard Drive Enclosure with One-Touch Backup Manual Revision:06/17/2010 For the most up-to-date information, please visit www.startech.com...
- Page 2 StarTech.com. Where they occur these references are for illustrative purposes only and do not represent an endorsement of a product or service by StarTech.com, or an endorsement of the product(s) to which this manual applies by the third-party company in question.
-
Page 3: Table Of Contents
Table of Contents Introduction ..............1 Packaging Contents..............1 System Requirements ..............1 Hardware Guide ............... 2 Front Panel ..................2 Rear Panel ...................2 Installation ............... 3 Hardware Installation ..............3 Driver Installation .................4 Software Installation ..............4 Recognizing the Hard Drive ........... 6 Windows XP ................6 Windows Vista ................7 Specifications .............. -
Page 4: Introduction
Introduction This enclosure lets you turn almost any high capacity 3.5” Serial ATA (SATA) or IDE hard drive into an eSATA (SATA only) or USB (SATA or IDE) external hard drive, allowing you to customize your external storage solution based on your preference of hard drive model and manufacturer. -
Page 5: Hardware Guide
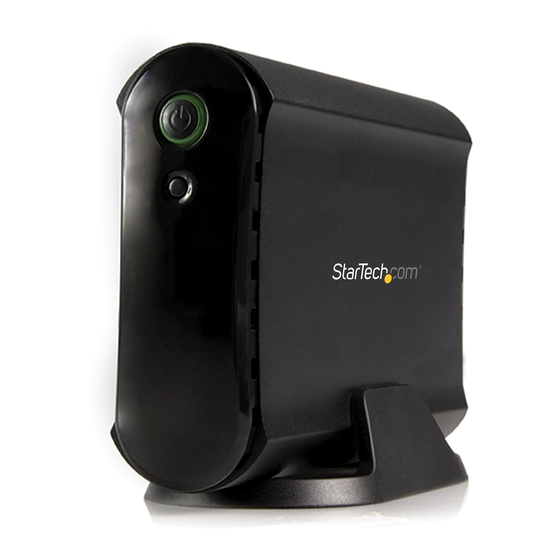
Hardware Guide Front Panel Power Button/LED Backup Button Rear Panel DC In Port eSATA Port Mini USB Port Hard Drive Release Switch... -
Page 6: Installation
Installation Hardware Installation Open the hard drive enclosure by pushing the rear panel release button to the right and sliding the hard drive bracket out of the external casing from the front. If using an IDE/ATA hard drive, ensure that the hard drive you are using is set to MASTER. -
Page 7: Driver Installation
IDE HDD: Only the USB 2.0 interface is available for connecting an IDE hard drive to the host computer. Plug the 40-pin IDE data cable into the port labelled CN1 on the enclosure’s PCB board. Plug the included 4-pin SP4 to LP4 power adapter cable into the J1 connector. - Page 8 Insert the Drivers CD into your computer’s CD-ROM. Open the DRIVERS.exe application to begin the installation process. Once the installer is running, there are a number of options available to you from the DRIVERS.exe home screen. To install the backup software, click Install Backup Program under the heading that corresponds with your drive-type (IDE or SATA).
-
Page 9: Recognizing The Hard Drive
Click Browse to designate the directory in which the software will be installed. Once you have made your selection, click Install to continue. The installation will now take place. Once the installation is complete, you may exit the DRIVERS.exe application. Recognizing the Hard Drive Windows XP USB 2.0... -
Page 10: Windows Vista
eSATA If you are using the eSATA interface to connect the hard drive enclosure to your computer, there are two setup processes you can follow. If the hard drive enclosure is powered on upon booting up the computer, it will automatically detect the drive. Otherwise, if you connect and power on the hard drive enclosure once the computer has already been booted up, you will need to open the Device Manager to scan for it. - Page 11 eSATA If you are using the eSATA interface to connect the hard drive enclosure to your computer, there are two setup processes you can follow. If the hard drive enclosure is powered on upon booting up the computer, it will automatically detect the drive. Otherwise, if you connect and power on the hard drive enclosure once the computer has already been booted up, you will need to open the Device Manager to scan for it.
-
Page 12: Specifications
Specifications SATA 3.0Gb/s Bus Interface USB 2.0 Chipset ID JMicron JMB20337 1 x eSATA connector* External Connectors 1 x USB Mini B connector 1 x DC Power connector 2 x SATA 7-pin 1 x SATA Power 15-pin Internal Connectors 1 x 40-pin IDE/ATA 1 x LP4 Power 4-pin 3.0 Gb/s (eSATA) Maximum Data Transfer Rate... -
Page 13: Technical Support
Limitation of Liability In no event shall the liability of StarTech.com Ltd. and StarTech.com USA LLP (or their officers, directors, employees or agents) for any damages (whether direct or indirect, special, punitive, incidental, consequential, or... - Page 14 StarTech.com has been making “hard-to-find easy” since 1985, providing high quality solutions to a diverse IT and A/V customer base that spans many channels, including government, education and industrial facilities to name just a few. We offer an unmatched selection of computer parts, cables, A/V products, KVM and Server...
Need help?
Do you have a question about the InfoSafe UNI3510U2E and is the answer not in the manual?
Questions and answers