Table of Contents
Advertisement
Advertisement
Table of Contents

Related Manuals for Durabook U12C


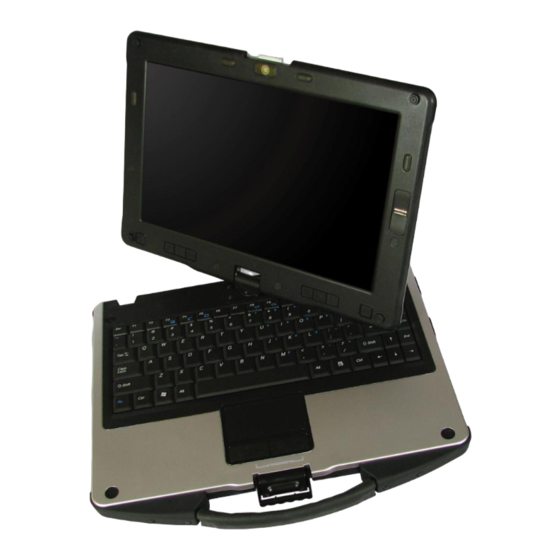
Summary of Contents for Durabook U12C
-
Page 2: Table Of Contents
Table of Contents ....................4 OPYRIGHT ................4 EGULATORY TATEMENT Federal Communications Commission Statement ......................4 Declaration of Conformity ............................... 4 RF exposure warning................................ 5 European Notice ................................5 R&TTE (CE) MANUAL REGULATORY REQUIREMENT (WLAN - IEEE 802.11b/g)..........5 Canadian Department of Communications........................6 Battery Disposal................................ - Page 3 ..................... 37 ..................37 DVANCED ..................... 38 ..................38 ECURITY & E ..................39 DURABOOK DATAGUARD SOFTWARE........40 ..............40 SING URABOOK UARD Creating New Tasks................................. 44 Running the Mirror Backup ............................45 Deleting Tasks ................................. 45 Using Tools..................................47 TROUBLESHOOTING..............
-
Page 4: Copyright
Preface Copyright © Copyright 2010. All rights reserved. No part of this user manual may be transmitted, stored in a retrieval system, or translated into any language or computer language, in any form or by any means, without the prior written permission of the manufacturer. Information is subject to change without prior notice. -
Page 5: Rf Exposure Warning
Preface RF exposure warning This equipment must be installed and operated in accordance with provided instructions and must not be co-located or operating in conjunction with any other antenna or transmitter. End-users and installers must be provided with antenna installation instructions and transmitter operating conditions for satisfying RF exposure compliance. -
Page 6: Canadian Department Of Communications
Preface Canadian Department of Communications This class B digital apparatus meets all requirements of the Canadian Interference-causing Equipment Regulations. Battery Disposal THIS PRODUCT CONTAINS A LITHIUM-ION OR NICKEL-METAL HYDRIDE BATTERY. IT MUST BE DISPOSED OF PROPERLY. CONTACT LOCAL ENVIRONMENTAL AGENCIES FOR INFORMATION ON RECYCLING AND DISPOSAL PLANS IN YOUR AREA. -
Page 7: Safety Instructions
Preface Safety Instructions DO NOT block the opening vents provided for ventilation. Blocking these vents may cause the notebook processor to overheat. Always keep strong magnetic or electrical objects away from your notebook. DO NOT use or store your notebook in extreme temperatures. DO NOT place your notebook near fire or other sources of heat. - Page 8 Preface DO NOT attempt to service your notebook yourself. Any attempt to do so will make the warranty invalid. When servicing, refer to qualified service personnel. For better environmental protection, waste batteries should be collected separately for recycling or special disposal. CAUTION FOR ADAPTER THIS NOTEBOOK IS FOR USE WITH DEDICATED AC ADAPTER.
-
Page 9: Before You Start
Before You Start Before You Start Congratulations on your purchase of this notebook. This business notebook is portable and suits a wide-range of user requirements, providing users with maximum computing experience. Before you begin using your notebook, read this chapter to familiarize yourself with the main components installed in the system. -
Page 10: Features
Before You Start Features • Intel HM55 platform ® • Operating system supports Microsoft Windows 7 • 12.1” convertible LCD display • High capacity hard disk drive • Light weight • Spill Proof • Intel WLAN capability • Bluetooth connectivity •... -
Page 11: Components
Before You Start Components Front View Item Description Camera Use to take picture, record videos, or video conference. Display panel Provides visual output. Fingerprint scanner Scans fingerprints for biometric identification. - Page 12 Before You Start Item Description Brightness control Press to increase the LCD panel brightness by one button level. Brightness control Press to decrease the LCD panel brightness by one button level. SAS button Press to exit Windows and switch to Standby mode.
-
Page 13: Left View
Before You Start Left View Item Description USB port Connects USB peripheral devices. Card reader Use to insert memory cards to transfer pictures, music, and data between your notebook and flash compatible devices. The card reader supports SD (Secure Digital), SDHC, Mini-SD (with adapter), MMC (Multi-media card), MMC+, Mini-MMC (with adapter) cards. -
Page 14: Back View
Before You Start Back View Item Description Kensington lock slot Connects to a Kensington-compatible notebook security lock. VGA port Connects to a display device. (e.g. external monitor, LCD projector). LAN (RJ-45) port Connects to a local area network (LAN) using an Ethernet cable. -
Page 15: Bottom View
Before You Start Bottom View Item Description Docking station port* Connects the notebook to a docking station. Modular I/O port Use for user changeable modular I/O bay to bays accommodate various devices applications. Cooling vents Use for air convection. Do not cover the cooling vents to protect your notebook from overheating. -
Page 16: Status Indicators
Before You Start Status Indicators The status indicators in the upper left corner of the keyboard light up when a particular function of the notebook is active. Each indicator is marked with a symbol. Icon Item Description The LED always lights on (blue) when the Power indicator system is running. -
Page 17: Getting Started
Getting Started Getting Started This chapter will guide you on how to use your notebook. Powering Up Your Notebook Your notebook can be powered up using the AC adapter or the Lithium-ion battery. Connecting the AC Adapter The AC adapter powers up your notebook and charges the battery. 1. -
Page 18: Installing The Battery
Getting Started Installing the Battery To install the battery, follow the steps below: 1. Slide and hold the battery latch to the unlock position. 2. Align and insert the battery to the battery compartment. 3. Push completely until the battery locks into place. 4. -
Page 19: Removing The Battery
Getting Started Removing the Battery To remove the battery, follow the steps below: 1. Slide and hold the battery latch to the unlock position. 2. Remove the battery out of the battery compartment. Starting Your Notebook Using the Display Panel •... -
Page 20: Turning On Your Notebook
Getting Started • To switch to tablet mode operation, twist the LCD panel 180°, then place it back on the notebook chassis. Lock the chassis latch to secure the LCD panel. Turning On Your Notebook Press the button until the Power LED lights up. Adjusting the LCD Panel Brightness You can adjust the brightness by pressing the Brightness control buttons. -
Page 21: Changing The Display Orientation
Getting Started Changing the Display Orientation You can rotate the display orientation to suit your preference. Each press of the button will rotate the display 90° clockwise. Shutting Down Your Notebook It is important to properly shut down your notebook to avoid the loss of unsaved data. -
Page 22: Using The Keyboard
Getting Started Using the Keyboard Keys Description These function keys are used to perform designated tasks. Function keys The tasks for each key may vary from one application to another. Press the [Fn] key in combination with other keys to [Fn] execute a command. -
Page 23: Using The Touch Pad
Getting Started Using the Touch Pad The touch pad is a cursor-pointing device that provides all the features of a two- button mouse. Its primary function is to move the cursor around the screen. You can also point, select, or drag items or objects on the screen. Main touchpad Left button Right button... -
Page 24: Using The Stylus
Getting Started Using the Stylus This notebook comes with an integrated stylus for accurate control input to the LCD touch panel and digitizer. You can use the stylus to point, select, or drag items or objects on the screen. To use the stylus, simply remove it from the back of the notebook. Calibrate the Screen To ensure touch accuracy, calibrate the screen. -
Page 25: Using The Quick Menu
Getting Started 3. Click Calibrate. 4. Follow the on-screen instructions to complete screen calibration. Using the Quick Menu Press the button to enter the Quick menu. Click on the icon to enable the respective function including wireless network, Bluetooth, Click the icon to 3G, GPS, and set up the media file... -
Page 26: Using The Memory Cards
Getting Started Using the Memory Cards Your notebook supports different types of memory cards to provide faster data transfer. Supported types are as follows: • SD card • SDHC card • Mini-SD card (with adapter) • MS card (Memory Stick/PRO) •... -
Page 27: Making Connections
Making Connections Making Connections This chapter will guide you on installing peripheral devices to maximize the use of your notebook. Connecting External Display Devices You can connect your notebook to other display devices, such as a projector, another display monitor, or a TV. Your notebook is equipped with a VGA port which provides both digital and analog video signals. -
Page 28: Connecting Usb Devices
Making Connections Connecting USB Devices You can connect your notebook to other USB devices, such as a mouse, keyboard, digital camera, printer, or an external hard disk drive. 1. Connect one end of a USB cable to the USB port of your notebook. 2. -
Page 29: Connecting Headphones
Making Connections Connecting Headphones You can connect your notebook to a headphone or external speakers. Plug the audio jack of the headphone or speakers to the Headphone jack of your notebook. NOTE • The headphone is not included in the package. It is sold separately. Connecting External Microphone You can connect your notebook to an external microphone. -
Page 30: Connecting To A Local Area Network (Lan)
Making Connections Connecting to a Local Area Network (LAN) You can connect your notebook to a local area network (LAN) using the RJ-45 LAN port. 1. Connect one end of an RJ-45 cable to the LAN port of your notebook. 2. -
Page 31: Connecting To Wireless Connections
Making Connections Connecting to Wireless Connections You can connect your notebook to a wireless local area network, WWAN, Bluetooth, or GPS. Before using a wireless built-in device, you need to turn the respective built-in wireless functions on. Connecting to a Wireless Local Area Network Your notebook comes with a WLAN module. -
Page 32: Connecting To A Bluetooth Device
Making Connections NOTE • Wi-Fi access requires service from a wireless service provider. Contact your service provider for more information. • Actual wireless connectivity will depend on system configuration. Please contact your dealer for more information. Connecting to a Bluetooth Device Your notebook can connect and communicate with other Bluetooth-enabled devices. - Page 33 Making Connections 7. The system displays the selected Bluetooth device. Double-click on the device icon to connect. 8. Enter the passkey (PIN) to start pairing, and click OK. NOTE • The PIN you enter on the notebook must be the same PIN to be entered on the other Bluetooth device.
-
Page 34: Power Management
Power Management Power Management This chapter will guide you on how to manage the system power. Using the Power Plan To improve energy efficiency, you can use the power plan to reduce the amount of power your notebook uses, maximize the performance, or balance the two. 1. -
Page 35: Using The Power Saving Mode
Power Management Using the Power Saving Mode When you are not using the notebook, turn off the notebook or set the notebook to enter sleep mode. To set the notebook to enter sleep mode, follow the steps below: 1. Click Start. 2. -
Page 36: Using The Bios Setup Utility
Using the BIOS Setup Utility Using the BIOS Setup Utility Your notebook has a BIOS setup utility which allows you to configure important system settings, including settings for various optional functions of the notebook. This chapter explains how to use the BIOS setup utility. BIOS Setup Menu The BIOS setup Utility allows you to configure your notebook basic settings. -
Page 37: Main Menu
Using the BIOS Setup Utility cannot be modified by users. Reverse the attribute of the main options and press Enter to enter into the submenu. Press Esc to return to the previous configuration page. Main Menu Display the system overview information about BIOS version, CPU features, and total memory size. -
Page 38: Boot Menu
Using the BIOS Setup Utility Boot Menu Configure the boot type and boot sequence. Security Menu Set or change the Administrator and User passwords, and configure TPM settings. -
Page 39: Save & Exit Menu
Using the BIOS Setup Utility Save & Exit Menu Save or discard the changes, or restore the default values for all setup options before leaving the BIOS Setup Menu. -
Page 40: Durabook Dataguard Software
Mirror backup: Backup all the files within the task list from HDD to DOM. Using Durabook DataGuard 1. When you launch the Durabook DataGuard software for the first time, you will be asked to specify the DOM path. NOTE •... - Page 41 Durabook DataGuard Software 2. Click OK and enter the main menu. There are mainly three parts: Tool bar, HDD task list and DOM task list. Tool bar: a. New button: create a new task. b. Mirror button: do mirror backup.
- Page 42 Durabook DataGuard Software HDD task list: It consists of the task list in HDD. The file number and file size of all tasks are displayed on the bottom left of the screen. Task list fields include: task, notes, local path, size, file number, and owner.
- Page 43 Durabook DataGuard Software DOM task list: It consists of the task list in DOM. The free space in DOM is displayed on the bottom right of the screen. Task information includes: task name, local path, size, file number last backup date, owner, and backup process status.
-
Page 44: Creating New Tasks
It will back up the file(s) in the folder immediately. NOTE • Durabook DataGuard will monitor the task(s) you have checked and if there are any changes on the file(s), it will do automatic backup. When the automatic backup is running, the system tray icon will blink... -
Page 45: Running The Mirror Backup
Durabook DataGuard Software Running the Mirror Backup Click the Mirror button to run the mirror backup. When mirror backup is complete, the backup log appears on the screen. Deleting Tasks Users can delete the task(s) in HDD. Check the box on the HDD task list and... - Page 46 Durabook DataGuard Software Check the box on the DOM task list and click the Delete button to clean up the folder(s) exists in DOM which not mapping with the task(s) in HDD task list. If the task is listed in the HDD task list, users are not allowed to delete the...
-
Page 47: Using Tools
Click the Tools button on the tool bar and do the following: • Select Help to get the software user’s manual. • Select Setting to set whether you want to run Durabook DataGuard when Windows starts up. • Select About to view the current software version. -
Page 48: Troubleshooting
Troubleshooting Troubleshooting This chapter contains a list of common problems that you might experience when using your notebook, and techniques to try and overcome the problem. If you need additional help, contact your retailer. Problems Solutions • Check if the power adapter is properly connected. -
Page 49: Specifications
Specifications Specifications Features Specifications Type & Speed Intel I3 and I5 UVL serial Install Processor Method Power Consumption Major Chipsets Chipsets Intel HM55 Type DDR-III 800/1333 Two 204-pin DDRIII SODIMM sockets each Capacity System Memory for 2GB, 4GB (if available) Maximum Memory 12.1”... - Page 50 Specifications Features Specifications Graphic Integrated graphic controller Controller Graphic Graphic Memory Hidden Capacitive Touch Pad – PS/2 mouse Point Device interface / 2 buttons support Right/Left I/O Devices Expansion One Express 34 card slot Card Memory Card One SD Card reader slot supports SDHC Networking Integrated Gigabit bps Ethernet ...
- Page 51 Specifications Features Specifications Operating Environment Temperature: -20°C ~ 50°C (Operating under 0°C by using SSD Temperature as the main storage) Environment / Humidity Non-operating Environment Temperature: -40°C ~ 70°C Operating Humidity:20% ~ 90%, relative humidity, non-condensing (Depends on temperature) Dimensions 328mm (W) x 277mm (D) x 40.8mm (H) Weight...
Need help?
Do you have a question about the U12C and is the answer not in the manual?
Questions and answers