
Related Manuals for Belkin F1DN104K


Summary of Contents for Belkin F1DN104K
-
Page 1: User Manual
Advanced Secure Keyboard/Mouse (KM) Switch User Manual F1DN104K – Advanced Secure 4-Port Keyboard/Mouse (KM) Switch F1DN108K – Advanced Secure 8-Port Keyboard/Mouse (KM) Switch 8820-01342 Rev. A00... -
Page 2: Table Of Contents
TABLE OF CONTENTS SECTIONS SECTIONS Table of Contents Table of Contents Introduction . . . . . . . . . . . . . . . . . . . . . . . . . . . . . . . . . . . . . . . . . . . . . 1 Package Contents . - Page 3 Belkin Secure provides the highest security safeguards and features, meeting the KM. The Belkin Secure KM is designed to have up to eight computers cyber prevention requirements of today, and the future.
-
Page 4: Package Contents
. If the • Belkin USB Configuration Cable unit’s enclosure appears disrupted or if all the port LEDs flash continuously, please call Belkin Technical Support at • User Manual (800) 282-2355 . Advanced Secure Keyboard/Mouse (KM) Switch... -
Page 5: Safety Precautions
• Be sure not to expose the product to excessive humidity. provided by Belkin or an authorized service provider. The use of an • Do not store or use for extensive period of time in extreme thermal improper power source will void product warranty. -
Page 6: Security Features
KM. The Belkin Secure KM Switch uses a one-piece aluminum enclosure (for the F1DN104K model) or thick steel (for the F1DN108K model) to No Cross Cabling, No Shared Resources protect the product from physical tampering and to minimize radiated There are no cables connecting two computers. - Page 7 OVERVIEW SECTIONS SECTIONS SECTIONS Table of Contents Table of Contents Table of Contents Secure Packaging “Tear away” packaging ensures secure delivery of the Switch as it is routed to the end user. Tamper-Proof Hardware All integrated circuits are soldered directly to the printed circuit board to prevent tampering with the components.
- Page 8 Table of Contents Table of Contents Operational Features The Belkin Advanced Secure KM Switch was designed with the user in mind for today’s IT environment. Below is a summary of some features incorporated into the Switch. Seamless Cursor Switching (SCS) SCS allows the KM to switch automatically between computers once mouse cursor crosses display borders.
- Page 9 The KM Switch features an integrated mounting system for easy Please refer to the DCU user manual for product functionality or under-the-desk or side-wall mounting. contact Belkin for more details regarding DCU product information and availability. Rack-Mount Brackets (for F1DN108K model only)
- Page 10 #3. Seamless Cursor Switching (SCS) is implemented in the Belkin SCS is now further enhanced with the inclusion of pointing device Advanced Secure KM Switch to enable seamless cursor and keyboard drivers to support dual-, triple- and up to 16-head computers.
-
Page 11: Equipment Requirements
One Cable Kit is required per connected computer. Belkin KM Switch USB A to A Programming Cable (Optional cable for Belkin USB with Audio Cables KM Configuration Utility use only): F1D9022b06 –... -
Page 12: System Requirements
Secure KM Switch Mouse Filter driver software from running on, but not limited to, the following OS platforms: the Support section of Belkin’s website, or purchase the optional CD • Windows® 2000 (Belkin part number 8810-00725) containing the KM Switch mouse filter software driver (available only for Windows operating systems •... - Page 13 Administrator Setup Operating-System (OS) Support USB Mouse Console Port The Belkin Advanced Secure KM Switch administrator setup software The Belkin Secure KM USB mouse console port is compatible with the suite is compatible with computers running on the following following types of devices: OS platforms: •...
- Page 14 Programming Cable In order to use the Secure KM Switch KMC Creator configuration tool, it is necessary to use Belkin’s special USB configuration cable [Belkin part number 6000-00071 (USB A TO A PROGRAMMING CABLE)] included with the Belkin Secure KM Switch.
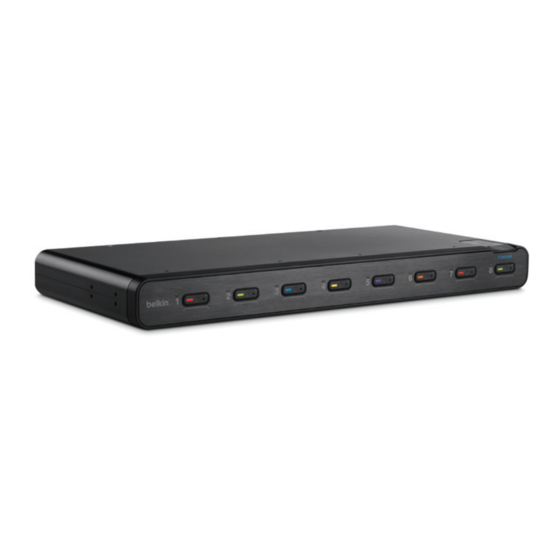
- Page 15 OVERVIEW SECTIONS SECTIONS SECTIONS Table of Contents Table of Contents Table of Contents Unit Display Diagrams, Front View Tamper-Evident Seal LED Indicator Port Selector Name Label Guide Color Chip (F1DN104K model shown) Advanced Secure Keyboard/Mouse (KM) Switch...
-
Page 16: Back View
Console PS/2 Keyboard Port DC Power Jack Console PS/2 Mouse Port 12V, 1.5A Audio Mouse Keyboard PS2 K PS2 M Audio Audio Audio Audio Console Mounting Mounting Track Track Console DCU Jack (F1DN104K model shown) Advanced Secure Keyboard/Mouse (KM) Switch... -
Page 17: Front View
OVERVIEW SECTIONS SECTIONS SECTIONS Table of Contents Table of Contents Table of Contents Front View LED Indicator Port Selector Tamper-Evident Seal Name Label Guide Color Chip (F1DN108K model shown) Advanced Secure Keyboard/Mouse (KM) Switch... - Page 18 OVERVIEW SECTIONS SECTIONS SECTIONS Table of Contents Table of Contents Table of Contents Back View Console USB Console USB Computer USB and Mouse Port Keyboard Port Audio Ports Console Audio Jack Power Switch Mounting Mounting Track Track AC Power Inlet Console DCU Jack (F1DN108K model shown)
- Page 19 Belkin Technical Support at (800) 282-2355 . Active Anti-Tampering System The Belkin Secure KM Switch is equipped with an always-on active anti-tampering system. If mechanical intrusion is detected by this system, the Switch will be permanently disabled and the LED will be flashing continuously.
-
Page 20: Specifications
DVI-D displays; analog VGA Administrator Settings: Display physical size, display monitors with adapter resolution X/Y, display orientation Maximum Number of Displays: (F1DN104K) 16, (F1DN108K) 32 (portrait/landscape), display head (1st, 2nd, ..16th), display location Maximum Total Transitions: (coordinates), mouse speed (1–10), mouse acceleration (1–10), SCS... - Page 21 MTBF: 10 years (per MIL-HDBK-217E) Warranty: 3 years Dimensions: (F1DN104K) 12.5 (W) x 6.4 (D) x 1.7 (H inches (F1DN108K) 17.25 (W) x 7.95 (D) x 1.7 (H) inches Weight: (F1DN104K) 4 lbs. (F1DN108K) 9 lbs. Made in the USA...
-
Page 22: Before Installation
Belkin Tech Support and do not use that product. Where to place the Switch: The enclosure of the Switch is designed for desktop or under-the- desk mount configurations. An optional Mount Kit (Belkin part number F1D006) is available for the F1DN104K. Rack-mount brackets are included with the F1DN108K. -
Page 23: Connection And Installation
Step 2 Connecting Computers to the Secure KM Switch 2.1 Connect each computer to the Switch ports marked “K/M” with standard USB A to B cables (Belkin part number F3U133-06 or Step 1 Connecting the Console Devices to the Secure KM Switch F3U133-10). - Page 24 INSTALLATION SECTIONS SECTIONS SECTIONS Table of Contents Table of Contents Table of Contents Step 3 Powering Up 3.1 Power on all of the monitors. 3.2 Connect the Secure KM Switch to the cable plug of the 12V 1.5A external power supply. 3.3 Connect the power adapter IEC power plug to a nearby wall outlet.
-
Page 25: Color Code Chip Installation
Table of Contents Color Code Chip Installation Port Name Label The Belkin Advanced Secure KM Switch’s port-selector buttons The included network-name labels can be placed in the area can be color-coded for easier identification. Refer to the installation underneath the port-selector buttons for port identification. Blank instructions below. - Page 26 (Figure 2 - Typical system installation for four dual-head computers) Note: The arrows pointing to the computers indicate that the Multiple- Head Display Driver (Belkin Advanced Secure KM Switch Mouse Filter driver software) is loaded on each computer. Advanced Secure Keyboard/Mouse (KM) Switch...
-
Page 27: Administrator Setup
OPERATING THE SECURE KM SWITCH OPERATING THE SECURE KM SWITCH SECTIONS Table of Contents Administrator Setup Once the Secure KM Switch is connected and powered on, essential operational settings need to be configured. The first and most important setting of the Switch is the monitor positioning. It is essential that the Switch configuration will match the actual positioning on the monitors. -
Page 28: Operating The Secure Km Switch
OPERATING THE SECURE KM SWITCH SECTIONS Table of Contents Selecting One of the Predefined Setups To load one of the default settings available in the non-volatile The loaded configuration will also include the following settings memory of the Switch: by default: 1. - Page 29 Creating a Custom Configuration File (Optional) In case the required configuration does not appear on the predefined configurations list, you can create a configuration file using Belkin’s Secure KM Configuration Utility Tool and load it to the Switch. For more information about this option, please refer to Appendices A and B of this user manual.
- Page 30 Constant mouse cursor speed is essential for system usability. Having several systems each with a different cursor “ground speed” is detrimental for the user. Belkin’s Secure KM Switch calculates and adjusts the cursor speed across different displays and computers using the geometry and display settings entered by the administrator.
- Page 31 Please download the multiple-head display driver from the Support section of Belkin’s website, or contact Belkin to order the optional CD (Belkin part number 8810-00725) that is part of the KM Switch Accessory Kit. Note: This driver must be removed from computers prior to using the computer without Belkin’s Secure KM.
- Page 32 Prevent Transition While Dragging Feature The Belkin Advanced Secure KM Switch offers a unique feature that further improves usability—Prevent Transition while Dragging. When this feature is enabled, if the user drags an object on one display (while the left mouse key pressed), the cursor will not leave that display.
-
Page 33: Frequently Asked Questions
Does the Switch require an AC adapter? has been removed or disrupted? For the F1DN104K model, the Switch requires a 12-volt DC, Please call Belkin Technical Support at (800) 282-2355 immediately. 1.5-Amp (minimum) power adapter in order to function properly. For The Switch’s circuitry may have been compromised. -
Page 34: Troubleshooting
No power, and none of the front-panel LEDs are illuminating . Keyboard and mouse are not working (all channels) • Check that the power supply (for the F1DN104K model) or the AC • Check that keyboard is not plugged into mouse port, and power cable is properly connected to the mains socket. - Page 35 • Check that the mouse you are using is connected properly to the Switch. Some non-standard keyboard functions are disabled by the Switch to prevent security risks. Contact Belkin Tech Support for the latest • Check that the USB cable between the Switch and the computer is compatibility list.
-
Page 36: Before You Begin
Please download the Secure KM Switch software files from the configuration file (.kmc extension) will later be loaded to the Switch Support section of Belkin’s website, or contact Belkin to order the that will be configured accordingly. optional CD-ROM disc (Belkin part number 8810-00725) containing Note: Refer to Appendix B for loading the configuration file to the files for the KMC Creator and the KMC Loader . - Page 37 • Product Model – The product model can be found on the back sticker of the KM Switch. The Belkin Advanced Secure KM Switch Each KM configuration file is called a “KM Configuration Project.” For can support two to four computers.
- Page 38 APPENDIX A – Secure KM Configuration Utility Software (KMC Creator) SECTIONS Table of Contents Step 3 – Enter Description Multiple Display Setup Add the description that will explain the project. The description will When creating a setup with multiple displays for one of the appear in the configuration file (.kmc) and can help explain computers, there is an additional requirement to enter the Microsoft the configuration.
- Page 39 APPENDIX A – Secure KM Configuration Utility Software (KMC Creator) SECTIONS Table of Contents The following instructions and screen captures are based on Windows • Enter the details for your main display as requested in the dialog. 7, but can be used for Windows XP and Windows Vista. •...
- Page 40 APPENDIX A – Secure KM Configuration Utility Software (KMC Creator) SECTIONS Table of Contents Step 5 – Place the Displays and Create the Geometry Examples: In the stage, the administrator will create his displays setup. The Example 1 - The following setup creates a corridor from the top right of administrator can drag and drop the monitors that were created in monitor 2 computer 2 to the top bottom left of monitor 1 computer 1.
- Page 41 APPENDIX A – Secure KM Configuration Utility Software (KMC Creator) SECTIONS Table of Contents Example 3 - The setup shown below is invalid. There is no interface Example 3 - The setup shown below is invalid. There is no interface Multi-Displays Rules between the two monitors hence the curser will not move.
- Page 42 SECTIONS Table of Contents Table of Contents Belkin’s Secure KM Configuration Utility (KMC Loader) allows you to 1. Disconnect the mouse connected to the Console mouse port of load the configured .kmc file (created per the procedure defined in the KM Switch.
- Page 43 APPENDIX B – SECURE KM CONFIGURATION UTILITY (KMC LOADER) SOFTWARE SECTIONS SECTIONS SECTIONS Table of Contents Table of Contents Table of Contents Loading Utility Loading a Configuration File Once the KM is in Administration mode and is connected to the PC: •...
- Page 44 APPENDIX B – SECURE KM CONFIGURATION UTILITY (KMC LOADER) SOFTWARE SECTIONS SECTIONS SECTIONS Table of Contents Table of Contents Table of Contents After loading is complete, restart the KM by disconnecting and then reconnecting power. Reconnect the mouse back to the mouse port and the new configuration will apply.
- Page 45 APPENDIX B – SECURE KM CONFIGURATION UTILITY (KMC LOADER) SOFTWARE SECTIONS SECTIONS SECTIONS Table of Contents Table of Contents Table of Contents To avoid this, ensure that the KM Switch is connected via the mouse No Communication with KM Switch (not keyboard) Console port on the KM Switch.
-
Page 46: Fcc Statement
DECLARATION OF CONFORMITY WITH FCC RULES FOR Belkin International, Inc. (“Belkin”) warrants to the original purchaser ELECTROMAGNETIC COMPATIBILITY of this Belkin product that the product shall be free of defects in design, assembly, material, or workmanship. We, Belkin International, Inc., of 12045 E. Waterfront Drive, Playa Vista, CA 90094, declare under our sole responsibility that the What the period of coverage is . - Page 47 What is not covered by this warranty? 2 . Your Belkin Customer Service Representative will then instruct you on how to forward your receipt and Belkin product and how to All above warranties are null and void if the Belkin product is not proceed with your claim.
- Page 48 DIRECT, INDIRECT, CONSEQUENTIAL OR MULTIPLE DAMAGES SUCH AS, BUT NOT LIMITED TO, LOST BUSINESS OR PROFITS ARISING OUT OF THE SALE OR USE OF ANY BELKIN PRODUCT, EVEN IF ADVISED OF THE POSSIBILITY OF SUCH DAMAGES. This warranty gives you specific legal rights, and you may also have other rights, which may vary from state to state.
- Page 49 © 2013 Belkin International, Inc. All rights reserved. All trade names are registered trademarks of respective manufacturers listed. Windows, Windows Vista, and Microsoft are either registered trademarks or trademarks of Microsoft Corporation in the United States and/or other countries. Mac OS is a trademark Apple Inc., registered in the U.S. and other countries.
Need help?
Do you have a question about the F1DN104K and is the answer not in the manual?
Questions and answers