Ruckus Wireless ZoneFlex 7025 User Manual
Multimedia wi-fi wall switch
Hide thumbs
Also See for ZoneFlex 7025:
- Quick setup manual (2 pages) ,
- User manual (187 pages) ,
- Quick setup manual (2 pages)
Table of Contents
Advertisement
Advertisement
Chapters
Table of Contents

Related Manuals for Ruckus Wireless ZoneFlex 7025


Summary of Contents for Ruckus Wireless ZoneFlex 7025
-
Page 1: User Guide
Ruckus Wireless ™ ZoneFlex™ 7025 Multimedia Wi-Fi Wall Switch User Guide For the following ZoneFlex 7025 Multimedia Wi-Fi Wall Switch models: 7025 Multimedia Wi-Fi Wall Switch (US) ■ 7025 Multimedia Wi-Fi Wall Switch (EU) ■ Part Number 800-70273-001 Published December 2010... -
Page 3: Table Of Contents
Package Contents ........... 3 Getting to Know the ZoneFlex 7025 Features ....... .3 ZF7025-US Model . - Page 4 Enabling Logging and Sending Event Logs to a Syslog Server....57 Sending a Copy of the Log File to Ruckus Wireless Support....58 Saving a Copy of the Current Log to Your Computer .
- Page 5 Index...
-
Page 7: About This Guide
Most user guides and release notes are available in Adobe Acrobat Reader Portable Document Format (PDF) or HTML on the Ruckus Wireless Support Web site at: http://support.ruckuswireless.com/... -
Page 8: Related Documentation
Warning Information that alerts you to potential personal injury Related Documentation In addition to this User Guide, each Ruckus Wireless 7025 Multimedia Wi-Fi Wall Switch documentation set includes the following: Quick Setup Guide/Getting Started Guide: Provides essential installation and ■... - Page 9 Part number: 800-70273-001 ■ Page 88 ■ NOTE: Throughout this guide, the ZoneFlex 7025 Multimedia Wi-Fi Wall Switch may be referred to as “ZF7025,” “Access Point,” “AP” or simply, “device.” All of these terms are synonymous for the purposes of this guide.
- Page 10 About This Guide Documentation Feedback...
-
Page 11: Introducing The 7025 Multimedia Wi-Fi Wall Switch
......... 3 Getting to Know the ZoneFlex 7025 Features... -
Page 12: Overview Of The 7025 Multimedia Wi-Fi Wall Switch
PBX system. An IEEE 802.3af-compliant PoE port, up to 15.4 watts, powers devices such as IP telephones directly from the wall switch. The ZoneFlex 7025 requires only a single PoE cable drop, thereby reducing cabling, switch ports, and power sourcing equipment. -
Page 13: Unpacking The Zoneflex 7025
Introducing the 7025 Multimedia Wi-Fi Wall Switch Unpacking the ZoneFlex 7025 Unpacking the ZoneFlex 7025 1. Open the ZoneFlex 7025 package, and then carefully remove the contents. 2. Return all packing materials to the shipping box, and put the box away in a dry location. -
Page 14: Rear Panel Features
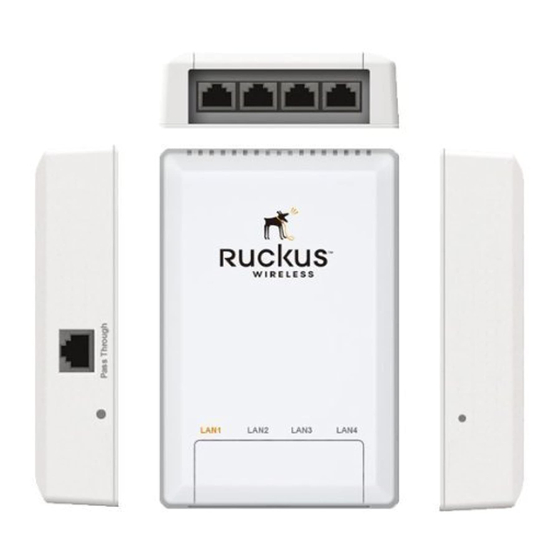
Introducing the 7025 Multimedia Wi-Fi Wall Switch Getting to Know the ZoneFlex 7025 Features Figure 1. ZF7025-US front view Table 3. ZF7025-US front view Number Name Description Pass Through port Pass through port. Power Input Optional 48V DC power input. - Page 15 Introducing the 7025 Multimedia Wi-Fi Wall Switch Getting to Know the ZoneFlex 7025 Features Figure 2. ZF7025-US rear panel Table 4. ZF7025-US rear panel features Number Name Description PoE In LAN 5/Uplink Uplink LAN port that supports 802.3af and 802.3at Power over Ethernet (PoE) input.
-
Page 16: Zf7025-Eu Model
Introducing the 7025 Multimedia Wi-Fi Wall Switch Getting to Know the ZoneFlex 7025 Features ZF7025-EU Model This section describes the physical features of the ZF7025-US model, which is designed to fit in a standard EU-style wall electrical outlet box. The outlet box must conform to BS 4662, with a minimum depth of 35mm. - Page 17 Introducing the 7025 Multimedia Wi-Fi Wall Switch Getting to Know the ZoneFlex 7025 Features Rear View Features Figure 4 shows the rear panel of the ZF7025-EU model. For a description of each rear panel element, refer to Table Figure 4.
-
Page 18: Leds
Introducing the 7025 Multimedia Wi-Fi Wall Switch Getting to Know the ZoneFlex 7025 Features LEDs The LEDs for both the US and EU models are the same. Refer to Table 7 for descriptions of LEDs and their behaviors. The LEDs are not visible once the AP is installed. -
Page 19: Reset Buttons
Introducing the 7025 Multimedia Wi-Fi Wall Switch Getting to Know the ZoneFlex 7025 Features Reset Buttons Two reset buttons on the left side of the AP are used to reboot or factory reset the AP. Figure 5. Reset buttons Hard Reset button Soft Reset button Press and release either of the reset buttons to reboot the AP. - Page 20 Introducing the 7025 Multimedia Wi-Fi Wall Switch Getting to Know the ZoneFlex 7025 Features...
-
Page 21: Installing The Multimedia Wi-Fi Wall Switch
Installing the Multimedia Wi-Fi Wall Switch In This Chapter Installing the ZF7025 ..........12 Associate a Wireless Client with the Access Point . -
Page 22: Installing The Zf7025
Installing the Multimedia Wi-Fi Wall Switch Installing the ZF7025 Installing the ZF7025 Before starting with the installation, make sure that you have the following items that are required for the installation ready: A computer with a Web browser ■ Two CAT5 Ethernet cables ■... -
Page 23: Step 2: Connect The Device To A Power Source And The Admin Computer
Installing the Multimedia Wi-Fi Wall Switch Installing the ZF7025 You can leave the Alternate DNS server box blank. 8. Click OK to save your changes and close the TCP/IP Properties dialog box. 9. Click OK again to close the Local Area Connection Properties dialog box. Windows saves the IP address settings that you have configured. -
Page 24: Step 3: Log In To The Device
Installing the Multimedia Wi-Fi Wall Switch Installing the ZF7025 3. Take one of the CAT5 Ethernet cables. Connect one end of the Ethernet cable to the Ethernet port on your computer, and then connect the other end to the 10/ 100 DATA IN port on the PoE injector. -
Page 25: Step 4: Configure The Wireless Settings
Installing the Multimedia Wi-Fi Wall Switch Installing the ZF7025 Figure 9. Web interface login page 4. Click the Login button. The Status :: Device page appears. 5. Continue to “Step 4: Configure the Wireless Settings”. Step 4: Configure the Wireless Settings To complete this step, you will need to configure the settings on the Common tab and at least one Wireless # tab. - Page 26 Installing the Multimedia Wi-Fi Wall Switch Installing the ZF7025 2. Verify that the common wireless settings are configured as listed in Table Table 10. Common wireless configuration Setting Recommended Value Wireless Mode 2.4GHz (802.11b/g/n) (not configurable). Channel SmartSelect Channel Width 20MHz Country Code •...
-
Page 27: Step 5: Verify That The Wireless Lan Is Operational
4. Clear the SSID box, and then type a unique and descriptive name that you want to call this wireless network. For example, you can type Ruckus Wireless AP. This SSID is the name that will help users identify this wireless network in their wireless network connection application. -
Page 28: Physical Installation
Mount the ZoneFlex 7025 to the Outlet Box 1. Prepare the electrical outlet box. The ZoneFlex 7025 requires a single-gang electrical outlet box mounted in a wall cavity. The US version requires a box conforming to NEMA-WD6, with a minimum depth of 1.4 inches. -
Page 29: Using The 110 Punch Down Block
• If required, connect the cable providing support for pass-through devices to the Pass Through port. 3. Mount the ZoneFlex 7025. • Align the mounting bracket with the outlet box so that the two screw holes line up, and pull the Ethernet cable through the center of the mounting bracket. - Page 30 Installing the Multimedia Wi-Fi Wall Switch Physical Installation Figure 13. Punch-down block wiring White/Orange Orange White/Green Blue White/Blue Green White/Brown Brown Congratulations! Your wireless network is now active and ready for use. If you want to become familiar with the Multimedia Wi-Fi Wall Switch Web ■...
-
Page 31: Navigating The Web Interface
Navigating the Web Interface In This Chapter Logging Into the Web Interface ........22 Navigating the Web Interface . -
Page 32: Logging Into The Web Interface
Logging Into the Web Interface Logging Into the Web Interface If you need to manage the device, you do it with the features of the Ruckus Wireless Web interface (which you already used to set up the device for use). -
Page 33: Navigating The Web Interface
Navigating the Web Interface Navigating the Web Interface Navigating the Web Interface You manage the Multimedia Wi-Fi Wall Switch through a Web browser-based inter- face that you can access from any computer that is on the same subnet as the Multimedia Wi-Fi Wall Switch. - Page 34 Navigating the Web Interface Navigating the Web Interface Table 11. 7025 Multimedia Wi-Fi Wall Switch Web interface elements Element Description Logout Button Click this button to log out of the Multimedia Wi- Fi Wall Switch. Help Button Click this button to open a help window with information related specifically to the options currently displayed in the workspace.
-
Page 35: Configuring The Multimedia Wi-Fi Wall Switch
Configuring the Multimedia Wi-Fi Wall Switch In This Chapter Configuring Device Settings......... . 26 Configuring Internet Settings . -
Page 36: Configuring Device Settings
Configuring the Multimedia Wi-Fi Wall Switch Configuring Device Settings Configuring Device Settings Device settings refer to the device name and service provider login settings. Figure 16. The Configuration :: Device page To configure the device settings 1. Go to Configuration > Device. The Configuration :: Device page appears. 2. -
Page 37: Configuring Internet Settings
Configuring the Multimedia Wi-Fi Wall Switch Configuring Internet Settings Configuring Internet Settings Internet settings define how the Multimedia Wi-Fi Wall Switch connects to your local area network and to the Internet. This section describes how to view and configure the Multimedia Wi-Fi Wall Switch’s Internet settings. Topics discussed include: Default IP Addressing Behavior ■... - Page 38 Configuring the Multimedia Wi-Fi Wall Switch Configuring Internet Settings Figure 17. The Configuration :: Internet page To assign a static IP address to the AP 1. Go to Configuration > Internet. The Internet page appears. 2. Verify that Connection Type is set to Static IP. 3.
-
Page 39: Changing The Network Connection Type
Configuring the Multimedia Wi-Fi Wall Switch Configuring Internet Settings Changing the Network Connection Type To change the connection type (DHCP or Static IP) 1. Go to Configuration > Internet. The Configuration > Internet page appears. 2. In Connection Type, select DHCP or Static IP. 3. - Page 40 Configuring the Multimedia Wi-Fi Wall Switch Configuring Internet Settings To renew or release the DHCP server-assigned IP address 1. Go to Status > Internet. 2. Review the current settings. 3. If the current Connection Type is DHCP, you will be able to see the currently- assigned IP address and subnet mask listed below.
-
Page 41: Configuring Wireless Settings
Configuring the Multimedia Wi-Fi Wall Switch Configuring Wireless Settings Configuring Wireless Settings This section describes how to configure the wireless settings of the ZF7025 Multimedia Wi-Fi Wall Switch. There are two types of wireless settings that you need to configure: Configuring Common Wireless Settings: Includes the wireless mode, country ■... - Page 42 If you purchased the Multimedia Wi-Fi Wall Switch in the United States, you do not need to set the country code manually. Ruckus Wireless devices that are sold in the US are preconfigured with the correct country code and this setting is non-...
- Page 43 Configuring the Multimedia Wi-Fi Wall Switch Configuring Wireless Settings 3. If you are using AeroScout Tags in your organization to locate assets or personnel, you can use your ZoneFlex AP to relay location or presence data from the AeroScout Tags to the AeroScout Engine via Wi-Fi. To enable the AP to relay AeroScout data, click the Enable option in AeroScout- RFID tag detection.
- Page 44 Configuring the Multimedia Wi-Fi Wall Switch Configuring Wireless Settings Figure 20. The Configuration :: Wireless :: Advanced :: Common page To configure the advanced common options 1. On the Configuration > Wireless page, click Edit Common Settings. The Configuration :: Wireless :: Advanced :: Common page appears.
- Page 45 Configuring the Multimedia Wi-Fi Wall Switch Configuring Wireless Settings 2. Configure the advanced settings listed in Table 13 as required. Table 13. Advanced > Common options Option Description Transmit Power The default setting is Full. Select the level of transmit power from the drop-down menu. This option sets the maximum transmit power level relative to the predefined power (this value differs according to the current country...
-
Page 46: Configuring Wireless # Settings
Configuring the Multimedia Wi-Fi Wall Switch Configuring Wireless Settings Configuring Wireless # Settings The ZF7025 provides up to eight wireless LANs that can be individually configured to provide different kinds of services for different kinds of wireless clients, traffic types or different user groups. - Page 47 Ruckus Wireless strongly recommends using WPA encryption, as WEP has been proven to be easily circumvented.
-
Page 48: Using Wep
WEP encryption has been proven to be easily circumvented. Therefore, CAUTION: Ruckus Wireless recommends using WPA whenever possible, and only use WEP if your client devices do not support WPA. Do not customize these options unless you are an experienced network CAUTION: administrator or are under the guidance of an IT/support professional. - Page 49 Configuring the Multimedia Wi-Fi Wall Switch Configuring Wireless Settings 4. Review the encryption settings listed in Table 15, and then make changes as required. Table 15. WEP settings Encryption Setting Description Authentication Mode Your options include: • Open: No security measure is enforced. •...
- Page 50 Configuring the Multimedia Wi-Fi Wall Switch Configuring Wireless Settings Using WPA Use of WPA-PSK allows automatic key generation based on a single passphrase. WPA- PSK provides very strong security, but may not be supported on older wireless devices. In some cases, the older devices can be upgraded with adapters to take advantage of WPA-PSK.
- Page 51 Configuring the Multimedia Wi-Fi Wall Switch Configuring Wireless Settings 4. Review the encryption settings listed in Table 16, and then make changes as preferred. Table 16. WPA settings Encryption Setting Description WPA Version Your options are WPA, WPA2 or WPA Auto. •...
- Page 52 Configuring the Multimedia Wi-Fi Wall Switch Configuring Wireless Settings Customizing 802.1X Settings Do not customize these options unless you are an experienced network CAUTION: administrator or are under the guidance of an IT/support professional. If you choose WPA as the encryption method, you have the option to set up the Multimedia Wi-Fi Wall Switch to act as an 802.1X proxy, utilizing external authentica- tion sources such as a RADIUS server.
-
Page 53: Setting Threshold Options
Configuring the Multimedia Wi-Fi Wall Switch Setting Threshold Options • RADIUS NAS-ID: Enter the network ID assigned to your RADIUS server. • Authentication Server [-Required-]: Enter the information needed to estab- lish a connection between the Multimedia Wi-Fi Wall Switch and the RADIUS server. - Page 54 Configuring the Multimedia Wi-Fi Wall Switch Setting Threshold Options 4. Review the options listed in Table 17, and then make any needed changes. Table 17. Threhold options Option Description Beacon Interval (The default value is 100.) The value indicates the frequency interval of the beacon in milliseconds.
-
Page 55: Rate Limiting
Configuring the Multimedia Wi-Fi Wall Switch Rate Limiting Figure 25. Threshold settings Rate Limiting Rate Limiting allows you to cap the data transfer rates per client for a specific WLAN. To enable per station rate limits 1. Go to Configuration > Wireless. 2. -
Page 56: Controlling Access To The Wireless Network
Configuring the Multimedia Wi-Fi Wall Switch Controlling Access to the Wireless Network Figure 26. Limit per station traffic rates on a specific WLAN Controlling Access to the Wireless Network Access Control enables you to specify the stations are allowed to join (associate with) your WLAN networks. -
Page 57: Changing The Access Controls For A Wlan
Configuring the Multimedia Wi-Fi Wall Switch Controlling Access to the Wireless Network Denying Only Stations Listed in the Access Controls Table: If you select Deny ■ only stations listed in the Access Controls Table, then stations entered into the access-controls table are disallowed but all others are allowed. To add MAC addresses, see “Changing the Access Controls for a WLAN”... -
Page 58: Removing A Mac Address
Configuring the Multimedia Wi-Fi Wall Switch Configuring LAN Ports • Address: Six text boxes appear in which you enter the desired MAC address, in hexadecimal digit form, two characters in each box. You can specify a full 12-hex-digit MAC address or enter “wildcard” characters for “don't care” digits. - Page 59 Configuring the Multimedia Wi-Fi Wall Switch Configuring LAN Ports Figure 28. The Configuration :: LAN Ports page To configure LAN ports 1. Go to Configuration > LAN Ports. 2. Review the following table and make changes as needed for each of the ports labeled LAN 1 through LAN 4, which correspond to the labels on the outside of the AP.
-
Page 60: Working With Port-Based Vlans
Configuring LAN Ports Working with Port-Based VLANs The ZoneFlex 7025 Multimedia Wi-Fi Wall Switch provides options for segmenting all incoming traffic (both wireless and wired Ethernet traffic) into specific VLANs. There are three ways to segment incoming traffic into VLANs: Each of the eight wireless interfaces (SSIDs) can be configured with a specific VLAN ■... -
Page 61: Managing The Multimedia Wi-Fi Wall Switch
Options......55 Sending a Copy of the Log File to Ruckus Wireless Support . -
Page 62: Viewing Current Wireless Settings
Managing the Multimedia Wi-Fi Wall Switch Viewing Current Wireless Settings Viewing Current Wireless Settings If you want to view the current common wireless settings that the Multimedia Wi-Fi Wall Switch is using, go to the Status > Wireless page. Table 19 lists the descriptions of each common wireless setting. -
Page 63: Changing The Administrative Login Settings
The default user name is super and the default password is sp-admin. To prevent unauthorized users from logging in to the Web interface using these default admin- istrator login settings, Ruckus Wireless recommends that you change the default Web interface password immediately after your first login. - Page 64 Managing the Multimedia Wi-Fi Wall Switch Changing the Administrative Login Settings 3. Under Service Provider Login, change the default administrator login settings. • (Optional) In Username, type a new user name that you will use to log in to the Web interface. The default user name is super. •...
-
Page 65: Configuring Management Access Options
Managing the Multimedia Wi-Fi Wall Switch Configuring Management Access Options Configuring Management Access Options In addition to managing the Multimedia Wi-Fi Wall Switch via a Web browser through HTTP, several other management access options are available on the AP. These options include management access via HTTPS, Telnet, and SSH. - Page 66 Managing the Multimedia Wi-Fi Wall Switch Configuring Management Access Options 2. Review the access options listed in Table 20, and then make changes as needed. Table 20. Management Access Options Option Description Telnet access By default, this option is disabled (inactive). Telnet port This field lists the default Telnet port of 23.
-
Page 67: Enabling Logging And Sending Event Logs To A Syslog Server
Managing the Multimedia Wi-Fi Wall Switch Enabling Logging and Sending Event Logs to a Syslog Server Enabling Logging and Sending Event Logs to a Syslog Server If you have a syslog server on the network, you can configure the Multimedia Wi-Fi Wall Switch to send the device logs to the server. -
Page 68: Sending A Copy Of The Log File To Ruckus Wireless Support
Wi-Fi Wall Switch and can be useful for troubleshooting. You have three options for sending a copy of the current log file to Ruckus Wireless Support: Save a copy to your local PC, then attach it to an email message and send it to ■... -
Page 69: Upgrading The Firmware
Run a one-time manual update right now. ■ By default, the automatic upgrade option is active, and will check the Ruckus Wireless update server every 12 hours. To get started with upgrading the firmware, go to Maintenance > Upgrade. When the Maintenance >... -
Page 70: Upgrading Manually Via The Web
Managing the Multimedia Wi-Fi Wall Switch Upgrading the Firmware 2. Click the host name field, and then type the URL of the server. Or click the IP address field, and then type the IP address of the server. Do not change any of the Image Control File, Username, or Password CAUTION: entries. - Page 71 Managing the Multimedia Wi-Fi Wall Switch Upgrading the Firmware Figure 34. The Auto Upgrade section on the Upgrade page To configure automatic upgrades 1. In the Upgrade Method options, click the button for your preferred upgrade method. NOTE: Automatic Upgrade is only available if you select TFTP, FTP, or Web as the Upgrade Method.
- Page 72 Multimedia Wi-Fi Wall Switch will be rebooted automatically after the new firm- ware is downloaded. The Multimedia Wi-Fi Wall Switch requires a reboot to complete the upgrade process. Ruckus Wireless recommends that you select an offpeak hour so fewer users would be affected by the reboot.
-
Page 73: Rebooting The Multimedia Wi-Fi Wall Switch
Managing the Multimedia Wi-Fi Wall Switch Rebooting the Multimedia Wi-Fi Wall Switch Rebooting the Multimedia Wi-Fi Wall Switch You can use the Web User interface to prompt the Multimedia Wi-Fi Wall Switch to reboot, which simply restarts the Multimedia Wi-Fi Wall Switch without changing any of the current settings. -
Page 74: Resetting To Factory Defaults
WARNING: DO NOT reset the Multimedia Wi-Fi Wall Switch to factory defaults, unless you are directed to do so by Ruckus Wireless support staff or by a network administrator. Do this only if you are able to immediately reconnect the restored Multimedia Wi-Fi Wall Switch to your computer, to reconfigure it for Wi-Fi network use. - Page 75 Managing the Multimedia Wi-Fi Wall Switch Running Diagnostics Figure 36. Pinging ruckuswireless.com Figure 37. Running traceroute on ruckuswireless.com...
-
Page 76: Where To Find More Information
Where to Find More Information Where to Find More Information If you have questions that this User Guide does not address, visit the Ruckus Wireless Support Portal at http://support.ruckuswireless.com/. The Support Portal hosts the latest versions of user documentation. You can also find answers to frequently asked... - Page 77 Index Numerics 802.1X factory defaults , 42 802.1X settings resetting , 42 , 9, 64 firmware upgrade , 59 access control , 46–47 administrative login Help , 53 , 24 advanced wireless settings , 32 AeroScout , 32, 53 installation , 11 Internet settings , 27...
- Page 78 PING wireless security , 64 PoE injector 802.11X , 13 , 42 port-based VLAN , 48, 50 , 38 protection mode , 35 , 40 punch down block wireless settings , 5, 7, 19 , 31 workspace , 23 , 40 WPA-Auto , 41 rebooting...
Need help?
Do you have a question about the ZoneFlex 7025 and is the answer not in the manual?
Questions and answers