Table of Contents
Advertisement
Advertisement
Table of Contents

Related Manuals for Brady BMP 91


Summary of Contents for Brady BMP 91
-
Page 1: User Guide
91 Tubing & Label Printer ® User Guide... -
Page 3: Copyright & Trademarks
© 201 1 Brady Worldwide, Inc. All Rights Reserved replacement of the product shown to Brady’s satisfaction to have been defective at the time Brady sold it. This warranty does not Brady Worldwide Inc. extend to any persons obtaining the product from the buyer. -
Page 4: Technical Support
Technical Support Technical Support Numbers/Online Help For repair or technical assistance, find your regional Brady Tech Support office by going to: • In the Americas: www.bradyid.com • In Europe: www.bradyeurope.com • In Asia: www.bradyid.com/ap Repair and Replacement Parts Brady Corporation offers repair and replacement services. -
Page 6: Table Of Contents
H. Canceling Printing ......35 Brady Warranty ....... i Technical Support . - Page 7 H. Tag Files ....... . 54 J. If you see this message… ..... 91 I.
- Page 8 English...
-
Page 9: Before You Begin
Background printing while you continue editting • Printing on high-quality Brady labels A. Introduction ......page 1 B. -
Page 10: Do's & Don'ts
C. Do’s & Don’ts • Keep small children away from the consumables. • Turn off the power switch before unplugging or plugging. To ensure safe operation of your BMP 91 printer, please observe ® • Hold the plug (not the cord) and push it firmly into the outlet. the following safety precautions. - Page 11 DON’T • Clean the printer with paint thinner or use inflammable sprays near the printer. The thinner or spray could come into contact • Handle the power cord or the with the internal components of the printer and cause a fire or plug with wet hands.
- Page 12 DON’T • Touch the ink ribbon. This could stain your hands or • Touch the print head result in poor printing. while it is printing or immediately after printing. This could cause a burn. • Re-use ribbons or label tape. This could damage the printer. •...
- Page 13 DON’T • Attempt to pull a stuck tube out. This could result in poor printing quality or other malfunctions. You can remove the tube easily by pressing the [Remove] quick key on the printer. Frame Maintain Char Space Symbol Remove Font Size Backspace •...
-
Page 14: In This Package
** The BMP 91 printer can also be powered by a Lithium-Ion 12V battery pack. However, since this is optional, a battery is not ® included in this package. You can buy one from a Brady dealer. 6 1. Before You Begin... -
Page 15: Travelling With Your Bmp®91 Printer
• Place the printer and all its accessories in the original 20 mm segments packaging material. You can also put them in a Brady hard- sided carrying case (optional) which has compartments for • Time taken to deplete battery with continuous printing = ribbon/label/heat-shrink cartridges, power adapter, CD-ROM, Appox. -
Page 16: External Components Of The Printer
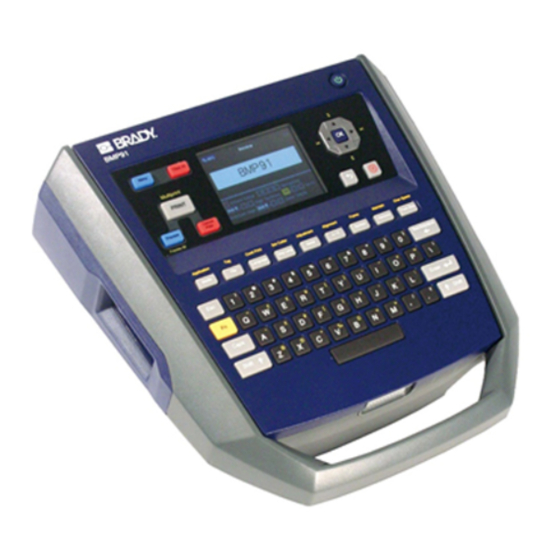
G. External components of the printer Environmental Specifications: Operating Environment Storage Environment The external components of the BMP 91 printer include: ® Printer Temperature: 15–35°C -30–60°C (-22–140°F) (59–95°F) • a sturdy handle (see below) for secure handling of the device; Relative Humidity (RH): Up to 90% non-condensing 20–85% non-condensing... - Page 17 on the BMP 91 printer. special keys ® Multiprint (<Fn> + <PRINT> keys): <Menu> key: Display the Advanced Print menu <Power> key: Power on or off the <Clear All> key: Clear all Access all the where you can select a range of tags printer.
- Page 18 keyboard on the BMP 91 printer. QWERTY ® <Esc> key: Cancel the current changes and <Backspace> key: Delete the return to last Menu (same as <Return>); or character on the left to the cursor in Close the Message Windows (same as the Editor.
- Page 19 on the BMP 91 printer. quick keys function keys ® Alignment (<Fn> Maintain (<Fn> + Tag (<Fn> + <File> <Fn> + <1>: Set Cutter (<Fn> + <Seg keys): Set <Remove> keys): Set the keys): Edit tag Leng> keys): Change Create a 1-line tag. printer to Maintenance the alignment type properties and...
- Page 20 System and Media information on the LCD screen AC Power icon: Printer is on AC power only. Battery level: Indicates how much power USB icon: USB device is left (also shown when printer is on both AC connected to the printer. power and battery).
- Page 21 Tag Editor information on the LCD screen Actual tag text: This is the only text that will be printed on the medium (tube or label). All the other details on the LCD screen are for information only. Half/Full-cut icon: E.g. this tag is set to “Half-cut”...
- Page 22 Tag Property information on the LCD screen CAPS: Auto-sized tag icon: Text spacing: Spacing Preview Zoom Ratio: Caps-lock Segment length will be between characters. 100 percent in this tag. is on here. set automatically. Font Size: Either Character scaling: The Language: fixed text (here) characters in this tag will...
-
Page 23: Internal Components Of The Printer
H. Internal components of the printer The BMP 91 printer has two media inlets for you to feed a tube ® into the printer from the outside (i.e. externally): Below the printer handle, locate and pull the cover latch. a. a large rectangular hole for tubes b. - Page 24 The latches, rollers, cutter, printhead, and cartridge holding areas inside the printer. Cover latch: Pull this to Feed roller: This roller open the printer cover. helps to move the tube/label forward or Wrap Roller latch: Pull backwards, this to move the Wrap depending on the roller away from the function triggered in...
-
Page 25: Setting Up Your Printer
The BMP 91 printer uses only Brady ribbon cartridges. A. Introduction ......page 17 You can load/unload the cartridge with the power on or B. -
Page 26: Powering The Printer With An Ac Supply
Press the [Power] key. spool of the ribbon counterclockwise. The printer starts up. The Brady logo appears and the last tag editing job gets loaded on the LCD screen. To turn off the printer, press the [Power] key and then [OK] key. -
Page 27: Powering The Printer With A Battery
A recharging operation under non-conforming conditions • Use only Brady Lithium-Ion 12V battery packs. (beyond the limits of temperature and larger voltage/current than specified) can cause the battery pack to be overcharged, CAUTION: Risk of Explosion if the battery is replaced or charged with extremely high current, abnormal chemical by an incorrect type. - Page 28 To load the battery in the printer: injury. Holding the printer securely by the handle, turn the printer • Dispose of Brady Lithium Ion batteries according to federal, over. state and local regulations. Contact a recycling agency in your area for recycle locations.
- Page 29 The printer starts up. The If you cannot easily connect the battery pack terminals Brady logo appears and to the printer’s battery compartment terminals, double- the last tag editing job check that the plus (+) and minus (-) terminal marks on gets loaded on the LCD the two are correctly oriented.
-
Page 30: Using The Printer With A Computer
E. Using the printer with a Computer Insert the smaller, squarish end of the USB cable into the printer’s socket as shown here. Plug the other end (with a rectangular connector) of the USB cable into a USB port on a personal computer (PC). -
Page 31: Printing On Selected Media
For a new printer, the default media type is “Tube”. 3. Printing on Selected Media A. Introduction ......page 23 B. - Page 32 3. Insert the tube into the printer A list of different tube diameters appears on the screen. Diameter refers to the inner diameter of the tube Please Select Tube 0.75mm /Tɸ2.5mm 01.0mm /Tɸ2.8mm 1.5mm /Tɸ3.2mm 2.5mm /Tɸ3.6mm The printer will not print properly on a tube that is 4.0mm /Tɸ4.2mm bumpy, dirty, or of uneven thickness.
- Page 33 a. From the printer’s right side, insert the tube into the larger If auto-loading fails, an error message will appear on screen. media inlet (see the next figure). Keep pushing the tube in To load the tube manually: until you cannot push it any further. i) Open the printer and remove any installed media cartridge.
-
Page 34: Printing With A Heat-Shrink Roll
C. Printing with a Heat-Shrink Roll A list of heat-shrink tube diameters appears on the screen. 1. Select “Heat-shrink Roll” on the printer. Please Select Heat Shrink Roll a. On the printer, press the [Media] quick key and then HS ɸ3.0mm Media press [OK]. - Page 35 ® The BMP 91 printer is optimised for Brady heat- When using a heat-shrink tube roll, minimise the shrink tubes. If third-party heat shrink tubes are tension in the tube so that printing performance is used, the printer might not print properly.
-
Page 36: Printing With A Heat-Shrink Cartridge
D. Printing with a Heat-shrink Cartridge b. Using the printer’s navigation keys , select “Heat-shrink Cartridge” and press [OK]. 1. Select “Heat-shrink Cartridge” on the printer. A list of heat-shrink tube diameters appears on the screen. a. On the printer, press the [Media] quick key and then Please Select Heat Shrink Cartridge Media... - Page 37 b. To see how the entered text/symbols look like when c. Holding the cartridge with its label facing up, insert it into the cartridge holding area (see the next illustration) and printed, press [Preview]. Preview press it down lightly. 3. Insert the cartridge into the printer. The cartridge should fit in snugly.
-
Page 38: Printing With A Label Cartridge
E. Printing with a Label Cartridge c. Using the printer’s vertical navigation keys select your label width on the screen and then press 1. Select “Label” on the printer. [OK]. a. Press the [Media] quick key and then press [OK]. d. - Page 39 3. Insert the cartridge into the printer properly. The cartridge should fit in snugly. If it doesn’t, pull the media channel latch downwards to enable the a. Ensure that a small cartridge to move into place. (The latch is portion (about 3 mm) between the media cartridge and the ribbon of the label is cartridge.)
-
Page 40: Changing The Media Type And Its Application
F. Changing the Media Type and Its Application If “Tube” (or “Heat-shrink Roll” or “Heat-shrink Cartridge”) was entered, only two application types — “General”, “Vertical” — appear on the medium’s Application screen. To change the Application only, press [Fn] + Media [Media]. - Page 41 If “Patch Panel” is entered: Select an application type and press [OK]. No. of Ports a. Confirm or change the If “General” or “Vertical” is entered: number in the “No. of No. of Ports a. To let the printer set the segment length, select “Auto- Ports”...
-
Page 42: Previewing Before Printing
G. Previewing before printing If “Terminal Block” is Set No. of Blocks entered: Press [Preview]. a. Confirm or change the No. of Blocks Preview Four preview options (“Current Tag”, “All Tags”, “Specific number in the the “No. Tags”, and “Zoom”) appear on the LCD screen. of Blocks”... -
Page 43: Canceling Printing
If “All Tags” is entered, the Preview screen will also appear. If “Zoom” is entered, the Please Select Zoom Level “Please select Zoom Level” Preview screen will appear. 100% a. Select the desired Line 1 characters 1234567890 Line 2 characters 1234567890 125% zoom level and press 150%... -
Page 44: Entering And Editing Text/Symbols
medium may be different from the last medium and even if the last 4. Entering and Editing Text/Symbols job was a blank one (with a blank tag), the printer will still load it. Therefore, the instructions in this chapter are written with the A. - Page 45 You can create as many tags as you want. You can also import Example 5: Turn a tag (usually single-line) into a multi-line one. and insert your own graphics into a tag. You can format the text or change the properties of a tag too. Line 1 characters 1234567890 Line 2 characters 1234567890 Example 1: Make some part of the text bold, italics or underlined,...
-
Page 46: General Navigation Tips
C. General Navigation Tips To return directly to the Tag Editor: • Press [Close]. To move the cursor on the LCD screen horizontally (e.g. across the characters in a tag or the items in a context menu): To view how the tag (when printed) will look like: •... - Page 47 To go to a specific tag (if you know the tag number): Enter [Fn] + [File] > Tag Edit > Edit > “Insert”. File An empty tag is inserted after the current tag. Enter [Fn] + [File] > Tag Edit > “Go To”. File In the “Tag Number”...
-
Page 48: Changing The Menu/Input Language
To delete all tags: Alternatively: Press the [Language] quick key. Enter [Fn] + [File] > Tag Edit > Edit > “Delete”. Language File The Language icon on the LCD screen changes. Select “All Tags” and press [OK]. Toggle to select your preferred language (“EN”, “ 中文 ”, “ 中 A warning message appears, asking for your confirmation to half-moon”... -
Page 49: Formatting The Font In A Tag
To add a barcode, see section “I. To Add a Barcode to a Tag”. or 28pts) and press [OK]. To add other symbols, see section “J. To Add Other Symbols Press [Close] to return to the Tag Editor. to a Tag”. To delete text/symbols, see section “K. -
Page 50: Adding Serialization To A Tag
H. Adding Serialization to a Tag Enter [Menu] > Font > “Scale”. Menu In the Scale list, select the desired zoom factor (e.g. 50%, To open the Serialization menu: 75%, 125% or 150%) and press [OK]. Enter [Menu] > “Quick Keys” > “Serialization”. Menu Press [Close] to return to the Tag Editor. -
Page 51: Adding A Barcode To A Tag
I. Adding a Barcode to a Tag If the “A–Z” option is entered, set the “Start” alphabet (default is A), the “End” alphabet (default is B) and the “Increment By” number (default is 1) and then press [OK]. Barcodes can be added to 9 mm and 12 mm labels only (and not on any tubes) on the printer. -
Page 52: Adding Other Symbols To A Tag
J. Adding Other Symbols to a Tag To add a special symbol: Press the [Symbol] quick key. Symbol To add a commonly used symbol: The Symbol menu appears. • Press [Fn] and the respective key on the QWERTY In the Symbol menu, press the horizontal navigation keys to keyboard. -
Page 53: Changing The Properties Of Tags
WHEN there are no more characters to delete in a tag To change the content alignment of a tag: AND the cursor is on the top left position in the first line, Enter [Fn] + [File] > Properties > “Alignment”. pressing [Backspace] will quickly delete this tag (if it File... - Page 54 To change the number of printed copies of a tag: Select an option (“Vertical”, “Horizontal” or “Hor Rotated”) and press [OK]. Enter [Fn] + [File] > Properties > “Continuous Print”. File Press [Close] to return to the Tag Editor. Enter the number of copies preferred and press [OK].
- Page 55 To apply the properties of the current tag to ALL or multiple tags: Enter [Fn] + [File] > “Apply Current Tag Settings”. File The Apply Current Tag Settings submenu appears. Select “All Tags” or “Set Range” (and enter the range of selected tags) AND press [OK].
-
Page 56: Advanced Functions
Manage tag files and user graphics files • 5. Advanced Functions Perform printer maintenance and firmware upgrades • A. Introduction ......page 48 Perform other useful functions •... -
Page 57: Multiprint Vs. Continuous Print
C. Multiprint vs. Continuous Print To open the Multiprint menu: Enter [Menu] > Quick Keys > “Multiprint”. Menu A print job is a tag or set of tags that has been submitted to be printed. For detailed explanation on what a tag is, Shortcut: Press the [Fn] + [PRINT] quick keys. -
Page 58: Print Job Settings
To print multiple copies of the current tag via Continuous Print In the Number of Copies box, enter your preferred number (Contiprint): and press [OK]. Enter [Menu] > Quick Keys > Tag> Properties > Press [Close] and then [PRINT]. Menu PRINT Continuous Print. - Page 59 If the printout is offset from the nominal position, you can adjust Using the [Up] or [Down] keys, adjust the vertical the lead (for insufficient leading space on the left) or the vertical spacing and press [OK]. spacing (for uneven vertical spacing) through the Tag menu. vertical spacing To adjust segment length for the current tag: Port 1...
-
Page 60: Cutter Settings
To improve readability, you To open the Cutter menu: Line 1 can add a horiztonal line in Line 2 Enter [Menu] > Settings > “Cutter”. • the center of a tag. Menu Shortcut: Press the [Fn] + [Seg Length] quick keys. To add a centerline for the current tag: Seg Leng Enter... -
Page 61: Barcode Settings
F. Barcode Settings Select “Solid” or ”Dotted” segment length (or “None”) and press [OK]. You can add numbers, text, symbols, barcodes and even Port 1 Port 2 serialization on a tag. You can also change the size, spacing, Note: This option is alignment and even orientation of the text. -
Page 62: Serialization
If barcodes on two-line tags are required, the “HR” option Shortcut: Press the [Serial] quick key instead of going Serial must be off. If HR barcodes are required, the tags can through the [Menu] key. only have one line. Menu H. -
Page 63: User Graphics
To name a file, you must use valid characters and at most Select the file from a list (if any) and press [OK]. 10 characters in length. These include numeric digits (e.g. “0”, “1”, “2”, “3”), lower or uppercase letters (e.g. “a”, To open a CSV file: “b”, “c”, “A”, “B”, “C”), underscore (“_”) and hyphen (“-”). -
Page 64: Usb Flash Drive Connection
User graphics must be in black and white AND in BMP, To exit from the USB Drive connection mode to the Tag JPEG, or PNG format (i.e. with bmp, jpg, or png file editor, press [Close]. extensions). They must not exceed 10 Kbytes in file size and 1 10x1 10 dots in picture size. -
Page 65: Other Userful Functions
L. Other Userful Functions Your BMP® 91 comes with TubingMark software to let you create print jobs on a PC. Insert the CD-ROM into your To enter a Chinese word (e.g.“ 标签 ”which means “label”): computer’s CD drive. TubingMark Ensure that the input mode is “Chinese”. The installation wizard starts If it is not, press the [Language] quick key and toggle... - Page 66 Enter [Menu] > Menu System Information System > “System Return to last menu Information”. Return to Editor Manufacturer: Brady Corporation The System Information Adjust the Brightness Level Printer Model: BMP91 Confirm Change Firmware Version: Ver Alpha 3.02 screen appears, giving ME Table Version: Ver1.0...
-
Page 67: Lists Of Shortcut Keys
The printer emits different types of sounds for different types of To restore the printer to initial (factory) settings: problems/issues. If necessary, you can turn off (or on) the sound. Enter [Menu] > Settings > Factory Settings. Menu A warning message appears, “Current settings will be To turn off (or on) the sound: cleared.”... -
Page 68: Lists Of Menu Options
[OK] To confirm a selected item/ [Remove] Media removal action. [Fn] + [Remove] Maintenance (Menu > Quick Keys) [Menu Return] To return to previous menu/ [Font Size] Font Size (Menu > Font) screen [Fn] + [Font Size] Character Spacing (Menu > Font) [Close] To close and return to the Tag Editor... - Page 69 For example: When you press When the [Menu] key is pressed, a set of menus (“Level 1 Menu Feed [Menu] and then select menus”) appears: Menu Forward “Feed”, the following set of Level “Remove USB Drive” option (also accessible via [Fn] + [9]) Reverse 2 options (not menus) appears.
- Page 70 1. Settings menu MENUS (Level 2) MENUS (Level 3) / “Options” MENUS (Level 4) / “Options” / Notes Menu Remove USB drive Settings LCD BRIGHTNESS “0” – “5” (Dark to Bright) – Font Barcode PRINT DENSITY “1” – “6“ Level of darkness. Feed Insert Date/Time UNITS...
- Page 71 2. Font menu MENUS (Level 2) MENUS (Level 3) / “Options” “Options” Menu Remove USB drive Settings SIZE “Auto-sized” or Fixed-size (from “4 pts” – “28pts”) – Font Barcode STYLE BOLD “On”/”Off” Feed ITALIC “On”/”Off” Insert Date/Time UNDERLINE “On”/”Off” User Data System EFFECTS “None”, “Superscript”...
- Page 72 4. Feed menu Menu Remove USB drive “Options” Notes Settings “Forward” To confirm moving a medium forward, press [OK]. Font Barcode “Reverse” To confirm moving a medium backward, press [OK]. Feed “Forward & Cut” To confirm moving a medium forward and cut it, press [OK].
- Page 73 1. Check the USB Flash Drive. Font USB drive” Barcode 2. In the root directory, look for the Brady.tar.gz file. Feed “PC connection” Check the USB connection to PC and go into FW upgrading mode. Wait for file Insert Date/Time transfer from ByTES PC Tubing Editing software.
- Page 74 8. Quick Keys menu Menu Remove USB drive MENUS (Level 2) MENUS (Level 3) /“Options” “Options” / Notes Settings MULTI PRINT “Current Tag” — Font Barcode “All Tags” — Feed SPECIFIC TAGS submenu Enter numbers into the text boxes for “Start Tag” Insert Date/Time (default “1”), “End Tag”...
- Page 75 MENUS (Level 2) MENUS (Level 3) /“Options” “Options” / Notes PREVIEW “Current Tag” “All Tags” SPECIFIC TAGS submenu Start Tag (default “0”), End Tag, Increment By (“1”) ZOOM submenu “50%” – “200%” SERIALIZATION 0-999 submenu Start (default “0”), End (“0”), Increment by (“1”) a-z submenu Start (default “a”), End (“z”), Increment by (“1”) A-Z submenu...
- Page 76 MENUS (Level 2) MENUS (Level 3) /“Options” MENUS (Level 4) / “Options” / Notes EDIT submenu “Go To” (enter Tag number in text box) “Copy” “Cut” “Paste” (before or after current tag) “Insert” DELETE (“Current Tag”, “All Tags”, or SET RANGE) PROPERTIES submenu SET MULTI-LINE: “1”/”2”/”3 lines”;...
-
Page 77: Lists Of Printable Symbols
O. Lists of printable Symbols ® The types of symbols supported by the BMP 91 printer include: Latin 1 symbols Japanesesymbols Latin 2 symbols Currencysymbols Greek symbols BPMF symbols Cyrillic symbols Unitssymbols General symbols Specialsymbols Number symbols Electric symbols Blocks symbols If the symbol you want is not in these lists, you can import and insert your own symbols using the “User Graphics”... - Page 78 1. Latin 1 symbols " Scroll Lock Shift + 6 0002 0003 0017 001A 001B 001C 001D 001E " & Shift + - Space Shift + 1 Shift + ' Shift + 3 Shift + 4 Shift + 5 Shift + 7 001F 0020 0021...
- Page 79 2. Latin 2 symbols 3. Greek symbols Ε ¤ § ¨ ¤ § ¨ ° ± Α Β Γ Δ Ζ Η Θ 009E 00A1 00A2 00A4 00A7 00A8 00AA 00AB 0391 0392 0393 0394 0395 0396 0397 0398 ° ±...
- Page 80 4. Cyrillic symbols 5. General symbols ‐ Ё А Б В Г Д Е Ж 0401 0410 0411 0412 0413 0414 0415 0416 2010 З И Й К Л М Н О 0417 0418 0419 041A 041B 041C 041D 041E 2013 2014 2015...
- Page 81 6. Number symbols 7. Blocks symbols 2460 2461 2462 2463 2464 2465 2466 2571 2572 2573 2581 2582 2583 2584 2585 2467 2468 2469 2474 2475 2476 2477 2478 2586 2587 2588 2589 258A 258B 258C 258D 258E 258F 2593 2594 2595 25A0...
- Page 82 8. Japanese symbols English 74 5. Advanced Functions...
- Page 83 9. Currency symbols 12. Special symbols € ¢ £ ¥ Scroll Lock 0002 0003 0007 0017 001A 001B 001C 001D Shift + 4 0024 20AC FFE0 FFE1 FFE5 Shift + 6 Space Shift + 1 Shift + ‘ Shift + 3 Shift + 5 Shift + 7 ’...
- Page 84 13. Electric symbols F12B F12C F12D F12E F12F F130 F131 F132 F133 F134 F135 F136 F137 F138 F139 F13A F13B F13C F13D F13E F13F F140 F141 F142 F143 F144 F145 F146 F147 F148 F149 F14A F14B F14C F14D F14E F14F F150 F151 F152...
-
Page 85: Maintaining Your Printer
B. Cleaning the Printer 6. Maintaining Your Printer If the printer is still on, press [Power] to switch it off. A. Introduction ......page 77 Dampen a cloth with water and wring out throughly. -
Page 86: Cleaning The Rollers
C. Cleaning the Rollers resuming operation. In particular, the platen roller should be removed for more thorough cleaning. For detailed instructions, refer to “E. If the printer is still on, press [Power] to switch it off. Replacing the Platen & Wrap rollers”. Pull the cover latch and open the printer cover. -
Page 87: Replacing The Platen & Wrap Rollers
E. Replacing the Platen & Wrap rollers To clean the adhesive build-up in the printer: If the printer is still on, press [Power] to switch it off. Your platen roller will wear out faster if you use the printer Pull the cover latch and open the printer cover. to print on tubes. - Page 88 With the other hand, Insert the new platen press and hold onto the roller, pushing it down the snap of the old platen spindle until you can hear roller. and feel it snap into place. Repeat steps 1-4 above to remove the old wrap roller and to Pull the platen roller up insert the new wrap roller.
-
Page 89: Replacing The Cutter
F. Replacing the Cutter Pull out the cutter. When the cutter is blunt, you need to replace it. For details on how to obtain a replacement cutter, contact your nearest dealer. Follow the instructions here closely and dispose of the old cutter immediately. -
Page 90: Replacing The Ribbon Cartridge
G. Replacing the Ribbon Cartridge Grasping the finger tab of the old ribbon cartridge, pull the cartridge up, as shown in the diagram below. Pull the cover latch and open the printer cover. Grasping the finger tab of the new ribbon cartridge, insert the cartridge with its label facing up, as shown in the diagram Within the printer, near the bottom right hand corner, you above. -
Page 91: Replacing The Heat-Shrink Or Label Cartridge
H. Replacing the Heat-shrink or Label Cartridge cartridge to move into place. (The latch is between the media cartridge and the ribbon cartridge.) Press the [Remove] quick key. Remove Pull the cover latch and open the printer cover. Frame Maintain Char Space Symbol Remove... -
Page 92: Troubleshooting
B. If the externally fed tube is not autoloaded… 7. Troubleshooting You do not need to power off the printer. But if the printer A. Introduction ......page 84 was off before the tube was inserted, switch on the B. -
Page 93: If The Loaded Tube/Label Cannot Be Removed
go through smoothly. Close the cover and you can continue with the editing or printing. Be careful not to scratch the printhead. C. If the loaded tube/label cannot be removed... Do NOT pull the tube/label to remove it. If a jam happens, refer to the next section “D. If the tube/label is jammed...”... -
Page 94: If The Tube/Label Is Jammed
[Maintain] to force them to message was displayed and as a result cannot clear the Maintain Home positions. If they still do not home, contact the Brady jam according to the messages, switch on the printer Tech Support. again by pressing [Power]. - Page 95 Clear the media jam. Prepare to print again. a. Pull the wrap roller latch a. If the printer ribbon is downwards (to move slack, use your finger to the wrap roller away turn the reel in the from the platen roller) direction indicated on and while holding it the cartridge to take up...
-
Page 96: If The Printer Ribbon Is Jammed
E. If the printer ribbon is jammed… Once removed, if the ribbon is slack, use your finger to turn the reel in the If the ribbon winds itself around some parts inside the printer and direction indicated on the causes a jam, make sure that the printhead and cutter are at the cartridge to take up the Home positions. -
Page 97: If The Half-Cuts Are Not Deep Enough
“E. To replace the cutter” section in the chapter, Press [OK]. “6. Maintaining Your Printer”. If the input display still does not appear, contact Brady If the cutter still does not cut properly with a new blade at the Technical Support. lowest cut depth, contact Brady Technical Support. -
Page 98: If The Printer Does Not Print (Properly Or Not At All)
I. If the printer does not print (properly or not at all)... Make sure character data has been input. (If no character data has been input, printing cannot start.) Confirm the size of the tube/label loaded in the printer and then select the same size on-screen. -
Page 99: If You See This Message
J. If you see this message… The messages in this section are displayed in alphabetical order. Message Description Action Barcode is not supported by The medium may not be suitable for barcode Use only: current tag settings. printing. Labels, and •... - Page 100 Message Description Action External media loading failed. External media was not autoloaded. Manually load the tube/label. For instructions, refer Remove media and try again. to the ”If the externally fed tube is not autoloaded...” section in “7. Troubleshooting”. File name cannot be blank. An attempt to name a file with invalid Use only valid characters, such as numeric digits characters.
- Page 101 An attempt to eject the media even though Continue with printer operations. If message appears there is no media in the printer. again, contact Brady Technical Support. 20 No more ribbon. Change The end of the ribbon is detected while Replace the empty ribbon cartridge with a new one.
- Page 102 “H. To Add Serialization to a Tag” section in “5. Advanced Functions”. 24 [MEF001] Power off printer. Error MEF001 is detected. Contact Brady Technical Support. Contact Brady for Tech Support. 25 Printer cover is open.
- Page 103 30 Unknown Error. [MEF100] Some type of error occurred while printing was Restart the printer. If the same message appears in progress. again, contact Brady Technical Support. Power off and on and try again. Required upgrade file not An attempt to locate the upgrading file is Confirm file folder.
Need help?
Do you have a question about the BMP 91 and is the answer not in the manual?
Questions and answers