Brady BMP 61 User Manual
Hide thumbs
Also See for BMP 61:
- User manual (123 pages) ,
- Quick start manual (56 pages) ,
- How-to manual (4 pages)
Table of Contents
Advertisement
Quick Links
Advertisement
Table of Contents
Troubleshooting

Related Manuals for Brady BMP 61


Summary of Contents for Brady BMP 61
- Page 1 ® 61 Label Printer USER’S MANUAL...
- Page 3 61 Label Printer is a trademark of BRADY Worldwide, Inc. Microsoft and Windows are registered trademark of Microsoft Corporation. BRADY reserves the right to make changes without further notice to any product or system described herein to improve reliability, function, or design.
- Page 4 UNITED STATES Note Note This equipment has been tested and found to comply with the limits for a Class A digital device, pursuant to part 15 of the FCC Rules. These limits are designed to provide reasonable protection against harmful interference when the equipment is operated in a commercial environment.
- Page 5 EUROPE WARNING WARNING WARNING This is a Class A product. In a domestic environment, this product may cause radio interference in which case the user may be required to take adequate measures. Waste Electrical and Electronic Equipment Directive In accordance with the European WEEE Directive, this device needs to be recycled in accordance with local regulations.
- Page 6 Batteries Directive 2006/66/EC This product contains a lithium coin cell battery. The crossed-out wheeled bin shown to the left is used to indicate 'separate collection' for all batteries and accumulators in accordance with European Directive 2006/66/EC. Users of batteries must not dispose of batteries as unsorted municipal waste.
- Page 7 BRADY’s satisfaction to have been defective at the time BRADY sold it. This warranty does not extend to any persons obtaining the product from the buyer.
-
Page 8: Technical Support
Technical Support Technical Support Numbers/On-line Help For repair or technical assistance, find your regional Brady Tech Support office in the following list. • United States: 1-800-643-8766 or via the web at www.bradyid.com/techsuppor • Australia: 1-800 644 834 or via the web at www.bradyid.com.au/en-au/supportlanding... -
Page 9: Table Of Contents
External View ....................1-6 Power Source ....................1-7 Loading the BMP41-BATT NiMH Battery Pack ..........1-8 AC Power Adapter ................... 1-9 Brady AC Adapters ..................1-9 Attaching the Adapter ................. 1-9 Quick Charger ....................1-10 Connecting ....................1-11 Connecting to a PC .................. 1-11 Download Print Drivers .............. - Page 10 Dialog Boxes ....................1-38 Drop Down Field Lists ................1-39 Data Fields ....................1-40 Spinner Boxes ..................1-41 Radio Buttons and Option Boxes ............. 1-42 Accept Dialog Box Edits ................1-43 Cancel a Menu or Dialog Box ..............1-43 Setup ......................1-44 Pause/Cut ....................
- Page 11 Labels and Areas ..................3-13 Add Label or Area ..................3-15 Label Length .................... 3-16 Go To Label or Area ................. 3-17 Shortcut Using Keys ................. 3- 17 Shortcut Using Touch Screen ............3- 18 Delete Label or Area ................3-19 Justification ....................
- Page 12 5 - Printing Labels Print ........................5-1 Print Preview ....................5-2 Scrolling in Print Preview ..............5- 3 Multiple Print ....................5-4 Collate ....................5- 4 Separator .................... 5- 5 Mirrored Print ....................5-6 Print History ..................... 5-7 6 - Label Types Label Types ......................
-
Page 13: Introduction
• Targeted applications to simplify the creation of specific label types • Battery operation - printing 1000 or more standard Brady labels with a fully charged Brady battery pack. • Ability to use the printer while the BMP41-BATT NiMH battery pack is charging •... -
Page 14: Unpack Your Printer
One PTL-19-423 general purpose white polyester media (1" x 25.4 mm x 25.4 mm) • Product CD with user’s manual and Quick Start guide in various languages • Brady Printer Drivers CD • Printed Quick Start Guide • Strap (BMP-Strap-1) Accessories The following items are accessories available for the BMP ®... -
Page 15: Save Your Packaging
Unpack Your Printer Save Your Packaging ® The packaging surrounding your BMP 61 printer should be saved in the event you have to ship the printer and accessories back to the supplier. Do NOT remove the BMP41-BATT NiMH battery pack from the printer ®... -
Page 16: Bmp ® 61 System Specifications
® 61 System Specifications ® 61 System Specifications ® The BMP 61 printer has the following specifications: • Weight 3.55 lbs (1.6 kg) (with battery pack and materials) • Thermal Transfer Print Mechanism 300 dpi • Optical Registration System for Precise Print Registration •... -
Page 17: Firmware Upgrades
61 firmware can be downloaded from Brady’s website. Access www.bradyid.com/BMP61, click Support>Downloads, then select ® 61 from the list of products or the Brady local site. "Config” on page 1-45 for information on how to locate the current firmware version on your printer. -
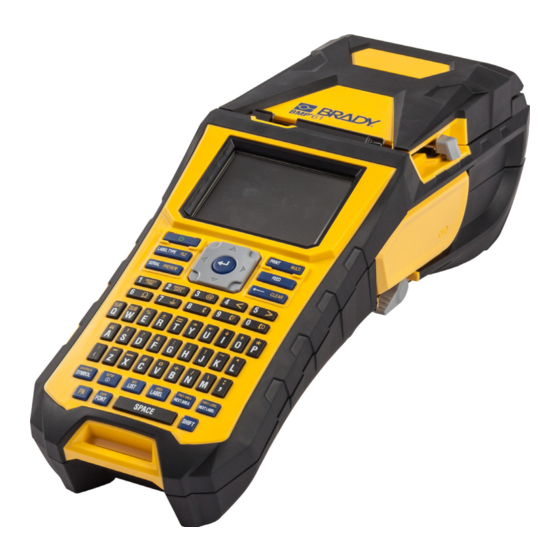
Page 18: External View
External View External View Cover (media well) Printhead lock lever Cover release latch Strap upper attachment loop AC adaptor port Tripod attachment screw hole USB port (computer connection) Battery door latch USB host port (flash drive) Battery door (battery well) Strap lower attachment loop Magnet attachment screw holes Cutter lever... -
Page 19: Power Source
Power Source Power Source ® Power is supplied to the BMP 61 printer from a BMP41-BATT NiMH battery pack, or from an AC power adapter. Do not expose batteries to temperatures above 60 C (140 Do not disassemble or mistreat the battery pack. Do not attempt to replace components in the battery pack. -
Page 20: Loading The Bmp41-Batt Nimh Battery Pack
Loading the BMP41-BATT NiMH Battery Pack Loading the BMP41-BATT NiMH Battery Pack 1. On the backside of the 2. With the battery label 3. Re-insert the battery printer, push down on facing outward, insert door tabs at the base of the door release latch the battery pegs into the the compartment and... -
Page 21: Ac Power Adapter
The printer can be powered through an AC/DC power adapter. When the adapter is plugged in, it is also charging the BMP41-BATT NiMH battery (if installed). Use only the 18 VDC, Brady AC/DC adapters, shown below, for ® supplying power to the BMP... -
Page 22: Quick Charger
Quick Charger Quick Charger The battery quick charger is an accessory that can be purchased through your BMP61 distributor. While the battery is charged from inside the printer when the AC adapter is attached, there may be times when you want to have another battery fully charged and ready to use when the AC adapter is not available. -
Page 23: Connecting
BMP 61 printer. Connecting to a PC ® In order to send data from a Brady PC labeling program to the BMP 61 printer, ® you must install the BMP 61 printer driver. The printer drivers can be found on the ®... -
Page 24: Pause/Cut Preference
Connecting Pause/Cut Preference After the printer driver is installed, access the printer and set the Pause/Cut preference. 1. In Windows XP, click Start, then choose Settings>Printers and Faxes. In Windows 7, click Start, then choose Devices & Printers. In Windows 8, using the Search feature in the Charms bar, search for Devices and Printers. -
Page 25: Wireless Driver Installation
The Brady Network Card, USB, and Wireless drivers, along with the driver installation instructions, can be found on the Brady Printer Drivers CD. 1. Insert the Brady Printer Drivers CD into the CD drive of your computer. 2. Follow the prompts on the screen for installation of a particular driver. -
Page 26: Ribbon
Ribbon Ribbon Product numbers for ribbons for the BMP61 printer begin with M61. Example: M61-R4310. Remove Ribbon 1. Flip the printhead lock lever 2. Grasp the ribbon and gently slide out of backward (to the right) to disengage printer. the printhead. ®... -
Page 27: Load Ribbon
Ribbon Load Ribbon Note: Load the ribbon BEFORE loading media (labels). Loading the ribbon after loading the media can cause damage to the ribbon. 1. Before inserting, remove any ribbon slack by rotating the take-up spool end clockwise. 2. Carefully slide the ribbon cartridge into the printer until it seats firmly against the metal frame, then flip the printhead lock lever forward (to the left) to re-engage the printhead. -
Page 28: Media
Media Media Brady labels come equipped with smart-cell technology that enables the printer to recognize the type of label and automatically sets many label formatting details. For optimum performance, it is recommended that you use genuine Brady BMP61 labels. Labels can be loaded with the power on or off. - Page 29 Media 3. If using anything but a 2-inch width 4. Feed the leading edge of the media roll media, slide the media guide to the left through the guide slots until it stops. until it fits snugly up against the media roll and clicks into place.
-
Page 30: Unload Media
Media Unload Media 1. To open the printer cover, put your thumb 2. Flip the printhead lock lever backward (to under the finger tab and push up. the right) to disengage the printhead. 3. If label spool is not empty, gently rewind 4. -
Page 31: Loading Bulk Media
Media Loading Bulk Media 1. Remove the BMP61 label spool and the 2. On the bulk media box, push Tab A and label feed ramp from the box. C in, then pull the perforated flap down and tear off. 3. Attach the label feed ramp to the 4. -
Page 32: B-593 Raised Panel Labels
Media 5. Insert the BMP61 label spool (smart 6. Pull the loose end of the bulk media out cell facing left) into the printer. Adjust of the box punch-out and thread over the media guide as needed. the tray and into the bulk label feed path on the printer. -
Page 33: Attaching The Strap
1. First, remove all labels from the media 2. Still on the back of the printer, feed the well. Then, with the Brady logo facing strap under the loop at the top of the up, thread the Double D-ring handstrap printer, directly into the media well. - Page 34 Attaching the Strap 5. Weave the loose end of the strap back 6. Pull the loose end of the strap until it over the first (lower) ring, then under feels tight, then press the scratch (burr) and through the second (top) ring. fastener against the strap so it lays flat.
-
Page 35: Recycling The Label And Ribbon Cartridge
Recycling the Label and Ribbon Cartridge Recycling the Label and Ribbon Cartridge Cartridges need to be recycled in accordance with local regulations. Before recycling, the used cartridges must be pulled apart to release the individual components. These various components must then be recycled in the correct recycling bins. - Page 36 Recycling the Label and Ribbon Cartridge 2. With the yellow ribbon cover facing up, insert the blade of the screwdriver, one at a time, in through the five locking tab holes to depress the locking tabs. While depressing each tab with the screwdriver, use your thumb or finger to apply upward pressure on the ribbon cap finger tab.
-
Page 37: Dismantling The Cartridge
Recycling the Label and Ribbon Cartridge Dismantling the Cartridge To open the cartridge: 1. Unwind any remaining label meda from the spool, then gently peel the end of the media off of the spool to separate. 2. Grip the media assembly just behind the black end cap (containing the smart cell). -
Page 38: Recycling Components
Recycling the Label and Ribbon Cartridge Recycling Components These components should be removed from the cartridge and recycled according to the following guidelines. Component Material Recycle Bin Ribbon Spools (White) #9 ABS Ribbon Smart Cell Electronic Electronic Waste Media Smart Cell Ribbon Cartridge (Clear) Polycarbonate (PC) #7 Other... -
Page 39: Power On
Power On Power On To turn the system on or off: 1. Press Power To preserve battery life, when the printer detects a time of inactivity, it automatically shuts down. Any data on the screen at the time of auto shutdown is retained and available the next time the [Power] key is pressed to restart the printer. -
Page 40: Display Screen
Display Screen Display Screen The display screen enables you to view font attributes and other formatting features directly on the screen while you are entering and editing data. The screen displays one label, or one area on a multi-area label, at a time. For labels with multiple areas, use Print Preview (see page 5-2) to view all areas... -
Page 41: Navigation And Editing
Navigation and Editing Navigation and Editing Touch Screen ® printer uses touch screen technology to The BMP manipulate menus and data Using your finger, or a stylus, touch the desired option on the display screen. Touch Screen Basics Using your finger or a stylus, use the following techniques to navigate through or access items on the touch screen. -
Page 42: Keypad
Navigation and Editing Keypad The following descriptions are based on the QWERTY keypad. If you are using a different keypad (such as Azerty or Cyrillic), some of the keys may vary. Please refer to Appendix A for a full description of other keypad layouts. ®... - Page 43 Navigation and Editing Function Description Navigation Keys Navigation keys: • In a line of text, move the cursor left or right a character at a time, or up and down a line at a time. • In menus, move the selection left or right in a primary menus;...
- Page 44 Navigation and Editing Function Description Backspace Key • Removes characters one at a time, moving to the left. • Backs out of menu options and functions, one screen at a time. Note: Depending on how deep you are into menus and functions, you may have to press Backspace multiple times.
- Page 45 Navigation and Editing Function Description Shift Key When Caps Lock is turned off, used in conjunction with a single letter to enter that letter in uppercase. Highlight Text Highlights (selects) text on the editing screen, left or right a character at a time, enabling you to add font attributes (bold, italics, underline) to text already entered.
- Page 46 Navigation and Editing Function Description List Key Enables you to produce multiple labels with variable information from a single, formatted label (main document) and a structured data source. (Refer to "List” on page 3-36.) Barcode Key Places a text string in Barcode format, toggling the barcode on and off.
- Page 47 Navigation and Editing Function Description Subscript Key • Places the next typed character in subscript format, displaying slightly below the line of text. • Will place multiple characters in subscript if the characters are highlighted first. (Refer to "Pre- Existing Data” on page 3-3 information on highlighting characters.) Insert Time Key...
-
Page 48: Menus
Menus Menus Menus display at the bottom of the screen and are activated by the function keys. Use navigation keys or the Touch screen to access the different menu items. Continue to press the navigation keys to access the overflow menus or, using your finger, scroll through the menus. -
Page 49: Cancel Menus
Menus To access menus using the touch screen: 1. Press the Function key for the menus you want to access. 2. Touch the desired main menu option. 3. If sub-menus are available, touch the desired sub-menu option. The various functions and menus are discussed in further detail in the Formatting section of this manual, starting on page 3-1. -
Page 50: Dialog Boxes
Dialog Boxes Dialog Boxes Some function keys display dialog boxes, rather than sub-menus. Note: You will know that a dialog box is associated with a menu if a sub-menu does not immediately pop up when highlighting or selecting the main menu option. To access a menu’s dialog box using the keypad: 1. -
Page 51: Drop Down Field Lists
Dialog Boxes Drop Down Field Lists If a field has a drop down list associated with it, a small arrow displays on the right side of the field. To select an option from the drop down list, using the keypad: 1. -
Page 52: Data Fields
Dialog Boxes Data Fields Data fields require user-supplied data. Some fields may have default data already entered. When you access a field with pre-existing data, the data highlights and you can enter new data directly over the highlighted data. To access data fields, using the keypad: 1. -
Page 53: Spinner Boxes
Dialog Boxes Spinner Boxes A spinner box lets you toggle through a range of values in a field. To use a spinner box, using the keypad: 1. Navigate to the field containing the spinner box. 2. Press Enter 3. Use the up/down navigation keys to toggle through the range of values. 4. -
Page 54: Radio Buttons And Option Boxes
Dialog Boxes Radio Buttons and Option Boxes In a series of radio buttons, only one radio button option can be selected at one time. In a series of option boxes, any number of options can be selected at one time. To check or uncheck a radio button or option box, using the keypad: 1. -
Page 55: Accept Dialog Box Edits
Dialog Boxes Accept Dialog Box Edits To accept all edits in a dialog box, using the keypad: 1. Navigate to at the bottom of the dialog box. 2. Press Enter To accept all edits in a dialog box, using the touch screen: 1. -
Page 56: Setup
Setup Setup Figure 1-7. Setup menu options The Setup function key is used to determine the default settings for the printer. To change Setup functions: 1. Press Setup Pause/Cut The Pause/Cut function allows you to remove a label from the printer before another label starts printing. -
Page 57: Config
Setup Config The following settings can be found under the Config menu in the Setup function. Figure 1-8. Printer configuration in Setup settings The Shut Off Delay sets the auto-off time-out. This refers to the number of minutes of inactivity after which the printer automatically shuts off. When using the AC adapter, power is constant so there is no drain on the battery. -
Page 58: Time/Date
Setup Time/Date The following settings can be found under the Time/Date menu in the Setup function. Set the Time/Date options upon initial start-up of the printer. Figure 1-9. Time/Date settings in Setup function Units The Units setting is used to configure label parameter measurements for the printer. -
Page 59: Language
Setup Language Depending on the printer keyboard type you are using, the following languages can be found under the Language menu in the Setup function. (See "Keyboard Configurations” on page A-1 for information on the different keyboard types.) English Norwegian Estonian Croatian French... -
Page 60: Font Settings
Setup Font Settings Use the Font Settings to indicate if you want the font size to be measured in points or millimeters. Figure 1-10. Font settings in Setup function Touchscreen Calibration Calibrate the touchscreen to the desired sensitivity (soft or hard touch). To calibrate the touchscreen: 1. -
Page 61: Getting Started
Getting Started Creating a Text Label This section describes the process of creating a text label with minimal formatting, using basic editing techniques, and printing the label. Entering Text Before entering label text, be sure the media cartridge is loaded and the power is ON. The vertical bar on the display screen is the cursor and is the starting point for every label ®... -
Page 62: Deleting Text
Creating a Text Label Existing data positioned to the right of the cursor moves progressively to the right to make room for the inserted text. As more data is added to a line of text, the font size automatically decreases a point at a time until the smallest font size is reached. -
Page 63: Clear
Creating a Text Label Clear [CLEAR] is used to clear data from the screen or cancel a function. To Clear data: 1. Press Clear You are presented with two options: • Clear Label Data • Clear All Clear Label Data removes all data on the label, but leaves the formatting in place (e.g., font size, number of areas, etc.) Clear All removes all data and formatting from the label. -
Page 64: Cancel Functions
Creating a Text Label Cancel Functions Backspace is also used to cancel functions, a menu, or dialog box. When pressing Backspace in the middle of a function, you are walked out of the function a screen at a time. You may have to press Backspace several times to completely exit the function. -
Page 65: Font Autosize
Font AutoSize Font AutoSize Autosize starts with the largest font size that fits on the label. When a line of text reaches the edge of a label it scales downward until you press [ENTER] or the minimum font size is reached. When working with autosize and multiple lines of text, all lines on a label maintain the same size. -
Page 66: Printing A Label
Printing a Label Printing a Label WARNING DO NOT insert fingers near cutter. It could pinch or cut. To print a label: 1. Press Print After printing, to cut the label: 2. Pull the cutter lever forward (towards you) as far as it will ®... -
Page 67: Formatting
Character/line formats are called attributes that change the appearance of the fonts, such as size, weight (bold), and angle (italics). There are two fonts available with the BMP61 printer, Brady Fixed Width and Brady Alpine. Both fonts give you the option of displaying a zero (0) with or without a slash through it ( ). -
Page 68: Size
Font Size Font size applies to an entire line of data at a time and is measured in point size or millimeters, as determined in the Setup function. To change the size of the chosen font: 1. Press Font A pop-up menu displays the available font sizes for the media installed. 2. -
Page 69: Font Attributes
Font Font Attributes Font attributes (bold, italics, underline) can be applied to individual characters in a line of text. To turn an attribute on: 1. Position the cursor where the attribute should take affect. 2. Press Font 3. Select the desired attribute, then select ON. 4. - Page 70 Font Note: Highlighting works on a line-by-line basis. You cannot highlight more than one line at a time. 3. Press Font 4. Select the attribute, then select ON. All highlighted text displays the attribute. To remove the highlighting from the characters, press any navigation key or touch anywhere on the screen.
-
Page 71: Expand/Condense
Font Expand/Condense Expanding and condensing data affects character width and the spacing between characters in a word. Data can be expanded or condensed according to predefined percentages. Standard Expanded Condensed Figure 3-2. Expaned and condensed text To Expand or Condense data, as it is entered: 1. -
Page 72: Superscript/Subscript
Font Superscript/Subscript Superscript places a character slightly above the line of type and subscript places a character slightly below the line of type. The super- or subscript character also displays slightly smaller than the normal line of type. Superscript and subscript functions are on the numeric keypad. - Page 73 Font To highlight multiple characters, using the keypad: 1. Position the cursor at the beginning of the character string that you want to display in Super- or Subscript. 2. Hold Shift while moving the cursor with the navigation keys across the characters that will display in Super- or Subscript.
-
Page 74: Symbols
Symbols Symbols Figure 3-4. Symbol categories The BMP61 printer contains hundreds of symbols that can be used for a variety of applications. To add a symbol to the label: 1. Position the cursor at the point where you want the symbol to display. 2. -
Page 75: Remove A Symbol From Label
Symbols Remove a Symbol from Label The symbol is the same as any other character. To remove a symbol from the label: 1. Postion the cursor to the right of the symbol. 2. Press Backspace ® 61 Label Printer User’s Manual... -
Page 76: Graphics
Graphics Graphics Graphics are symbols, logos, or other artwork supplied from an outside source, such as a PC. These graphics must be bitmap files (*.bmp) and can only be black and white. The BMP61 printer will automatically resize the graphic, but it is important to keep the graphic size approximate to the printed output (about 2-inch x 2-inch). -
Page 77: International Character Sets
International Character Sets International Character Sets The BMP61 printer contains hundreds of internationally recognized characters, complete with diacritical marks. To add an international character to your label: 1. Position the cursor at the point where you want the international character to display. -
Page 78: Date And Time
Date and Time Date and Time To have the current date and/or time inserted on each label: 1. Position the cursor at the point on the label where you want the date and/or time to be inserted. 2. To insert the date, press Insert Date Touch the Header or Status bar, then touch Date in the pop-up menu. -
Page 79: Labels And Areas
Labels and Areas Labels and Areas Figure 3-6. Label menu options You can create a number of labels in one label file, each new label being inserted immediately after the current label. ® 61 Label Printer User’s Manual 3-13... - Page 80 Labels and Areas Figure 3-7. Area menu options Areas are used to apply different formatting (such as justification, rotation, and frames) to different parts of a single label. Areas can only be added to continuous media set to auto length mode. However, area formatting can be applied to die cut labels that have pre-defined areas.
-
Page 81: Add Label Or Area
Labels and Areas Add Label or Area Note: Labels cannot be added to files containing serialization. To add a label to a label file: 1. Press Label OR, to add an area to a single label: Press Area 2. Choose Add. The new label is inserted immediately after the current label and its number is reflected on the right side of the Header bar. -
Page 82: Label Length
Labels and Areas Label Length Auto length is the default for continuous media. With Auto Length, the label will be as long as it needs to be to accommodate the entered data, up to a maximum of 40 inches. You can, however, set a fixed length for a label. A different length can be set for each label in a file. -
Page 83: Go To Label Or Area
Labels and Areas Go To Label or Area To move to another label: 1. Press Label To move to another area on a multi-area label: 1. Press Area 2. Select GoTo, then enter the number of the label or area to go to. 3. -
Page 84: Shortcut Using Touch Screen
Labels and Areas Shortcut Using Touch Screen You can access different labels in a multi-label file or different areas on a multi- area label using the scroll arrows on the screen. To access the scroll arrows: 1. Touch Labels in the Header bar. Four arrows display on the screen. -
Page 85: Delete Label Or Area
Labels and Areas Delete Label or Area Deleting a label removes all data and formatting on that particular label. If multiple areas exist on one label, when that label is deleted all the areas associated with that one label are also deleted. Deleting an area removes all data and formatting from that one area on one particular label. -
Page 86: Justification
Labels and Areas Justification Justification refers to the alignment of data between boundaries (margins) on a label or in an area. There are two types of justification: horizontal and vertical. Horizontal justification (H. Justify) aligns data between the left and right boundaries of a label or area, while Vertical justification (V. -
Page 87: Rotate
Labels and Areas Rotate Rotation flips the data on a label or in an area, counter-clockwise, at 90° increments. Rotation affects all data on a label or in an area. Figure 3-9. Degrees of rotation on printed label Note: If rotation is applied individually to areas, you cannot apply rotation to the entire label. -
Page 88: Frame
Labels and Areas Frame A frame (border) can be added to an area or a label, but not to a line of text. You can have a different frame, or no frame, on individual labels in a multi-label file. You can also place a frame on a label that contains area frames. Note: Frames can only be placed on continuous labels, not die cut labels. - Page 89 Labels and Areas To remove the Frame: 1. Navigate to the label or area that contains the Frame. 2. Press Label Press Area 3. Choose Frame>None. ® 61 Label Printer User’s Manual 3-23...
-
Page 90: Reverse
Labels and Areas Reverse The Reverse function switches the foreground and background colors of data on a label, based on the color ribbon and media installed. Figure 3-11. Reverse text For instance, black lettering on a yellow background, if reversed, would print yellow lettering on a black background. -
Page 91: Vertical Text
Labels and Areas Vertical Text In Vertical text, each character drops down a line below the preceding character. The word “WIRE” as vertical text displays as such: Example: Vertical text can only be applied to an area or a label. It cannot be applied line-by- line. - Page 92 Labels and Areas If a barcode is in the line of text to be placed vertically, or if the height of the label cannot accommodate the vertical placement of text, an error message displays. Note: See "Error Messages” on page 2-4 for information on clearing an error message from the screen.
-
Page 93: Barcode
Barcode Barcode A Barcode element represents a barcode graphic generated from user input. Barcodes are generated following industry standard symbology. A typical barcode is composed of vertical lines (bars) and spaces of varying thickness, depending on the text entered. It can also include “human readable text.” Human readable text is the data entered that makes up the barcode. - Page 94 Barcode Field To Use Barcode The BMP61 Label Printer supports Code 128 and Code 139 Symbology barcode symbology. Ratio The ratio of a barcode is the relationship of narrow elements to wide elements, where elements are the bars and spaces. The ratios available are 2:1 and 3:1.
-
Page 95: Add A Barcode
Barcode Add a Barcode The barcode key acts as a toggle between a barcode and text. Press once to turn it on, press again to turn it off. To add a barcode: 1. Position the cursor where you want to add the barcode. 2. -
Page 96: Edit Barcode Data
Barcode Edit Barcode Data To edit barcode data: 1. Position the cursor in the barcode text. The barcode mode automatically turns on. 2. Edit the barcode text. The barcode mode automatically turns off when you move past the last character of the barcode. -
Page 97: Serialization
Serialization Serialization Serialization (or sequencing) automatically adds a series of sequential numbers or letters to the printed labels. The Serial function consecutively places the next number or letter in the defined sequence on individual labels. The number of labels created is defined by the sequence values you enter, and displays in the Header Bar. - Page 98 Serialization You can combine letters and numbers in a single serialization. When the right- most character in the Start Value reaches its maximum value (9, Z), the character immediately to the left is incremented, and the right character cycles back to its mimimum value (0, A) Example: Combined, single serialization:...
-
Page 99: Add Serialization
Serialization Add Serialization To add serialization to labels: 1. Position the cursor on the label where you want the serialization to display. 2. Press Serial A dialog box displays where you can enter the start value of the serialization, the end value, and the increment value. - Page 100 Serialization The previous serialization values display in the dialog box presented. 10. Navigate to the Add Seq 2 option box and press Enter 11. In the Sequence #2 Start Value field, enter the start value for that sequence. 12. In the Sequence #2 End Value field, enter the end value for that sequence. 13.
-
Page 101: Edit A Sequence
Serialization Edit a Sequence You can change the serialization values after a sequence has been determined. To edit the sequence values: 1. Press Serial The Serial dialog box displays with the current values listed. 2. Select the value fields to change and enter the new value. Note: If using multiple serialization at different positions on the label, be sure Add Seq 2 option box is checked. -
Page 102: List
List List The List function enables you to produce multiple labels with variable information from a single, formatted label (main document) and a structured data source. The label format contains fixed text or graphics, which are the same in each output label, and placeholders that are replaced by the variable text from the data source. - Page 103 List 2. Set up the data source. The data source contains the unique variable information that will merge on to the label (main document). The data source is set up in columns (fields) and rows (records). Each column contains one part of the unique, variable information.
- Page 104 List Using the above example, the results of the merge would look like the following. ® 3-38 61 Label Printer User’s Manual...
-
Page 105: Setting Up The Data Source
List Setting up the Data Source The data source must be a .csv file created in a spreadsheet or database program on a PC and imported to the BMP61 printer via the USB port and a flash drive. You can also create the .csv file directly on the BMP61 printer. If you have created the .csv file on a PC, you must import the file to the printer before you can use the List function. -
Page 106: Working With Rows Of Data
List To select a field, using the keyboard: 5. Navigate to the field where you want to enter data and press Enter To select a field, using the Touch screen: Double tap the field in which you want to enter data. The data entry area of the selected field displays on the bottom half of the screen. -
Page 107: Save The Data Source
List The row selected moves down and a new, blank row is inserted. Figure 3-16. Inserting a row in the database To remove a row in the datasource: 1. Select a field in the row you want to delete. 2. Select Delete Save the Data Source To save the data source: 1. - Page 108 List To exit out of the data source: 3. Press Backspace A message displays asking if you want to save the file before exiting. 4. If you have already saved the file, select . The file remains saved. 5. If you have not yet saved the file, select .
-
Page 109: Merging Files
List Merging Files Fields from the data source merge into specific areas defined on the label. To merge the data source with the label: 1. Create, or open, the label that will receive the data from the data source. With the label in the Editing screen: 2. -
Page 110: Advanced Merge
List Advanced Merge You can create a data source to have many fields with varying information. However, you do not have to use every field on every label. For instance, even though the example database contains four fields (name, address, city-state, and customer number), you can create a label that uses only one or two of the fields. -
Page 111: Edit Datasource
List Figure 3-1. Results using only two fields from a multi-field data source Edit Datasource You do not have to enter all records into the data source at one time. You can continue to add more records to a saved data source as needed. To add more records to an existing data source: 1. -
Page 113: File Management
File Management Label Files Figure 4-1. File menu options A single label or a number of labels can be saved as a file, to be opened and reused at a later date. The following are guidelines when creating a label file: •... -
Page 114: Internal Vs. External
Label Files Internal vs. External You can save labels as internal or external files. Internal files are labels stored directly on the BMP61 printer. External files are labels stored on some external device, such as a flash drive. To save labels: 1. - Page 115 Label Files <New Folder> displays in the text entry box. Enter the file name directly over the <New Folder> moniker. 5. Press Enter If the name already exists, a message displays asking if you want to overwrite the previous file with that name. ®...
- Page 116 Label Files Using the keyboard: 1. Press Enter to overwrite. 2. Press Backspace to remove the message from the screen and return to the file name entry field. Using the Touch screen: 1. Touch to overwrite. 2. Touch to cancel the overwrite and return to the file name entry field. When the file is saved, you are returned to the Editing screen with the saved file still displayed.
-
Page 117: Folders
Folders Folders To better organize your data, place similar label files into folders. Similar files could consist of all labels for a specific project, or all files that use the same media, or specific label applications, etc. To create a label file folder: 1. - Page 118 Folders To return to the list of folders: 1. Press Enter Double Tap <Previous Folder>. ® 61 Label Printer User’s Manual...
-
Page 119: Open A File
Open a File Open a File To open (recall) a saved file: 1. Press File 2. Choose Open. A list of previously saved folders and files displays. To open a folder, using the keypad: 3. Navigate to the folder to open. 4. - Page 120 Open a File Only one file can be displayed on the screen at a time. When opening a saved file, if the Editing screen contains other data, you are prompted to save the data before the screen is cleared. If you decide to save the displayed data, the Save function is invoked and you are allowed to give the data a file name before the requested file to open is displayed in the Editor.
-
Page 121: Delete A File
Delete a File Delete a File The Editor does not have to be cleared before deleting a file. A file can be deleted with other data still on the screen. To delete a previously saved file: 1. Press File 2. Select Delete. 3. - Page 122 Delete a File A delete confirmation message displays. 6. Select to confirm deletion. Select to cancel the delete function. If Yes is selected, the file is removed from the system and is no longer available for use. Note: Folders are deleted the same way. However, you can only delete empty folders.
-
Page 123: Using Files From An External Source
Using Files from an External Source Using Files from an External Source You can use labels, .csv lists, or .bmp graphics created on a PC and stored on a flash drive. Labels can be imported (transferred) from a flash drive to reside on the BMP61 printer or you can open the label file directly from the flash drive. - Page 124 Using Files from an External Source 6. If importing a Label file, on the Select Destination screen, select the destination folder or storage area on the BMP61 printer where you want to store the imported file. Label files can be stored in any folder on the printer. However, List files (.csv) and Graphic files (.bmp) are stored in specific folders used by the List and Graphics functions.
-
Page 125: Export A File
Using Files from an External Source Export a File Files created on the BMP61 printer, or previously imported from an external device can, in turn, be exported back to an external device. To export a file currently on the BMP61 printer to an external device: 1. -
Page 127: Printing Labels
Printing Labels Print The Print function prints the current file. To print: 1. Press Print The data is printed and the status of the print job is reflected in the Status Bar (e.g., Printing 1 of 10). After printing, to cut the label: 2. -
Page 128: Print Preview
Print Print Preview The Print Preview function of the BMP61 printer enables you to view your label file prior to printing. To preview the label: 1. Press Preview Double Tap the data in the Editor screen. The label contents display. To print directly from Print Preview: 2. -
Page 129: Scrolling In Print Preview
Print Scrolling in Print Preview If a label file is particularly long it may not be completely visible on one screen in print preview. The Print Preview screen displays left/right or up/down scroll bars indicating there is more data to view. To scroll through a preview of a long label or multiple labels: 1. -
Page 130: Multiple Print
Multiple Print Multiple Print Multiple print lets you print multiple copies of a label or series of labels. To print a number of copies: 1. Press Multit 2. With the cursor in the No. of Copies field, enter the number of copies desired. Collate To get multiple copies of a serialization, first determine if the sequence should be collated or non-collated. -
Page 131: Separator
Multiple Print Non-collated – Prints all first numbers in a sequence, then all second numbers, etc. Print three copies of sequence 1-5, non-collated Example: Produces: 1,1,1; 2,2,2; 3,3,3; 4,4,4; 5,5,5. The default is to print collated. If you do not want to collate the copies: 3. -
Page 132: Mirrored Print
Mirrored Print Mirrored Print Mirrored print takes all data on a label and flips it to provide a mirror image. Mirroring displays on the printed label only. Figure 5-2. Mirror image Mirrored print is label-based, meaning all data on the label is mirrored. You cannot mirror data in an individual area. -
Page 133: Print History
Print History Print History Print History is a convenient feature that enables easy access to recently used files. It keeps track of the last 10 label files printed. To access Print History: 1. Press Print History Touch the Header or Status bar, then select Print History. A list of previously printed files displays at the bottom of the print screen. - Page 134 If the file you want to reprint is incompatible with the currently installed media, a message displays indicating such. 4. To correct, install the media indicated in the error message. 5. Clear the message, then press Print...
-
Page 135: Label Types
Label Types Label Types Label types provide templates that guide and control the layout for label formats and may require specific media. The label types available are: • General • Wire Marker • Flags • Terminal Block • Patch Panel •... -
Page 136: General
General General The General label type contains standard functions and formats used for most generic labels. However, all other label types provide templates that guide and control the layout for the specific application. Depending on the application chosen, a sub-menu or dialog box displays to collect information for automatically formatting the specific label type. -
Page 137: Wiremarker
WireMarker WireMarker The WireMarker label type is designed to repeat entered data down the length of the label. The data repeats as many times as possible, considering the font size and the wire size selected. Figure 6-2. Repeated data on a WireMarker or Cable Marker label Die-cut, self-laminating, or continuous media can be used for WireMarker labels. - Page 138 WireMarker The data is repeated down the wiremarker label as many times as the length of the label allows and the font size used. The smaller the font size, the more the data is repeated. If you press [Enter] to start a new line of text, a space opens below each line of repeated data and begins to repeat the next line of text as you enter it.
-
Page 139: Flags
Flags Flags A Flag label wraps around a wire or cable, with the ends joined together to form a flag. The Flag application is designed to work with continuous media or specific multi-area die cut labels. To use a Flag label type: 1. - Page 140 Flags Figure 6-4. Flag length vs. diameter 3. In the Cable Diameter field, enter the diameter of the wire/cable to which the flag will be applied. The range for the cable diameter is 0.25 inches to 8 inches. By entering the diameter of the wire or cable, the system automatically calculates an additional length of label to allow complete wrap of the wire/cable with additional label material left for the flag.
- Page 141 Flags 4. To rotate data, select Rotate to place a checkmark in the option box. 5. When finished, select 6. On the Editing screen, enter the text that will display on the flag. Rotation is embedded in the template design, based on the flag design you pick. Justification is defaulted to center, middle.
-
Page 142: Terminal Block, 66 Block, Patch Panel
Terminal Block, 66 Block, Patch Panel Terminal Block, 66 Block, Patch Panel Terminal Block, 66-Block, and Patch Panel applications are designed to be used with continuous media. If no continuous media is installed, these applications do not display in the menu. To use a Terminal Block, 66-Block, or Patch Panel label type: 1. - Page 143 Terminal Block, 66 Block, Patch Panel If you intend to use serialization for the Terminal Block, 66-Block, or Patch Panel label type, you do not need to enter the Number of Terminals. The serialization values determine how many labels to create. 5.
- Page 144 Terminal Block, 66 Block, Patch Panel 9. Complete the Serialization. (See "Add Serialization” on page 3-33 for more information.) 10. When finished, select The number of terminal blocks are created as labels, with the serialization characters displayed on each label. If serialization was not used, on the Editing screen, enter unique data for each label.
-
Page 145: 110-Block, Bix Block Label Type
110-Block, Bix Block Label Type 110-Block, Bix Block Label Type The 110-Block and Bix Block use only the following dedicated label parts. • 110-Block: M71C-475-412 or M71C-412-422 • Bix Block: M71C-625-412 or M71C-625-422 The 110-Block label type is based on user-selected pair configurations, with the length of the label determined by the pair type selected. - Page 146 110-Block, Bix Block Label Type Figure 6-7. Sample pair configurations 3. In the Block Type field, from the drop down list, select the pair configuration to use. Sequence Type is used to determine how, and if, you want to serialize data. If None is selected, the areas are blank and you can independently enter data in each area of the strip.
- Page 147 110-Block, Bix Block Label Type Figure 6-8. Sample seqeunce types 4. In the Sequence Type field, from the drop down list, select the Sequence Type to use. 5. In the Start Value field (except when “None” is selected in the Sequence Type field), enter the first number of the sequence.
-
Page 148: Vial
Vial Vial The Vial label type can be used with any media except SelfLam or Permasleeve. (If SelfLam or Permasleeve media is installed, the Vial label type does not display.) The Vial label type fixes the length of the label based on the vial size selected and formats the data horizontally or vertically. -
Page 149: Desistrip
DesiStrip DesiStrip A DesiStrip (Designation Strip) is a paper faceplate label that can rest over the keys of a phone or switches in a breaker box, etc. Figure 6-9. Example of DesiStrip labels To create a DesiStrip: 1. Press Label Type 2. -
Page 150: Breaker Box
Breaker Box Breaker Box Breakers are usually arranged in two columns or along one row, depending on geographic regions. The breaker positions are numbered left-to-right or top-to- bottom, depending on label orientation. This numbering system is universal across various competing manufacturers of breaker panels. To create Breaker Box labels: 1. - Page 151 Breaker Box 6. In the Separator field, from the drop down list, select the separator to use. Line Separator, Vertical Orientation Tic Separator, Horizontal Orientation Figure 6-10. Separators and orientation 7. In the Orientation field, from the drop down list, select the orientation to use. 8.
- Page 152 Breaker Box Each breaker is consigned to a single label, the number of labels designated by the number of breakers defined. The number of labels display in the Header bar. Use the Next Label and Prev Label keys to move to the different labels. The Header bar indicates which label you are on.
-
Page 153: Maintenance And Troubleshooting
Display Screen To clean the display screen: 1. Lightly moisten a soft (non-scratching) cloth with isopropyl alcohol. Use pre-moistened static-free cloths available with the Brady PCK-6 Cleaning Kit. 2. Gently wipe the display screen until clean. ® 61 Label Printer User’s Manual... -
Page 154: Internal Components
Cleaning the Printer Internal Components Internal Components Use a Brady BMP61 disposable cleaning card to safely and effectively remove all dirt, ribbon ink residue, adhesive, and other contaminants from the thermal print head, platen roller, and paper path. Note: Remove the ribbon and label spool before initiating the cleaning routine. -
Page 155: Replacing The Cutter Blade Cover
Replacing the Cutter Blade Cover Internal Components Replacing the Cutter Blade Cover If the printer is accidently dropped, the cutter blade cover may come lose or fall out. If the blade cover is not dented or damaged in some other way, you can easily re-insert the blade cover into the printer. - Page 156 Replacing the Cutter Blade Cover Internal Components The blade cover snaps in easily. To remove the cutter blade cover: 1. From inside the media well, slip your finger under the right side of the blade cover and gently pull up to unhook the blade cover. The blade cover releases easily.
-
Page 157: Replacing The Printer (Media Well) Cover
Replacing the Printer (Media Well) Cover Internal Components Replacing the Printer (Media Well) Cover If the printer is accidently dropped, the media well cover may come off. If the cover is not damaged, it can easily be re-attached to the printer. To re-attach the printer media well cover: 1. -
Page 158: Troubleshooting
Internal Components Troubleshooting ® Use the following table to troubleshoot and diagnose possible performance problems with your BMP 61 Label Printer. If the corrective action suggested does not work, contact Brady’s Technical Support Group. Problem Cause Corrective Action Hardware Head over temp... - Page 159 Replacing the Printer (Media Well) Cover Internal Components Problem Cause Corrective Action Power ON/OFF (Printer not working) (continued) Printer frequently powers OFF. Battery is low. Attach the AC Adapter to the printer and plug into an electrical outlet. This will supply immediate power while charging the battery at the same time.
- Page 160 Replace ribbon cartridge. Error - "No ribbon installed" Damaged circuit board (memory device) on ribbon cartridge. Send to Brady for repair. Error - "No ribbon installed" Damaged contacts on printer for reading ribbon cartridge. 1. Replace ribbon cartridge. Error - "Out of ribbon"...
- Page 161 Replacing the Printer (Media Well) Cover Internal Components Problem Cause Corrective Action Ribbon (continued) 1. With the ribbon installed, Error - "Out of ribbon" Ribbon cartridge has excessive tension the ribbon by rotating slack between the supply spool the rewind spool (top spool) in and rewind spool.
- Page 162 Replacing the Printer (Media Well) Cover Internal Components Problem Cause Corrective Action Labels (Media) Printer will not feed labels. The leading edge of the label roll Make sure the leading edge of the is not inserted up to the black line label roll is securely under the ribs under the ribs.
- Page 163 2. Press [CLEAR/ESC] key to clear error Error - "No media installed" Damaged contacts in receiver slot Send to Brady for Repair of lower printer base. 1. Clear any jams by opening the Error - "Top of form" Label/media or ribbon has caused...
- Page 164 Replacing the Printer (Media Well) Cover Internal Components Problem Cause Corrective Action Program File incompatible with installed A saved file (or power off file) Install correct media. media was designed for media not currently installed. Incompatible Media for chosen The labels installed cannot Install correct media.
-
Page 165: A Keyboard Configurations
Keyboard Configurations Languages on Keyboards Your keyboard configuration depends on the region where you do business. The following are the currently supported keyboard configurations. ® There are four keypad configurations available for the BMP 61 Label Printer. The keypad layouts and the language supported by each are as follows: Keyboard Type Language Applied QWERTY... -
Page 166: Qwerty
Languages on Keyboards QWERTY QWERTY ® 61 Label Printer User’s Manual... -
Page 167: Qwertz
Languages on Keyboards QWERTZ QWERTZ ® 61 Label Printer User’s Manual... -
Page 168: Azerty
Languages on Keyboards AZERTY AZERTY ® 61 Label Printer User’s Manual... -
Page 169: Cyrillic
Languages on Keyboards CYRILLIC CYRILLIC ® 61 Label Printer User’s Manual... - Page 171 Symbols Symbols for all enabled applications are available for use on any label, regardless of the application/label type in use. for information on how to apply symbols to your labels. page 3-8 ® 61 Label Printer User’s Manual...
- Page 172 Arrows DataComm ® 61 Label Printer User’s Manual...
- Page 173 Electrical Exit Fire First Aid ® 61 Label Printer User’s Manual...
- Page 174 CLP/GHS HSID Greek International ® 1-10 61 Label Printer User’s Manual...
- Page 175 Laboratory Laboratory (cont.) ® 61 Label Printer User’s Manual 1-11...
- Page 176 Mandatory Misc Packaging ® 1-12 61 Label Printer User’s Manual...
- Page 177 Prohibition Public Info Safety ® 61 Label Printer User’s Manual 1-13...
- Page 178 Warning WHMIS...
Need help?
Do you have a question about the BMP 61 and is the answer not in the manual?
Questions and answers