Table of Contents
Advertisement
Quick Links
Advertisement
Table of Contents

Related Manuals for Axis T8412


Summary of Contents for Axis T8412
- Page 1 User’s Guide AXIS T8412 Installation Display...
- Page 2 • find answers to resolved problems in the FAQ database. requirements of the Radio communications Search by product, category, or phrases (Electromagnetic Compatibility) Standard AS/NZS • report problems to Axis support by logging in to your CISPR22. private support area. Equipment Modifications...
-
Page 3: Table Of Contents
AXIS T8412 User’s Guide Page 3 AXIS T8412 User’s Guide This user’s guide provides instructions for using the AXIS T8412 Installation Display. Overview - page 4 Battery - page 6 Power up - page 7 Viewing Images - page 8... -
Page 4: Overview
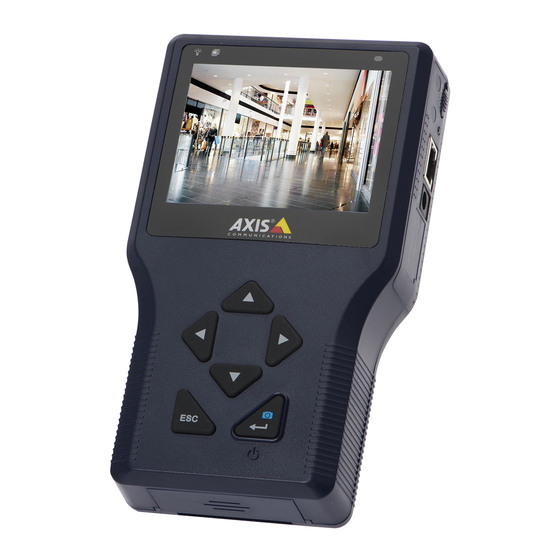
It offers user-friendly features such as touchscreen, zoom and snapshot functions. AXIS T8412 can connect directly to a camera, or to a network and search for Axis network video products. An Axis camera with built-in PoE support can be powered directly by AXIS T8412, giving installers greater flexibility. -
Page 5: Hardware Overview
AXIS T8412 User’s Guide Page 5 Hardware overview Stylus slot AV in Data indicator LED Power indicator LED Light sensor LCD screen Navigation keys Start/Enter ESC key Snapshot key POWER on/off Power bank on/off Charging LED CAT5 Cable LAN/PoE OUT... -
Page 6: Battery
The LED will stay lit while the AXIS T8412’s battery is charging. Battery The AXIS T8412 is powered by a rechargeable Li-ion battery pack that takes approximately 4 hours to charge, and provides the AXIS T8412 with up to 3 hours run time. -
Page 7: Power Up
Page 7 Power up 1. To power up the AXIS T8412, first set the Power switch to the “ON” position. 2. Press the Start key and hold for 3 seconds. 3. The Power indicator lights. and a progress bar is displayed on the screen. -
Page 8: Viewing Images
When zooming into the view (see Digital zoom below) the camera's own default resolution is used instead, to provide greater detail. Press the ESC key on the AXIS T8412 front panel at any time to exit the viewing screen. Digital zoom, PT mode, and Flip view - all cameras Zoom - Tap ZOOM on the screen for digital zoom. - Page 9 AXIS T8412 User’s Guide Page 9 Cameras with optical zoom For cameras that support optical zoom, this is controlled by the following: Press and hold the Up or Down navigation key for continuous optical zoom, in or out. • Press and release the Up or Down navigation key for optical zoom in single steps, in or •...
-
Page 10: Menus
Page 10 AXIS T8412 User’s Guide Menus - Main menu Button Function Main Menu. Return, go to previous page. Enter, opens a submenu or saves settings. PoE indicator Battery status Connect to an Axis network camera. View analog camera connected... -
Page 11: Connect To An Ip Camera
With AXIS T8412 Installation Display you can connect to a camera either through Connect or Device Search. If the IP address for the camera is not the default address expected, AXIS T8412 will change its own IP address so as to enable the connection. This may take a few seconds to complete. -
Page 12: Network Cable Test
Video in Test analog video by connecting the BNC cable from the camera's video output to the AXIS T8412 video input port. Tap the AV In icon in the Main Menu, and the video signal will be displayed on the LCD screen. - Page 13 Page 13 Power over Ethernet AXIS T8412 delivers PoE to Axis network video products with PoE support, either from the unit's own battery, or from an extenal PoE source, via the bypass function. Tap this icon to turn on and off the unit’s own Power over Ethernet.
-
Page 14: Setup
AXIS T8412 - The IP address can be set to DHCP or to a fixed address. DHCP is the default set- ting and should be used in most situations, even when there is no actual DHCP server available via a network. - Page 15 “+” key. To delete a camera profile, find it in the list and tap the “-” key. Note: If AXIS T8412 detects a camera with an IP address on a different subnet it will automatically change its own address so that a connection becomes possible.
-
Page 16: Snapshot Function
Tap the Enter icon to save the settings. Tap this icon to switch between brightness, sharpness and contrast Snapshot Function Snapshot key In the IP Camera viewing mode, press the Snapshot key on the AXIS T8412 front panel to save the current image... -
Page 17: File Management
AXIS T8412 to factory default. Backlight Adjustment - Control the brightness of the AXIS T8412 screen by moving the slider of the Backlight value indicator. A higher value produces a brighter image. Firmware Upgrade - When you upgrade your AXIS T8412 with the latest firmware from the Axis Web site, your Installation Display receives the latest functionality available. -
Page 18: Alternative Connection Methods
Complete Update - Check this option if you would like a complete installation of every component in the firmware. If this option is not checked, only the changes in the firmware will be upgraded. Restore to Factory Defaults - Restore the AXIS T8412 system to factory default by tapping the Default button, Auto Shutdown - To save power, tap the drop-down list to choose the amount of idle time before AXIS T8412 shuts down. -
Page 19: Technical Specifications
AXIS T8412 User’s Guide Page 19 Technical Specifications Function/ Item Specification group Model AXIS T8412 Installation Display Display Color LCD Field Display 3.5 inches Resolutions 320x240 Video Image settings Autosensing Network IP Setting • Static IP address • DHCP General... - Page 20 Page 20 AXIS T8412 User’s Guide...
- Page 22 Ver.1.1 User’s Guide June 2011 AXIS T8412 Part No. new number © Axis Communications AB, 2009-2011...
Need help?
Do you have a question about the T8412 and is the answer not in the manual?
Questions and answers