Table of Contents
Advertisement
COMMERCIAL MICROWAVE OVEN
This operation manual contains important information which you should read carefully
IMPORTANT:There may be a serious risk to health if this operation manual is not
followed or if the oven is modifi ed so that it operates with the door open.
R-1900M [EN].indd 1
R-1900M [EN].indd 1
Model
R-1900M
OPERATION MANUAL
OPERATION MANUAL
before using your microwave oven.
9/29/08 1:36:29 PM
9/29/08 1:36:29 PM
Advertisement
Table of Contents

Subscribe to Our Youtube Channel
Related Manuals for Sharp R-1900M


Summary of Contents for Sharp R-1900M
- Page 1 IMPORTANT:There may be a serious risk to health if this operation manual is not followed or if the oven is modifi ed so that it operates with the door open. R-1900M [EN].indd 1 R-1900M [EN].indd 1 9/29/08 1:36:29 PM...
-
Page 2: Table Of Contents
Defrosting Chart Time Cooking Cooking Chart Single Stage Cooking Reheating Chart Multi Stage Cooking Caution Repeat Cooking To Replace the Mains Plug Express Defrost Calling for Service Specifi cations R-1900M [EN].indd Sec1:1 R-1900M [EN].indd Sec1:1 9/29/08 1:46:40 PM 9/29/08 1:46:40 PM... -
Page 3: Important Safety Instructions
Contact your dealer or an authorised Service Technician or loose. appointed by SHARP. • Ensure the door seal and sealing surfaces are not damaged. • Inspect the oven interior and door for dents. R-1900M [EN].indd Sec1:2 R-1900M [EN].indd Sec1:2 9/29/08 6:16:51 PM 9/29/08 6:16:51 PM... - Page 4 It is hazardous for anyone other than a Service Technician, as this protects it from dirt. approved by SHARP to carry out any service or repair operation 2. Place oven on a secure, level surface, strong enough to take which involves the removal of a cover which gives protection the oven weight, plus the heaviest item likely to be cooked in against exposure to microwave energy.
-
Page 5: Troubleshooting
B. Does the “ON” indicator come on? Yes ________No yourseif with care. The light bulb can be purchased from Sharp Electronics (U.K.) Ltd. See page 39. Unplug the oven C. At the end of 30 seconds, is the water hot? before replacing the light bulb. -
Page 6: Maintenance Mode
For example, if CC1 occurs, the display will show CC and 1 reciprocally or if CC2 and CC4 occur at the same time, the display will show CC and 2.4. reciprocally. R-1900M [EN].indd Sec1:5 R-1900M [EN].indd Sec1:5... -
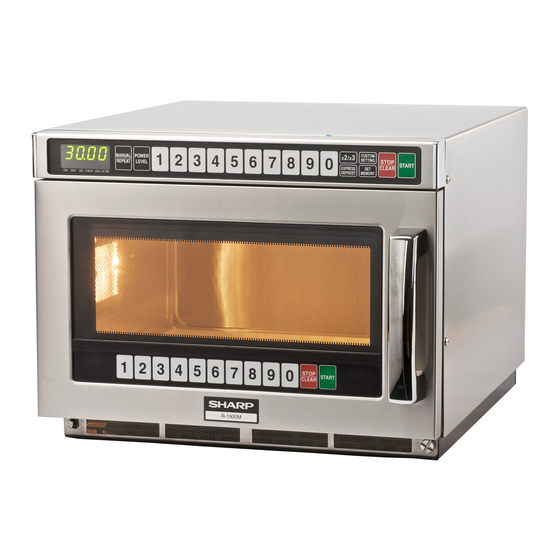
Page 7: Oven & Control Panel
7. Ten number pads 3. DOUBLE/TRIPLE QUANTITY pad 8. EXPRESS DEFROST pad 4. CUSTOM SETTING pad 9. SET MEMORY pad 5. STOP/CLEAR pad ON DEF. CHECK LOCK FILTER R-1900M [EN].indd Sec1:6 R-1900M [EN].indd Sec1:6 9/29/08 3:59:49 PM 9/29/08 3:59:49 PM... -
Page 8: Before Operation
See Saving Memories page 17 - 21 to program 1 min. 100% a new memory. 1 min. 15 sec. 100% 1 min. 30 sec. 100% 2 min. 100% R-1900M [EN].indd Sec1:7 R-1900M [EN].indd Sec1:7 9/29/08 6:17:07 PM 9/29/08 6:17:07 PM... -
Page 9: Cooking Double/Triple Quantity With Memory
2 Press the START pad. quantity or cook without using Double/Triple Quantity. For details see Custom Setting 10 on page 15 and Maximum Cooking Time on page 21. R-1900M [EN].indd Sec1:8 R-1900M [EN].indd Sec1:8 9/29/08 1:36:31 PM 9/29/08 1:36:31 PM... -
Page 10: Express Defrost With Memory
1 Place food in oven and press 3 Press the MANUAL/REPEAT pad. the MANUAL/REPEAT pad. Enter cooking time for 2nd Enter cooking time. stage. 2 Press the POWER LEVEL pad and enter power level. R-1900M [EN].indd Sec1:9 R-1900M [EN].indd Sec1:9 9/29/08 1:36:32 PM 9/29/08 1:36:32 PM... -
Page 11: Repeat Cooking
If foods have varied thickness, it may be necessary 2 Press the START pad. to shield the thin edges with small fl at pieces of aluminum foil to prevent overdefrosting. R-1900M [EN].indd Sec1:10 R-1900M [EN].indd Sec1:10 9/29/08 1:36:32 PM 9/29/08 1:36:32 PM... -
Page 12: Program & Customize
Press the START pad to save settings and the STOP/CLEAR 4 Press the STOP/CLEAR pad to pad to exit from the Custom Setting Function. exit from the Custom Setting Function. R-1900M [EN].indd Sec1:11 R-1900M [EN].indd Sec1:11 9/9/08 2:37:19 PM 9/9/08 2:37:19 PM... - Page 13 : no operation CHECK 1 Press the CUSTOM SETTING Quantity pad twice within 2 seconds and enter 6. EXPRESS Express Defrost check : operation DEFROST Setting set : no operation R-1900M [EN].indd Sec1:12 R-1900M [EN].indd Sec1:12 9/29/08 1:36:33 PM 9/29/08 1:36:33 PM...
-
Page 14: Counter Check/Clear
Express Defrost has been used. Total usage Press the CUSTOM SETTING pad twice within 2 seconds, then enter 7. Total usage will be displayed. R-1900M [EN].indd Sec1:13 R-1900M [EN].indd Sec1:13 9/9/08 2:37:19 PM 9/9/08 2:37:19 PM... -
Page 15: Air Intake Filter Counter
CH81 : The total used air intake fi lter time appears. 3 Press the STOP/CLEAR pad to exit CH82 : The limit time for using a fi lter can be changed. from the Custom Setting Function. R-1900M [EN].indd Sec1:14 R-1900M [EN].indd Sec1:14 9/29/08 6:17:51 PM 9/29/08 6:17:51 PM... - Page 16 9, 1 to stop operation when one magnetron fails 9, 2 to allow operation of one magnetron only Press the START pad to save settings and the STOP/CLEAR pad to exit from the Custom Setting Function. R-1900M [EN].indd Sec1:15 R-1900M [EN].indd Sec1:15 9/29/08 1:36:34 PM 9/29/08 1:36:34 PM...
- Page 17 After 90% of total cooking time. power level for PL1 at DEF. Stage 1. START After ending of each stage (Ex: Enter 5 for 50%) DEF. R-1900M [EN].indd Sec1:16 R-1900M [EN].indd Sec1:16 9/9/08 2:37:20 PM 9/9/08 2:37:20 PM...
-
Page 18: Saving Memories
7 Press the SET MEMORY pad to Press the MANUAL/REPEAT pad again to enter positive save memory. numbers. ( is displayed.) 8 Press the STOP/CLEAR pad to exit. R-1900M [EN].indd Sec1:17 R-1900M [EN].indd Sec1:17 9/29/08 1:36:35 PM 9/29/08 1:36:35 PM... - Page 19 See Maximum Cooking Time on page 21. 3. It is not necessary to press the POWER LEVEL pad for 11 Press the POWER LEVEL pad. 100% in Single Stage. R-1900M [EN].indd Sec1:18 R-1900M [EN].indd Sec1:18 9/29/08 1:36:35 PM 9/29/08 1:36:35 PM...
- Page 20 3. It is not necessary to press the POWER LEVEL pad for 100% in the last stage in Multi Stage Cooking. 3 Press the MANUAL/REPEAT pad. 4 Enter cooking time for 1st stage. 5 Press the POWER LEVEL pad. R-1900M [EN].indd Sec1:19 R-1900M [EN].indd Sec1:19 9/9/08 2:37:21 PM 9/9/08 2:37:21 PM...
- Page 21 3. Refer to NOTES for Advice for Defrosting on page 27. error code, press the STOP/CLEAR pad and re-program. See Maximum Cooking Time on page 21. 4. Refer to NOTES for Advice for Defrosting on page 27. R-1900M [EN].indd Sec1:20 R-1900M [EN].indd Sec1:20 9/29/08 1:36:36 PM 9/29/08 1:36:36 PM...
-
Page 22: Other Convenient Features
To set cooking during the Demonstration Mode, press the the previous display. MANUAL/REPEAT pad and enter time and press the START pad. After cooking, press the STOP/CLEAR pad to show Demonstration again. R-1900M [EN].indd Sec1:21 R-1900M [EN].indd Sec1:21 9/9/08 2:37:22 PM 9/9/08 2:37:22 PM... -
Page 23: Cleaning & Maintenance
Projection A Splash Cover Hole Antenna Cover Ceramic Shelf Hole Fig.1 Screw Hole Air intake fi lter Frame Fig.2 Projection B Projection A Cover Catch Catch Fig.3 Splash Cover R-1900M [EN].indd Sec1:22 R-1900M [EN].indd Sec1:22 9/29/08 4:36:24 PM 9/29/08 4:36:24 PM... - Page 24 Do not use abrasive the oven ceiling cover to the oven cavity ceiling as shown or harsh cleaners, scouring pads, metallic brushes or sharp- in Fig. 2, then gently pull the cover downwards to separate edged tools.
-
Page 25: Cooking Advice
Always attend the oven when in use. Carefully follow the SHARP Operation Manual at all times. If you exceed recommended cooking times and/or use power levels that are too high, food may overheat, burn, and in extreme circumstances, catch fi re and damage the oven. - Page 26 Check the temperature of food and drink and stir (before serving). Take special care when serving food to babies, children or the elderly. The contents of feeding bottles and baby food jars should be stirred or shaken and the temperature checked before consumption to avoid burns. R-1900M [EN].indd Sec1:25 R-1900M [EN].indd Sec1:25 9/9/08 2:37:23 PM...
-
Page 27: Food Handling & Preparation
Food hygiene standards (storage, handling and preparation) apply to microwaving. Always store convenience foods as recommended by the food manufacturer and keep no longer than the “Use By” date. R-1900M [EN].indd Sec1:26 R-1900M [EN].indd Sec1:26 9/9/08 2:37:23 PM 9/9/08 2:37:23 PM... -
Page 28: Advice For Defrosting
• Shield warm areas with small pieces of foil if necessary. • It is important to turn food over, separate (where appropriate) and rearrange to ensure even defrosting. • Standing time is necessary after defrosting to ensure thorough defrosting. R-1900M [EN].indd Sec1:27 R-1900M [EN].indd Sec1:27 9/9/08 2:37:24 PM... -
Page 29: Advice For Reheating
Place pies on plate or in a fl an dish. Reheat meat pies and fruit pies on MEDIUM (50%). Vegetables Cover with vented microwave cling fi lm or suitable lid and reheat on MEDIUM (50%). Stir at least once during reheating. R-1900M [EN].indd Sec1:28 R-1900M [EN].indd Sec1:28 9/9/08 2:37:24 PM 9/9/08 2:37:24 PM... -
Page 30: Defrosting Chart
(30%) 2. Turn over, separate and re-arrange twice during defrosting. Remove defrosted slices each time. 3. After defrosting, cover with foil for 5-10 minutes or until thoroughly defrosted. R-1900M [EN].indd Sec1:29 R-1900M [EN].indd Sec1:29 9/9/08 2:37:24 PM 9/9/08 2:37:24 PM... - Page 31 3. If pieces are stuck together separate as soon as possible. 4. Turn over, rearrange after the audible sound. 5. After defrosting allow to stand for 15-45 mins. R-1900M [EN].indd Sec1:30 R-1900M [EN].indd Sec1:30 9/29/08 1:36:39 PM 9/29/08 1:36:39 PM...
-
Page 32: Cooking Chart
fi lm and pierce in 4-5 places. Chilled (5°C) 2. Leave to stand for 2-3 minutes before serving. Trout 3 mins MEDIUM HIGH As above (whole) /450g (1lb) (70%) Chilled (5°C) R-1900M [EN].indd Sec1:31 R-1900M [EN].indd Sec1:31 9/9/08 2:37:24 PM 9/9/08 2:37:24 PM... - Page 33 1. Chop or leave whole as desired. (fresh) for 225g (8oz) (70%) 2. Place in dish, cover with microwave cling fi lm and pierce Room (20°C) in 4-5 places. 3. Stir halfway through cooking. R-1900M [EN].indd Sec1:32 R-1900M [EN].indd Sec1:32 9/9/08 2:37:25 PM 9/9/08 2:37:25 PM...
- Page 34 • The cooking times given above are provided as a guide only. Cooking times will vary according to food weight, quality and initial temperature. Please ensure that food is thoroughly cooked before serving. R-1900M [EN].indd Sec1:33 R-1900M [EN].indd Sec1:33 9/9/08 2:37:25 PM...
-
Page 35: Reheating Chart
400g (14oz) As above 2 mins 30 sec Dumplings Bangers & Chilled 325g (12oz) Place on a plate, cover with cling fi lm 1 min 15 sec Mash R-1900M [EN].indd Sec1:34 R-1900M [EN].indd Sec1:34 9/9/08 2:37:25 PM 9/9/08 2:37:25 PM... - Page 36 35 sec (175g) (6oz) each As above 1 min 10 sec Sausage Roll(s) Chilled Place on a plate, uncovered 15 sec 75g (3oz) each As above 25 sec R-1900M [EN].indd Sec1:35 R-1900M [EN].indd Sec1:35 9/9/08 2:37:25 PM 9/9/08 2:37:25 PM...
- Page 37 Place on the turntable, uncovered 1 min Potatoes New Potatoes Chilled 225g (8oz) Place on a plate, uncovered 1 min Brussels Chilled 225g (8oz) Place on a plate, uncovered 30 sec Sprouts R-1900M [EN].indd Sec1:36 R-1900M [EN].indd Sec1:36 9/9/08 2:37:25 PM 9/9/08 2:37:25 PM...
- Page 38 • The reheating times given above are provided as a guide only. Reheating times will vary according to food weight, quality and initial temperature. Please ensure that food is thoroughly reheated before serving. R-1900M [EN].indd Sec1:37 R-1900M [EN].indd Sec1:37 9/9/08 2:37:26 PM...
-
Page 39: Caution
8. Stir liquids briskly before heating and allow to stand at least for 20 seconds after heating before stirring or drinking to avoid eruption. R-1900M [EN].indd Sec1:38 R-1900M [EN].indd Sec1:38 9/9/08 2:37:26 PM... -
Page 40: To Replace The Mains Plug
230-240 Volt, 50Hz alternating current supply. If you do not make the proper electrical connections you WARNING: might damage the oven or injure yourself. Neither SHARP nor the supplier will be liable if this happens. THIS APPLIANCE MUST BE EARTHED. -
Page 41: Specifi Cations
SHARP Electronics (U.K.) Ltd. • The illustrations, technical information and data contained in this publication to our best knowledge, were correct at the time of going to print. - Page 42 If the product is used for business purposes and you want to discard it: Please contact your SHARP dealer who will inform you about the take-back of the product. You might be charged for the costs arising from take-back and recycling. Small products (and small amounts) might be taken back by your local collection facilities.
Need help?
Do you have a question about the R-1900M and is the answer not in the manual?
Questions and answers
The filter error will not reset
To reset the filter error on a Sharp R-1900M, use the Custom Setting Function for the Air Intake Filter Counter. Follow these steps:
1. Press the CUSTOM SETTING pad twice within 2 seconds.
2. Enter 7 to display the total usage.
3. Press the START pad to reset the counter to “0”.
This will stop the FILTER indicator from flashing, reminding you to clean the air intake filter.
This answer is automatically generated