Table of Contents
Advertisement
Quick Links
Advertisement
Table of Contents

Related Manuals for Konica Minolta 7915


Summary of Contents for Konica Minolta 7915
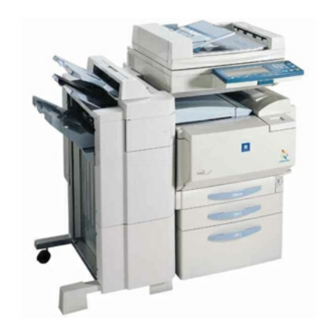
- Page 1 7915/ 7920...
-
Page 2: Energy Star
® Energy Star ® As an ENERGY STAR Partner, we have determined that this machine ® meets the ENERGY STAR Guidelines for energy efficiency. ® *The ENERGY STAR Guidelines are not met if printer controller Fiery Z4 is installed. ® What is an ENERGY STAR Product? ®... -
Page 3: Table Of Contents
CONTENTS CONTENTS Introduction We Want You to Be a Satisfied Customer ........1-1 SAFETY INFORMATION..............1-1 Warning and Precaution Symbols...........1-1 Meaning of Symbols................1-2 WARNING..................1-2 CAUTION ..................1-4 Precautions for Routine Use ............1-5 CE Marking (Declaration of Conformity) for Users of the European Union (EU) ..........1-6 For users in countries subject to Class B regulations .....1-6 For users in countries not subject to Class B regulations ....1-6 LED Radiation Safety..............1-7... - Page 4 CONTENTS Before Making Copies Available Features................ 3-1 Components and Their Functions ..........3-6 Parts Names and Their Functions ..........3-10 Outside of Copier................3-10 Inside of Copier ................3-12 Supplies and Parts ............... 3-13 Duplexing Document Feeder (Optional) ........3-14 Duplex Unit (Optional) ..............
- Page 5 CONTENTS Copy Paper Paper Specifications..............4-1 Paper Types..................4-1 Paper Sizes..................4-2 Paper Types To Be Avoided ............4-4 Print Area ..................4-5 Paper Storage................4-5 Loading Paper ................4-6 To load paper into the 1st drawer (250-sheet multipurpose tray) ...4-6 To set the paper size for the 1st drawer........4-10 To load paper into the 2nd drawer or the 500-sheet paper feed unit ................
- Page 6 CONTENTS Basic Operations Making Copies ................6-1 To copy a document (To make a basic copy)......... 6-1 Selecting the Paper Source ............6-4 To select the paper source before copying ........6-4 Making Copies on Paper Loaded into the 1st Drawer (Multipurpose Paper Drawer) ............
- Page 7 CONTENTS Finishing (“Sort” and “Group” settings) ........7-8 Non-Sort:..................7-8 Sort:....................7-8 Group: .....................7-9 Sorting/Grouping ................7-10 To select the finishing settings ............7-11 Staple Binding ................7-12 Types of stapling ................7-12 Staple position................7-13 Hole Punching (“Hole-Punch” Setting)........7-15 Types of hole punching ..............7-15 Punched hole position:..............7-15 Feeding Documents of Different Sizes (“Mixed Orig Detection”...
- Page 8 CONTENTS Utility Mode Operations Resetting the Copier (“Default Settings” Function)....8-1 To specify the default settings ............8-1 Viewing Counters (“Meter Count” Function) ......8-2 To view the meter counts ............... 8-3 Storing and Recalling Jobs (“Job Memory Input” Function) ... 8-4 To store a job..................
- Page 9 CONTENTS Specifying the Expert Settings (“Expert User’s Mode” Function)..................9-20 To change the Expert User’s Mode settings .........9-20 To set the “Thick Paper and OHP Film Image Density” parameter..................9-22 To set the “Color Shift Correction” parameters ......9-23 To set the “Stabilizer” parameter........... 9-26 To set the “PRT Area (Top Margin)”...
- Page 10 When the Copier Is Not Operating Correctly ......11-3 12 Appendix 12.1 Specifications ................12-1 Copier Konica 7915/Konica 7920 ..........12-1 Duplexing Document Feeder DF-331........... 12-3 500-sheet Paper Feed Unit PF-231..........12-3 Large Capacity Tray DB-431 ............12-4 Duplex Unit AD-231..............12-4 10-Mailbin Sorter ST-134 .............
-
Page 11: Introduction
Introduction Introduction We Want You to Be a Satisfied Customer Thank you for choosing a Konica 7915/7920. To ensure the best performance and effective use of your copier, this manual will provide information on the following topics: Getting to Know Your Copier. -
Page 12: Meaning Of Symbols
Should a piece of metal, water, or any other similar foreign matter get inside the product, immediately turn OFF the power switch, unplug the power cord from the power outlet, and then call your authorized service representative. Konica 7915/7920... - Page 13 Do not throw the toner cartridge or toner into an open flame. The hot toner may scatter and cause burns or other damage. Connect the power cord to an electrical outlet that is equipped with a ground- ing terminal. Konica 7915/7920...
-
Page 14: Caution
Dust that accumulates between the plug terminals may cause a fire. • When unplugging the power cord, be sure to hold onto the plug. Pulling on the power cord could damage the cord, resulting in a fire or electrical shock. Konica 7915/7920... -
Page 15: Precautions For Routine Use
Do not touch or scratch the surface of imaging unit developing roller and the PC drum, as poor image quality could result. Use the supplies and consumables recommended by the dealer. Use of any supply or consumable not recommended could result in poor image quality and breakdown. Konica 7915/7920... -
Page 16: Ce Marking (Declaration Of Conformity) For Users Of The European Union (Eu)
This device must be used with shielded interface (Parallel) cable and shielded network (10/100Base-T) cable. The use of non-shield cables is likely to result in interference with radio communications and is prohibited under CISPR 22 and local rules. Konica 7915/7920... -
Page 17: Led Radiation Safety
Pour avoir la certitude de travailler dans un environnment réunissant des conditions de confort, santé et de sécurité, il est préférable de bien aérer la pièce ou se trouve l’appareil. Konica 7915/7920... -
Page 18: Caution Label
Do not remove caution label or indicators. CAUTION Install this machine so that it can quickly be unplugged from the electrical outlet in case of an emergency. ➜ The socket-outlet shall be installed near the machine and shall be eas- ily accessible. Konica 7915/7920... -
Page 19: Guide To Manuals
➜ Observe all cautions in order to ensure safe use of the copier. Note (*May also appear as “Important” or “Tip”) Text highlighted in this manner contains useful information and tips to ensure safe use of the copier. Konica 7915/7920... - Page 20 Text formatted in this style pro- vides additional assistance. ➜ Text formatted in this style describes the action that will ensure the desired results are achieved. [Copy] key The names of keys on the control panel are written as shown above. 1-10 Konica 7915/7920...
-
Page 21: Explanation Of Basic Concepts And Symbols
During copying, paper is supplied from the right side of the copier and fed into the copy tray on the top or the output option at the left with the printed surface of the copy facing down. The paper feed direction is shown by the arrows in the diagram below. Konica 7915/7920 1-11... -
Page 22: Width" And "Length
The icons shown below are displayed when the corresponding paper is loaded or copy is made. : Overhead projector transparencies : Thick paper 1 : Second side of a double-sided copy : Second side of a double-sided copy on thick paper 1-12 Konica 7915/7920... -
Page 23: Features
High-quality, business-standard images with a resolution of 600 dpi (true) × 1800 dpi (simulated)/256 variations High-speed full-color printing (Letter landscape/continuous copying) at 20 sheets per minute with the Konica 7920 (15 sheets per minute with the Konica 7915) Makes multiple copies from one scan... - Page 24 Introduction 1-14 Konica 7915/7920...
-
Page 25: Precautions
A location that is not near any kind of heating devices Power source The power source requirements are as follows. Voltage fluctuation: Maximum ±10% Frequency fluctuation: Maximum ±0.3% ❍ Use a power source with as little voltage or frequency fluctuations as possible. Konica 7915/7920... -
Page 26: Space Requirements
1,397 (55) 510 (20) 787 (31) 1,707 (67-1/4) (10-3/4) 1,222 (48) (8-1/4) Unit: mm (inch) Note Be sure to allow a clearance of 100 mm (4 in.) or more at the back of the copier for the ventilation duct. Konica 7915/7920... -
Page 27: Operation Precautions
A negligible amount of ozone is generated during normal operation of this copier. An unpleasant odor may, however, be detected in poorly ventilated rooms during extensive copier operations. ➜ For a comfortable operating environment, it is recommended that the room be well ventilated. Konica 7915/7920... -
Page 28: Transporting The Copier
Store in a sealed plastic bag in a cool, dark place paper that has been removed from its wrapper but not loaded into the copier. Only use toner that has been manufactured specifically for this copier. Never use other types of toner. Keep all supplies out of the reach of children. Konica 7915/7920... -
Page 29: Storage Of Copies
Copies pasted together using adhesive that contains solvent (e.g., spray glue) may dissolve the toner on the copies. Color copies have a thicker layer of toner than normal black-and-white copies. Therefore, when a color copy is folded, the toner at the fold may peel off. Konica 7915/7920... -
Page 30: Legal Restrictions On Copying
Copyrighted works without permission of the copyright owner In addition, it is prohibited under any circumstances to copy domestic or foreign currencies, or works of art without permission of the copyright owner. When in doubt about the nature of a document, consult with legal counsel. Konica 7915/7920... -
Page 31: Before Making Copies
The main copy settings available with this copier are listed below. For de- tails on their operation, refer to the pages indicated. Orig. Ö Copy (Refer to page 7-1.) Single-Sided Ö Single-Sided Single-Sided Ö Double-Sided Double-Sided Ö Single-Sided Double-Sided Ö Double-Sided Single-Sided Ö Single–2in1 Konica 7915/7920... - Page 32 The “Double-Sided” and the “Double–2in1” Copy settings are only available if the duplex unit and the memory are installed. Zoom settings (Refer to page 6-14.) Reduced/Full Size/Enlarged Finishing (Refer to page 7-8, page 7-12, and page 7-15.) “Sort” setting Konica 7915/7920...
- Page 33 The “Sort” and “Group” settings are only available if the 10-mailbin sorter is installed. The “Staple” and “Hole-Punch” settings are only available if both the finisher and the printer controller are installed, and the print job is sent from the computer. Konica 7915/7920...
- Page 34 “OHP Interleaving” function (Refer to page 7-30.) “Frame Erase” function (Refer to page 7-19.) “Mirror Image” function (Refer to page 7-21.) “X/Y Zoom” function (Refer to page 7-32.) “Postcard” function (Refer to page 7-33.) “Image Repeat” function (Refer to page 7-35.) Konica 7915/7920...
- Page 35 Before Making Copies Note The “X/Y Zoom”, “Postcard” and “Image Repeat” functions are only available if the memory is installed. (7915 only) “Mixed Orig Detection” function (Refer to page 7-17.) Mixed originals Note The “Mixed Orig Detection” function is only available if the duplexing document feeder is installed.
-
Page 36: Components And Their Functions
Prints the image scanned with the scanner Original cover CV-131 (optional) Presses down on the loaded docu- ment Duplexing document feeder DF-331 (optional) Automatically feeds and scans one document sheet at a time, and auto- matically turns over double-sided documents and scans them Konica 7915/7920... - Page 37 (sorting, grouping, stapling, or hole-punching [Only with finisher FS-134 installed.]) selected at the computer, then feeds out the pages Duplex unit AD-231 (optional) Automatically turns over copies, al- lowing double-sided copies to be made Konica 7915/7920...
- Page 38 (ST-134) or an optional finish- er (FS-134/FS-133) is installed with- out an optional paper feed unit Copy table (optional) Used when the optional 10-mailbin sorter (ST-134) or an optional finish- er (FS-134/FS-133) is installed with two optional paper feed units in- stalled Konica 7915/7920...
- Page 39 Fiery X3e and ena- bles use as a multifunctional printer Memory (256 MB: 128 MB × 2) MU-431 (optional with 7915; standard installation with 7920) Increases the memory of the copier, allowing functions such as dou- ble-sided and 2in1 copying to be performed...
-
Page 40: Parts Names And Their Functions
Before Making Copies Parts Names and Their Functions Outside of Copier * The original cover, copier stand, and copy desk shown installed in the illustration are optional. 3-10 Konica 7915/7920... - Page 41 Used for connecting the scanner’s power cord socket (outlet) Scanner connector Used for connecting the scanner hookup cord Printer power cord Used for connecting the printer’s power cord socket Sorter/finisher connec- Used for connecting the sorter or finisher hookup cord Konica 7915/7920 3-11...
-
Page 42: Inside Of Copier
Opened when adding toner Imaging unit release le- Used to install and replace the imaging unit Imaging unit removing Used to remove the imaging unit bracket Upper right-side door Opened when replacing the fusing unit or clearing misfeeds 3-12 Konica 7915/7920... -
Page 43: Supplies And Parts
Ozone filter Collects the ozone generated in the copier LED cleaning tool Used to clean the surface of the LED unit, for example when replacing the image transfer belt unit Store in a safe place for later use. Konica 7915/7920 3-13... -
Page 44: Duplexing Document Feeder (Optional)
See p. 5-4. Document feed tray Load the documents to be copied. See p. 5-4. Misfeed clearing cover Opened when clearing a misfed document F1/F2 Single-sheet feed tray Open to feed one sheet of the document at a time 3-14 Konica 7915/7920... -
Page 45: Duplex Unit (Optional)
Before Making Copies Duplex Unit (Optional) Part Name Description Duplex unit door Opened when clearing paper misfed within the duplex unit Konica 7915/7920 3-15... -
Page 46: 10-Mailbin Sorter (Optional)
Collects copies that are sorted Upper door/Lower door Opened when clearing paper misfed within the sorter Horizontal transport Transports copies to the sorter or finisher unit Horizontal transport Opened when clearing paper misfed within the horizontal unit cover transport unit 3-16 Konica 7915/7920... -
Page 47: Finisher (Optional)
Sort” setting) Lower paper output Collects copies that are sorted tray Front door Opened when clearing paper misfed within the finisher Right-side door Opened when replacing the staple cartridge or clearing pa- (FS-134 only) per misfeeds Konica 7915/7920 3-17... -
Page 48: Paper Feed Unit (Optional)
Before Making Copies Paper Feed Unit (Optional) Part Name Description 3rd drawer Holds 500 sheets of paper The paper size can be adjusted freely. 4th drawer As many as two units can be installed. See p. 4-12. 3-18 Konica 7915/7920... -
Page 49: Large Capacity Tray (Optional)
Holds 2,500 sheets of paper See p. 4-14. Printer Controller Fiery Z4 For more details, refer to the manual of the printer controller. Printer Controller Fiery X3e For more details, refer to the manual of the printer controller. Konica 7915/7920 3-19... -
Page 50: Names Of Control Panel Parts And Their Functions
• Full Color: The copier makes a full-color copy of the doc- ument. • Black: The copier makes a black-and-white copy regard- less of the color of the document. 3-20 Konica 7915/7920... - Page 51 • The [Scan] key indicator lights up in green to indicate that the copier is in Scanner mode. Keypad • Use to type in the number of copies to be made. • Use to type in the zoom ratio. • Use to type in the various settings. Konica 7915/7920 3-21...
-
Page 52: Using The Touch Panel
Note The screen illustrations in this manual may be slightly different from the screens that appear on your copier’s touch panel. Organization of Screens Screen tabs Message display Available functions/settings Selected settings 3-22 Konica 7915/7920... - Page 53 Select a different function to display the corresponding screen. Example) The available zoom ratio settings are shown above. * The currently selected setting appears in the tab. Selected settings The current settings are shown by messages and graphics. Konica 7915/7920 3-23...
-
Page 54: Operating The Touch Panel
To activate a function or to select a setting, lightly touch the desired func- tion or setting shown on the touch panel. CAUTION Be careful not to damage the touch panel. ➜ Never push on the touch panel, and never push on it using a hard or pointed object. 3-24 Konica 7915/7920... -
Page 55: Useful Operations
The length of time until the copier automatically resets itself can be set between 1 and 9 minutes. The “Auto Panel Reset” parameter can even be turned off. For more details, refer to “Specifying Default Settings (“User’s Choice” Function)” on page 8-8 and page 8-15. Konica 7915/7920 3-25... -
Page 56: Energy Saver Mode
The length of time until the copier enters Sleep mode can be set between 15 and 240 minutes. The “Sleep Mode” parameter can even be turned off. For more details, refer to “Specifying Default Settings (“User’s Choice” Function)” on page 8-8 and page 8-17. 3-26 Konica 7915/7920... -
Page 57: Interrupting Copy Jobs
If the large-capacity cabinet (DB-431) is also in- stalled, up to 3,250 sheets of “A4C” paper can be fed continuously. Konica 7915/7920 3-27... -
Page 58: Access Codes
Scanning From the Computer If the optional printer controller is installed, the copier can be used as an A3 full-color scanner configured into a computer network. For operating details, refer to the manual for the printer controller. 3-28 Konica 7915/7920... -
Page 59: Power Switch And Default Settings
The length of time until the copier enters Energy Saver mode or Sleep mode can be set using the “User’s Choice” function. For more details, refer to “Specifying Default Settings (“User’s Choice” Function)” on page 8-8, page 8-16, and page 8-17. Konica 7915/7920 3-29... -
Page 60: Turning On The Copier
Number of copies: 1 Original Image Type: Text&Photo Zoom: Full Size (×1.000) Paper: Auto Paper Orig. Ö Copy: Single-Sided Ö Single-Sided Finishing: Non-Sort The default settings can be customized using the “User’s Choice” function. (Refer to page 8-1.) 3-30 Konica 7915/7920... -
Page 61: Copy Paper
2: If the optional duplex unit is used to make double-sided copies, only certain types of paper can be used. 3: If the optional 10-mailbin sorter is used to sort or group copies, only certain types of paper can be used. Konica 7915/7920... -
Page 62: Paper Sizes
3: If the optional 10-mailbin sorter is used to sort or group copies, only certain types of paper can be used. 4: The size should be entered using the “User’s Choice” function. 5: The paper size should be changed by your service representative. Konica 7915/7920... -
Page 63: Paper Capacity
2nd Drawer 500 sheets — — — — Paper Feed Unit 500 sheets — — — — Large Capacity 2,500 — — — — Tray sheets * 1: The paper feed unit and large capacity tray are optional. Konica 7915/7920... -
Page 64: Paper Types To Be Avoided
Paper that has been decorated with foil or embossing Paper of various sizes Paper of a non-standard shape (not rectangular) Paper that is bound with glue, staples, or clips Paper with labels attached Paper with ribbons, hooks, buttons, etc. attached Konica 7915/7920... -
Page 65: Print Area
Not exposed to direct sunlight Not exposed to fire Not exposed to high humidity Not extremely dusty ✚ Unwrapped paper should be stored in a plastic bag in a cool, dry loca- tion. Keep paper out of the reach of children. Konica 7915/7920... -
Page 66: Loading Paper
Slide the lateral guides to fit the size of paper to be loaded. ❍ For paper of a non-standard size, first load the paper, and then adjust the lateral guides to the size of the loaded paper. Konica 7915/7920... - Page 67 ➜ We recommend replenishing the paper only after all of the paper in the drawer has been used. Konica 7915/7920...
- Page 68 When loading postcards, load them as shown. ➜ Do not load postcards cross- wise, as shown. Are the recommended overhead projector transparencies loaded? ➜ When loading the recommend- ed overhead projector transpar- encies, load them as shown in the illustration. Konica 7915/7920...
- Page 69 “Thick 1”. Setting the Paper Size The default setting for the paper size of the 1st drawer is “Auto Detect”. For postcards, non-standard or inch paper sizes, change the paper size according to the procedure in the following section. Konica 7915/7920...
-
Page 70: To Set The Paper Size For The 1St Drawer
Copy Paper To set the paper size for the 1st drawer Press the [Utility] key to enter Utility mode. Touch [User’s Choice]. Touch [2/2] to view the next page. Touch [1st Drawer Paper Select]. 4-10 Konica 7915/7920... - Page 71 [X] and [Y], and use the keypad to specify the desired size, and then touch [Enter]. In the Input Size screen, touch [Enter]. In the 1st Drawer Paper Size screen, touch [Enter]. In the User’s Choice screen, touch [Exit]. Konica 7915/7920 4-11...
-
Page 72: To Load Paper Into The 2Nd Drawer Or The 500-Sheet Paper Feed Unit
Press down on the paper-lifting plate until it locks into place. Remove the trailing-edge guide, and then re-install it for the size of paper to be loaded. Slide the lateral guides to fit the size of paper to be loaded. 4-12 Konica 7915/7920... - Page 73 Slide the lateral guides against the edges of the paper. ❍ Make sure that the paper is not curled when it is loaded. Check that the lateral guides are pushed up against the edges of the paper. Close the paper drawer. Konica 7915/7920 4-13...
-
Page 74: To Load Paper Into The Large Capacity Tray
➜ We recommend replenishing the paper only after all of the paper in the drawer has been used. 4-14 Konica 7915/7920... - Page 75 ➜ We recommend replenishing the paper only after all of the paper in the drawer has been used. Close the paper drawer. Konica 7915/7920 4-15...
-
Page 76: To Load Paper Into The Manual Bypass Tray
➜ Feed only one sheet of paper at a time. ➜ Copies will be made on the surface of the paper facing down when it is loaded into the manual bypass tray. 4-16 Konica 7915/7920... - Page 77 When loading a postcard, load it as shown. ➜ Do not load the postcard cross- wise, as shown. Is the recommended overhead projector transparency loaded? ➜ When loading the recommend- ed overhead projector transpar- ency, load it as shown in the illustration. Konica 7915/7920 4-17...
- Page 78 Do you wish to specify a non-standard paper size? ➜ Touch [X] and [Y], and use the keypad to specify the desired size, and then touch [Enter]. Touch [Paper Type], select the setting for the type of paper loaded, and then touch [Enter]. 4-18 Konica 7915/7920...
-
Page 79: Original Documents
This method is best with books and other docu- ments that cannot be fed through the duplexing document feeder. See p. 5-11, p. 5-12, p. 5-13, p. 5-14. Konica 7915/7920... -
Page 80: Document Paper Types
Standard size documents larger than A3 or smaller than A5 Documents that are transparent or translucent, such as overhead transparencies or diazo photosensitive paper Wrinkled, folded, rolled, or torn documents Documents bound with clips or staples Coated documents such as carbon-backed paper Konica 7915/7920... -
Page 81: Precautions For Manual Feeding
Scan without closing the original cover or duplexing document feeder. In addition, do not press down extremely hard on the document, otherwise the copier may be damaged. (The original glass can only resist a weight of up to 2 kg.) Konica 7915/7920... -
Page 82: Feeding The Document Through The Duplexing Document Feeder
Be sure to adjust the paper guide to the size of the document, other- wise the documents may not be fed in straight. Slide the adjustable document guide to fit the size of the documents. Load the documents face up into the document feed tray. Konica 7915/7920... -
Page 83: Multi-Sheet Feeding (Documents Of Mixed Sizes)
With this feature, a stack of documents of different sizes can be copied as a set using the duplexing document feeder. (For more details, refer to “Feeding Documents of Different Sizes (“Mixed Orig Detection” Function)” on page 7-17.) Konica 7915/7920... -
Page 84: To Make Copies Using Multi-Sheet Feeding (Documents Of Mixed Sizes)
Slide the adjustable document guide to the edge of the largest document. Press the [Start] key to start feeding and copying the documents from the top page. Konica 7915/7920... -
Page 85: Single-Sheet Feeding (Standard Paper/Thick Paper)
Zoom setting and the number of copies). Do you need more information about the settings? ➜ Refer to “6 Basic Operations” and “7 Advanced Operations”. Open the single-sheet feed tray, and then slide the adjustable document guide to fit the size of the document. Konica 7915/7920... - Page 86 Insert the document pages one at a time. ➜ Be sure the documents are not folded or curled when they are fed. Make sure the indicator on the [Start] key lights up in green before feeding the next page of the document. Konica 7915/7920...
-
Page 87: Single-Sheet Feeding (Thin Paper)
(such as the zoom ratio and the number of copies). For more details, refer to “6 Basic Operations” and “7 Advanced Opera- tions”. Continue with steps 2 through 4 of “Single-Sheet Feeding (Standard Paper/Thick Paper)” on page 5-7. Konica 7915/7920... -
Page 88: Positioning The Document On The Original Glass
Lift open the original cover, or the duplexing document feeder if it is in- stalled, 15° or more, otherwise the document size will not be detected and the correct paper size or zoom ratio may not be selected automat- ically. 15° 5-10 Konica 7915/7920... -
Page 89: Manual Feeding (Sheet Documents)
Close the original cover, or the duplexing document feeder if it is in- stalled. Select the desired settings. Do you need more information about the settings? ➜ Refer to “6 Basic Operations” and “7 Advanced Operations”. Press the [Start] key to copy the document. Konica 7915/7920 5-11... -
Page 90: Manual Feeding (Transparent Or Translucent Documents)
A3 W ide original glass. Place a blank sheet of paper of the same size as the document over the document. Close the original cover, or the duplexing document feeder if it is in- stalled. 5-12 Konica 7915/7920... -
Page 91: Manual Feeding (Books)
Close the original cover, or the duplexing document feeder if it is in- stalled. Is a thick book or object being copied? ➜ Make the copy without closing the original cover or duplexing doc- ument feeder. Konica 7915/7920 5-13... -
Page 92: Manual Feeding ("A3Wide" Paper)
“A3Wide” mark on the top docu- A3Wide ment width scale as shown in the il- lustration. Close the original cover, or the duplexing document feeder if it is in- stalled. 5-14 Konica 7915/7920... - Page 93 Original Documents Select the desired settings. Do you need more information about the settings? ➜ Refer to “6 Basic Operations” and “7 Advanced Operations”. Press the [Start] key to copy the document. Konica 7915/7920 5-15...
- Page 94 Original Documents 5-16 Konica 7915/7920...
-
Page 95: Basic Operations
Type set to “Text&Photo”, Zoom set to “×1.000”, Paper set to “Auto Pa- per”, and the number of copies set to “1”. Press the [Copy] key to enter Copy mode. Position the document(s) to be cop- ied. (Refer to page 5-1 for more de- tails.) Konica 7915/7920... - Page 96 Does the wrong number of cop- ies appear? ➜ Press the [C] (clear) key, and then enter the correct number of copies. ➜ The number of copies can only be set to a number between 1 and 100. Konica 7915/7920...
- Page 97 Do you wish to stop copying be- fore the set number of copies are made? ➜ Press the [Stop] key. Note During the process of successive copying jobs, the machine may stop printing temporarily to maintain the copy quality. Konica 7915/7920...
-
Page 98: Selecting The Paper Source
❍ Original Image Type (Refer to page 6-18 for more details.) ❍ Density (Refer to page 6-20 for more details.) Using the keypad, enter the number of copies you wish to make, and then press the [Start] key. Konica 7915/7920... -
Page 99: Making Copies On Paper Loaded Into The 1St Drawer (Multipurpose Paper Drawer)
Paper types: Standard paper (thickness: 64 to 90 g/m Thick paper 1 (thickness: 91 to 163 g/m Overhead projector transparencies Second side of a double-sided copy on standard paper Second side of a double-sided copy on thick paper 1 Konica 7915/7920... -
Page 100: To Copy A Document
❍ Original Image Type (Refer to page 6-18 for more details.) ❍ Density (Refer to page 6-20 for more details.) Using the keypad, enter the number of copies you wish to make, and then press the [Start] key. Konica 7915/7920... -
Page 101: Feeding Paper Manually
Minimum size: 90 × 140 mm To feed the paper manually Position the document(s) to be copied. (Refer to page 5-1 for more de- tails.) Select the desired color mode. (Refer to page 3-20 for more details.) Open the manual bypass tray. Konica 7915/7920... - Page 102 Has paper not been loaded into the manual bypass tray yet? ➜ Copies can also be made by loading paper into the manual bypass tray after selecting the paper size by touching [Paper] in the Basic screen, then touching [Bypass]. Konica 7915/7920...
-
Page 103: To Make Copies Onto Overhead Projector Transparencies
Position the document(s) to be copied. (Refer to page 5-1 for more de- tails.) Select the desired color mode. (Refer to page 3-20 for more details.) Open the manual bypass tray. Konica 7915/7920... - Page 104 Specify any other necessary settings. ❍ Zoom (Refer to page 6-14 for more details.) ❍ Original Image Type (Refer to page 6-18 for more details.) ❍ Density (Refer to page 6-20 for more details.) Press the [Start] key. 6-10 Konica 7915/7920...
-
Page 105: To Make Copies Onto Postcards
[A6Card]. The “Paper Type” setting automati- cally changes to “Thick Paper 2”. (* Setting the paper size for the manual bypass tray to “A6Card” au- tomatically changes the “Paper Type” setting to “Thick Paper 2”.) Konica 7915/7920 6-11... -
Page 106: To Make Copies Onto Thick Paper
Make sure that the screen that allows you to select the manual bypass tray paper size is displayed, check that the desired paper size is selected, and then touch [Paper Type]. 6-12 Konica 7915/7920... - Page 107 Specify any other necessary settings. ❍ Zoom (Refer to page 6-14 for more details.) ❍ Original Image Type (Refer to page 6-18 for more details.) ❍ Density (Refer to page 6-20 for more details.) Press the [Start] key. Konica 7915/7920 6-13...
-
Page 108: Specifying A Zoom Setting
0.001 increments. Keep touching the arrow to change the zoom ratio more quickly. Full Size: This setting makes a copy the same size as the document (×1.000). CustomZoom: With this setting, the keypad can be used to enter a zoom ratio. 6-14 Konica 7915/7920... -
Page 109: To Specify The Zoom Ratio Before Copying
Original Image Type (Refer to page 6-18 for more details.) ❍ Density (Refer to page 6-20 for more details.) Using the keypad, enter the number of copies you wish to make, and then press the [Start] key. Konica 7915/7920 6-15... -
Page 110: To Record A Zoom Ratio
Do you know what is the range for the “Minimal” zoom ratio? ➜ The zoom ratio of the “Minimal” setting can be set between × 0.900 and × 0.999. Touch [Enter]. 6-16 Konica 7915/7920... -
Page 111: To Recall A Recorded Zoom Ratio
The recorded zoom ratios can be recalled whenever they are needed. In the screen that allows you to select the zoom ratio, touch [CustomZoom]. Touch the zoom ratio that you wish to recall (“1”, “2” or “Minimal”). Touch [Enter]. Konica 7915/7920 6-17... -
Page 112: Selecting The Original Image Type
If moiré effects should occur in copies containing lines or shading, re- duce their effects by selecting the appropriate setting. “Gradation” is the default setting; however, “Resolution” is also available. These settings are only available if “Text&Photo”, “Photo Image” or “Printed Image” are selected. 6-18 Konica 7915/7920... -
Page 113: To Select The Document Type Before Copying
Paper (Refer to page 6-4 for more details.) ❍ Zoom (Refer to page 6-14 for more details.) ❍ Density (Refer to page 6-20 for more details.) Using the keypad, enter the number of copies you wish to make, and then press the [Start] key. Konica 7915/7920 6-19... -
Page 114: Specifying The Copy Density
Position the document(s) to be copied. (Refer to page 5-1 for more de- tails.) Select the desired color mode. (Refer to page 3-20 for more details.) Make sure that the Basic screen is displayed, and then touch [Original/ Density]. 6-20 Konica 7915/7920... - Page 115 Zoom (Refer to page 6-14 for more details.) ❍ Original Image Type (Refer to page 6-18 for more details.) Using the keypad, enter the number of copies you wish to make, and then press the [Start] key. Konica 7915/7920 6-21...
-
Page 116: Interrupting A Copy Job
When the [Interrupt] key is pressed, all functions and settings are reset to their defaults. Using the keypad, enter the number of copies you wish to make, and then press the [Start] key to copy the other document. 6-22 Konica 7915/7920... - Page 117 After the other document is copied, press the [Interrupt] key. The indicator on the [Interrupt] key goes off. Reposition the document for the interrupted copy job that was re- moved in step 2. Press the [Start] key. The interrupted copy job continues. Konica 7915/7920 6-23...
- Page 118 Basic Operations 6-24 Konica 7915/7920...
-
Page 119: Advanced Operations
Single-Sided Ö Single–2in1: Important) ✔ This setting is only available if both the duplexing document feeder (DF-331) and the memory (MU-431) are installed. ➜ This setting makes a single-sided copy of two pages side-by-side from two single-sided documents. Konica 7915/7920... -
Page 120: Single-Sided Ö Double-2In1
(DF-331) and the memory (MU-431) are all installed. ➜ This setting makes a double-sided copy from a double-sided docu- ment. Book (Separation) Ö Single-Sided: ➜ This setting makes a single-sided copy of each of the two pages of an open book. Konica 7915/7920... -
Page 121: Book (Spread) Ö Single-Sided
Book (either Standard Book or RightBound) Ö Book Erase: ➜ This setting erases the area around the text (frame erase) or the bind- ing of the book (centre erase) so that it does not appear in the copy. Konica 7915/7920... -
Page 122: To Make Settings For Single- Or Double-Sided Documents And Copies
10-45.) Since copy quality will decrease when Compress Mode is changed, the setting should normally not be changed. Specify any other necessary settings. Using the keypad, enter the number of copies you wish to make, and then press the [Start] key. Konica 7915/7920... -
Page 123: To Make Settings For Copying A Book
(centre erase) so that it does not appear in the copy, touch [Book Erase]. The Book Erase screen appears. Is frame erasing and centre erasing unnecessary? ➜ If frame erasing and centre erasing are unnecessary, skip to step Konica 7915/7920... - Page 124 ➜ Even if the document size has already been specified using a set- ting on another screen, the size set here determines the document size setting. In the Book screen, touch [Enter]. Specify any other necessary settings. Konica 7915/7920...
- Page 125 Advanced Operations Using the keypad, enter the number of copies you wish to make, and then press the [Start] key. Konica 7915/7920...
-
Page 126: Finishing ("Sort" And "Group" Settings)
Sort: Important) ✔ When used as a copier, the 10-mailbin sorter (ST-134) must be in- stalled. ➜ The copies are automatically divid- ed into sets with each set containing a copy of each page. Konica 7915/7920... -
Page 127: Group
When used as a copier, the 10-mailbin sorter (ST-134) must be in- stalled. ➜ The copies are automatically divid- ed into stacks containing copies of the same page. Note The orientation in which the copies are fed out depends on the select- ed settings. Konica 7915/7920... -
Page 128: Sorting/Grouping
None For a print job*, the printouts are sorted and fed out into the normal copy output tray. 7-10 Konica 7915/7920... -
Page 129: To Select The Finishing Settings
(ST-134) is installed. If the finisher is installed, [Sort] and [Group] do not appear. Specify any other necessary settings. Using the keypad, enter the number of copies you wish to make, and then press the [Start] key. Konica 7915/7920 7-11... -
Page 130: Staple Binding
2-Point stapling (only with finisher FS-134 installed): The printed pages, positioned ac- cording to the specified paper orien- tation, are bound with two staples at the centre, parallel to the edge of the pages. 7-12 Konica 7915/7920... -
Page 131: Staple Position
(FS-134: 64 to 90g/m *Only with finisher FS-134 installed A3L, B4L Printed image: Landscape Paper orientation: Crosswise A4C, B5C Possible paper sizes: A4C, B5C Possible paper types: Standard pa- per (FS-134: 64 to 90g/m *Only with finisher FS-134 installed Konica 7915/7920 7-13... - Page 132 Paper orientation: Lengthwise, Crosswise Possible paper sizes: A3L, B4L, A4C, B5C Possible paper types: Standard paper (64 to 90g/m A4C, B5C For more details on selecting the stapling settings, refer to the manual for the printer controller. 7-14 Konica 7915/7920...
-
Page 133: Hole Punching ("Hole-Punch" Setting)
Number of holes punched: 4 Possible paper sizes: A4C, A3L Possible paper types: Standard paper (64 to 90g/m Punched hole position: The position of the punched hole differs according to the printed image and paper orientation. Possible paper sizes: A4C, A3L Konica 7915/7920 7-15... - Page 134 Advanced Operations Possible paper sizes: A4C, A3L For more details on selecting the “Hole-Punch” setting, refer to the manual for the printer controller. 7-16 Konica 7915/7920...
-
Page 135: Feeding Documents Of Different Sizes ("Mixed Orig Detection" Function)
Select the desired color mode. (Refer to page 3-20 for more detail.) Konica 7915/7920 7-17... - Page 136 Specify any other necessary settings. Using the keypad, enter the number of copies you wish to make, and then press the [Start] key. 7-18 Konica 7915/7920...
-
Page 137: Erasing Edges ("Frame Erase" Function)
Therefore, be careful × 0.5 when selecting this setting while making enlarged or reduced copies. Example) When using the 20 mm 10 mm “Frame Erase” function while copying an A3-size document with a zoom ratio of “× 0.500” Konica 7915/7920 7-19... - Page 138 [Enter]. In the Frame Erase screen, touch [Enter]. Specify any other necessary settings. Using the keypad, enter the number of copies you wish to make, and then press the [Start] key. 7-20 Konica 7915/7920...
-
Page 139: Creating Mirror Image Copy ("Mirror Image" Function)
(otherwise, skip to step 8): To specify the document size, touch [Original Size]. In the Original Size screen, touch [X] and [Y], and use the keypad to specify the desired size, and then touch [Enter]. Konica 7915/7920 7-21... - Page 140 Advanced Operations In the Mirror Image screen, touch [Enter]. Specify any other necessary settings. Using the keypad, enter the number of copies you wish to make, and then press the [Start] key. 7-22 Konica 7915/7920...
-
Page 141: Improving Copy Quality ("Color Adjustment" Function)
Position the document(s) to be copied. (Refer to page 5-1 for more de- tail.) Select the desired color mode. (Refer to page 3-20 for more detail.) Touch [Auxiliary]. The Auxiliary screen appears. Touch [Color Adjustment]. Touch the parameter that you wish to change. Konica 7915/7920 7-23... -
Page 142: To Make Test Prints
The paper for the test print is automatically selected in the following order: A4C, LetterC, A3L, 11 ×17L. While referring to the test prints, touch the arrows to select the desired setting for the current parameter, and then touch [Enter]. Correctly position the document for normal printing. 7-24 Konica 7915/7920... -
Page 143: To Adjust The Hue
[Hue]. Touch the arrows to select the desired setting, and then touch [Enter]. To adjust the saturation This parameter can be used to adjust the vividness of the colors. In the Color Adjustments screen, touch [Saturation]. Konica 7915/7920 7-25... -
Page 144: To Adjust The Brightness
[Enter]. To adjust the brightness This parameter can be used to adjust the brightness of the image. In the Color Adjustments screen, touch [Brightness]. Touch the arrows to select the desired setting, and then touch [Enter]. 7-26 Konica 7915/7920... -
Page 145: To Adjust The Sharpness
[Sharpness]. Touch the arrows to select the desired setting, and then touch [Enter]. To adjust the contrast This parameter can be used to make an image either lighter or darker. In the Color Adjustments screen, touch [Contrast]. Konica 7915/7920 7-27... -
Page 146: To Adjust The Color Balance
Change the color balance of the image by adjusting the concentration of each color (cyan, magenta, yellow and black). In the Color Adjustments screen, touch [Color Balance]. Select the color that you wish to adjust, touch specify the desired setting, and then touch [Enter]. 7-28 Konica 7915/7920... -
Page 147: To Adjust The Density
To adjust the density This parameter can be used to make an image either more rich or more pale. In the Color Adjustments screen, touch [Density]. Touch the arrows to select the desired setting, and then touch [Enter]. Konica 7915/7920 7-29... -
Page 148: Inserting Pages Between Copies Of Overhead Transparencies ("Ohp Interleaving" Function)
Load the overhead transparencies into the 1st drawer, and then set the media type selection dial on the drawer to “OHP”. Select the desired color mode. (Refer to page 3-20 for more detail.) Touch [Auxiliary]. The Auxiliary screen appears. Touch [OHP Interleaving]. 7-30 Konica 7915/7920... - Page 149 Advanced Operations Select the drawer loaded with the interleaves, and then touch [Enter]. Specify any other necessary settings. Press the [Start] key. Konica 7915/7920 7-31...
-
Page 150: Specifying Different Vertical And Horizontal Scaling Proportions ("X/Y Zoom" Function)
Touch [X] or [Y], and use the keypad to enter the desired zoom ratio, and then touch [Enter]. Specify any other necessary settings. Using the keypad, enter the number of copies you wish to make, and then press the [Start] key. 7-32 Konica 7915/7920... -
Page 151: Reducing The Document To Postcard Size And Printing Multiple Copies On One Page ("Postcard" Function)
To set the “Postcard” function Position the document(s) to be copied. (Refer to page 5-1 for more details.) Select the desired color mode. (Refer to page 3-20 for more details.) Touch [Auxiliary]. The Auxiliary screen appears. Touch [Postcard]. Touch [Original Size]. Konica 7915/7920 7-33... - Page 152 Using the keypad, enter the number of copies you wish to make, and then press the [Start] key. Note To purchase postcard paper, contact the sales representative for this copier. 7-34 Konica 7915/7920...
-
Page 153: Tiling Copies ("Image Repeat" Function)
Select the desired color mode. (Refer to page 3-20 for more details.) Touch [Auxiliary]. The Auxiliary screen appears. Touch [Image Repeat]. Make sure that [Zoom] is selected, and then use the keypad to enter the desired zoom ratio. Konica 7915/7920 7-35... - Page 154 [Enter]. The appropriate size of loaded paper for the set zoom ratio, number of copies, and document size is selected. Check the selected paper size, and then touch [Enter]. 7-36 Konica 7915/7920...
- Page 155 Advanced Operations ❍ To manually select the paper source, touch [Paper Size]. Select the tray or drawer containing the paper that you wish to use, and then touch [Enter]. Press the [Start] key. Konica 7915/7920 7-37...
- Page 156 Advanced Operations 7-38 Konica 7915/7920...
-
Page 157: Utility Mode Operations
Press the [Utility] key to enter Utility mode. Touch [Default Settings]. Select the desired setting, and then touch [Enter]. Do you wish to record the cur- rent settings as the default set- tings? ➜ Touch [Current Settings]. In the Utility screen, touch [Exit]. Konica 7915/7920... -
Page 158: Viewing Counters ("Meter Count" Function)
Number of copies/printouts made on paper registered as large-size paper Duplex Copy: Number of double-sided copies made using the duplex unit Duplex Print: Number of double-sided computer printouts made using the duplex unit G. Total (C+P): Total number of all pages copied or printed Konica 7915/7920... -
Page 159: To View The Meter Counts
Do you wish to print out the me- ter counts? ➜ As described by the instructions that are displayed, load paper ) into the first paper drawer, and then press the [Start] key. When you are finished viewing the meter counts, touch [Exit]. Konica 7915/7920... -
Page 160: Storing And Recalling Jobs ("Job Memory Input" Function)
First, specify the copy settings that you will store as a job. Press the [Utility] key to enter Utility mode. Touch [Job Memory Input]. Touch [Input], and then touch the number where you wish to store the job. Konica 7915/7920... -
Page 161: To Delete A Job
Check that the name for the selected job is typed correctly, and then touch [Exit]. To delete a job Press the [Utility] key to enter Utility mode. Touch [Job Memory Input]. Konica 7915/7920... -
Page 162: To Recall A Stored Job
After the entered job name is erased to indicate that the job was deleted, touch [Exit]. To recall a stored job Press the [Copy] key to enter Copy mode. Press the [Job Recall] key. Touch the number of the job that you wish to recall. Konica 7915/7920... - Page 163 Do you wish to select a different job instead? ➜ Touch [Next]. Position the document(s) to be copied. Do you need more information on feeding the document? ➜ Refer to “Original Documents” on page 5-1 for more details. Press the [Start] key. Konica 7915/7920...
-
Page 164: Specifying Default Settings ("User's Choice" Function)
[Panel Reset] key is pressed. To change the User’s Choice settings Press the [Utility] key to enter Utility mode. Touch [User’s Choice]. Touch the parameter that you wish to change. Konica 7915/7920... -
Page 165: To Set The "Language Selected" Parameter
This parameter can be used to change the language of the touch panel. The default setting is “English”. In the User’s Choice screen, touch [Language selected]. Select the desired language, and then touch [Enter]. In the User’s Choice screen, touch [Exit]. Konica 7915/7920... -
Page 166: To Set The "2In1Copy Zoom" Parameter
2in1 copy mode is chosen. The default set- ting is “ON”. In the User’s Choice screen, touch [2in1copy zoom]. Select whether the recommended zoom ratio will be used (“ON”) or not (“OFF”), and then touch [Enter]. In the User’s Choice screen, touch [Exit]. 8-10 Konica 7915/7920... -
Page 167: To Set The "Intelligent Sorting" Parameter
The “Sort” setting is only available if the optional 10-mailbin sorter (ST- 134) is installed. In the User’s Choice screen, touch [Intelligent Sorting]. Select whether intelligent sorting will be used (“ON”) or not (“OFF”), and then touch [Enter]. In the User’s Choice screen, touch [Exit]. Konica 7915/7920 8-11... -
Page 168: To Set The "Acs Determination Level Adjust." Parameter
The default setting is “3 (Std.)”. In the User’s Choice screen, touch [ACS Determination level Adjust.]. Touch [Black] or [Full Color] to specify the standard detection level, and then touch [Enter]. In the User’s Choice screen, touch [Exit]. 8-12 Konica 7915/7920... -
Page 169: To Set The "Confirmation Beep" Parameter
The default setting is “ON”. In the User’s Choice screen, touch [Confirmation Beep]. Select whether the confirmation beep is sounded (“ON”) or not (“OFF”), and then touch [Enter]. In the User’s Choice screen, touch [Exit]. Konica 7915/7920 8-13... -
Page 170: To Set The "Mail Bin Assignment" Parameter
When setting the bins to be used as mailbins, how many bins can be selected? ➜ Bins specified as mailbins cannot be used for sorting when making copies. For the example mentioned above, bins 1 through 4 can be used for sorting while making copies. 8-14 Konica 7915/7920... -
Page 171: To Set The "Auto Panel Reset" Parameter
Do you wish to change the number of minutes entered? ➜ Press the [C] (clear) key to erase the entered number, and then use the keypad to enter the correct number of minutes. In the User’s Choice screen, touch [Exit]. Konica 7915/7920 8-15... -
Page 172: To Set The "Energy Save Mode" Parameter
Do you wish to change the number of minutes entered? ➜ Press the [C] (clear) key to erase the entered number, and then use the keypad to enter the correct number of minutes. In the User’s Choice screen, touch [Exit]. 8-16 Konica 7915/7920... -
Page 173: To Set The "Sleep Mode" Parameter
Do you wish to change the number of minutes entered? ➜ Press the [C] (clear) key to erase the entered number, and then use the keypad to enter the correct number of minutes. In the User’s Choice screen, touch [Exit]. Konica 7915/7920 8-17... -
Page 174: To Set The "1St Drawer Paper Select" Parameter
[Input Size], select the de- sired paper size, and then touch [Enter]. To specify a paper size other than those listed, touch [Custom Size], touch [X] and [Y], and use the keypad to specify the desired size, and then touch [Enter]. 8-18 Konica 7915/7920... - Page 175 Utility Mode Operations In the Input Size screen, touch [Enter]. In the 1st Drawer Paper Size screen, touch [Enter]. In the User’s Choice screen, touch [Exit]. Konica 7915/7920 8-19...
- Page 176 Utility Mode Operations 8-20 Konica 7915/7920...
-
Page 177: Administrator Mode Operations
Be sure to write down this number and store it in a safe place. ✚ If the administrator access code has been change, be sure to notify the appropriate service representative. To change the Administrator Mode settings Press the [Utility] key to enter Utility mode. Touch [Administrator Mode]. Konica 7915/7920... - Page 178 Administrator Mode Operations Using the keypad, enter the four- digit administrator access code. Touch [Copy Track]. The Copy Track screen appears. Touch [ON], and then touch the parameter that you wish to change. Konica 7915/7920...
-
Page 179: To Register Access Codes
Press the [C] (clear) key to erase the entered access code. Has registration of the entered access code been cancelled? ➜ If the entered access code is the same as one that has already been registered, registration is cancelled. Try again using a differ- ent access code. Konica 7915/7920... -
Page 180: To Change The Account Numbers Registered
A maximum of 99 account numbers can be registered at one time. Ad- ditional accounts cannot be added. In the Copy Track screen, touch [ON], and then touch [Access # In- put]. The Access # Input screen appears. Konica 7915/7920... - Page 181 The same account number cannot be registered more than once. ➜ If a previously registered account number is registered again, the previous one is deleted. Touch [Enter] in the Copy Track screen. In the Administrator Mode screen, touch [Exit]. In the Utility screen, touch [Exit]. Konica 7915/7920...
-
Page 182: To Reset Copy Track Mode
In the Copy Track screen, touch [OFF]. The All Accounts Data Reset screen appears. Touch [Yes], and then touch [Enter] to reset the data for all accounts. In the Administrator Mode screen, touch [Exit]. In the Utility screen, touch [Exit]. Konica 7915/7920... -
Page 183: To Check The Number Of Copies Made By Each Account
Load the paper indicated on the screen, and then press the [Start] key again to print the counter table. In the Counter Status screen, touch [Enter]. In the Copy Track screen, touch [Enter]. In the Administrator Mode screen, touch [Exit]. In the Utility screen, touch [Exit]. Konica 7915/7920... -
Page 184: To Reset The Counters For Each Account
Do you wish to reset the counters for all accounts regis- tered? ➜ Touch [All Accts.]. Touch [Yes], and then touch [Enter]. To reset the counters for other ac- counts, repeat steps 2 and 3. In the Counter Reset screen, touch [Enter]. Konica 7915/7920... -
Page 185: To Limit The Type Of Copies For An Account
Touch to select the account whose copies you wish to limit. Select whether color copying and black-and-white copying are al- lowed (“Allow”) or not (“Prohibit”). To limit the copies for other ac- counts, repeat steps 2 and 3. Konica 7915/7920... - Page 186 Administrator Mode Operations In the Permission Level screen, touch [Enter]. In the Copy Track screen, touch [Enter]. In the Administrator Mode screen, touch [Exit]. In the Utility screen, touch [Exit]. 9-10 Konica 7915/7920...
-
Page 187: To Limit The Number Of Copies For An Account
2 through 4. Do you wish to change the number entered? ➜ Press the [C] (clear) key to erase the entered number, and then use the keypad to enter the correct number. Konica 7915/7920 9-11... - Page 188 Administrator Mode Operations In the Account Copy Limitations screen, touch [Enter]. In the Copy Track screen, touch [Enter]. In the Administrator Mode screen, touch [Exit]. In the Utility screen, touch [Exit]. 9-12 Konica 7915/7920...
-
Page 189: Adjusting The Gradation Levels ("Gradation Adjust" Function)
Density” parameter of the Expert User’s Mode must be reset. To adjust the gradation levels Press the [Utility] key to enter Utility mode. Touch [Administrator Mode]. Using the keypad, enter the four- digit administrator access code. Konica 7915/7920 9-13... - Page 190 Close the original cover, and then press the [Start] key to begin adjust- ing the gradation. When the color gradation has been adjusted, the Administrator Mode screen appears. Repeat steps 5 through 8 three times. In the Administrator Mode screen, touch [Exit]. In the Utility screen, touch [Exit]. 9-14 Konica 7915/7920...
-
Page 191: Turning Off The Sleep Function ("Disable Sleep Mode" Function)
Setting this function to “Yes” turns off the Sleep function. The default set- ting is “No”. To turn off the Sleep function Press the [Utility] key to enter Utility mode. Touch [Administrator Mode]. Using the keypad, enter the four- digit administrator access code. Konica 7915/7920 9-15... - Page 192 Administrator Mode Operations Touch [Disable Sleep Mode]. The Disable Sleep Mode screen ap- pears. Touch [Yes], and then touch [Enter]. In the Administrator Mode screen, touch [Exit]. In the Utility screen, touch [User’s Choice]. 9-16 Konica 7915/7920...
- Page 193 If the time in the Sleep Mode screen (displayed by pressing the [Utility] key, touching [User’s Choice], then touching [Sleep Mode]) is set, the Sleep function will again be enabled. For more details, refer to “To set the “Sleep Mode” parameter” on page 8-17. Konica 7915/7920 9-17...
-
Page 194: Erasing Copy Edges ("Erase" Function)
To set the “Erase” function Note) ✔ Discuss any changes to this function with your service representative. Press the [Utility] key to enter Utility mode. Touch [Administrator Mode]. Using the keypad, enter the four- digit administrator access code. 9-18 Konica 7915/7920... - Page 195 Administrator Mode Operations Touch [2/2], and then touch [Erase]. The Tip Erase screen appears. Select the desired setting, and then touch [Enter]. In the Administrator Mode screen, touch [Exit]. In the Utility screen, touch [Exit]. Konica 7915/7920 9-19...
-
Page 196: Specifying The Expert Settings ("Expert User's Mode" Function)
Discuss any changes to the Expert User’s Mode settings with your technical representative. To change the Expert User’s Mode settings Note) ✔ Discuss any changes to this function with your service representative. Press the [Utility] key to enter Utility mode. Touch [Administrator Mode]. 9-20 Konica 7915/7920... - Page 197 Administrator Mode Operations Using the keypad, enter the four-digit administrator access code. Touch [2/2], and then touch [Expert User’s Mode]. The Expert User’s Mode screen ap- pears. Touch the parameter that you wish to change. Konica 7915/7920 9-21...
-
Page 198: To Set The "Thick Paper And Ohp Film Image Density" Parameter
(cyan, magenta, yellow and black), and then touch [Enter]. In the Expert User’s Mode screen, touch [Exit]. In the Administrator Mode screen, touch [Exit]. In the Utility screen, touch [Exit]. 9-22 Konica 7915/7920... -
Page 199: To Set The "Color Shift Correction" Parameters
[Enter]. If there is a shift, touch to specify the desired adjustment for “θ”, and then repeat steps 2 and 3 until there no longer is a shift. Konica 7915/7920 9-23... - Page 200 The example below shows the adjustment for cyan; however, the other colors should be adjusted in the same way. ❍ If the lines are shifted in the X- direction: Touch [X], and then align on the black grid. 9-24 Konica 7915/7920...
- Page 201 Touch [θ], and then align the A2 shift on the A1 shift. If necessary, touch [X], and then make the necessary adjustment. In the Expert User’s Mode screen, touch [Exit]. In the Administrator Mode screen, touch [Exit]. In the Utility screen, touch [Exit]. Konica 7915/7920 9-25...
-
Page 202: To Set The "Stabilizer" Parameter
In the Expert User’s Mode screen, touch [Exit]. In the Administrator Mode screen, touch [Exit]. In the Utility screen, touch [Exit]. Copy a document, and then compare the copy to the original docu- ment. Check that the copy is correct. 9-26 Konica 7915/7920... -
Page 203: To Set The "Prt Area (Top Margin)" Parameter
Load paper (A3L) into the 1st drawer, and then press the [Start] key to print out the test pattern. The screen at the right is displayed if the paper type dial on the 1st drawer is set for normal paper. Konica 7915/7920 9-27... - Page 204 (1st drawer), change the paper type dial to the appropriate paper setting, and then perform step 2. In the Expert User’s Mode screen, touch [Exit]. In the Administrator Mode screen, touch [Exit]. In the Utility screen, touch [Exit]. 9-28 Konica 7915/7920...
-
Page 205: To Set The "Prt Area (Left Margin)" Parameter
Load paper (A3L) into the third paper drawer. In the Expert User’s Mode screen, touch [2/2], and then touch [PRT Area (Left Margin)]. The Left Margin screen appears. Touch [3rd Drawer], and then press the [Start] key to print out the test pattern. Konica 7915/7920 9-29... - Page 206 In the Expert User’s Mode screen, touch [Exit]. In the Administrator Mode screen, touch [Exit]. In the Utility screen, touch [Exit]. 9-30 Konica 7915/7920...
-
Page 207: To Set The "Prt Area (Dup. Left Margin)" Parameter
In the Expert User’s Mode screen, touch [2/2], and then touch [PRT Area (Dup. Left Margin)]. The Dup. Left Margin screen ap- pears. Touch [4th Drawer], and then press the [Start] key to print out the test pat- tern. Konica 7915/7920 9-31... - Page 208 3.0 mm ± 1.0 mm In the Expert User’s Mode screen, touch [Exit]. In the Administrator Mode screen, touch [Exit]. In the Utility screen, touch [Exit]. 9-32 Konica 7915/7920...
-
Page 209: To Set The "Thin Orig." Parameter
Orig.]. The Thin Orig. screen appears. Touch [ON], and then touch [Enter]. In the Expert User’s Mode screen, touch [Exit]. In the Administrator Mode screen, touch [Exit]. In the Utility screen, touch [Exit]. Touch [Orig. Ö Copy]. Konica 7915/7920 9-33... -
Page 210: Registering Scan Save Locations ("Scanner Addr. Input" Function)
Touch [Thin Orig.]. Specify any other necessary settings. Registering Scan Save Locations (“Scanner Addr. Input” Function) This function can be used when the printer controller is connected. For more details, refer to the manual for the printer controller. 9-34 Konica 7915/7920... -
Page 211: Touch Panel Messages
Follow the procedure below to load more paper. Loading paper into the 1st drawer (250-sheet multipurpose paper drawer) --> page 10-2 into the 500-sheet paper feed unit --> page 10-3 into the large capacity tray --> page 10-5 Konica 7915/7920 10-1... -
Page 212: To Load Paper Into The 1St Drawer (250-Sheet Multipurpose Paper Drawer)
Make sure to align the stack of paper. Do you wish to load a paper size or type different from that previ- ously loaded? ➜ For more details on changing the paper size and type, refer to “Loading Paper” on page 4-6. 10-2 Konica 7915/7920... -
Page 213: To Load Paper Into The 500-Sheet Paper Feed Unit
Be careful not to touch the sur- face of the paper take-up roller with your hands. If the roller has been touched, wipe it with a dry cloth. Press down on the paper-lifting plate until it locks into place. Konica 7915/7920 10-3... - Page 214 Slide the lateral guides against the edges of the paper. ❍ Make sure that the paper is not curled when it is loaded. Check that the lateral guides are pushed up against the edges of the paper. Close the paper drawer. 10-4 Konica 7915/7920...
-
Page 215: To Load Paper Into The Large-Capacity Cabinet
Have you loaded too much pa- per into the drawer? ➜ Do not load so much paper that the top of the stack is higher than the Ä mark. Close the paper drawer. Konica 7915/7920 10-5... -
Page 216: When The Message "Please Add Toner." Appears
Do not refill the toner until the message indicating that the toner be re- filled appears on the touch panel. In addition, do not refill the toner of any color other than the one indicated in the message on the touch panel. 10-6 Konica 7915/7920... - Page 217 Do not throw away the used toner bottle; instead, keep it to be collect- ed by your technical representative. WARNING Precautions for handling toner and the toner bottle: ➜ Do not throw toner or the toner bottle into a fire. Toner expelled from the fire may cause burns. Konica 7915/7920 10-7...
-
Page 218: To Add Toner
Is the toner within the bottle hard? ➜ The toner within the bottle may become compacted. If it does, be sure to shake the bottle until the toner is mostly broken up be- fore adding it to the hopper. 10-8 Konica 7915/7920... - Page 219 Do you know what precautions should be taken when refilling the toner? ➜ Do not tap on the toner bottle while refilling the hopper; other- wise, the toner may spurt out. Push the toner hopper shutter closed. Konica 7915/7920 10-9...
- Page 220 Touch Panel Messages Tilt the toner bottle backward, and then pull the opening of the bottle up and toward you to remove it. Close the toner hopper lid, and then close the toner supply door. 10-10 Konica 7915/7920...
-
Page 221: When The Message "Replace Staple Cartridge X." Appears
When finisher FS-134 or FS-133 is installed and is about to run out of sta- ples, the message shown below appears. Follow the procedure below to replace the staple cartridge. To replace the staple cartridge Slide the finisher away from the copier. If finisher FS-134 is installed, open right-side door FN7. Konica 7915/7920 10-11... - Page 222 Stapler 2 ❍ Finisher FS-133 Stapler 1 Since finisher FS-134 is equipped with two staple holders, which staple holder should be pulled out? ➜ The message on the touch panel indicates which staple holder should be pulled out. 10-12 Konica 7915/7920...
- Page 223 Remove the empty staple cartridge from the staple holder. (Finisher FS-134) Insert the new staple cartridge into the staple holder, and then carefully remove the stopper. (Finisher FS-133) Remove the empty staple cartridge from the staple holder. Konica 7915/7920 10-13...
- Page 224 Insert the new staple cartridge into the staple holder, and then carefully remove the stopper. Insert the refilled staple holder until it locks into place. ❍ Finisher FS-134 ❍ Finisher FS-133 If finisher FS-134 is installed, close right-side door FN7. 10-14 Konica 7915/7920...
- Page 225 Touch Panel Messages Slide the finisher back against the copier. Note Be sure to replace the staple cartridge only after this message ap- pears. Injuries may occur if the staple cartridge is removed before the message appears. Konica 7915/7920 10-15...
-
Page 226: When The Message "Misfeed Detected." Appears
✚ A flashing “2” indicates the location of the paper misfeed. In addition, a lit “2” indicates areas where paper may have been misfed and that should be checked. 10-16 Konica 7915/7920... - Page 227 10-mailbin sorter/ Duplex unit Finisher p. 10-34 p. 10-21 Manual bypass tray p. 10-19 Copier p. 10-24 Paper drawers p. 10-22 Copier p. 10-24 Paper feed unit p. 10-22 Duplex unit p. 10-21 Manual bypass tray p. 10-19 Konica 7915/7920 10-17...
- Page 228 Touch Panel Messages Duplexing document feeder p. 10-28 Finisher FS-134/FS-133 p. 10-30 10-mailbin sorter p. 10-34 10-18 Konica 7915/7920...
-
Page 229: Paper Misfeed In The Manual Bypass Tray
➜ Be careful not to touch the surface of the image transfer belt at the bot- tom of the copier’s fusing unit. Pull up the lock release lever to open the right-side door. Konica 7915/7920 10-19... - Page 230 Touch Panel Messages Carefully pull out the paper. Close the right-side door. 10-20 Konica 7915/7920...
-
Page 231: Paper Misfeed In The Duplex Unit
Touch Panel Messages Paper Misfeed in the Duplex Unit To clear a paper misfeed in the duplex unit Open the duplex unit door. Carefully pull out the paper. Close the duplex unit door. Konica 7915/7920 10-21... -
Page 232: Paper Misfeed In The Paper Feed Unit
Paper Misfeed in the Paper Feed Unit To clear a paper misfeed in the paper feed unit Open the lower right-side door. Turn the green wheels to feed the paper so that it can be easily re- moved. 10-22 Konica 7915/7920... - Page 233 Has the paper take-up roller been touched? ➜ Be careful not to touch the sur- face of the paper take-up roller with your hands. If the roller has been touched, wipe it with a dry Paper take-up roller cloth. Konica 7915/7920 10-23...
-
Page 234: Paper Misfeed In The Copier
➜ Touching anything other than the paper within the area around the fus- ing unit may result in burns. ➜ If you get burnt, immediately cool the skin under cold water, and then seek professional medical advice. 10-24 Konica 7915/7920... - Page 235 While moving the green lever on the inside of the upper right-side door in the direction of the arrow, carefully pull out the paper. Carefully pull out the paper. Konica 7915/7920 10-25...
- Page 236 While holding the levers on the ends of the oil-roller unit, move the unit back to its original position. Fully move the two lock release le- vers for the oil-roller unit in the di- rection of the arrows. 10-26 Konica 7915/7920...
- Page 237 The area around the fusing unit is extremely hot. ➜ Touching anything other than the indicated levers around the fusing unit may result in burns. ➜ If you get burnt, immediately cool the skin under cold water, and then seek professional medical advice. Konica 7915/7920 10-27...
-
Page 238: Paper Misfeed In The Duplexing Document Feeder
To clear a paper misfeed in the duplexing document feeder Open misfeed clearing cover F1. Remove all documents from the document feed tray, and then care- fully pull out any other documents. Open misfeed clearing cover F2, and then carefully pull out any doc- uments. 10-28 Konica 7915/7920... - Page 239 Remove any documents on the original glass, and then close the duplexing document feeder. Close misfeed clearing covers F1 and F2. Reload the documents according to the instructions that appear on the touch panel. Konica 7915/7920 10-29...
-
Page 240: Paper Misfeed In Finisher Fs-134/Fs-133
Be careful about a protrusion on the backside of the horizontal trans- port unit cover. It can hurt you! (Part indicated in step 3.) To clear a paper misfeed in finisher FS-134/FS-133 Slide the finisher away from the copier. 10-30 Konica 7915/7920... - Page 241 Touch Panel Messages Open the cover of the horizontal transport unit. Remove any paper, and then close the cover of the horizontal transport unit. If finisher FS-134 is installed, open right-side door FN7. Konica 7915/7920 10-31...
- Page 242 FS-134:FN8 FS-133:FN7 If finisher FS-134 is installed, close right-side door FN7. Open front door FN4. Turn knobs FN5 at the same time to feed out any paper. Close front door FN4. Open upper cover FN1. 10-32 Konica 7915/7920...
- Page 243 FN2 open, remove any paper While holding misfeed clearing guide FN3 open, remove any paper. Close upper cover FN1. While holding misfeed clearing guide FN6 open, remove any paper. Slide the finisher back against the copier. Konica 7915/7920 10-33...
-
Page 244: Paper Misfeed In The 10-Mailbin Sorter
Be careful about a protrusion on the backside of the horizontal trans- port unit cover. It can hurt you! (Part indicated in Step 4.) To clear a paper misfeed in the 10-mailbin sorter Slide the 10-mailbin sorter away from the copier. Remove any paper from the mail- bins. 10-34 Konica 7915/7920... - Page 245 Touch Panel Messages Open the cover of the horizontal transport unit. Remove any paper, and then close the cover of the horizontal transport unit. Open the upper door and the lower door. Konica 7915/7920 10-35...
- Page 246 Touch Panel Messages Remove any paper. Close the upper door and the lower door. Slide the 10-mailbin sorter back against the copier. 10-36 Konica 7915/7920...
-
Page 247: When The Message "Cannot Staple." Appears
When finisher FS-134 or FS-133 is installed and the staples are jammed, the message shown below appears. Follow the procedure below to clear the jammed staples To clear jammed staples Slide the finisher away from the copier. If finisher FS-134 is installed, open right-side door FN7. Konica 7915/7920 10-37... - Page 248 ➜ The message on the touch pan- el indicates which staple holder should be pulled out. Stapler 1 Push the staple holder guide up, and then pull out one sheet of sta- ples. 10-38 Konica 7915/7920...
- Page 249 Touch Panel Messages Move the guide back to its original position. Insert the staple holder until it locks into place. ❍ Finisher FS-134 ❍ Finisher FS-133 If finisher FS-134 is installed, close right-side door FN7. Konica 7915/7920 10-39...
- Page 250 Touch Panel Messages Slide the finisher back against the copier. Are the staples still jammed, even after performing the above procedure? ➜ Contact a qualified technical representative. 10-40 Konica 7915/7920...
-
Page 251: When The Inspection Mark " " Appears
When contacting the technical representative, inform them of the num- bers (“P-7” in the example below) listed in the screen that appears. Touching [Exit] in the top-right corner displays the Basic screen. Konica 7915/7920 10-41... -
Page 252: When The Message "Malfunction Detected." Appears
When the message shown below appears in the touch panel, a malfunc- tion has occurred within this copier. If this message appears, contact your technical representative. Note When contacting the technical representative, inform them of the code (“C0400” in the example above) in the screen that appears. 10-42 Konica 7915/7920... -
Page 253: When The Message "Need To Replace Xxxxx." Appears
“Need to Replace XXXXX.” appears in the touch panel followed by instructions for replacing the unit. Replace the unit according to the instructions that appear. Disposing of Used Parts Dispose of used units according to your local regulations, or contact your technical representative. Konica 7915/7920 10-43... -
Page 254: Other Messages
Since the maximum amount Remove all copies from the capacity. Please remove all of copies for the indicated fin- indicated tray. pages from -> section tray. isher tray has been exceed- ed, the copier is unable to make copies. 10-44 Konica 7915/7920... - Page 255 If the same message ap- pears again, install the op- tional memory. Your account has reached its The limit on the number of Contact your administrator. maximum allowance. copies that can be made has p. 9-11 been reached. Konica 7915/7920 10-45...
- Page 256 Touch Panel Messages 10-46 Konica 7915/7920...
-
Page 257: Troubleshooting
5-12. If a thin double-sided docu- Select a darker setting for the ment is being copied, the in- background copy density. formation on the back side Refer to p. 6-20. may be reproduced in the copy. Konica 7915/7920 11-1... - Page 258 The document guides are not Slide the document guides positioned along the edges against the edges of the pa- of the paper. per. Curled paper was loaded into Flatten the paper before the paper drawer. loading it. 11-2 Konica 7915/7920...
-
Page 259: When The Copier Is Not Operating Correctly
The copier cannot be turned The power supply cord may Plug the power supply cord have been unplugged from into an electrical outlet. the electrical outlet. The room’s circuit breaker is Close the room’s circuit tripped. breaker. Konica 7915/7920 11-3... - Page 260 Troubleshooting 11-4 Konica 7915/7920...
-
Page 261: Appendix
Appendix Appendix 12.1 Specifications Copier Konica 7915/Konica 7920 Specification Konica 7915 Konica 7920 Type Desktop Platen Stationary Photo conductor Copying system Digital Full-color Copying Developing system Dry, 2-Component Magnetic Brush Developing Fusing system Belt-fixing Resolution Scanning: 600 dpi; Printing: 600 dpi × 1800 dpi/256 variations Document •... - Page 262 Appendix Specification Konica 7915 Konica 7920 Copy speed Full color/Black: Full color/Black: A4C: 15 sheets/min. A4C: 20 sheets/min. B4L: 12 sheets/min. B4L: 12 sheets/min. A3L: 10 sheets/min. A3L: 10 sheets/min. Magnification ratios • Full size: ×1.000 • Enlargement ratios: × 1.154, × 1.414, × 2.000 •...
-
Page 263: Duplexing Document Feeder Df-331
Appendix Duplexing Document Feeder DF-331 Specification Konica 7915 Konica 7920 Document feed methods • Standard paper: Single-sided and double-sided documents • “Mixed Orig Detection” function: Various sizes of single-sided and double-sided documents • Single-sheet feeding: Single-sided documents Paper types Single-sided: 50 to 110 g/m... -
Page 264: Large Capacity Tray Db-431
Standard paper (64 to 90 g/m Paper sizes A3L to A5L Power source Supplied from copier Power consumption Less than 17 W Dimensions 139 mm (width) × 440 mm (depth) × 365 mm (height) Weight About 3.1 kg 12-4 Konica 7915/7920... -
Page 265: Mailbin Sorter St-134
Total: 2,000 sheets Power source Supplied from copier Power consumption Less than 32 W Dimensions 554 mm (width) × 512 mm (depth) × 874 mm (height) Weight • Main unit: about 29 kg • Horizontal transport unit: 4 kg Konica 7915/7920 12-5... -
Page 266: Finisher Fs-134
Holes punching: 4 holes Power source Supplied from copier Power consumption Less than 63 W Dimensions 538 mm (width) × 629 mm (depth) × 978 mm (height) Weight About 39.2 kg Accessories 2 staple cartridges (5,000 staples) 12-6 Konica 7915/7920... -
Page 267: Finisher Fs-133
• 2 to 20 sheets of densely printed paper Power source Supplied from copier Power consumption Less than 63 W Dimensions 538 mm (width) × 629 mm (depth) × 978 mm (height) Weight About 35.5 kg Accessories 1 staple cartridge (3,000 staples) Konica 7915/7920 12-7... -
Page 268: Care Of The Copier
Original glass ➜ Clean the original glass by wiping it with a soft, dry cloth. Operation panel ➜ Clean the operation panel by wiping it with a soft, dry cloth. 12-8 Konica 7915/7920... -
Page 269: Document Transfer Belt
Clean the newly exposed surface of the belt by wiping it with a soft cloth dampened with a mild household detergent (as in step 1). Repeat the above steps until the entire surface of the document trans- fer belt has been wiped clean. Konica 7915/7920 12-9... -
Page 270: Function Combination Table
Appendix 12.3 Function Combination Table Function combination table 12-10 Konica 7915/7920... - Page 271 Appendix Konica 7915/7920 12-11...
-
Page 272: Function Combination Code Keys
When making “Single-sided Ö Double-sided” copies while manually placing the documents on the original glass, the copy job cannot be interrupted by pressing the [Interrupt] key. * 1: The “Staple” and “Hole-Punch” settings are only available if both the finisher and printer controller are installed. 12-12 Konica 7915/7920... -
Page 273: Paper Size And Zoom Ratio Tables
216 mm × 279 mm Government Letter 8 in. × 10-1/2 in. 203 mm × 267 mm Quarto 8 in. × 10 in. 203 mm × 254 mm Statement Invoice 5-1/2 in. × 8-1/2 in. 140 mm × 216 mm Konica 7915/7920 12-13... -
Page 274: Zoom Ratios
× 1.733 × 1.224 × 2.000 105mm × 148mm × 1.414 4-1/4 in. × 5-3/4 in. × 1.733 × 1.224 × 0.816 257mm × 364mm × 0.577 10 in. × 14-1/4 in. × 0.707 × 0.500 × 1.154 12-14 Konica 7915/7920... - Page 275 279.4 mm × 355.6 mm Foolscap × 0.772 Letter × 0.772 Invoice × 0.500 Legal Foolscap × 0.928 11 in. × 17 in. Letter × 0.785 215.9 mm × 355.6 mm Invoice × 0.607 11 in. × 17 in. × 1.214 Konica 7915/7920 12-15...
- Page 276 × 1.647 139.7 mm × 215.9 mm Legal × 1.545 Foolscap × 1.529 Letter × 1.294 * Zoom ratio = Copy paper size / Document size 1 in. (inch) = 25.4 mm 1 mm = 0.0394 in. (inch) 12-16 Konica 7915/7920...
-
Page 277: Index
INDEX INDEX Numerics 10-Mailbin sorter ...............3-7 3-16 12-5 1st drawer .................. 3-11 2in1 copying ..................7-4 2nd drawer ..................3-11 A3wide paper ..................5-14 Access codes ..................3-28 Registering ..................9-3 Accounts Changing numbers registered ............9-4 Limiting number of copies ............9-11 Limiting type of copies ..............9-9 Resetting counters for all ...............9-6 Resetting counters for one .............9-8 Viewing counters ................9-7... - Page 278 INDEX Brightness ................... 7-26 Color balance ................7-28 Contrast ..................7-27 Density ..................7-29 Hue ....................7-25 Saturation ..................7-25 Sharpness ................... 7-27 Control panel ..................3-11 Access key .................3-21 3-28 Auto Color, Full Color, and Black keys ........3-20 C (clear) key ................
- Page 279 INDEX Density ....................6-20 “Disable Sleep Mode” function ............9-15 Document scale .................3-11 Document type ..................6-19 Documents of mixed sizes ............5-5 7-17 Double-sided documents and copies ..........7-4 Duplex unit ................3-7 3-15 12-4 Duplexing document feeder ........3-6 3-14 12-3 Energy Saver mode ................
- Page 280 INDEX Hole punching ................... 7-15 Punched hole position ..............7-15 Types of hole punching ............... 7-15 “Image Repeat” function ..............7-35 Image transfer belt unit ..............3-13 Image transfer roller unit ..............3-13 Imaging unit ..................3-13 Installation site ..................2-1 Interrupting a copy job ...........
- Page 281 INDEX media type selection dial ..............6-6 Memory ....................3-9 Messages ..................10-44 “Mulfunction detected.” ..............10-42 “Need to Replace XXXXX.” ............10-43 “Meter Count” function .................8-2 “Minimal” zoom setting ..............6-14 “Mirror Image” function ..............7-21 “Mixed Orig Detection” function ............7-17 Multipurpose paper drawer ..............6-5 Multi-sheet feeding ...............5-1 OHP film ....................
- Page 282 INDEX Duplexing document feeder ............10-28 Finisher ..................10-30 Manual bypass tray ..............10-19 Paper feed unit ................10-22 Paper orientation ................1-12 Paper replenishing ................10-1 Paper sizes ................4-2 12-13 Paper source ..................6-4 Paper types ..................4-1 “Postcard” function ................7-33 Power source ..................
- Page 283 INDEX Staple jam clearing ................10-37 Storing a copy job ................8-4 Supervising copier use ................9-1 Thin paper ...................5-9 Toner hopper lid ................3-12 Toner refilling ..................10-6 Toner supply door ................3-11 Troubleshooting .................11-1 Turning the copier on and off .............3-29 Upper right-side door .................
- Page 284 Recycled paper is used for the inside pages of this manual. MANUFACTURER • ONICA CORPORATION • TOKYO JAPAN 2001. 05 x Printed in Japan...
Need help?
Do you have a question about the 7915 and is the answer not in the manual?
Questions and answers