Table of Contents
Advertisement
18.1
AXT
ELLIPTICAL OWNER'S MANUAL
MANUEL DU PROPRIÉTAIRE DE L'EXERCISEUR ELLIPTIQUE
MANUAL DEL PROPIETARIO DE LA MÁQUINA ELÍPTICA
Read the ELLIPTICAL gUIDE before using this OWNER'S MANUAL.
Lire le gUIDE D'UTILISATION DE L'EXERCISEUR ELLIPTIQUE avant de se servir du présent MANUEL DU PROPRIÉTAIRE.
Lea la gUÍA DEL USUARIO DE LA MÁQUINA ELÍPTICA antes de usar este MANUAL DEL PROPIETARIO.
Advertisement
Table of Contents

Related Manuals for AFG 18.1AXT


Summary of Contents for AFG 18.1AXT
- Page 1 18.1 ELLIPTICAL OWNER’S MANUAL MANUEL DU PROPRIÉTAIRE DE L’EXERCISEUR ELLIPTIQUE MANUAL DEL PROPIETARIO DE LA MÁQUINA ELÍPTICA Read the ELLIPTICAL gUIDE before using this OWNER’S MANUAL. Lire le gUIDE D’UTILISATION DE L’EXERCISEUR ELLIPTIQUE avant de se servir du présent MANUEL DU PROPRIÉTAIRE. Lea la gUÍA DEL USUARIO DE LA MÁQUINA ELÍPTICA antes de usar este MANUAL DEL PROPIETARIO.
-
Page 2: Important Precautions
IMPORTANT PRECAUTIONS SAVE THESE INSTRUCTIONS When using an electrical product, basic precautions should always be followed, including the following: Read all instructions before using this elliptical. It is the responsibility of the owner to ensure that all users of this elliptical are adequately informed of all warnings and precautions. - Page 3 dANGER TO REdUCE THE RISk Of ElECTRICAl SHOCk: Always unplug the elliptical from the electrical outlet immediately after using, before cleaning, performing maintenance and putting on or taking off parts. WARNING TO REdUCE THE RISk Of bURNS, fIRE, ElECTRICAl SHOCk OR INjURy TO pERSONS: •...
- Page 4 WARNING TO REdUCE THE RISk Of bURNS, fIRE, ElECTRICAl SHOCk OR INjURy TO pERSONS: • Keep power cord away from heated surfaces. Do not carry this unit by its supply cord or use the cord as a handle. • Do not use other attachments that are not recommended by the manufacturer. Attachments may cause injury. •...
-
Page 5: Grounding Instructions
GROUNdING INSTRUCTIONS If your elliptical has power incline with a 3-prong plug, you must follow these grounding instructions. This product must be grounded. If a elliptical should malfunction or break down, grounding provides a path of least resistance for electrical current to reduce the risk of electrical shock. This product is equipped with a cord having an equipment-grounding conductor and a grounding plug. - Page 6 ENTER YOUR SERIAL NUMBER IN THE BOX BELOW: SERIAL NUMBER: AfG 18.1AXT EllIpTICAl MODEL NAME: » Refer to the SERIAL NUMBER and MODEL NAME when calling for service.
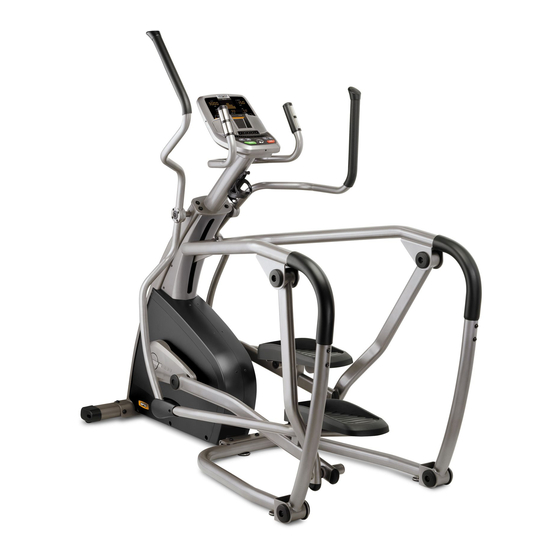
- Page 7 CONSOLE SPEAKERS UPPER HANDLEBAR CONSOLE CONTROLS AND DISPLAY WINDOWS PULSE GRIPS WATER BOTTLE HOLDER LOWER HANDLEBAR WARNING TOP HAND RAIL PEDAL ARM CONSULT A PHYSICIAN PRIOR TO USING ANY EXERCISE EQUIPMENT. POSSIBILITY OF SERIOUS INJURY IF EQUIPMENT IS USED IMPROPERLY. READ INSTRUCTION MANUAL BEFORE USING.
-
Page 8: Tools Included
pRE ASSEMBLY TOOlS INClUdEd: F Phillips Screwdriver F 6mm L Wrench UNpACkING F 5mm L Wrench F 5mm T Wrench Unpack the product where you will be using it. Place the elliptical carton on a level F 13/15mm Flat Wrench flat surface. -
Page 9: Assembly Step
ASSEMBLY STEp 1 HARdWARE fOR STEp 1: BOLT (A) FLAT WASHER (B) 20 mm 20 mm Qty: 8 Qty: 8 Open hardware for step 1. Attach the front stabilizer tube to the main frame using 4 bolts (a) and 4 washers (b). - Page 10 ASSEMBLY STEp 2 HARdWARE fOR STEp 2: BOLT (C) WASHER (D) 16 mm 25 mm Qty: 12 Qty: 4 ARC WASHER (E) AXLE 17 mm Qty: 2 SIDE Qty: 8 TOP HANDRAIL VIEW ARC WASHERS (E) Open hardware for step 2. BOLTS (C) Attach the rear uprights to the base frame using 4 bolts (C), 4 washers (d),...
- Page 11 ASSEMBLY STEp 3 HARdWARE fOR STEp 3: BOLT (F) NUT (G) 25 mm 8 mm Qty: 4 Qty: 4 Open hardware for step 3. TOP HANDRAIL Attach each top handrail to the inCline BOLTS (F) arm using 4 bolts (f) and 4 nuts (g). To make assembly easier, lightly tighten all four INCLINE ARM bolts to begin, then tighten firmly after all bolts...
- Page 12 ASSEMBLY STEp 4 HARdWARE fOR STEp 4: BOLT (H) BOLT (C) WAVY WASHER (J) 20 mm 16 mm Qty: 8 Qty: 2 HANDLEBAR SHAFT WASHER (I) WAVY WASHER (J) REAR MAST COVER RIGHT UPPER 34 mm 23 mm HANDLEBAR Qty: 2 Qty: 2 WASHER (I) LEFT UPPER...
- Page 13 ASSEMBLY STEp 5 HARdWARE fOR STEp 5: CONSOLE BOLTS (C) BOLT (C) WASHER (L) CONSOLE CABLES WASHER (L) 16 mm 18 mm Qty: 4 Qty: 4 PRE-ATTACHED CONSOLE MAST Open hardware for step 5. BOLTS Run Console Cables from main frame braCket through the Console mast.
- Page 14 ASSEMBLY STEp 6 HARdWARE fOR STEp 6: BOLT (K) WASHER (L) 12 mm 18 mm Qty: 8 Qty: 8 BOLT (C) WASHER (P) WAVY WASHER (M) FOOTPAD Open hardware for step 6. 16 mm 38 mm 34 mm LINK ARM Qty: 2 Qty: 2 Qty: 2...
- Page 15 ASSEMBLY STEp 7 BOLT (K) WASHER (L) 12 mm 18 mm Qty: 8 Qty: 8 HARdWARE fOR STEp 7: BOLT (C) WASHER (P) WAVY WASHER (M) 16 mm 38 mm 34 mm Qty: 2 Qty: 2 Qty: 2 WASHER (P) PEDAL ARM BOLT (C) WAVY WASHER (M)
- Page 16 ASSEMBLY STEp 8 HARdWARE fOR STEp 8: BOLT (C) WASHER (D) 16 mm 25 mm Qty: 6 Qty: 6 WAVY WASHER (J) WAVY WASHER (J) AXLE 29 mm Qty: 2 Qty: 2 RIGHT PEDAL ARM TOP HANDRAIL CRANK WASHER (D) Lay waste packaging plastic over the base rail.
- Page 17 ASSEMBLY STEp 9 HARdWARE fOR STEp 9: BOLT (N) WASHER (L) 45 mm 18 mm Qty: 2 Qty: 2 WASHER (L) LOWER HANDLEBAR ROD BEARING NUT (G) SPACER NUT (G) BOLT (N) SHAFT 8 mm Qty: 4 Qty: 2 Qty: 2 Open hardware for step 9.
- Page 18 ASSEMBLY STEp 10 HARdWARE fOR STEp 10: SCREW (O) 12 mm Qty: 6 Open hardware for step 10. Attach Joint Covers to the joint between the link arm and the lower handlebar using 3 sCrews (o). Repeat on opposite side. LOWER HANDLEBAR Adjust the 2 rear levelers so that the...
-
Page 20: Elliptical Operation
ELLIPTICAL OPERATION This section explains how to use your elliptical’s console and programming. The BASIC OPERATION section in the ELLIPTICAL gUIDE has instructions for the following: • lOCATION Of THE EllIpTICAl • pOWER/GROUNdING INSTRUCTIONS • fOOT pOSITIONING • MOVING THE EllIpTICAl •... - Page 21 watts r pm calories speed hear t r ate change display press to switch performance filing system ipod contr ols BACK ENTER...
-
Page 22: Console Operation
CONSOlE OpERATION Note: There is a thin protective sheet of clear plastic on the overlay of the console that should be removed before use. A) lEd dISplAy WINdOWS: time, distance, date and clock. b) AlpHANUMERIC dISplAy WINdOW: displays watts, calories, rpm, heart rate, speed and PROFILE™ display information. C) WORkOUT pROfIlE dISplAy: displays workout level and progress. -
Page 23: Display Windows
watts r pm calories speed hear t r ate dISplAy WINdOWS • WATTS: Displays current user power output. • TIME: Shown as minutes : seconds. View the time remaining or the time elapsed in your workout. • RpM: Rotations Per Minute. •... -
Page 24: Getting Started
GETTING STARTEd dATE ANd ClOCk SETUp 1) Check to make sure no objects are nearby that will hinder the 1) Enter Setup mode: Press and hold the 1 movement of the elliptical. and 2 buttons for 3 seconds. 2) Plug in the power cord and turn the elliptical ON. (Switch is 2) Use on the PROgRAMMINg located at the bottom-front of the elliptical.) -
Page 25: Program Information
pROGRAM INfORMATION NOTE: If resistance or incline are changed during your workout, the remaining segments will be affected accordingly. MANUAl: Manually adjust your resistance and incline levels as you work out toward a time-based goal. INTERVAlS: Alternating levels of resistance build endurance in this time-based workout with 16 levels to choose from. WARM-UP PROgRAM SEgMENTS - REPEAT COOL-DOWN... - Page 26 WEIGHT lOSS: Fat-burning, time-based workout that steadily builds resistance for a gradual comedown, with 16 levels to choose from. WARM-UP PROgRAM SEgMENTS - REPEAT COOL-DOWN TIME 4 minutes Each segment lasts 60 seconds 4 minutes Level...
- Page 27 pROGRAM INfORMATION CONSTANT WATTS: This workout automatically adjusts the resistance to keep you within a set Watts range and maintains your desired level of exercise intensity. 1) Select Constant Watts program using and press ENTER on the PROgRAMMINg BUTTON. 2) Set time using and press ENTER.
- Page 28 REVERSE TRAIN: Alternate forward (F) and backward (R) pedaling at varying resistance levels for a challenging workout that builds greater lower body and core strength, with 16 levels to choose from. WARM-UP COOL-DOWN TIME 4 minutes 4 minutes LEVEL...
- Page 29 pROGRAM INfORMATION OREGON TRAIl: Experience a hike through the foothills with an alternating resistance workout for a time-based goal. Choose from 10 levels. WARM-UP PROgRAM SEgMENTS - REPEAT COOL-DOWN TIME 4 minutes 4 minutes LEVEL HEART RATE TRAINING The first step in knowing the right intensity for your training is to find out your maximum heart rate (max HR = 220 – your age). The age-based method provides an average statistical prediction of your max HR and is a good method for the majority of people, especially those new to heart rate training.
- Page 30 THR zONE: Simulate the intensity of your favorite sport as the program resistance automatically adjusts to maintain a set Target Heart Rate range. 1) Select THR Zone program using and press ENTER on the PROgRAMMINg BUTTON. 2) Select TIME using and press ENTER on the PROgRAMMINg BUTTON.
- Page 31 pROGRAM INfORMATION p10 CARdIO bOOST: Take your fitness goals to the next level with high-energy bursts that alternate resistance and incline combinations for greater results in less time. Choose from 10 levels. NOTE: All elevations are listed as a percent of total elevation. WARM UP PROgRAM SEgMENTS - REPEAT COOL DOWN...
- Page 32 p11 MOUNTAIN ClIMb: Combinations of resistance and incline gradually increase for an effective, climb-simulated workout that boosts strength and endurance, with 10 levels to choose from. NOTE: All elevations are listed as a percent of total elevation. WARM UP PROgRAM SEgMENTS - REPEAT COOL DOWN TIME 4:00...
-
Page 33: Custom Programs
CUSTOM pROGRAMS 1) Select CUSTOM 1, 2 or 3 program using and press ENTER on the programming button PROgRAMMINg BUTTON. 2) Set time using and press ENTER on the PROgRAMMINg BUTTON. 3) Set the RESISTANCE profiles using and press ENTER on the PROgRAMMINg BUTTON after each segment is set to the desired level (repeat until all 15 segments are BACK ENTER... - Page 34 ™ Research shows that those who journal their fitness routines or workouts, on average, achieve greater success than those who do not. Because your new elliptical is equipped with AFg’s exclusive PROFILE Performance Tracker, you’ve taken an important step ™...
- Page 35 pROfIlE pERfORMANCE TRACkER ™ ACCUMUlATEd dATA VERAGE WORkOUT: This option allows you to see your average accumulated data for the last 30 workouts. The following information will be shown in each display window: • TIME - Average workout time. • DISTANCE - Average workout distance. •...
-
Page 36: Using Your Cd / Mp3 Player
pROfIlE pERfORMANCE TRACkER ™ WEEkly GOAl SETUp Select USER 1 or USER 2. PROFILE ™ Press button until it displays “WEEKLY gOAL.” Press ENTER. to set a time goal (leave time at 0:00 if you want to set a distance goal). Press ENTER. to set a distance goal. -
Page 37: Using The Ipod Docking Station
IpOd dOCkING STATION ® The iPod docking station is the entertainment solution for your workouts. Various iPod and iPhone models with a dock connector can fit this dock. USING THE IpOd dOCkING STATION RUBBER (IpOd NOT INClUdEd) PLUG 1) Remove the rubber plug from bottom of the docking station. 2) Plug in your iPod/iPhone by matching the dock connector pin on the console with the dock connector on your iPod/ iPhone. - Page 38 REAdy Connect your Nike Plus-compatible device to the built-in Made for iPod connector on Nike + iPod compatible fitness equipment. Full console controls and built-in SonicSurround ™ speakers make it easy to exercise to your favorite workout playlist. Start walking or running. Your distance, time, and calories burned are recorded as you go.
- Page 39 NIkE + OpERATION REQUIREMENTS Nike Plus-compatible iPod or iPhone (See www.apple.com/nikeplus for more information). Before syncing your Apple device to your computer, you must first create a free Nike Plus account at www.nikerunning.com and download the latest iTunes software (www.apple.com/itunes). GETTING STARTEd 1) Before connecting your Apple device to the elliptical, you must first turn on Nike Plus on the device.
-
Page 40: Limited Home-Use Warranty
LIMITED HOME-USE WARRANTY... -
Page 41: Exclusions And Limitations
• 1 yEAR intended or compatible with the equipment as sold. AFg shall cover the labor cost for the repair of the device for a period of one year from the date of the original purchase, • Damage or failure due to accident, abuse, corrosion,... - Page 42 AT YOUR OWN your rights may vary from states to state. RISK and AFg shall have no liability for any injury to the person or property arising from such repairs. • If you are out of the manufacturer’s warranty but have an extended...
- Page 43 18.1...
- Page 44 Cover;Link Arm;Right REf # dESCRIpTION Stabilizer Frame Set;Rear Cover;Crank Set Screw Console Mast Set Cover;Axle extremity; Fix plate Pedal Arm Set;Right Screw;Button head;4X10L Pedal Arm Set;Left Hardware Set Steel cable Swing Arm Set Wheel Motor for Electronic Controlled Brake Vertical Stabilizer Arm Set Wheel cover Owner’s Manual Incline Arm Set;Left...
Need help?
Do you have a question about the 18.1AXT and is the answer not in the manual?
Questions and answers