Table of Contents

Related Manuals for KitchenAid KHMS 9010/I


Summary of Contents for KitchenAid KHMS 9010/I
- Page 1 KHMS 9010/I...
-
Page 3: Table Of Contents
Product description and symbols Gas burner functions Practical advice on how to use the burners Injectors table Induction zone functions Positioning the pan supports and Wok support Sizes and installation measurements (mm) Precautions and general recommendations Safeguarding the environment Installation Gas connection Electrical connection Securing the hob into cabinetry... -
Page 4: Product Description And Symbols
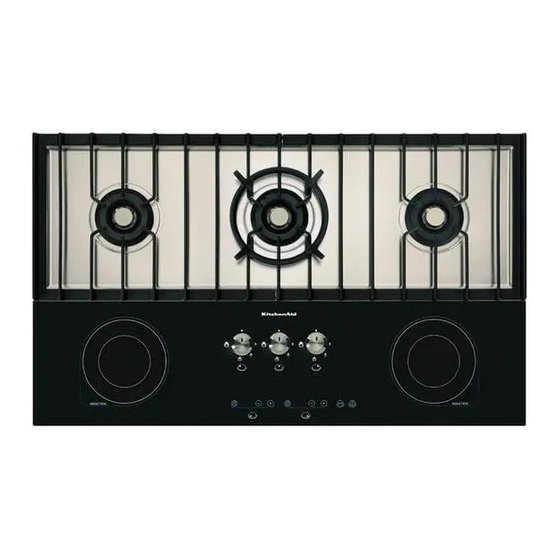
Product description and symbols 1. Removable pan supports 2. Professional double crown Wok burners 3. 145 mm diameter induction zone 4. Left gas burner control knob 5. Central gas burner control knob 6. Right gas burner control knob 7. Display and touch control panel for the induction zones Gas burner control knob symbols A. -
Page 5: Practical Advice On How To Use The Burners
Practical advice on how to use the burners Read these instructions to get the best out of your - The use of two burners simultaneously with just burners: one container such as a fish kettle. - Use pans with a diameter the same as the burner (see pan diameter table to the side). -
Page 6: Induction Zone Functions
Induction zone functions This hob is fitted with 2 induction zones that allow you to boil water very quickly, as well as control the temperature with extreme precision, giving you The child safety option can be turned on by a vast range of cooking options. The induction pressing the button (2) until the illuminated point zone control panel has the following functions. -
Page 7: Positioning The Pan Supports And Wok Support
Induction zone functions The time remaining can also be changed by Warning, when using the Fast Boil option (P) and pressing the clock symbol button (4) at any time high levels of power, especially if both zones are and using the +/- buttons (3) to alter the time. The being used simultaneously, the appliance may light above the display will flash for 10 seconds, become noisy. -
Page 8: Sizes And Installation Measurements (Mm)
Sizes and installation measurements (mm) NOTE: If a hood is installed above the hob, read Rear wall the instructions for fitting the hood where it indicates the correct distances to be complied with. Front • The cooktop has to be set into a work top between 20 - 40 mm deep. -
Page 9: Precautions And General Recommendations
Precautions and general recommendations To get the best out of your hob, please read the • The appliances should only be repaired or instructions carefully and keep them for future adjusted by a qualified electrician. consultation. • Make sure the electrical wires of other electrical •... -
Page 10: Safeguarding The Environment
Safeguarding the environment Packing Note: The packaging material is 100% recyclable and is • Improper use of the pan supports can scratch labelled with the recycling symbol that the hob surface. Avoid placing them, or dragging identifies it as a kind of material to be sent to local them if unprotected by rubber stoppers. -
Page 11: Installation
Installation Technical information for the installer • This product can be built into a 20 to 40 mm deep worktop. • The hob cannot be installed with an oven underneath. Always insert a separator panel under the hob at a distance of no less than 25 mm from the lowest point (electronic control module) on the appliance. -
Page 12: Gas Connection
Gas connection The gas mains system must comply with local regulations. • The paragraph on “national legislation reference” shows the local legislation specific to the country of destination. • Should there be no information regarding your country of interest, ask for further details from the installer. •... -
Page 13: Securing The Hob Into Cabinetry
Securing the hob into cabinetry 1. After cleaning the surfaces around the edges, fit the seal provided around the hob. 2. Position the hob inside the opening according to the sizes indicated in the description sheet. 3. Use the brackets (A) provided to secure the hob, fixing it with the proper screws to adapt it to the thickness. -
Page 14: Replacing The Injectors
Replacing the injectors (See the product description sheet for model) Remove the bottom of the hob, lifting out the installation brackets to change the dual crown wok burner injector. Please contact the Customer Care Centre. REMOVING THE MAIN INJECTOR Remove the injector (F) using a 10mm spanner. Slacken the holding screw (H) to regulate the position (X) of the gas inlet coupling (G) with regard to the injector. -
Page 15: General Cleaning
General cleaning In order to keep your hob in good condition, you Note: in the models fitted with electronic ignition must keep it clean, removing any food residue each and safety thermocouples, you have to clean the time you use it. terminal part very carefully to ensure they work Always disconnect the hob from the electrical properly. -
Page 16: Troubleshooting Guide
Troubleshooting guide The hob is not working properly or not working at 2. If one of the following codes appears when you all. Before calling the Customer Care Centre, see if press the ignition button on the hob: ER31, the problem you are encountering is mentioned in ER47, ER36, ER39, ER20, ER37, ER22, E5, E6, this guide. -
Page 17: After Sales Service
After Sales Service Before contacting the Customer Care Centre, clarify that you cannot resolve the problem yourself based on the descriptions given in the “Troubleshooting guide”. 1. Turn the apparatus off and restart it to see if the fault is repeated. - Page 20 Printed in Italy 01/07 5019 719 01020...
Need help?
Do you have a question about the KHMS 9010/I and is the answer not in the manual?
Questions and answers