
Related Manuals for KitchenAid KHMP5


Summary of Contents for KitchenAid KHMP5
- Page 1 Questo manuale d’istruzione è fornito da trovaprezzi.it. Scopri tutte le offerte per Kitchenaid KHMP5 86510 cerca il tuo prodotto tra le migliori offerte di Cucine e Piani cottura Instructions for use...
-
Page 3: Table Of Contents
These instruction shall be available on website www.kitchenaid.eu Product description and symbols Using the burners Practical advice on using the hob Positioning the pan supports and wok support Hood and cabinetry clearances (mm) Injectors table Warnings and suggestions Safeguarding the environment... -
Page 4: Product Description And Symbols
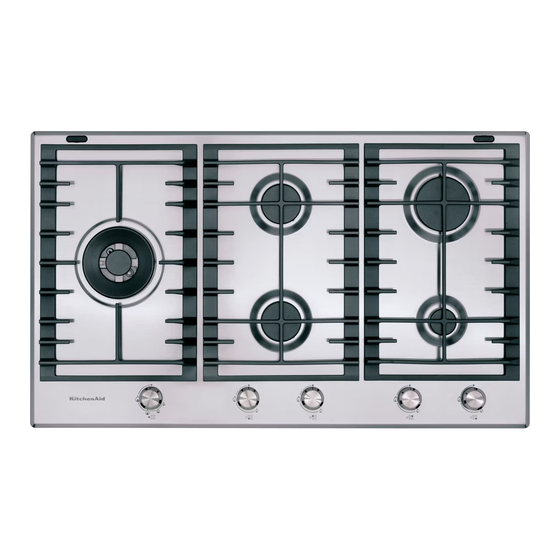
Product description and symbols 1. Removable pan supports 2. Auxiliary burner 3. Semi-rapid burner 4. Semi-rapid burner 5. Rapid burner 6. Professional wok burner 7. Auxiliary burner control knob 8. Rapid burner control knob 9. Semi-rapid burner control knob 10. Semi-rapid burner control knob 11. -
Page 5: Practical Advice On Using The Hob
Practical advice on using the hob Read the instructions to get the best out of your Important: hob. Do not rest or drag the pan supports upside down - Use pans with a similar diameter to the burner on the hob as this could scratch it. (see the table on this page) Failure to comply with these - Use flat bottomed pans except with the wok... -
Page 6: Hood And Cabinetry Clearances (Mm)
Hood and cabinetry clearances (mm) If a hood is to be installed above the hob, refer to the hood installation instructions to ensure the correct height above the hob Injectors table Category I2E Gas pressure mbar Type of Injector Nominal heat Rated Reduced heat Type of gas used... -
Page 7: Warnings And Suggestions
Warnings and suggestions To get the most out of your hob, please read Note: the instructions carefully and keep them for • Incorrect placement of the pans supports can future consultation. scratch the hob. To avoid this always ensure • These instructions are only valid in the countries that the rubber feet on the bottom of the pan whose destination symbol is shown on the serial supports are the only part of the pan supports... -
Page 8: Safeguarding The Environment
Safeguarding the environment Packing The packing material is 100% recyclable and is labelled with the recycling symbol . Please dispose of all packing responsibly and carefully. Product This appliance is marked according to the European Directive 2012/19/EU, Waste Electrical and Electronic Equipment (WEEE). By ensuring that this product is disposed of correctly, you will help prevent potentially negative consequences for the environment and human... -
Page 9: Installation
• This hob is designed to operate perfectly with section, which must be: any oven in the KitchenAid range. The - perminent and accessable on the walls of the Manufacturer declines all responsibility should room being ventilated and extracting towards any other make of oven be installed. -
Page 10: Electrical Connection
Electrical connection The electrical connections must comply with current legislation and be carried out by a qualified, competent person. • Information on the voltage and power absorbed are shown on the serial no. plate. Earth • The appliance must be earthed. (yellow/green) •... -
Page 11: Daption To A Different Type Of Gas Supply
daption to a different type of gas supply If you are using a different kind of gas from the one requested from the Customer Care Centre on indicated on the serial no. plate and the orange 00800-3810-4026. label on the back of the hob, you must replace the •... -
Page 12: Injectors Replacement In The Wok Burner
Injectors replacement in the wok burner To replace the injectors in special burner it is necessary to: 1. Remove spreader (C), the screws (B) holding the cover cap (A) and the cap itself. 2. Unscrew the inner injector (D) and the outer injector (E) with a box spanner 7. -
Page 13: Care And Maintenance
Care and maintenance Before any cleaning and/or maintenance or that are highly acidic will cause irreparable operation, disconnect the hob from power damage to the hob. Before any kind of use, we supply and wait until it is cold. advise you read the product label to check if a To keep the hob in perfect condition, remove any product is suitable. -
Page 14: Troubleshooting Guide
Troubleshooting guide If the hob is not working properly work through 2. the burner’s openings are not blocked in the this guide before contacting our Customer relation to the thermocouple. Care Centre. 3. the end part of the thermocouple is clean. The burner does not ignite, or the flame is The pans are not stable? Check that: unsteady? Check that:... - Page 16 Whirlpool Europe S.r.l. Socio Unico Viale G. Borghi, 27 - 21025 Comerio (VA) Phone 0332.759111 - Fax 0332.759268 www.whirlpool.eu Printed in Italy 03/15 1 85225...
Need help?
Do you have a question about the KHMP5 and is the answer not in the manual?
Questions and answers