Table of Contents
Advertisement
Quick Links
Advertisement
Table of Contents

Related Manuals for Philips Magic 3-2


Summary of Contents for Philips Magic 3-2
- Page 1 Easy Install User Manual...
-
Page 2: Packaging
Easy Install Dear Customer, With the following installation guide, you can quickly and easily start using your fax machine; you can also find more detailed explanations and descriptions regarding your machine in the user manual. Please read this carefully, and al- ways follow the safety instructions. -
Page 3: Handset
Easy Install 3 Close the paper feed flap. Handset Insert one end of the spiral cable into the socket of the telephone handset and the other end into the socket identified with a handset on the side of the unit. Power supply Loading paper 1 Insert the paper tray in the slots provided behind... -
Page 4: Ink Film
Easy Install 5 Close the machine by swinging the operation panel Ink film forward, until it snaps in. Your fax machine is supplied complete with a free ink film for a few trial pages. A new Plug’n’Print card has to be inserted with each new ink film (only the first free ink film will work with- out a Plug’n’Print card). -
Page 5: Answering Machine B
Easy Install Answering machine b (for device with built-in answering machine) Your answering machine is factory-programmed with a recorded outgoing message. Activated or deactivate your answering machine with b ON/OFF. Activated mode is indicated with the symbol b on the display. Listening to messages 1 If PLAY flashes, messages have been recorded for you. -
Page 6: Description Of The Machine
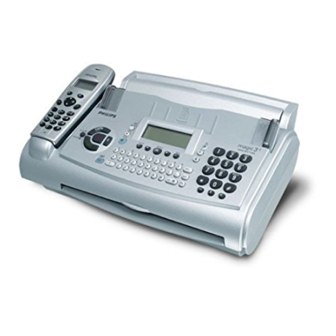
User Manual Description of the machine 8 Printer roller 1 Mains cable with power plug 9 Scanner lid 2 Document guide 10 Holder for “Plug’N’Print” card 3 Paper feed flap 11 Front ink film compartment 4 Paper tray 12 Rear ink film compartment 5 Telephone handset 6 Document Feeder 7 Operation panel... -
Page 7: Controls
User Manual Controls for device with built-in HELP/w press twice briefly: to print operating instructions for the most answering machine important functions (with references to additional help pages); press and hold (for two seconds): to start the automatic installation of your fax machine / bON/OFF to activate / printout of Easy Install deactivate answering machine... -
Page 8: Table Of Contents
User Manual Fax & Copy ........23 Contents Feeding documents in ......23 Sending faxes ....... 23 Packaging . -
Page 9: Safety Instructions
User Manual Disconnect the fax machine from the mains and tele- Safety phone line before cleaning the surface of the machine. Never use liquid or gaseous cleaning agents (sprays, instructions scouring agents, polishes etc.). Do not allow any liquid to enter the fax machine. Oth- Please read all warning notices and instructions and erwise there is a risk of electric shock or other injury to follow them precisely. -
Page 10: Installation
User Manual Handset Installation Insert one end of the spiral cable into the socket of the telephone handset and the other end into the socket identified with a handset on the side of the unit. Connection Please read all warning notices and instructions and follow them precisely. -
Page 11: User Manual
1 Carefully remove the rubber rings from the new ink film. Take care not to damage the ink film. v For use with Philips ink films only! 2 Lay the large roll in the grooves provided in the rear ink film compartment. The blue toothed wheel Removing the ink film must be on the right-hand side. -
Page 12: Loading Paper
User Manual 5 Break out the new Plug’n’Print card and insert it in 3 Pull the paper feed flap fully forward until it stops. In- the slot to the left of the ink film compartments. sert several sheets of A4 paper (80 g/m ) up to the end- stop in the paper feed mechanism (max. - Page 13 User Manual If you are running an SMS-capable cordless phone Separate sockets on the same line it is impossible to say which device You can connect additional devices to separate sockets will actually receive the SMS message. However, you on the same line even if they are in different rooms. can only receive SMS messages on one device at any In the UK one time.
-
Page 14: Easy Install
User Manual Easy Install Private branch exchange Using EASY INSTALL your fax machine will be con- Private branch exchange systems are very common in figured according to your local conditions. large companies. ISDN connections are private branch exchanges and are used very often in private house- 1 Press HELP/w for at least two seconds. -
Page 15: Basic Settings
User Manual 2a For device with SMS functionality: Enter your Basic settings name using the alphabetic keypad. To enter upper case letters, press + and the desired key at the same If you want to keep a note of the factory settings on time. -
Page 16: Correction
User Manual Correction Volume If you have entered a wrong letter or number in func- Ringer tion 13 or 14 you can correct the mistake during the You can adjust the volume of the ring signal if the entering as well as later. If you want to make your cor- fax machine is in stand-by mode or if it is just ringing. -
Page 17: Fax Switch
User Manual 2 Select number of rings with u before your an- Fax switch swering device will be activated. TAM RINGS: 5/2 The built-in fax switch enables you to phone and fax 3 Confirm with OK. from the same telephone connection and use addition- 4 Enter the number of rings after which the fax al devices. -
Page 18: Special Settings
User Manual Special settings External answering machine Silent fax reception Connect your answering machine as described in In- To receive faxes without any ring signals, set the amount stallation / Additional devices. of ring signals in FAX RINGS to 0. To provide for the optimum performance of an ex- Completely silent operation $ ternal answering machine, set this device to ring once... - Page 19 User Manual If your answering machine accepts the call but your fax machine does not stop ringing, try to install your answering machine by serial connection, for example by connecting it to the same telephone socket or to the EXT socket of your fax machine (see chapter Instal- lation / Additional devices).
-
Page 20: Telephone
User Manual Using short dial Telephone 1 Press n and choose a number between 0 and 9. The stored name or telephone number appears on the display. In order to edit the number press Making a call OK and make the desired changes. 1 Dial the desired number. - Page 21 User Manual 2 Enter a last name using the keypad. Use > to move 4 You can assign this entry to a category: the cursor one position to the right. Then press OK. DEFAULT 3 Use the keypad to enter a first name and press FAMILY FRIENDS 4 For the subsequent entries, you will be asked for the...
-
Page 22: List Of Numbers
User Manual 2 Using u select delete member? and con- Correcting entries firm with OK. Press a and select the entry you want to correct with u then press a for two seconds. Select a 3 Using u select an entry that you want to de- character with u and press C to delete it. -
Page 23: Fax & Copy
User Manual 3 Move the document guide so that it rests on the Fax & Copy document. Write clearly and legibly. Only use pens with dark ink (black or dark-blue, not yellow, orange or light green). The following points are the most common causes of errors when sending faxes: v Don’t send ... -
Page 24: Broadcast
User Manual 3 Use u to select SEND Fax reception without paper FAX? and press START. The document will be sent to all persons If there is no more paper in the feeder or if the ink- in the group. film is empty an incoming fax will be stored in memory (storage capacity for a machine without an answer ma- If the fax can’t be sent to one of the recipients,... -
Page 25: Transmission Speed
User Manual Polling with code Transmission speed If your correspondent has entered a code to protect Your fax machine automatically adjusts its transmission the document to be retrieved please follow this pro- speed to the quality of the telephone line. Especially cedure: in case of overseas transmissions this process can take 1 Press MENU, 22 and OK. -
Page 26: Send Later
User Manual The display will show the actual number of cop- Send later ies. If you want to change this figure enter the de- If you wish to make use of cheaper telephone rates, or sired number with the number keys (max. 15). Press if your fax correspondent is only available at particular COPY. -
Page 27: Sms W
User Manual SMS W Disable SMS printing 1 Press MENU, 64 and then OK four times. (for device with SMS functionality) 2 Use u to choose whether to have in- coming messages automatically printed (not available in all countries) not: PRINT SMS: YES, NO You can send and receive SMS (Short Message Service) 3 Press OK to complete your action. -
Page 28: Sending Sms Messages
User Manual Sending SMS messages Deleting SMS messages 1 Press SMS. To free up the memory so it can receive new messages you should delete any messages you have already read. 2 Press u to select SEND SMS. 1 Press SMS. 3 Press OK. -
Page 29: Disable Sms Reception
User Manual Disable SMS reception If you are running an SMS-capable cordless phone on the same line it is impossible to say which device will actually receive the SMS message. However, you can only receive SMS messages on one device at any one time. -
Page 30: Answering Machine B
User Manual Answering Duration of recording 1 Select MENU, 51 and OK. machine b 2 Press u to choose between 30, 60, 120 seconds or the AUTO mode (unlimited recording time). Please note that AUTO mode is not available in all (for device with built-in answering machine) countries. -
Page 31: Forwarding Messages
User Manual Forwarding messages Recording a conversation Your fax machine can automatically forward all incom- You can record a telephone conversation with your fax ing messages to another telephone number. Enter the machine. telephone number to which you wish recorded calls to 1 Press REC during a telephone conversation. -
Page 32: Remote Control
User Manual Overview of commands Remote control 1 The message you are just listening to will be repeat- You can also control the answering machine functions on your fax from any telephone using tone dialling. Be- 2 Your messages will be played back. fore you can use remote control you have to enter an access code in function 52 (this code will also be used 3 Move to the next message. -
Page 33: Hints And Tips
5 Close the panel so that it also clicks into place. Hints and Tips Delivery service You can order inkfilms and cleaning accessories at your local dealer or directly from PHILIPS (free delivery) on Freefone 0800 358 08 07 (United Kingdom). Paper jam 1 The display shows Paper jam. -
Page 34: Easylink
User Manual 4 Carefully remove the document either from the When you answer using an additional phone and it front or the back. turns out to be a fax, you can start the fax reception by pressing *5 and then hang up. The fax machine will receive the fax. -
Page 35: Care
User Manual Code No. 7140 3 Open the scanner cover by pressing the two lugs in. The cover will open downwards. When you enter this code, all your entered settings and data will be erased, except for: • received fax messages •... -
Page 36: Troubleshooting
User Manual Cleaning the Document Feed Roller … when a black stripe appears at the top of a copy. … when two pages are printed out when copying or sending a single page or when the recipient receives two pages. 1 Open the machine and the scanner cover by press- ing the latch (A) inward (see user manual under Hints and Tips / Care). - Page 37 User Manual Problems when faxing or printing Change the resolution setting to F or f. Faxes are of poor quality. Check the document or set a higher contrast with function 47 (see chapter Fax & Copy / Contrast). Test the fax machine by making a copy. If your copy is fault- less the correspondent’s fax machine might be defective.
-
Page 38: Appendix
User Manual 36 Distinctive ringing ..........16, 21 Appendix (assigning a special ring tone) Others Functions 41 Call list ................20 (last 50 dialled numbers) To print a list of functions, press MENU three times. 42 Call waiting ..............22 Setup (activate and deactivate the function call waiting) 11 Set language ...............16 44 Dialling list ..............22 (select the language of the display text) -
Page 39: Technical Data
User Manual Technical data Power consumption stand by: about telephoning: about 4 W Compatibility ITU Group 3 sending a standard Connection type outside line (PSTN) letter < 20 W extension (PABX) receiving a standard Flash times outside line (PSTN):100 ms letter <... -
Page 40: Warranty
Please note that only Philips ink films should be used. - an external cause to the equipment (including but not Your Philips guarantee does not cover damage to your limited to, lightening, fire, shock or water damage of... -
Page 41: Environment
User Manual Environment Respect of environment is a key objective of SAGEM SA. The SAGEM Group uses environmentally friendly processes to run its operations and has chosen to inte- grate strong environmental constraints in the full life- cycle of its products including manufacturing, product use and end of life. -
Page 42: Index
User Manual Clean the scanner glass 35 Send later 26 Function list 38 Index Code Technical data 39 Printout 15, 38 Easylink 34 Duration of recording 30 For polling 25 Activate built-in answering Group 22 For remote control of machine 30 Easylink 34 Broadcasting to a group built-in answering ma-... - Page 43 User Manual List of numbers 22 Disable reception 29 of play back messages 30 Problems 37 Display symbol 6 of the ringer 16 Making a call 20 SMS messages 28 Function list 38 of the speaker 16 Manual fax reception 18 Transmission and error Key 7 Memo 31...
-
Page 44: Customer Information
0870 124 0202 As an Energy Star Program Partici- pant, SAGEM Communication Austria You should only use original PHILIPS consumables— GmbH has determined that this prod- your guarantee does not cover damage to your product uct meets the Energy Star guidelines for caused by the use of any other consumables energy efficiency.
Need help?
Do you have a question about the Magic 3-2 and is the answer not in the manual?
Questions and answers