Nokia A032 Getting Started Manual
Wireless lan access point
Hide thumbs
Also See for A032:
- User manual (218 pages) ,
- Safety information manual (76 pages) ,
- Manual (46 pages)
Table of Contents
Advertisement
Quick Links
Advertisement
Table of Contents

Related Manuals for Nokia A032


Summary of Contents for Nokia A032
- Page 1 Wireless LAN Access Point Getting Started...
- Page 2 Nokia A032 Wireless LAN Access Point Getting Started...
-
Page 3: Copyright Notices
We reserve the right to make changes and improvements to any of the products described in this guide without prior notice. Nokia is not responsible for any loss of data, income or any consequential damage howsoever caused. ISSUE 1... -
Page 4: Welcome
• Installing the Nokia A032 – tells you what items should have been supplied, and lists the main features of the unit, it also explains how to connect your Access Point to a LAN. -
Page 5: Related Documents
LED) or a button on screen that you need to click (e.g. “click ”). Restart Related documents The Advanced User Guide is for more experienced users and system managers who want to customize and fine-tune the Access Point’s performance. Nokia A032 Getting Started... -
Page 6: Table Of Contents
Restarting the Nokia A032 in Normal mode ... . 24 Testing the Nokia A032 ......25 What next? . - Page 7 Nokia A032 Getting Started...
-
Page 8: Overview
This chapter contains useful background information. You can skip this chapter if you’re familiar with the principles of wireless networking, WEP security and Internet access, and go straight to Installing the Nokia A032 on page 7. In this chapter, you’ll find information on: •... - Page 9 LANs. Not In this manual, a only will it communicate with computers computer fitted with equipped with Nokia wireless LAN adapter an IEEE802.11 cards – it will communicate with any compatible adapter card is referred to as a IEEE802.11 compatible adapter card, using...
- Page 10 Scanning and network names When a wireless station starts up it needs to find and communicate with the Access Point. The wireless station will search all the available frequency bands — a process called scanning. Each wireless network has a network name which can be assigned by the network manager.
-
Page 11: Operating Modes
This mode provides a high degree of control over connections because they pass through a single Access Point. Also, a station can change radio channels when switching from one Access Point to another. This is known as multi-channel roaming. Nokia A032 Getting Started... -
Page 12: Wep Security And Encryption
WEP security and encryption The Nokia A032 can provide access security and eavesdropping protection using a method called wire equivalent privacy (WEP). WEP is specified as an option under the IEEE802.11 standard. It is designed to protect the wireless portion of a network. -
Page 13: Internet Access Sharing
Internet access sharing You can use your Nokia A032 with a modem to A PC can dial up and connect a wireless station to the Internet. connect to most internet service Getting started explains how to configure your providers (ISPs) using Nokia A032 to connect automatically. -
Page 14: Installing The Nokia A032
2. Installing the Nokia A032 This chapter describes the connectors, buttons and LEDs on the front and rear panels of your Nokia Access Point. It then explains how to install the Nokia A032 prior to testing. Features Checklist After unpacking your Nokia A032, check the contents against the packing list. -
Page 15: Rear Panel
– This is where you connect Power connector WARNING: Use of a the power unit. Only use the power unit power unit other than supplied with the Nokia A032. that supplied with the Nokia A032 may result • – Use this to make... -
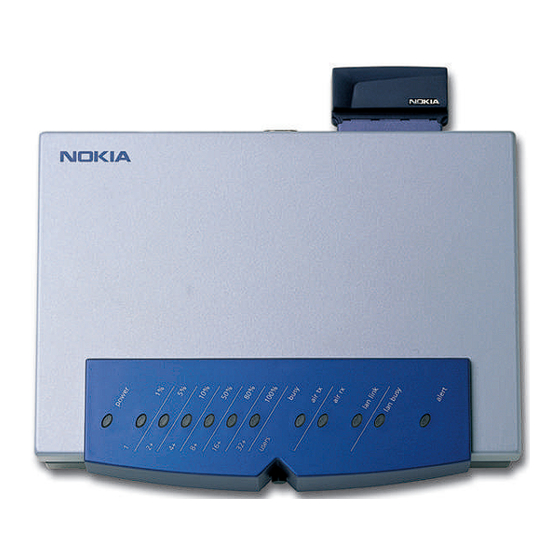
Page 16: Front Panel
Front panel The diagram below shows the Nokia A032 viewed from the top: power info LEDs radio alert mode button • button – This controls Access Point mode start-up modes, and affects the information displayed in the LEDs. info •... - Page 17 (see Troubleshooting in the Advanced User Guide). Wireless LAN card and external antenna The Nokia A032 is supplied with a Nokia C111 Wireless LAN Card. This has two internal antennas, so for most purposes you should not need to fit an external antenna.
-
Page 18: Performing The Installation
Performing the installation This chapter shows you how to set up your Note: You’ll need a Nokia A032 on an isolated LAN segment and working wireless test it with a wireless station. station and LAN connection to test that In brief, the steps you’ll need to take to install... -
Page 19: Installing The Wireless Lan Card
If you are not getting good coverage try moving the Nokia A032 to a new location or fitting an external antenna. Installing the wireless LAN card The Nokia C111 Wireless LAN Card conforms to Note: Install the the PCMCIA type II specification. -
Page 20: Installing The External Antenna
Installing the external antenna In most operational situations, the two internal Note: You only need antennas in the Nokia C111 Wireless LAN Card to install an antenna if will give adequate radio coverage. However, if you are getting necessary you can fit one or two external insufficient radio coverage. - Page 21 Positioning the antenna The Nokia C950 Omnidirectional Antenna radiates radio frequency energy in a 360 degree pattern around its axis. The Nokia C950 has been designed for indoor use – it can be mounted vertically on a ceiling, wall, or on a...
- Page 22 Connecting to an existing 10baseT LAN If you have an existing 10baseT wired Ethernet LAN, you can connect the Nokia A032 to it now: Connect a twisted pair 10baseT cable to the RJ45 connector in the rear of the unit.
- Page 23 Nokia A032 Getting Started...
-
Page 24: Setting Up And Testing
3. Setting up and testing This chapter explains how to switch on the Nokia A032 and configure its TCP/IP and WEP settings. You can get up and running very quickly by Learn mode is a configuring your Nokia A032 from a wireless... -
Page 25: Before You Begin
Configuring TCP/IP settings on page 22. • The IP address of a computer on your wired LAN, so that you can test the Nokia A032 is working properly. If you’re not sure about any of the above, please ask your network administrator for advice. -
Page 26: Preparing A Wireless Station
Learn mode allows you to configure the Nokia A032 from its default (factory) state. Remove the power connector from the rear panel of the Nokia A032, or switch off the power at the wall outlet. Press and hold the button and, while mode still holding it, power the unit on again. -
Page 27: Connecting To The Nokia A032
At this stage, the Nokia A032 is in Learn mode – the LAN port is disabled and all access occurs via the wireless interface. Connecting to the Nokia A032 To access the Nokia A032 from the wireless station: While the Nokia A032 is in Learn mode, start up the wireless station. -
Page 28: Configuring The Nokia A032
Configuring the Nokia A032 Displaying the Learn mode Web page Now the wireless station is communicating Note: You must with the Nokia A032, proceed as follows: power up the Nokia A032 before the On the wireless station, start a standard wireless station for Web browser, such as Internet Explorer. - Page 29 TCP/IP mode. It’s more likely that you’ll want renew the client IP information in your to use the Nokia A032 on an established wireless station – see network, so: the appendix entitled Enter a fixed IP address and subnet for the...
- Page 30 WEP keys – next time you’re in Learn mode, just click before Enter you restart the Nokia A032 (you don’t even need to click in the WEP field at the Enable top of the Learn mode screen).
-
Page 31: Restarting The Nokia A032 In Normal Mode
Enabling dial-up networking If you are going to be using the Nokia A032 to provide automatic dial-up Internet access via a modem: Click field. Enable Internet Access Fill in the following fields: Note: Entering these ISP Phone Number details carefully could... -
Page 32: Testing The Nokia A032
Testing the Nokia A032 To test the Nokia A032, you’re going to check communication between a computer on the wired LAN and the wireless station. networked PC 192.168.5.21 Nokia Access Point wireless station For test purposes, you need: • A working wired LAN connection •... - Page 33 Request timed out. Request timed out. Request timed out. Request timed out. C:\> Either the Nokia A032 is not configured properly (check the Access Control setting is in Learn mode), or you have not Open entered the IP address correctly.
- Page 34 • If you see the following output: C:\> ping 192.168.5.21 Pinging 192.168.5.21 with 32 bytes of data: Destination host unreachable. Destination host unreachable. Destination host unreachable. Destination host unreachable. C:\> This indicates that your wireless station is set to use Auto TCP/IP settings but there is no DHCP server available.
-
Page 35: What Next
What next? Now that your Nokia A032 is working correctly, you can customize your network to use the Nokia A032’s features to full effect. For example, you can: • Use WEP and NID security measures to safeguard your network •... -
Page 36: Supplementary Information
4. Supplementary information Operating modes and LED status Startup mode Startup mode occurs from the time power is Notes: applied until the unit is operating normally. alert LED also During the startup mode the LED will be alert flashes during internal on or flashing. - Page 37 See the Upgrading in the Advanced User Guide for more details. Starting in Learn mode To start in Learn mode: Switch off the unit. Note: The Nokia A032 Press and hold the button while mode has no integral power switch –...
- Page 38 Starting in BIOS mode Switch off the unit. Press and hold the button while mode switching on again. Keep holding the button. mode After one second, all the LEDs will go info off. After a further five seconds, all the info LEDs will come on again.
- Page 39 Restart the Access Point in normal mode. You can now configure the unit using the normal Web based configuration utility (see Using the Web manager in the Advanced User Guide). Nokia A032 Getting Started...
-
Page 40: Configuring Devices To Accept Automatic Ip Addresses
Configuring devices to accept automatic IP addresses By default, Windows clients are set to accept IP addresses automatically. However, if a station has subsequently been configured with IP information, you’ll need to reset the defaults before the Access Point DHCP server can provide the correct configuration: Use the Windows Network control panel to Obtain an IP address automatically... -
Page 41: Initialization Error Codes
Bad Manufacturer's info Bad unit checksum 011010 Bad log sector Log sector bad — recovered 011011 System error System fault Troubleshooting in the Advanced User Guide gives a more detailed explanation of the above error messages. Nokia A032 Getting Started... -
Page 42: Index
Index Numerics 10baseT LAN diagnostics phase 29 connecting 15 dial-up internet access sharing 1 DSSS 2 Access Point installing 11 air tx/air rx LEDs 9 encryption key 5 alert LED 10 error messages antenna 10 initialization 34 authentication 5 external antenna 12 auto TCP/IP settings 22 installing 13 automatic IP addresses 33... - Page 43 Password 24 Phone Number 24 NAT firewall 6 network name 3, 19 key 5 Nokia A032 overview 1 Nokia C111 Wireless LAN adapter card 8, 10 Nokia C950 Omnidirectional Antenna 13 Nokia WLAN network name 18 Nokia A032 Getting Started...
- Page 44 LED 9 radio (air tx/air rx) LEDs 9 overview 5 rear panel 8 wireless RJ45 networking 1 10baseT connector 8 wireless LAN card roaming installing 12 multi-channel 4 wireless station connecting to Nokia A032 20 using in Learn mode 19 Index...
- Page 45 Nokia A032 Getting Started...
Need help?
Do you have a question about the A032 and is the answer not in the manual?
Questions and answers