Table of Contents
Advertisement
Advertisement
Table of Contents

Related Manuals for York Fitness 51113


Summary of Contents for York Fitness 51113
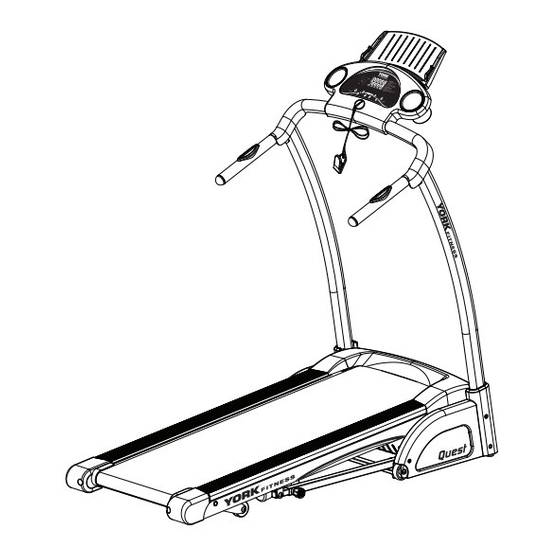
- Page 1 Owner’s Manual Quest Treadmill 51113 5NOV2011 www.yorkfitness.com...
-
Page 2: Table Of Contents
Table of contents Congratulations on CONTENTS purchasing your exercise equipment from Safety information Customer support Assembly instructions You have chosen a high quality, safe and innovative piece of equipment as your training Operational instructions partner and we are certain it will keep you motivated on the way to achieving your personal fitness goals. -
Page 3: Safety Information
• This product has been tested for use in a home place your feet on the side platforms provided, once environment and is warranted for In Home, personal, you are stable pull out the safety key, the treadmill family or household use. will begin to decelerate until it stops. • Due to our continuous policy of product • The safety level of this equipment can only be development, York Fitness reserves the right to maintained only if it is regularly examined for wear change specifications without notice. and tear. CAUTION! The instructions must be followed carefully in • Replace defective components immediately, and/or the assembly, use and maintenance of your equipment. keep the equipment out of use until it is repaired. The warranty does not cover damage due to negligence • Use only the adjustment settings as described in the... -
Page 4: Customer Support
• Place of purchase • Information about the place and conditions of use • Precise description of the issue / defect IMPORTANT!! - Please retain your sales receipt, York Fitness Customer Care may request proof of purchase to validate eligibility for warranty service. Warranty cover starts from the date shown on the proof of purchase. -
Page 5: Assembly Instructions
Assembly instructions • Prepare your work area - It is important you assemble the product in a clean and uncluttered space. • Work with a friend - We recommend you have someone assist you with the assembly as some of the components are quite heavy. • Open the carton - Check any warnings on the carton and make sure you have it the right way up. • Unpack the carton - Remove all the parts and lay them out on the floor. Make sure you have the following parts: 42 x 1 BASE FRAME COVER - RIGHT 56 x 1 SAFETY KEY 41 x 1 BASE FRAME COVER - LEFT... - Page 6 Assembly instructions STEP 1 93 x 4 97 x 4 Take care to ensure the wire does not trap when you attach the upright. STEP 2 74 x 2 93 x 2 97 x 2 Take care to ensure the wires do not get trapped when you attach the handlebar.
- Page 7 STEP 3 Before you attach the plastic covers, make sure all the screws / bolts and covering are fully tightened. 85 x 6 STEP 4 84 x 2 www.yorkfitness.com...
-
Page 8: Operational Instructions
Operational instructions Final Check Your treadmill is now assembled. Please make the following final checks: • Make sure all screws / bolts are tightened. • Make sure the equipment is on a flat, level surface. Power Up 1. Plug one end of power cable into the treadmill as shown. 2. Plug the other end into a suitable AC outlet (220-240 volt, 50Hz). 3. Switch the treadmill on using the on/off switch. 4. Attach the safety key to the console. NOTE: Before you run on the treadmill for the first time, allow the treadmill to run independently for 10 minutes. -
Page 9: Safety Key
Safety Key The treadmill will only operate when the safety key is in position - if the safety key is removed while the treadmill is in operation, it will stop immediately. Before every workout session please make sure you attach the safety key to the console and the clip at the other end to your clothing. -
Page 10: Major Function Keys
Operational instructions Major function keys KEYS PRE-WORKOUT DURING WORKOUT MODE SCAN Select “Target Program” mode - Switches between the feedback Time > Distance > Calories modes in following order - Time > Speed > Dist. > Cal. > Incline > Scan PROGRAM Enter the pre-set programs selection (P1 to P8). - Page 11 Target Programs This treadmill features 3 target programs: Target Time > Target Distance > Target Calories You can choose to workout by setting a target based on time or distance travelled or calories burned you want to achieve. Throughout these programs the user is free to adjust the speed if wanted.
-
Page 12: Monitoring Your Heart Rate
Operational instructions Monitoring your heart rate This treadmill is fitted with 2 hand pulse sensors. To obtain a pulse reading you must have both your left and right hands on the sensors at the same time. Do not grip the hand sensors to tight and allow the computer a few seconds to display the reading. -
Page 13: Care & Maintenance
If you need more lubricant, we recommend you use the Lube-N-Walk Treadmill Lubrication Kit, it can be obtained from local York distributors - see the Contact Us details at the front of this manual or visit www.yorkfitness.com. - Page 14 Care & Maintenance Adjusting Running Mat Alignment The alignment of the mat has been pre-set at the factory, however, the mat can be caused to run out-of-line by a user’s running style (eg, more weight on one foot), or if it is placed on an uneven surface - so it may need adjusting from time to time.
-
Page 15: Troubleshooting
If there is still a problem call your local York distributor for advice. Please find below some specific error messages you may see on the display: ERROR CODE... -
Page 16: Fitness Guide
Fitness guide Starting Your Workout Finishing Your Workout 1. Turn the treadmill to the lowest speed and incline Begin each workout with a Warm Up session - settings. a few minutes of stretching to help prevent strains, pulls and cramps. 2. Using the handrails for support place your feet on the side rails (either side of the running mat). 1. Get onto the treadmill, using the handrails for 3. Stop the treadmill. support, and place your feet on the side rails (either side of the running mat). -
Page 17: How Long Should I Exercise For
How Long Should I Exercise For? That really depends on your current level of fitness. If you’re just starting out on a new exercise program, you should start gradually and build up - do not try to do too much too quickly. 30 minutes, 3 times a week should be enough. -
Page 18: Exploded Drawing
Exploded drawing www.yorkfitness.com... -
Page 19: Part List
Part list Ref. Description Qty. Ref. Description Qty. York Ref. York Ref. 51113-1 Main Frame (T) 51113-54 Filter (LCR092.00423.00) 51113-2 Upright Post ( T) 51113-55 Lower Controller PCB (TM5966A) 51113-3 Rear Incline Frame (T) 51113-56 Safety Key 51113-4 Console Support & Handlebar (T) 51113-57 Speed Sensor &... - Page 20 www.yorkfitness.com...
Need help?
Do you have a question about the 51113 and is the answer not in the manual?
Questions and answers