
Subscribe to Our Youtube Channel
Related Manuals for Kramer VP-719DS


Summary of Contents for Kramer VP-719DS
- Page 1 Kramer Electronics, Ltd. USER MANUAL Model: 719DS, Seamless Switcher / Scaler...
-
Page 2: Table Of Contents
Contents Contents Introduction Getting Started Overview Your Seamless Switcher / Scaler Connecting the Seamless Switcher / Scaler Connecting a PC Understanding the Seamless Switcher / Scaler Understanding the OUTPUT MODE SELECT Button Functionality Locking and Unlocking the Front Panel Operating the Seamless Switcher / Scaler Switching and Scaling 7.1.1 Switching an Input... - Page 3 Contents Figures Figure 1: VP-719DS Seamless Switcher / Scaler Figure 2: Connecting the PC Figure 3: Connecting the VP-719DS Rear Panel Figure 4: OUTPUT MODE LED Sequence Figure 5: Locking / Unlocking the Front Panel Figure 6: OSD Input Status...
- Page 4 Contents Tables Table 1: Front Panel VP-719DS, Seamless Switcher / Scaler Features Table 2: Rear Panel VP-719DS, Seamless Switcher / Scaler Features Table 3: Selecting the Output Mode Resolution Table 4: User Mode Setting Definitions Table 5: Infra-red Remote Control Transmitter Functions...
- Page 5 (from 0 to 36) of the horizontal and vertical positions of the PIP. For details, see the protocol table. This option does not apply to the VP-719DS. Added new output resolution 1280x768. This resolution is marked with an asterisk “*”...
- Page 6 Define”. This feature lets you set the size of the PIP to your exact needs. To use this option, select “User Define”, then press the “PIP User Define” bar and set the PIP ). This option does not apply to the VP-719DS. V-size (0-255...
-
Page 7: Introduction
2 We recommend that you use only the power cord that is supplied with this machine 3 Download up-to-date Kramer user manuals from the Internet at this URL: http://www.kramerelectronics.com/manuals.html 4 The complete list of Kramer cables is on our Web site at http://www.kramerelectronics.com (click “Cables and Connectors” in the Products section) -
Page 8: Kramer: Simple Creative Technology
• 1400x1050 • A user definable output mode The VP-719DS is a 7-input seamless presentation switcher, that: • Digitally reprocesses the signal to correct mastering errors, and regenerates the video at a chosen line and pixel rate format, providing, for example, native-resolution video for LCD, DLP and Plasma displays •... -
Page 9: Your Seamless Switcher / Scaler
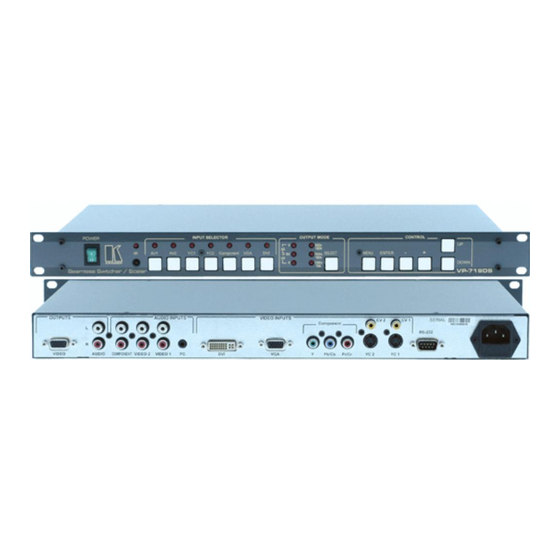
(often associated with low quality cables) • Avoiding interference from neighboring electrical appliances that may adversely influence signal quality and positioning your Kramer VP-719DS away from moisture, excessive sunlight and dust Your Seamless Switcher / Scaler Figure 1, Table 1 and Table 2 define the front and rear panels of the VP-719DS. -
Page 10: Figure 1: Vp-719Ds Seamless Switcher / Scaler
Your Seamless Switcher / Scaler Figure 1: VP-719DS Seamless Switcher / Scaler KRAMER: SIMPLE CREATIVE TECHNOLOGY... -
Page 11: Table 1: Front Panel Vp-719Ds, Seamless Switcher / Scaler Features
Your Seamless Switcher / Scaler Table 1: Front Panel VP-719DS, Seamless Switcher / Scaler Features Feature Function POWER Switch Illuminated switch supplying power to the unit IR Receiver / LED Green when the unit will accept IR remote commands Illuminates... -
Page 12: Table 2: Rear Panel Vp-719Ds, Seamless Switcher / Scaler Features
/ audio source 2 and illuminate the AV2 LED Press to select the composite video / audio source 1 and illuminate the AV1 LED Table 2: Rear Panel VP-719DS, Seamless Switcher / Scaler Features Feature Function... -
Page 13: Connecting The Seamless Switcher / Scaler
Connecting the Seamless Switcher / Scaler Connecting the Seamless Switcher / Scaler Using the VP-719DS you can select any one of the 7 inputs and scale that input to the output at the set resolution. To connect the VP-719DS, connect the following... -
Page 14: 5.1 Connecting A Pc
(the power connector is not illustrated in Figure 3). A PC (optional), as section 5.1 describes. 5.1 Connecting a PC You can connect a PC (or other controller) to the VP-719DS via the RS-232 port for remote control, and for upgrading the firmware, as section 7.4 describes. -
Page 15: Figure 3: Connecting The Vp-719Ds Rear Panel
Connecting the Seamless Switcher / Scaler Figure 3: Connecting the VP-719DS Rear Panel... -
Page 16: Understanding The Seamless Switcher / Scaler
Understanding the Seamless Switcher / Scaler Understanding the Seamless Switcher / Scaler The VP-719DS includes the following front panel buttons: • A set of 7 INPUT SELECTOR buttons (AV1, AV2, YC1, YC2, Component, VGA, and DVI) • An OUTPUT MODE SELECT button (see section 6.1) •... -
Page 17: Figure 4: Output Mode Led Sequence
Understanding the Seamless Switcher / Scaler Figure 4: OUTPUT MODE LED Sequence... -
Page 18: 6.2 Locking And Unlocking The Front Panel
6.2 Locking and Unlocking the Front Panel You can lock the front panel and control from the infra-red remote control transmitter to safeguard the settings on the VP-719DS. To lock the front panel: • Press and hold the MENU front panel OSD button... -
Page 19: Operating The Seamless Switcher / Scaler
Operating the Seamless Switcher / Scaler Operating the Seamless Switcher / Scaler Section 7.1 describes how to switch and scale an input. Section 7.2 describes the methods of controlling the Seamless Switcher / Scaler. 7.1 Switching and Scaling Section 7.1.1 describes how to switch an input. Section 7.1.2 describes how to select the output resolution. -
Page 20: 7.2 Controlling The Seamless Switcher / Scaler
7.3 Operating via the OSD MENU Screen The OSD superimposes a menu on the screen from which you can control your the VP-719DS, using the MENU, ENTER, -, +, UP and DOWN front panel OSD buttons. Pressing the MENU front panel OSD button or the MENU key on the infra-red remote control transmitter (see Figure 42) displays the first OSD screen, the “Menu screen”... -
Page 21: Controlling The Brightness And Contrast
Operating the Seamless Switcher / Scaler Figure 8: MENU Screen Brightness Gamma Geometry Utility Information Source and Color Contrast Figure 9: Menu Screen Icons 7.3.1 Controlling the Brightness and Contrast Figure 10 illustrates the Brightness and Contrast Screen: Figure 10: Brightness and Contrast Screen 7.3.2 Controlling the Gamma and Color Figure 11 illustrates the Gamma and Color Screen. -
Page 22: Selecting The Source
The user sets the parameters and saves them for recall later. Figure 12: Gamma, Color Temperature/Manager User 1/2 Screen 7.3.3 Selecting the Source Figure 13 illustrates the Source Screen, displaying the active source, as well as facilitating changing of the source. Figure 13: Source Selection Screen KRAMER: SIMPLE CREATIVE TECHNOLOGY... -
Page 23: Controlling The Scale Geometry
Operating the Seamless Switcher / Scaler 7.3.4 Controlling the Scale Geometry Figure 14 illustrates the main Geometry Screen, from which you can scale and zoom. Figure 14: Geometry (Scale and Zoom) Screen Figure 15 illustrates the Geometry (Scale) Screen, from which you can scale (Aspect Ratio and Nonlinear): Figure 15: Geometry (Scale: Aspect Ratio and Nonlinear) Screen Set the aspect ratio according to your specific requirements—the native... -
Page 24: Adjusting The Zoom Ratio And Position
2 In this standard, the ratio between the length and height is 4:3 3 In this standard (a Cinema mode standard used for movies and DVDs), the ratio between the length and height is 16:9 (or sometimes 1:2.35) 4 Panning the picture refers to resizing and cropping it KRAMER: SIMPLE CREATIVE TECHNOLOGY... -
Page 25: Figure 18: Osd Enlarge Status
Operating the Seamless Switcher / Scaler The zoom ratio and the zoom position are illustrated by a small rectangle inside a transparent pop-up OSD Enlarge status box that appears at the top right corner of the screen, as the example in Figure 18 illustrates: Figure 18: OSD Enlarge Status When you change the zoom ratio or zoom position, the screen image is adjusted correspondingly, and the change is reflected in the pop-up OSD... -
Page 26: Adjusting The Zoom Ratio
2 For example, to zoom-in to the lower right corner of the image, press the button 3 For example, to zoom-in toward the lower right of the image, press the and the buttons separately, as required KRAMER: SIMPLE CREATIVE TECHNOLOGY... -
Page 27: Configuring Via The Utility Screens
Figure 24: Geometry (Zoom Position Adjustment) Screen 7.3.6 Configuring via the Utility Screens You can determine how your VP-719DS will function either generally or on a specific occasion, via the Utility screen settings (see Figure 25): Figure 25: Utility Screen... -
Page 28: Choosing The Graphic Utility Settings
2 Assesses the image and improves the quality accordingly, by automatically adjusting the phase, frequency and position 3 Automatically adjusts the brightness and contrast 4 That is Y, B-Y, R-Y colorspace, also known as Y, C b , C r or Y, P b , P r KRAMER: SIMPLE CREATIVE TECHNOLOGY... -
Page 29: Choosing The Video Utility Settings
Operating the Seamless Switcher / Scaler 7.3.6.2 Choosing the Video Utility Settings From the Video Setting Utility screen (see Figure 28), you can set the Standard (see Figure 29), color, hue, sharpness, and position. Figure 28: Video Setting Utility Screen Figure 29: Video Setting Standard Utility Screen... -
Page 30: Choosing The Audio Utility Settings
From the Audio Setting Utility screen (see Figure 30), you can set the volume, treble, bass, and choose between stereo and mono (see Figure 31). Figure 30: Audio Setting Utility Screen Figure 31: Audio Setting Stereo Utility Screen KRAMER: SIMPLE CREATIVE TECHNOLOGY... -
Page 31: Choosing The Seamless Switch Utility Settings
Operating the Seamless Switcher / Scaler 7.3.6.4 Choosing the Seamless Switch Utility Settings From the Seamless Switch Utility screen (see Figure 32), you can choose the image transition speed Mode , set the Background screen color when there is no active source (Black or Blue), and activate (finds the active source) or deactivate (displays the source selected prior to power down) the Auto Search: Figure 32: Seamless Switch Utility Screen 7.3.6.5... -
Page 32: Figure 34: Osd Size Utility Screen
Operating the Seamless Switcher / Scaler Figure 34: OSD Size Utility Screen Figure 35: OSD Source Prompt Activation Utility Screen Figure 36: OSD Blank Color Utility Screen KRAMER: SIMPLE CREATIVE TECHNOLOGY... -
Page 33: Choosing The Output Utility Settings
Operating the Seamless Switcher / Scaler 7.3.6.6 Choosing the Output Utility Settings From the Output Setting Utility screen (see Figure 37), you can set the resolution (see Figure 38), refresh rate (see Figure 39), and a user definable output mode (see Figure 40 and Table 4). -
Page 34: Figure 39: Output Setting Refresh Rate Utility Screen
HW: Horizontal sync pulse width HS: Horizontal active start point HA: Horizontal active region HP: Horizontal polarity VT: Vertical total VW: Vertical sync pulse width VS: Vertical active start point VA: Vertical active region VP: Vertical polarity OCLK: Output clock KRAMER: SIMPLE CREATIVE TECHNOLOGY... -
Page 35: Choosing Factory Reset
Operating the Seamless Switcher / Scaler 7.3.6.7 Choosing Factory Reset From the Factory Reset Utility screen (see Figure 41), you can reset your VP-719DS to its preset default setting: Figure 41: Factory Reset Utility Screen 7.3.7 Verifying Configuration Details via the Information Screen From the Information screen, you can verify the main source, whether mute is activated, output mode, as well as the firmware version number. -
Page 36: Figure 42: Infra-Red Remote Control Transmitter
Operating the Seamless Switcher / Scaler Figure 42: Infra-red Remote Control Transmitter KRAMER: SIMPLE CREATIVE TECHNOLOGY... -
Page 37: Table 5: Infra-Red Remote Control Transmitter Functions
6 Consists of a set of 5 separate keys. See the illustration in Figure 42 which shows an enlarged view of this part of the Infra-red remote control transmitter 7 Not available on the VP-719DS (to toggle between the PIP content and the screen source content). Available on machines such as the VP-720DS 8 Not available on the VP-719DS (to select the picture-in-picture function). -
Page 38: 7.4 Upgrading Firmware
1 Specifications are subject to change without notice 2 When installing a Kramer machine on a closed or multi-unit rack assembly, be aware that the operating ambient temperature of the rack environment may be greater than room ambient. In particular, take care that there is sufficient air flow. (Refer to the "Operating Conditions.pdf"... -
Page 39: Communication Protocol
Communication Protocol Communication Protocol The Com port setting details are: Baud Rate: 9600/115200, Parity: none, Data Bits: 8 bits, Stop Bits: 1 bit, Set CTS Mode: Off, and Set XON/XOFF: Off. Table 7: RS-232 Protocol Field 1 Field 2 Field 3 Field 4 Field 5 "L"... - Page 40 L BA45 12 User Define L BA45 13 480P L BA45 13 720P L BA45 14 1080i L BA45 15 User Define L BA45 16 0xE3 0x1C PIP Size L E31C ** ** is PIP size index KRAMER: SIMPLE CREATIVE TECHNOLOGY...
-
Page 41: Table 9: Rs-232 Read Command
Communication Protocol Table 9: RS-232 Read Command Command Sent Return Source K 15EA VGA1 K 16E9 VGA2 K 17E8 K 18E7 Component K 19E6 C-Video 1 K 39C6 C-Video 2 K 3AC5 S-Video 1 K 3BC4 S-Video 2 K 3CC3 Freeze K 1CE3 Freeze On... - Page 42 EXCLUSION OF DAMAGES The liability of Kramer for any effective products is limited to the repair or replacement of the product at our option. Kramer shall not be liable for: Damage to other property caused by defects in this product, damages based upon inconvenience, loss of use of the product, loss of time, commercial loss;...
- Page 43 For the latest information on our products and a list of Kramer distributors, visit our Web site: www.kramerelectronics.com. Updates to this user manual may be found at http://www.kramerelectronics.com/manuals.html. We welcome your questions, comments and feedback. Kramer Electronics, Ltd. 3 Am VeOlamo Street. Jerusalem 95463, Israel Tel: (+972-2)-654-4000 Fax: (+972-2)-653-5369, E-mail: info@kramerel.com...
Need help?
Do you have a question about the VP-719DS and is the answer not in the manual?
Questions and answers