Kramer VP-720DS User Manual
Seamless switcher / scaler
Hide thumbs
Also See for VP-720DS:
- User manual (45 pages) ,
- User manual (23 pages) ,
- User manual (28 pages)

Related Manuals for Kramer VP-720DS


Summary of Contents for Kramer VP-720DS
- Page 1 Kramer Electronics, Ltd. USER MANUAL Models: VP-720DS, Seamless Switcher / Scaler VP-723DS, Seamless Switcher / Scaler...
-
Page 2: Table Of Contents
Contents Contents Introduction Getting Started Overview Your Seamless Switcher / Scaler Connecting the Seamless Switcher / Scaler Connecting a PC Understanding the Seamless Switcher / Scaler Understanding the OUT Button Functionality Understanding the PIP Button Feature 6.2.1 Activating the PIP Feature 6.2.2 PIP Characteristics 6.2.3... - Page 3 Upgrading Firmware Technical Specifications Communication Protocol Figures Figure 1: Front Panels of the VP-720DS and VP-723DS, and their Rear Panel Figure 2: Connecting the PC Figure 3: Connecting the VP-720DS / VP-723DS Rear Panel Figure 4: OUT LED Sequence Figure 5: OSD PIP Status...
- Page 4 Figure 48: Information Screen Figure 49: Infra-red Remote Control Transmitter Tables Table 1: Front Panel VP-720DS and VP-723DS, Seamless Switcher / Scaler Features Table 2: Rear Panel VP-720DS and VP-723DS, Seamless Switcher / Scaler Features Table 3: Selecting the Output Resolution...
- Page 5 Master-Firmware Ver-2.33 Release. This version requires Slave Firmware version 1.06 or higher. The version can be seen in the INFO section of the on-screen menu. Contact your Kramer service center if you have any questions. Improved functionality lets you select the PIP source via the RS-232 command.
- Page 6 Addendum: Scalers Group Under the Utility>Output Setting>User Mode Setting there is a new option: “Set Current”. This feature lets you apply the parameters of the currently selected output resolution to the User Define output resolution (Utility>Output Setting>Resolution). This set of parameters can be used as a “starting point” to adjust parameters according to the requirements of the signal receiver.
-
Page 7: Introduction
2 We recommend that you use only the power cord that is supplied with this machine 3 Download up-to-date Kramer user manuals from the Internet at this URL: http://www.kramerelectronics.com/manuals.html 4 The complete list of Kramer cables is on our Web site at http://www.kramerelectronics.com (click “Cables and Connectors” in the Products section) - Page 8 • A user definable output mode The VP-723DS has 3 additional output modes used for high definition television (HDTV): 480p, 720p, and 1080i. Both the VP-720DS and VP-723DS are 7-input seamless presentation switchers, that: • Digitally reprocess the signal to correct mastering errors, and regenerate...
-
Page 9: Your Seamless Switcher / Scaler
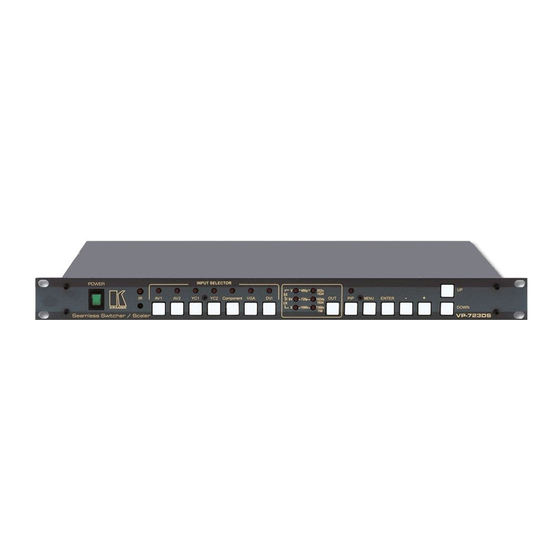
VP-723DS away from moisture, excessive sunlight and dust Your Seamless Switcher / Scaler Figure 1 illustrates the front panels of the VP-720DS and VP-723DS, as well as the rear panel. The latter is identical on both the VP-720DS and VP-723DS. -
Page 10: Figure 1: Front Panels Of The Vp-720Ds And Vp-723Ds, And Their Rear Panel
Your Seamless Switcher / Scaler Figure 1: Front Panels of the VP-720DS and VP-723DS, and their Rear Panel KRAMER: SIMPLE CREATIVE TECHNOLOGY... -
Page 11: Table 1: Front Panel Vp-720Ds And Vp-723Ds, Seamless Switcher / Scaler Features
Your Seamless Switcher / Scaler Table 1: Front Panel VP-720DS and VP-723DS, Seamless Switcher / Scaler Features Feature Function POWER Switch Illuminated switch supplying power to the unit IR Receiver / LED Green when the unit will accept IR remote commands... - Page 12 4 Press again (when the LED illuminates) to freeze the image; the LED flashes. Press once again (when the LED flashes), to display a blank screen; the LED flashes more slowly. Alternatively, to freeze the image, press the FREEZE key on the infra-red remote control transmitter (see Figure 49) KRAMER: SIMPLE CREATIVE TECHNOLOGY...
-
Page 13: Table 2: Rear Panel Vp-720Ds And Vp-723Ds, Seamless Switcher / Scaler Features
Your Seamless Switcher / Scaler Table 2: Rear Panel VP-720DS and VP-723DS, Seamless Switcher / Scaler Features Feature Function VIDEO HD15 Connects to the video acceptor (for example, Plasma display, Connector projector or monitor) that displays the scaled output (with the OSD... -
Page 14: Connecting The Seamless Switcher / Scaler
Figure 3) 1 For details of how to set the output resolution on the VP-720DS and VP-723DS, refer to section 6.1 2 Switch OFF the power on each device before connecting it to your Seamless Switcher / Scaler. After connecting your... -
Page 15: 5.1 Connecting A Pc
A PC (optional), as section 5.1 describes. 5.1 Connecting a PC You can connect a PC (or other controller) to the VP-720DS or VP-723DS via the RS-232 port for remote control, and for upgrading the firmware, as section 7.4 describes. -
Page 16: Figure 3: Connecting The Vp-720Ds / Vp-723Ds Rear Panel
Connecting the Seamless Switcher / Scaler Figure 3: Connecting the VP-720DS / VP-723DS Rear Panel KRAMER: SIMPLE CREATIVE TECHNOLOGY... -
Page 17: Understanding The Seamless Switcher / Scaler
Understanding the Seamless Switcher / Scaler Understanding the Seamless Switcher / Scaler The VP-720DS and VP-723DS include the following front panel buttons: • A set of 7 INPUT SELECTOR buttons (AV1, AV2, YC1, YC2, Component, VGA, and DVI) • An OUT button (see section 6.1) •... -
Page 18: Figure 4: Out Led Sequence
Understanding the Seamless Switcher / Scaler Figure 4: OUT LED Sequence KRAMER: SIMPLE CREATIVE TECHNOLOGY... -
Page 19: 6.2 Understanding The Pip Button Feature
Understanding the Seamless Switcher / Scaler 6.2 Understanding the PIP Button Feature The Picture-in-Picture inserter (PIP) is used for the simultaneous display of video and graphic sources, and lets you display: • An inserted video source PIP over a graphic source display •... -
Page 20: Pip Characteristics
The OSD SWAP status appears superimposed over the top right corner of the screen for a few seconds , as Figure 6 illustrates Figure 6: OSD SWAP Status 1 By default, 20 seconds. But you can reset the timeout (from 3 to 60 seconds), see section 7.3.6.6 KRAMER: SIMPLE CREATIVE TECHNOLOGY... -
Page 21: Resizing The Pip
6.3 Locking and Unlocking the Front Panel You can lock the front panel and control from the infra-red remote control transmitter to safeguard the settings on the VP-720DS or VP-723DS. To lock the front panel: • Press and hold the MENU front panel OSD button... -
Page 22: Operating The Seamless Switcher / Scaler
4 To set the image transition speed (fast, safe or moderate), see section 7.3.6.5 5 By pressing the INPUT SELECTOR button again when the appropriate LED illuminates 6 By pressing the INPUT SELECTOR button once again when the appropriate LED flashes KRAMER: SIMPLE CREATIVE TECHNOLOGY... -
Page 23: Choosing The Output Resolution
7.3 Operating via the OSD MENU Screen The OSD superimposes a menu on the screen from which you can control your the VP-720DS or VP-723DS, using the MENU, ENTER, -, +, UP and DOWN front panel OSD buttons. Pressing the MENU front panel OSD button or the MENU key on the infra-red remote control transmitter (see Figure 49) displays the first OSD screen, the “Menu screen”... -
Page 24: Controlling The Brightness And Contrast
Figure 10: MENU Screen Brightness Gamma Geometry Utility Information Source and Color Contrast Figure 11: Menu Screen Icons 7.3.1 Controlling the Brightness and Contrast Figure 12 illustrates the Brightness and Contrast Screen: Figure 12: Brightness and Contrast Screen KRAMER: SIMPLE CREATIVE TECHNOLOGY... -
Page 25: Controlling The Gamma And Color
Operating the Seamless Switcher / Scaler 7.3.2 Controlling the Gamma and Color Figure 13 illustrates the Gamma and Color Screen. You can choose Normal (average setting), Presentation (higher black level), Cinema (higher white balance), Nature (higher green level), User 1 or User 2. Figure 13: Gamma and Color Screen Choosing User 1 or User 2 from the Gamma and Color Screen illustrated in Figure 13, displays the Gamma, Color Temperature and Color Manager... -
Page 26: Selecting The Source
Figure 16 illustrates the main Geometry Screen, from which you can scale and zoom. Figure 16: Geometry (Scale and Zoom) Screen Figure 17 illustrates the Geometry (Scale) Screen, from which you can scale (Aspect Ratio and Nonlinear): KRAMER: SIMPLE CREATIVE TECHNOLOGY... -
Page 27: Figure 17: Geometry (Scale: Aspect Ratio And Nonlinear) Screen
Operating the Seamless Switcher / Scaler Figure 17: Geometry (Scale: Aspect Ratio and Nonlinear) Screen Set the aspect ratio according to your specific requirements—the native resolution—that is, depending on the specifications of the Plasma screen or projector. When using a VGA, DVI and/or component video source, you can choose an aspect ratio from the following: Full Screen, Native, 4:3 Output , and 16:9... -
Page 28: Adjusting The Zoom Ratio And Position
When you change the zoom ratio or zoom position, the screen image is adjusted correspondingly, and the change is reflected in the pop-up OSD Enlarge status box. For example, Figure 21 illustrates a zoom ratio increase from 200% (Image A) to 400% (Image B): KRAMER: SIMPLE CREATIVE TECHNOLOGY... -
Page 29: Adjusting The Zoom Ratio
Operating the Seamless Switcher / Scaler Figure 21: Zoom Ratio Adjustment Example Figure 22 illustrates how the pop-up OSD Enlarge status box shows a zoom position adjustment from the top left corner (Image C) to the lower right corner (Image D): Figure 22: Zoom Position Adjustment Example 7.3.5.1 Adjusting the Zoom Ratio... -
Page 30: Configuring Via The Utility Screens
7.3.6 Configuring via the Utility Screens You can determine how your VP-720DS or VP-723DS will function either generally or on a specific occasion, via the Utility screen settings (see Figure 27): 1 For example, to zoom-in to the lower right corner of the image, press the... -
Page 31: Choosing The Graphic Utility Settings
Operating the Seamless Switcher / Scaler Figure 27: Utility Screen 7.3.6.1 Choosing the Graphic Utility Settings From the Graphic Setting Utility screen (see Figure 28), you can set the color format (see Figure 29), position, saturation, hue, sharpness, frequency and phase, as well as auto image and auto gain Figure 28: Graphic Setting Utility Screen... -
Page 32: Choosing The Video Utility Settings
Choosing the Video Utility Settings From the Video Setting Utility screen (see Figure 30), you can set the Standard (see Figure 31), color, hue, sharpness, and position. Figure 30: Video Setting Utility Screen Figure 31: Video Setting Standard Utility Screen KRAMER: SIMPLE CREATIVE TECHNOLOGY... -
Page 33: Choosing The Audio Utility Settings
Operating the Seamless Switcher / Scaler 7.3.6.3 Choosing the Audio Utility Settings From the Audio Setting Utility screen (see Figure 32), you can set the volume, treble, bass, and choose between stereo and mono (see Figure 33). Figure 32: Audio Setting Utility Screen Figure 33: Audio Setting Stereo Utility Screen 7.3.6.4 Choosing the PIP Utility Settings... -
Page 34: Figure 35: Pip Activation Utility Screen
Operating the Seamless Switcher / Scaler Figure 35: PIP Activation Utility Screen Figure 36: PIP Source Utility Screen Figure 37: PIP Size Utility Screen KRAMER: SIMPLE CREATIVE TECHNOLOGY... -
Page 35: Choosing The Seamless Switch Utility Settings
Operating the Seamless Switcher / Scaler 7.3.6.5 Choosing the Seamless Switch Utility Settings From the Seamless Switch Utility screen (see Figure 38), you can choose the image transition speed Mode , set the Background screen color when there is no active source (Black or Blue), and activate (finds the active source) or deactivate (displays the source selected prior to power down) the Auto Search: Figure 38: Seamless Switch Utility Screen 7.3.6.6... -
Page 36: Choosing The Output Utility Settings
(see Figure 44), refresh rate (see Figure 45), and a user definable output mode (see Figure 46 and Table 4). 1 Recommended for advanced users only – non-standard settings may not be recognized by the display device KRAMER: SIMPLE CREATIVE TECHNOLOGY... - Page 37 Operating the Seamless Switcher / Scaler Figure 43: Output Setting Utility Screen Figure 44: Output Setting Resolution Utility Screen Figure 45: Output Setting Refresh Rate Utility Screen...
-
Page 38: Choosing Factory Reset
VP: Vertical polarity OCLK: Output clock 7.3.6.8 Choosing Factory Reset From the Factory Reset Utility screen (see Figure 47), you can reset your VP-720DS or VP-723DS to its preset default setting: Figure 47: Factory Reset Utility Screen KRAMER: SIMPLE CREATIVE TECHNOLOGY... -
Page 39: Verifying Configuration Details Via The Information Screen
Operating the Seamless Switcher / Scaler 7.3.7 Verifying Configuration Details via the Information Screen From the Information screen (see Figure 48), you can verify the main source, PIP source, whether mute is activated, output mode, as well as the firmware version number: Figure 48: Information Screen 7.3.8... - Page 40 Operating the Seamless Switcher / Scaler Figure 49: Infra-red Remote Control Transmitter KRAMER: SIMPLE CREATIVE TECHNOLOGY...
-
Page 41: Table 5: Infra-Red Remote Control Transmitter Functions
Operating the Seamless Switcher / Scaler Table 5: Infra-red Remote Control Transmitter Functions Keys Function Selects the output resolution and illuminates the appropriate LED FREEZE Pauses the output video POWER Cycles power INPUT SELECTOR* 7 separate keys for selecting each of the following sources: AV1, AV2, COMP. -
Page 42: 7.4 Upgrading Firmware
1 Specifications are subject to change without notice 2 When installing a Kramer machine on a closed or multi-unit rack assembly, be aware that the operating ambient temperature of the rack environment may be greater than room ambient. In particular, take care that there is sufficient air flow. (Refer to the "Operating Conditions.pdf"... -
Page 43: Communication Protocol
Communication Protocol Communication Protocol The Com port setting details are: Baud Rate: 9600/115200, Parity: none, Data Bits: 8 bits, Stop Bits: 1 bit, Set CTS Mode: Off, and Set XON/XOFF: Off. Table 7: RS-232 Protocol Field 1 Field 2 Field 3 Field 4 Field 5 "L"... - Page 44 L BA45 12 User Define L BA45 13 480P L BA45 13 720P L BA45 14 1080i L BA45 15 User Define L BA45 16 0xE3 0x1C PIP Size L E31C ** ** is PIP size index KRAMER: SIMPLE CREATIVE TECHNOLOGY...
-
Page 45: Table 9: Rs-232 Read Command
Communication Protocol Table 9: RS-232 Read Command Command Sent Return Source K 15EA VGA1 K 16E9 VGA2 K 17E8 K 18E7 Component K 19E6 C-Video 1 K 39C6 C-Video 2 K 3AC5 S-Video 1 K 3BC4 S-Video 2 K 3CC3 Freeze K 1CE3 Freeze On... - Page 46 EXCLUSION OF DAMAGES The liability of Kramer for any effective products is limited to the repair or replacement of the product at our option. Kramer shall not be liable for: Damage to other property caused by defects in this product, damages based upon inconvenience, loss of use of the product, loss of time, commercial loss;...
- Page 47 For the latest information on our products and a list of Kramer distributors, visit our Web site: www.kramerelectronics.com. Updates to this user manual may be found at http://www.kramerelectronics.com/manuals.html. We welcome your questions, comments and feedback. Kramer Electronics, Ltd. 3 Am VeOlamo Street. Jerusalem 95463, Israel Tel: (+972-2)-654-4000 Fax: (+972-2)-653-5369, E-mail: info@kramerel.com...
Need help?
Do you have a question about the VP-720DS and is the answer not in the manual?
Questions and answers