Bayer HealthCare Contour next EZ User Manual
Blood glucose monitoring system
Hide thumbs
Also See for Contour next EZ:
- User manual (33 pages) ,
- Quick reference manual (2 pages) ,
- User manual
Table of Contents
Advertisement
Advertisement
Table of Contents

Related Manuals for Bayer HealthCare Contour next EZ


Summary of Contents for Bayer HealthCare Contour next EZ
- Page 1 ® Blood Glucose Monitoring System USER GUIDE...
- Page 2 Intended Use WARNING: Potential Biohazard The C ® EZ blood glucose monitoring system ONTOUR Health care professionals or persons using this system is intended for self-testing by people with diabetes on multiple patients should follow the infection control and by health care professionals to monitor glucose procedure approved by their facility.
-
Page 3: Table Of Contents
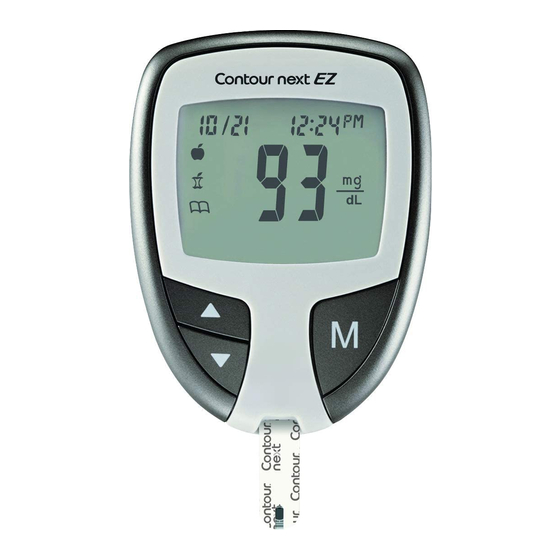
Your C ® EZ Meter Table of Contents ONTOUR Your Meter Overview ............iii Your Meter Features ............4 Display Information For Safety............5 Up/Down Scroll Buttons Memory Button Getting Ready to Test............8 (On/Off, Memory Getting the Blood Drop ........... 10 Recall, Enter) Testing Your Blood ............ - Page 4 Your Meter Display Icon What it Means The picture below shows all the symbols that appear Top area on the display presenting date and time. on your meter display. To view, with the meter off, press and hold ▲ or ▼. All display segments will appear Pre-meal result marker.
-
Page 5: Your Meter Overview
Thank you for choosing the C ® • Results in mmol/L will always have a decimal point; ONTOUR blood glucose monitoring system! We are proud • Results in mg/dL will never have a decimal point. to be your partner in helping you manage your diabetes. - Page 6 Information For Safety • Do not press the test strip against your finger • Have all the materials you will need ready when testing. This may block the sample tip. before you begin testing. This includes your ® ® EZ meter, the C test ONTOUR ONTOUR...
- Page 7 3. Insert the lancet firmly into The following steps are shown in the proper order the lancing device until it for performing a blood glucose test, pages 8-14. comes to a full stop. This will re-set the device. You Preparing the Test Strip can also pull and release 1.
-
Page 8: Getting The Blood Drop
Getting the Blood Drop and Testing 4. Immediately touch the tip of 1. Press the endcap the test strip to the drop of firmly against the blood. The blood is pulled puncture site and into the test strip through press the blue the tip. -
Page 9: Test Results
Test Results Expected Values: 5. After a beep, you will see the meter count down 5 seconds. Blood glucose values will vary depending on food Your blood test result will be intake, medication dosages, health, stress, or exercise. displayed and automatically Consult with your health care professional for the stored in the meter memory. -
Page 10: Cleaning Your Meter
Removing the Used Lancet Cleaning Your Meter 1. In one hand, hold the The exterior of the C ® EZ meter can be ONTOUR lancing device with your cleaned using a moist (not wet) lint free tissue with a thumb on the grip indent. mild detergent or disinfectant solution, such as 1 part With your other hand, hold bleach mixed with 9 parts water. -
Page 11: Control Solution Testing
Control Solution Testing Use only Bayer’s C ® control solutions ONTOUR 3. Hold the test strip with the ® (Normal, Low or High) with your C ONTOUR gray end facing up. blood glucose monitoring system. 4. Insert the gray end into Using anything other than C control ONTOUR... - Page 12 7. Immediately touch the tip of the test strip to the drop 9. Compare your control test result with of control solution. The solution is pulled into the test the Normal Control Range provided on the test strip bottle or carton. strip through the tip.
-
Page 13: Setting The Time, Date And Sound
Setting the Time, Date and Sound If you selected a 12 hour time setting, the AM or PM ® Your C EZ meter allows you to set the ONTOUR will now flash. Press ▲ or ▼ date, time, and sound as you like them. to select AM or PM. -
Page 14: Set-Up For Basic (L-1) And Advanced (L-2) Modes
Setting the Sound Set-up for Basic (L-1) and Advanced (L-2) Modes The flashing bell symbol will now appear on the display ® Your new C EZ meter is pre-set for the ONTOUR along with the word Basic Mode and offers the same easy test procedure in either the Basic or Advanced Mode. -
Page 15: Personalizing Lo, Hi And Reminder Settings
Personalizing LO, HI and Post-Meal Test Reminder Set-up Reminder Settings To change the reminder time for post-meal testing, If you selected Advanced press ▲ or ▼ to display the Mode (L-2 on your display) options available. Select 2.5, you can change your meter’s 2.0, 1.5, or 1.0 hour(s) to set personal low and high your post-meal reminder... - Page 16 Using the Markers If you want to mark the test result Before you remove your test strip, press ▲ or ▼ to If you have set up your select the marker you want to set. The marker will flash. meter in Advanced Mode, your meter will display three markers after you test your To mark a result with the pre-...
-
Page 17: Transferring Results To A Computer
Using the Reminder Feature To Cancel a Reminder When the reminder sounds, When the meter is off, press the meter will automatically M to turn on the meter. The turn on. The reminder will date and time will appear beep 20 times, and the along with the display will show the pre- Press ▲... - Page 18 After performing a test To Mark You Will See What It Means You Will See To Set Results Result is marked as a Pre-Meal Press M pre-meal test. You can Press ▲ or ▼ (Flashing) now set a reminder. Reminder is set to go off in the Reminder amount of time you have set Press M...
-
Page 19: Viewing Results: Basic Mode
Press ▼ twice to review Viewing Basic Mode Results previous results. Press M to turn your meter on. Press M again to view Results will be shown the memory. starting with the most recent. Each result will The 14 day average will show the date and time appear in the center of the display with the number of... -
Page 20: Viewing Results: Advanced Mode
Viewing Advanced Mode Results Viewing Advanced Mode Averages In Advanced Mode (L-2), you have all of the options Press M to turn your meter on. Press M again to view described in Basic Mode plus additional items available. the 14 day average including the number of results used to obtain the average. -
Page 21: Error Codes And Symbols
Error Codes and Symbols If you do not resolve the problem, contact Bayer Diabetes Care Helpline at 1-800-268-7200. Press ▲ again to view the 30 day average of results What What It What You Should Do marked with a pre-meal You See Means marker. - Page 22 If you do not resolve the problem, contact If you do not resolve the problem, contact Bayer Diabetes Care Helpline at 1-800-268-7200. Bayer Diabetes Care Helpline at 1-800-268-7200. What What It What What It What You Should Do What You Should Do You See Means You See...
- Page 23 If you do not resolve the problem, contact If you do not resolve the problem, contact Bayer Diabetes Care Helpline at 1-800-268-7200. Bayer Diabetes Care Helpline at 1-800-268-7200. What What It What What It What You Should Do What You Should Do You See Means You See...
-
Page 24: Changing The Batteries
Changing the Batteries 4. Place new batteries under Batteries should be replaced the prongs and into the when the meter continually battery compartment with displays or the meter the “+” side up. [Use two briefly shows and then 3-volt (DL2032 or CR2032) turns off (See Error Codes lithium batteries.] and Symbols, page 37). -
Page 25: Caring For Your Meter
Caring for Your Meter Symptoms of High or Low Blood Glucose • Store meter in the carrying case provided whenever possible. You can better understand your test results by being • Wash and dry hands well before handling to keep aware of the symptoms of high or low blood glucose. -
Page 26: Specifications
System Specifications Immunity to electrostatic discharge meets the Test Sample: Venous or capillary whole blood requirements of IEC 61000-4-2: 2008. It is advisable Test Result: Referenced to plasma/serum glucose to avoid use of electronic devices in very dry Sample Volume: 0.6 μL environments especially if synthetic materials are Measuring Range:... -
Page 27: Technical Information
Limitations Technical Information ® The C EZ blood glucose monitoring ONTOUR Preservatives: Blood may be collected by health care system was tested using 100 capillary blood samples professionals into test tubes containing heparin. Do not ® (duplicate replicates from three C strip use other anticoagulants or preservatives. - Page 28 Technical Information Technical Information A repeatability study was conducted with the Table 2 - System accuracy results for glucose ® EZ blood glucose monitoring system concentration ≥ 4.2 mmol/L ONTOUR using five venous whole blood specimens with Difference range in glucose levels from 2.2 mmol/L to 17.0 mmol/L.
-
Page 29: Service Information
Service Information Warranty If you have a problem and none of the problem solving Important: Bayer Inc. (“Bayer”) has no knowledge ® steps in this user guide help, contact Bayer Diabetes of the performance of the C EZ meter ONTOUR ®... -
Page 30: Supplies
Supplies 3. Bayer Inc. reserves the right to make changes When calling or writing for supplies be sure to include in design of this instrument without obligation the number with the name of the replacement part or to incorporate such changes into previously accessory item. - Page 31 Distributed By: Bayer Inc. Toronto, Ontario M9W 1G6 Canada ®/TM Trademarks of Bayer HealthCare LLC, used under license by Bayer Inc. Bayer and Bayer Cross are registered trademarks of Bayer AG, used under license by Bayer Inc. All other trademarks are the property of their respective owners.
Need help?
Do you have a question about the Contour next EZ and is the answer not in the manual?
Questions and answers