Bayer HealthCare CONTOUR User Manual
Hide thumbs
Also See for CONTOUR:
- User manual (48 pages) ,
- Quick test manual (2 pages) ,
- Quick reference manual (2 pages)
Table of Contents
Advertisement
Quick Links
Advertisement
Table of Contents

Related Manuals for Bayer HealthCare CONTOUR


Summary of Contents for Bayer HealthCare CONTOUR
- Page 1 BLOOD GLUCOSE MONITORING SYSTEM USER GUIDE...
-
Page 2: Table Of Contents
® Thank you for choosing the C blood glucose Table of Contents ONTOUR monitoring system! We are proud to be your partner in Your Testing Tools helping you manage your diabetes. Our goal is to make Your Meter Display this the simplest, most accurate meter you will ever use. Your Meter Features The C blood glucose monitoring system is intended... -
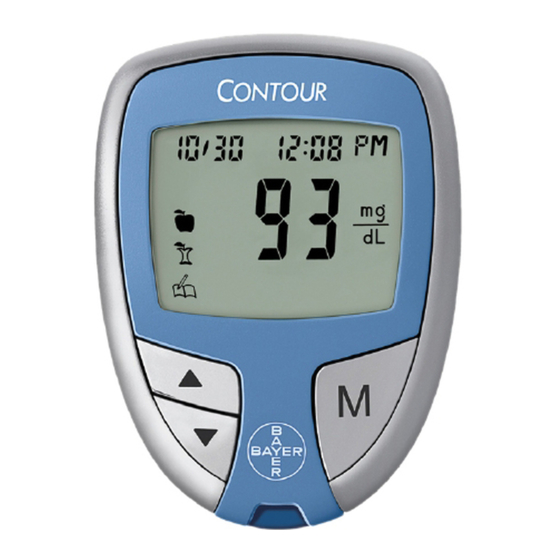
Page 3: Your Meter Display
® Your Meter Display: Your ONTOUR Meter: The picture below shows all the symbols that appear on your meter display. To view, with the meter off, press and hold ▲ or ▼. All dis- play segments will appear for 10 seconds. If you need more than 10 seconds to check the display, press and hold ▲... -
Page 4: Your Meter Features
Your Meter Features: Symptoms of High or Low Blood Sugar: ® Easy: The C blood glucose monitoring system is You can better understand your test results by being aware ONTOUR about simplicity. You will notice its uncomplicated approach of the symptoms of high or low blood sugar. the first time you see it. -
Page 5: Important Things To Know
Important Things to Know: IMPORTANT NOTE: Always keep the test strips in the original bottle. Tightly close the bottle immediately after remov- • Your meter has been preset and locked to display results ing a test strip. The bottle is designed to keep the in mmol/L (millimoles of glucose per liter). -
Page 6: Getting Ready To Test
Twist off the round protective The following steps (pages 8–13) are shown in the lancet cap. Be sure to save it proper order for performing a blood glucose test. for disposing of the used lancet. Getting Ready to Test: Read the M 2 insert for complete instructions. -
Page 7: Getting The Blood Drop
Getting the Blood Drop: Testing Your Blood: The puncture depth Immediately touch the tip of Fingertip depends on the endcap the test strip to the drop of testing—Use setting and the amount of blood. The blood is pulled into the Gray endcap pressure applied to the the test strip through the tip. - Page 8 You can set your meter to use special marker options by Removing the used lancet: using Advanced Mode (L-2). See pages 24–29. In one hand, hold the lancing device with your thumb on the Blood glucose values will vary depend- Expected Values: grip indent, with your other ing on food intake, medication dosages, health, stress, or...
-
Page 9: Control Solution Testing
Control Solution Testing: ® Use only Bayer’s C control solutions (Normal, The meter will turn on. An ONTOUR Low, or High) with your C meter. Using anything image of a test strip with ONTOUR other than C control solution could present incorrect a flashing blood drop will ONTOUR results. - Page 10 After a beep, you will see the If your control test result is out-of-range, see the meter count down 5 seconds “What You Should Do” recommendations on page 36. until the test is complete and your control test result is To turn your meter off, simply displayed.
-
Page 11: Alternative Site Testing (Forearm Or Palm)
Alternative Site Testing (AST): Use AST only when it has been more than For palm testing, For forearm two hours after any one of the following: a it is not necessary to testing only, meal, diabetes medication, or exercise. To rub the skin or pump rub the testing receive a clear AST endcap, please call... -
Page 12: Set-Up For Basic (L-1) And Advanced (L-2) Modes
Set-up for Basic (L-1) and Advanced (L-2) Modes: Setting the Date, Time and Sound: ® Your new C meter is pre-set for the Basic Mode Your C meter allows you to set the date, time, and ONTOUR ONTOUR and offers the same easy test procedure in either the Basic sound as you like them. - Page 13 Setting the Month and Day Format: Setting the Sound: m/d will now flash on the The flashing bell symbol will display. Press ▲ or ▼ to now appear on the display select the format you wish along with the word “ ”.
-
Page 14: Setting Advanced Mode (L-2) Features
Setting Advanced Mode (L-2) Features: If you selected Advanced You have now completed your meter set-up for Mode (L-2 on your display) ONTOUR you can change your meter’s Advanced Mode! personal low and high blood glucose settings. By person- alizing these settings, your meter will help you ONTOUR track these HI and LO results. - Page 15 If you do not want to mark the test result: Using the Alarm: Remove the used test strip to automatically save the test When the alarm sounds, the result in the meter memory with no markers. Dispose of the meter will automatically turn used test strip and lancet properly.
-
Page 16: Transferring Results To A Computer
Press M to cancel the alarm. IMPORTANT: The Contour meter has not been tested or certified by Bayer for use with any software other than Bayer’s diabetes management software. Bayer is not responsible for any erroneous results from the use of other software. - Page 17 Viewing Basic Mode Results: When appears on the Press M to turn your meter on. Press M again to view display, you have viewed all of the memory. the results in the memory. The 14 day average will appear in the center of the display with the number of results shown at the top of the display.
- Page 18 Viewing Advanced Mode Results: Press ▲ to view the 7 day In Advanced Mode (L-2), you have all of the options described in Basic Mode plus additional items available. average. Press M to turn your meter You will see the average in the on.
-
Page 19: Error Codes And Symbols
Error Codes and Symbols: If you do not resolve the problem, contact Bayer Diabetes Care Helpline at 1-800-268-7200. WHAT YOU SEE WHAT IT MEANS WHAT YOU SHOULD DO WHAT YOU SEE WHAT IT MEANS WHAT YOU SHOULD DO Low batteries. Replace the batteries as soon as Incorrect sensor Remove the test strip and retest... -
Page 20: Changing The Batteries
If you do not resolve the problem, contact Bayer Changing the Batteries: Diabetes Care Helpline at 1-800-268-7200. Batteries should be replaced when the meter continually WHAT YOU SEE WHAT IT MEANS WHAT YOU SHOULD DO displays or the meter • Test strip or control •... -
Page 21: Caring For The System
Caring for the System: Place new batteries under the • Store meter in the carrying case provided whenever prongs and into the battery possible. compartment with the “+” • Wash hands and dry them thoroughly before handling side up. to keep the meter and test strips free of oils and other contaminants. -
Page 22: Technical Information
Technical Information: Potential Biohazard Accuracy: The accuracy of the C blood glucose monitoring ONTOUR Healthcare professionals or persons using this system on system has been assessed in a correlation study conducted by health- multiple patients should follow the infection control proce- care professionals. -
Page 23: Warranty
Warranty: Important: Bayer Inc. (“Bayer”) has no knowledge of the perform- THIS WARRANTY IS EXPRESSLY LIMITED TO THE METER ance of the C ® blood glucose meter when used with any AND MADE IN LIEU OF ANY AND ALL OTHER WARRANTIES ONTOUR test strip other than C ®... - Page 24 Service Information: Supplies: If you have a problem and none of the problem solving steps When calling or writing for supplies be sure to include the num- in this user guide help, call Bayer Diabetes Care Helpline at ber with the name of the replacement part or accessory item. 1-800-268-7200.
- Page 25 Bayer Inc. C , NO CODING and ONTOUR Design, M and GLUCOFACTS are registered trademarks ICROLET of Bayer Healthcare LLC, used under license by Bayer Inc. 83269783 © 2011 Bayer Inc. All rights reserved. Rev. 03/11...
Need help?
Do you have a question about the CONTOUR and is the answer not in the manual?
Questions and answers