Hand Held Products Dolphin 7200 User Manual
Handheld computer and homebase
Hide thumbs
Also See for Dolphin 7200:
- User manual (181 pages) ,
- User manual (114 pages) ,
- User manual (2 pages)

Related Manuals for Hand Held Products Dolphin 7200


Summary of Contents for Hand Held Products Dolphin 7200
- Page 1 H A N D H E L D P R O D U C T S Dolphin 7200 Handheld Computer and HomeBase™ User’s Guide 7200/UG Rev . E...
- Page 2 Microsoft Corporation. RF Simplicity, Dolphin, Dolphin RF and HomeBase are trademarks or registered trademarks of Hand Held Products. iButton is a trademark of Dallas Semiconductor. Other product names mentioned in this document may be trademarks or registered trademarks of their respective companies and are hereby acknowledged.
-
Page 3: Table Of Contents
Batteries ........................... 14 Care and Cleaning of the Dolphin .................... 14 Chapter 1 Getting Started .............. 15 About the Dolphin 7200 Handheld Computer ............16 Accessories for the Dolphin ..................... 16 Dolphin 7200 Models and Options ..................17 Bar Code Symbologies Supported.................... 18 Using Dolphin for the First Time................19... - Page 4 Chapter 3 Dolphin® 7200 RF Handheld Computer....39 About the Dolphin 7200 RF Handheld Computer ..........40 802.11b-Compliant Dolphin 7200 RF Terminal ..............40 Configuring Your 802.11b- Compliant Dolphin 7200 RF Terminal ........41 WLIF™-Compliant Dolphin 7200 RF Terminal..............53 Dolphin 7200 RF Peripherals....................56 Host Connectivity........................
- Page 5 How Problems Should Be Handled ..................142 Return Information ......................... 142 How To Extend Your Warranty ..................... 144 Application Support ..................144 Appendix A Dolphin 7200 Terminal Specifications........145 Appendix B Bar Code Samples...............158 Appendix C Dolphin 7200 2D Decoding Demo Menu Layout.......159...
- Page 6 Appendix D Dolphin 7200 Scan Maps ............164 Appendix E IQ Imaging Test Target ...............166 Appendix F GS-DOS Commands ..............167 Appendix G Declarations of Conformity ............176...
-
Page 7: Before You Begin
The terminal may be equipped with a scan engine capable of reading all standard bar code symbologies. Dolphin 7200 is also available with the IMAGETEAM ™ 4250 Image Engine, a low power, high- resolution digital image engine for omni-directional and auto-discrimination reading and decoding of linear barcodes, stacked linear (PDF417) and 2D matrix codes. -
Page 8: Safety
Please read them carefully before using your Dolphin. Required Safety Labels Dolphin 7200 hand held computers use a low power Visible Laser to scan bar codes. Short-term exposure to CDRH Class II laser light is not known to be harmful. As with any bright light source, such as the sun, you should avoid direct eye exposure. - Page 9 Label for WLIF radio-equipped terminals Label for 802.11b radio-equipped terminals Figure 2 Safety Labels for Dolphin 7200 RF terminals Figure 3 Safety Labels for Dolphin 7200 2D terminals...
-
Page 10: Rf Energy
• Consult the dealer or an experienced radio or television technician for help. Caution: Any changes or modifications made to this device that are not expressly approved by Hand Held Products may void the user’s authority to operate the equipment. -
Page 11: Canadian Notice
9.0 mW at 670 nanometers per EN 60825-1:1994, Issue 2, June 1997. R&TTE Directive: 7200 802.11 Model The Dolphin 7200 RF is in conformity with all essential requirements of the R&TTE Directive (1999/5/EC). This equipment has been assessed to the following standards: ETS 300 328 ETS 300 826 (November, 1997);... - Page 12 R&TTE Directive: 7200 Proxim Model The Dolphin 7200 RF is in conformity with all essential requirements of the R&TTE Directive (1999/5/EC). This equipment has been assessed to the following standards: ETS 300 328 ETS 300 826 (November, 1997); EN 60950: 1992, Incl Amdt 1-4, 11.
-
Page 13: Interference
Dallam Court Dallam Lane Warrington, Cheshire WA2 7LT England Hand Held Products shall not be liable for use of our product with equipment (i.e., power supplies, personal computers, etc.) that is not CE marked and does not comply with the Low Voltage Directive. -
Page 14: Batteries
Microwaves The radio in the Dolphin RF terminal operates on the same frequency band as a microwave oven. Therefore, if you use a microwave within range of the Dolphin RF terminal you may notice performance degradation in your wireless network. However, both your microwave and your wireless network will continue to function. -
Page 15: Chapter 1 Getting Started
Chapter 1 Getting Started Summarizes the Dolphin’ s features, functions and accessories and getting it started for the first time. -
Page 16: About The Dolphin 7200 Handheld Computer
It has a 386 33 MHz microprocessor that runs with GS- DOS and is PC-compatible. Accessories for the Dolphin The Dolphin 7200 is part of a data collection system that includes accessories specifically designed for vehicle, desktop and hub operations. Accessories available include serial and networkable communications/charging cradles, serial communications/charging cables, desktop “gang chargers”... -
Page 17: Dolphin 7200 Models And Options
Dolphin 7200 SCANTEAM 6180 Bar Code Wand Reader/Decoder through the terminal’s Micro-DB9 RS-232 port. For use only with non-scan Dolphin 7200 RS-232 terminal as part of Dolphin 7200 Wand product package. Connects HomeBase to your desktop PC. 6’ RS-232 Serial Cable N O T E Contact your Value-Added Reseller for more information. -
Page 18: Bar Code Symbologies Supported
Micro-DB9 RS-232 serial port Bar Code Symbologies Supported The Dolphin 7200 series of terminals supports the following 1D linear codes: Code 3 of 9, Interleaved 2 of 5, Code 11, MSI, UPC A, UPC EO, UPC EI, EAN/EAN13, Codabar, Code 128, Code 93, UPC... -
Page 19: Using Dolphin For The First Time
N O T E N O T E 1 Checking Your Package If you ordered a Dolphin 7200 Batch, iButton, 2D or RF terminal, inspect the package Be sure to keep the Be sure to keep the original carton and... - Page 20 G E T T I N G S T A R T E D If you ordered a Dolphin 7200 Wand (non-scan Dolphin 7200 RS-232 terminal and SCANTEAM 6180 bar code wand reader/decoder), inspect the package to see that the following standard items and accessories (if ordered) are included: •...
-
Page 21: Charging The Battery
WARNING: Although the Dolphin 7200 terminal is received with the battery inserted, it is NOT ready for charging and/or deep-cycling. Remove the plastic insulator located between the terminal and battery connectors. Failure to remove the insulator may result in damages to the terminal. -
Page 22: Inserting The Battery Pack
C H A P T E R G E T T I N G S T A R T E D For help, see the chapter on the Dolphin. To learn more about managing the terminal’s battery power, see “Maintaining the Dolphin’s Batteries” in Chapter 2. Inserting the Battery Pack 1. -
Page 23: Turning The Dolphin On And Off
C H A P T E R G E T T I N G S T A R T E D 3 Turning the Dolphin On And Off Turning On the Dolphin Install the charged battery pack in the Dolphin. Hold the Dolphin in the palm of your hand so that you can press the ON/SCAN key easily with your thumb. - Page 24 C H A P T E R G E T T I N G S T A R T E D To set the date on a numeric Dolphin: Press <SHIFT> to put the Dolphin in alpha mode. Enter <DATE> at the Dolphin’s DOS prompt. See the section called Using the Numeric Keypad in Chapter 2 for more information.
-
Page 25: Chapter 2 Dolphin Basics
Chapter 2 Dolphin Basics Describes system features and explains how to use the Dolphin’ s keypad, display, batteries, drives and scanner. -
Page 26: System Features
C H A P T E R D O L P H I N B A S I C S System Features The Dolphin’s computing power is provided by a highly integrated AMD ELAN SC310 386SX 33 MHz microprocessor. Disk Drives The Dolphin contains two disk drives that provide storage for system files, applications, and data. -
Page 27: Liquid Crystal Display (Lcd)
C H A P T E R D O L P H I N B A S I C S Liquid Crystal Display (LCD) The alphanumeric, scrollable LCD consists of nine rows with 20 character positions per row and 119 x 73 graphics pixels, which are software addressable. The electroluminescent backlight allows you to view the display in low light conditions. -
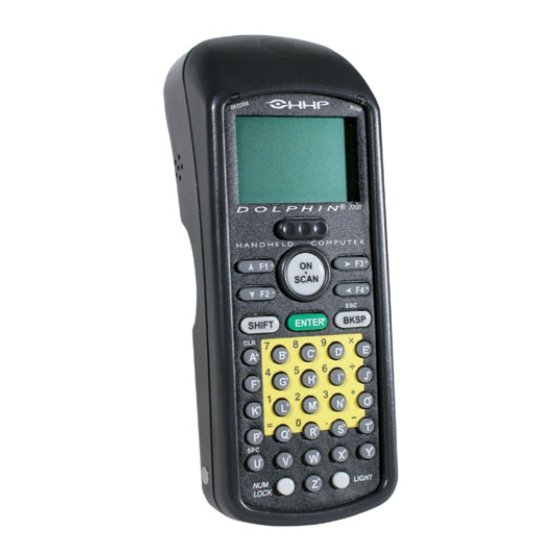
Page 28: Using The Alphanumeric Keypad
C H A P T E R D O L P H I N B A S I C S Using the Alphanumeric Keypad The Dolphin’s alphanumeric, splash-resistant keypad has 36 epoxy coated keys. The keyboard’s yellow background enhances the readability of the numeric and special character keys. -
Page 29: Key Combinations For Keypad Functions And Special Characters
C H A P T E R D O L P H I N B A S I C S Key Combinations For Keypad Functions and Special Characters Use the key combinations listed below to access certain keypad functions or to use special characters that are not defined on the Dolphin keypad. -
Page 30: Using The Numeric Keypad
C H A P T E R D O L P H I N B A S I C S Using the Numeric Keypad The Dolphin’s numeric, splash-resistant keypad has 20 epoxy coated keys. The large, amber-color keys are large, easy-to-read, and comfortably spaced to help prevent errors in data entry. -
Page 31: Key Combinations For Keypad Functions And Special Characters
C H A P T E R D O L P H I N B A S I C S Key Combinations For Keypad Functions and Special Characters Key Combination Function The ESC function performs a cancel ESC (SHIFT + BKSP) action. -
Page 32: Display Symbols
Battery Charge Battery charging symbol blinks while main battery in the Dolphin terminal is charging in the Dolphin 7200 HomeBase. Located in lower left-hand corner of the LCD. Battery charging symbol blinks while the main battery in the Dolphin... - Page 33 C H A P T E R D O L P H I N B A S I C S Alpha mode -- alphabetic characters are active Numeric mode -- numeric characters are active...
-
Page 34: Back Panel Features
Back Panel Features This section describes features on the Dolphin’s back panel. The alphanumeric and numeric Dolphins have identical back panels. Laser/Image EngineWindow Micro-DB9 RS-232 (Dolphin 7200 RS- 232) or Lanyard Eyelet (not available on Dolphin RF or Dolphin 2D) -
Page 35: Laser Engine
A clear window covers the laser engine to protect it from dust and dirt. Image Engine The Dolphin 7200 2D terminal is available with the following imaging options: • Standard image engine: scans 2 to 9 in. (5 to 23 cm) •... -
Page 36: Maintaining The Dolphin's Batteries
Maintaining the Dolphin’s Batteries CAUTION: Use only the 3.6V battery packs provided by Hand Held Products. The use of any other battery pack in the Dolphin 7200 terminal will void your warranty and may result in damage to the Dolphin terminal or battery. -
Page 37: Nimh Battery Pack
10 and 35 °C (50 and 95° F). Keep a charged battery pack in the WARNING: Although the Dolphin 7200 terminal is received with the battery inserted, it is Dolphin at all times to NOT ready for charging and/or deep-cycling. Remove the plastic insulator located between the conserve the internal terminal and battery connectors. -
Page 38: Storing Batteries
C H A P T E R D O L P H I N B A S I C S Charging the Battery Pack You can recharge an individual battery pack using the auxiliary battery well of the Dolphin HomeBase, or the Dolphin 10-Slot Multiple Battery Charger. Both accessories use a charging method that senses when the battery pack is fully charged and then drops to a trickle charge to keep the battery pack at full capacity. -
Page 39: Chapter 3 Dolphin® 7200 Rf Handheld Computer
Chapter 3 Dolphin® 7200 RF Handheld Computer... -
Page 40: About The Dolphin 7200 Rf Handheld Computer
LAN link as secure as a traditional wired link. The optional WEP security mechanism is available with 128-bit or 40-bit encryption. Dolphin 7200 RF is interoperable with other 802.11b compliant products to allow network expansion as needed. It can be connected to other devices, such as printers... -
Page 41: Configuring Your 802.11B- Compliant Dolphin 7200 Rf Terminal
C O M P U T E R Configuring Your 802.11b- Compliant Dolphin 7200 RF Terminal The Dolphin 7200 RF Utilities program provides basic functions required to prepare your terminals for use. The program also includes a Scan Demo, Help, and an Inventory Control demo. - Page 42 F 1 - S c a n F1-Scan Menu This option demonstrates how the Dolphin 7200 RF terminal scans bar codes. Press F1 to configure the terminal to read linear barcodes. Follow the directions on the screen to set-up which bar codes you want the terminal to read. Once the terminal is configured, press <ESC>...
- Page 43 C H A P T E R D O L P H I N 7 2 0 0 H A N D H E L D C O M P U T E R F 3 - H H P D e m o F3-HHP Demo The HHP Demo is a sample inventory control program.
- Page 44 F2-System Menu This option allows you to view system information such as version and serial numbers about specific Dolphin 7200 RF terminals. You may also enable or disable the reboot setting and turn the display status line on or off.
- Page 45 F3-DOS Prompt Press <F3> to exit to the DOS prompt. F4-RF Menu Press <F4> and the menu below will appear. Use options from this menu to configure the Dolphin 7200 RF for use in your wireless local area network. F4-RF Menu...
- Page 46 N O T E Press <F1> to set the SSID. This value is case sensitive. Enter a value for the SSID option and press <ENTER>. Once the SSID is written, the Dolphin 7200 RF The SSID and Subnet terminal must be reset to activate the new SSID.
- Page 47 C O M P U T E R F2 SET NODE Press F2 to set a system name for the Dolphin 7200 RF terminal. Enter a value for the N O T E NODE option and press <ENTER>. Once the NODE is written, the Dolphin 7200 RF terminal must be reset to activate the new NODE.
- Page 48 C H A P T E R D O L P H I N 7 2 0 0 H A N D H E L D C O M P U T E R Setting WEP Modes And Keys On The 802.11b Radio Card This section describes how to set WEP (Wired Equivalent Privacy) modes and keys on the Cisco®...
- Page 49 This section describes usage and command line options for the WEP.BAT utility. Note: The WEP.BAT file must be run with the radio driver NOT loaded. Reboot the N O T E Dolphin 7200 RF terminal with the ON/SCAN key depressed so that the driver will Reset the Dolphin terminal not load.
- Page 50 C H A P T E R D O L P H I N 7 2 0 0 H A N D H E L D C O M P U T E R Example 1: To configure WEP using the batch mode, create the keys.txt file using a text editor as shown: Sample ASCII keys.txt file for 40-bit encryption where x is the key code: ASCII...
- Page 51 C H A P T E R D O L P H I N 7 2 0 0 H A N D H E L D C O M P U T E R Example 2: To set the WEP keys using an ASCII character string via the Dolphin terminal keyboard, enter C:\>...
- Page 52 C H A P T E R D O L P H I N 7 2 0 0 H A N D H E L D C O M P U T E R Example 4: To display the radio’s WEP settings, enter C:\>WEP STATUS Result: The terminal will displays the settings as shown below: WEP128 encryption...
-
Page 53: Wlif™-Compliant Dolphin 7200 Rf Terminal
The F1 Scan Demo, F2 Help, and F3 HHP Demo programs on the main menu shown below function the same as they do for the 802.11b- compliant Dolphin 7200 RF unit. For more information, refer to the section on the main menu for the 802.11b terminal. - Page 54 C H A P T E R D O L P H I N 7 2 0 0 H A N D H E L D C O M P U T E R F 4 U t i l i t i e s M e n u Press <F4>, the following screen will appear: F4-Utility Menu The F1, F2 and F3 functions on the Utility menu for WLIF-compliant terminals are...
- Page 55 Press <F3> to enter the IP address. Once the IP Address is written, the Dolphin 7200 done once all RF terminal must be reset to activate the new IP Address.
-
Page 56: Dolphin 7200 Rf Peripherals
PC cards provide devices such has laptop and desktop computers with wireless connectivity to the RF network. Access Points Access Points link a wired network to a wireless Dolphin 7200 RF handheld computer network. There are a wide range of mounting brackets and antenna cabling options available to provide wireless coverage for a customer’s entire facility. - Page 57 Ethernet backbone and that support TCP/IP. The TNVT, TN3270, and TN5250 emulations use TCP/IP to communicate from the Dolphin 7200 RF™ terminal through the access point to the host. There is no network controller or server.
- Page 58 C O M P U T E R Thin-Client Terminal Emulation Hand Held Products’ thin-client terminal emulation solution uses a Universal Gateway to provide host connectivity. The Universal Gateway connects to the hosts such as AS/400, ES/9000 and HP/6000 via Ethernet and communicates to the application via Ethernet for 3270, 5250 or telnet for DEC VT220 terminal emulation environments.
-
Page 59: Terminal Emulation Keyboard Overlays
C H A P T E R D O L P H I N 7 2 0 0 H A N D H E L D C O M P U T E R Terminal Emulation Keyboard Overlays There are host-specific keyboard overlays supporting all necessary program keys, character sets, and control and display functions. - Page 60 C H A P T E R D O L P H I N 7 2 0 0 H A N D H E L D C O M P U T E R Numeric 3270 Numeric 5250 Numeric VT220...
-
Page 61: Chapter 4 Dolphin® 7200 With Ibutton Reader Handheld Computer
Chapter 4 Dolphin® 7200 with iButton Reader Handheld Computer Describes the iButton reader and how to use it. -
Page 62: About Dolphin With Ibutton Reader Handheld Computer
C H A P T E R A B O U T T H E D O L P H I N 7 2 0 0 W I T H I B U T T O N R E A D E R H A N D H E L D C O M P U T E R About Dolphin with iButton Reader Handheld... -
Page 63: Working With Ibuttons
C H A P T E R A B O U T T H E D O L P H I N 7 2 0 0 W I T H I B U T T O N R E A D E R H A N D H E L D C O M P U T E R Working with iButtons... -
Page 64: Developing Applications With Dolphin With Ibutton Reader
EPROM devices Developing Applications with Dolphin with iButton Reader Hand Held Products has a Software Developer’s Kit (SDK) that includes the following: API for iButton functions that support the most commonly used iButton types and concern file handling and data manipulation of iButton specific features. May be used in conjunction with Dolphin Development System. -
Page 65: Chapter 5 Dolphin® 7200
Chapter 5 Dolphin® 7200 RS-232 Handheld Computer... -
Page 66: About Dolphin 7200 Rs-232 Hand Held Computer
® high performance data collection terminal with standard connectivity at a low cost. Capable of reading all popular linear barcodes, the Dolphin 7200 terminal fits into an array of environments. Through the terminal’s micro-DB9 RS-232 port, the Dolphin 7200 can be connected to a host computer to send and receive data. - Page 67 C O M P U T E R Cables The following table shows pinout for the Dolphin 7200 terminal’s micro-DB9 RS-232 port. Note: The " RF_card" function call will turn off the 5V supplied on pin 9 of the 7200 RS-232 non-scan units. This already exists in OS4.1 API.
-
Page 68: Charging The Battery Through The Rs-232 Port
For more on maintaining the batteries, see the section on Maintaining Batteries in Chapter 2. Sending and Receiving Data The Dolphin 7200 RS-232 terminal can be connected to a host computer to send and receive data via the micro-DB9 RS-232 port using the YX.EXE Utility or the Dolphin File Transfer Program. -
Page 69: Chapter 6 Dolphin® 7200 2D Terminal
Chapter 6 Dolphin® 7200 2D Terminal 222567-22... -
Page 70: About The Dolphin 7200 2D Hand Held Computer
H A N D H E L D C O M P U T E R About the Dolphin 7200 2D Hand Held Computer The Dolphin® 7200 2D hand held computer features the IMAGETEAM ™ 4250 Image Engine, a low power, high-resolution digital image engine for omni-directional and auto-discrimination reading and decoding of linear barcodes, stacked linear (PDF417) and 2D matrix codes. -
Page 71: Reading Barcodes
C O M P U T E R Reading Barcodes The omni-directional scanning capabilities of the Dolphin 7200 2D terminal greatly simplify operation and training and increase productivity. To read a bar code: Press the ON/SCAN button to project the scanner’s bright red aiming beam Center the aiming beam over the barcode. -
Page 72: Capturing Images
4-8 K. Lighting Conditions The Dolphin 7200 2D terminal is designed to read bar codes and take images in dim light conditions. It is suggested that you turn on the unit’s electroluminescent display... -
Page 73: Dolphin 7200 2D Demo Software
C O M P U T E R Dolphin 7200 2D Demo Software The Dolphin 7200 2D terminal demonstration software allows you to show terminal’s ability to do omni-directional decoding, image capture and I.Q. Imaging. The Image Capture demo requires that you have a PC available with a program such as the Dolphin File Transfer utility that is capable of receiving files via Ymodem protocol, and a Dolphin home base connected to that PC. -
Page 74: Main Menu
C H A P T E R D O L P H I N 7 2 0 0 H A N D H E L D C O M P U T E R Main Menu Dolphin Demo Main Screen When you start the program, this menu screen will be the first one you see. - Page 75 C H A P T E R D O L P H I N 7 2 0 0 H A N D H E L D C O M P U T E R F1 - Decoding Demo Press F1 and the “Scan a Target” screen shown below will display: Scan a Target Screen For optimal scanning performance for your application, the 2D imager has three scanning modes: standard omni, reduced omni and ALD (Advanced Linear...
- Page 76 C H A P T E R D O L P H I N 7 2 0 0 H A N D H E L D C O M P U T E R Decoded Message Screen The top of the screen tells the name of the symbology decoded, the bottom of the screen tells the length of the data decoded, and the middle section shows the message.
- Page 77 C H A P T E R D O L P H I N 7 2 0 0 H A N D H E L D C O M P U T E R To setup the imager, press F3. To take an image: Press and hold the ON/SCAN button.
- Page 78 C H A P T E R D O L P H I N 7 2 0 0 H A N D H E L D C O M P U T E R F3 - I.Q. Imaging Demo Press F3 and the screen shown below will display: “Scan the Test Target”...
- Page 79 C H A P T E R D O L P H I N 7 2 0 0 H A N D H E L D C O M P U T E R Press and hold the ON/SCAN button and aim at the barcode. When the engine successfully decodes, you will hear a short beep.
-
Page 80: Chapter 7 Using The Dolphin® 7200 Homebase
Chapter 7 Using the Dolphin® 7200 HomeBase Summarizes the features of the Dolphin 7200 HomeBase and explains how to use it. -
Page 81: Hub Of The System
7 2 0 0 H O M E B A S E Hub of the System As the hub of your Dolphin system, the Dolphin 7200 HomeBase performs three important functions – battery management, communications and storage. Battery Management The Dolphin 7200 HomeBase uses a charging method that senses when the battery pack is fully charged and then drops to a trickle charge to keep the battery pack at full capacity. -
Page 82: Dolphin 7200 Homebase Parts And Functions
U S I N G T H E D O L P H I N 7 2 0 0 H O M E B A S E Dolphin 7200 HomeBase Parts and Functions Dolphin Terminal Well Main Serial Port Charging Main... -
Page 83: Back Panel
C H A P T E R U S I N G T H E D O L P H I N 7 2 0 0 H O M E B A S E Charging Aux Batt LED Description Battery pack not properly inserted into the auxiliary battery well, or the HomeBase has no power Battery discharging... - Page 84 C H A P T E R U S I N G T H E D O L P H I N 7 2 0 0 H O M E B A S E Use these switches to select the network and communications Configuration switches modes for your Dolphin.
-
Page 85: Charging Batteries In The Dolphin 7200 Homebase
H O M E B A S E Charging Batteries In The Dolphin 7200 HomeBase CAUTION: Use only the 3.6V battery packs provided by Hand Held Products. The use of any other battery pack in the Dolphin Terminal will void your warranty and may result in damage to the Dolphin Terminal or battery. - Page 86 Deep-cycling the Battery For maximum battery life, Hand Held Products recommends that you deep- cycle (service) the battery twice before initial use and then, once a month thereafter. To deep-cycle, insert the battery into the HomeBase auxiliary battery well. Then, push and hold the Service Aux Batt button for at least 4 seconds.
-
Page 87: Setting Up For Communications
C H A P T E R U S I N G T H E D O L P H I N 7 2 0 0 H O M E B A S E The CHARGING AUXBATT LED is red while the battery is discharging and changes to blinking red when the charging cycle begins and orange when charging at the maximum rate. - Page 88 8 (CTS) Figure 16 Pin Configuration With the Dolphin 7200 HomeBase, use the appropriate cable to connect each device to the Main Comm Port for a single Dolphin HomeBase or to the Multi-HomeBase Port if you are creating a Dolphin HomeBase network.
- Page 89 C H A P T E R U S I N G T H E D O L P H I N 7 2 0 0 H O M E B A S E Setting the Baud Rate You may use the HomeBase Configuration utility program to select the baud rate. The program can also be used to change the host system’s COM port and will run a diagnostic check for optimal communications.
-
Page 90: Configuring A Single Dolphin 7200 Homebase
D O L P H I N 7 2 0 0 H O M E B A S E Configuring a Single Dolphin 7200 HomeBase N O T E To prepare a single Dolphin HomeBase for communications, you must enter the Command Mode to configure the version number and select the baud rate. -
Page 91: Creating A Dolphin 7200 Homebase Network
Figure 18 Baud Rate per Value of n Creating a Dolphin 7200 HomeBase Network This information applies only to the Dolphin 7200 HomeBase. The Dolphin 7200 Compact HomeBase is not networkable. Each HomeBase must have its own AC power adapter connected to a standard AC electrical socket. The group can be placed on a table or desk, or rail-mounted using the mounting holes on the two outside Dolphin HomeBase units. - Page 92 C H A P T E R U S I N G T H E D O L P H I N 7 2 0 0 H O M E B A S E Type or send the escape and command strings to set-up the configuration mode and establish the beginning unit ID number: <ESC>HHP >100 ms<...
- Page 93 C H A P T E R U S I N G T H E D O L P H I N 7 2 0 0 H O M E B A S E Switch Setting Function FIXED BPS Baud rate fixed at 9600 (DOWN) PROGRAM Baud rate can be programmed...
- Page 94 C H A P T E R U S I N G T H E D O L P H I N 7 2 0 0 H O M E B A S E When data transfer begins, the COMM LED on the Dolphin HomeBase will blink red and green.
-
Page 95: Communicating With The Dolphin Terminal
C H A P T E R U S I N G T H E D O L P H I N 7 2 0 0 H O M E B A S E Communicating with the Dolphin Terminal To communicate with the Dolphin and any other devices connected to the HomeBase: Insert the Dolphin into the terminal well of the HomeBase. -
Page 96: Chapter 8 Using The Dolphin® 7200 Compact Homebase
Chapter 8 Using the Dolphin® 7200 Compact HomeBase Summarizes the features of the Dolphin 7200 Compact HomeBase and explains how to use it. -
Page 97: Hub Of The System
C O M P A C T H O M E B A S E Hub of the System As the hub of your Dolphin system, the Dolphin 7200 Compact HomeBase performs three important functions – battery management, communications and storage. Battery Management... -
Page 98: Dolphin 7200 Compact Homebase Parts And Functions
T H E D O L P H I N 7 2 0 0 C O M P A C T H O M E B A S E Dolphin 7200 Compact HomeBase Parts and Functions Front Panel COMM DOCK Figure 16 Front View of HomeBase The Compact HomeBase’s front panel has one slot:... -
Page 99: Bottom Panel
C H A P T E R U S I N G T H E D O L P H I N 7 2 0 0 C O M P A C T H O M E B A S E Back Panel Power Supply... -
Page 100: Powering The Dolphin Terminal
C H A P T E R U S I N G T H E D O L P H I N 7 2 0 0 C O M P A C T H O M E B A S E Baud Rate Switch 1 Switch 2... - Page 101 For maximum battery life, Hand Held Products recommends that you deep- cycle (service) the battery twice before initial use and then, once a month thereafter. Since the Dolphin 7200 Compact HomeBase does not have deep-cycling capabilities, it is recommended that you use the Dolphin 7200 Multicharger or the Dolphin 7200 HomeBase.
-
Page 102: Mounting The Dolphin 7200 Compact Homebase
C O M P A C T H O M E B A S E Mounting the Dolphin 7200 Compact HomeBase The Dolphin 7200 Compact HomeBase may be desk or wall-mounted for convenience and storage. Desk Mounting: The Compact HomeBase has a DIN rail (7.5 X 35 mm) slot on the bottom to allow for secure desk attachment of the unit if desired (see figure 21). - Page 103 C H A P T E R U S I N G T H E D O L P H I N 7 2 0 0 C O M P A C T H O M E B A S E that the rails be mounted to the wall using a 25mm (1 in.) spacer to allow for appropriate strain relief of the cables (see figure 23).
-
Page 104: Setting Up For Communications
The Dolphin terminal and Dolphin Compact HomeBase support RS-232 communications through the RS-232 Main Communications Port on the back of the Dolphin 7200 Compact HomeBase. The HomeBase translates the RS-232 signals from the host computer into infrared signals to communicate with the Dolphin Terminal. - Page 105 7 (RTS) 8 (CTS) Figure 16 Pin Configuration With the Dolphin 7200 Compact HomeBase, connect each device to the RS-232 Communications Port on the back of the HomeBase. The Compact HomeBase cannot be networked. Connect the power supply to the Compact HomeBase. Plug the AC transformer into the Dolphin HomeBase 12 Volt DC power supply connector.
-
Page 106: Communicating With The Dolphin Terminal
C H A P T E R U S I N G T H E D O L P H I N 7 2 0 0 C O M P A C T H O M E B A S E Communicating with the Dolphin Terminal To communicate with the Dolphin and any other devices connected to the Compact HomeBase:... -
Page 107: Chapter 9 Learning About The Dolphin Os And Development System Software
Chapter 9 Learning About the Dolphin OS and Development System Software Explains how to use and manage the software accompanying the Dolphin 7200 terminal. -
Page 108: Dolphin Os And Development System
Dolphin becoming unstable or inoperable, and requiring the unit to be returned to HHP for repair. The Dolphin OS and Development System is available from the Partners Area of the Hand Held Products website, www.handheld.com. The self-extracting file contains: • Dolphin Development Tools and Libraries (API) •... - Page 109 C H A P T E R D O L P H I N A N D D E V E L O P M E N T S Y S T E M Directory Contents c:\dolphin\devtools Dolphin Development Libraries, Samples and API Help file.
-
Page 110: Help File, Document And Utility Icons
C H A P T E R D O L P H I N A N D D E V E L O P M E N T S Y S T E M Help File, Document and Utility Icons The Dolphin OS and Development System set up program will set up a Dolphin group or folder and install the following Help, Document and Utility icons. -
Page 111: Dolphin Hhp Demo Program
Dolphin HHP Demo Program A simple demonstration program is included with the Dolphin OS and Development System that shows how the Dolphin 7200 terminal works. The Dolphin OS and Development system setup program installs the demonstration programs in the c:\dolphin\hhpdemo directory on your PC. - Page 112 C H A P T E R D O L P H I N A N D D E V E L O P M E N T S Y S T E M F 1 – I n p u t D e m o Press F1 to load the Input demo and the following screen will appear.
- Page 113 C H A P T E R D O L P H I N A N D D E V E L O P M E N T S Y S T E M If you press the ON/SCAN button to scan a bar code, the following screen will appear and display the results of the scanned input: Press ESC to return to the main menu.
- Page 114 C H A P T E R D O L P H I N A N D D E V E L O P M E N T S Y S T E M Follow the instructions shown on the previous screen and the screen shown below will display indicating that information is being sent to the printer: If the connection with the printer is not found, the message below will display:...
- Page 115 S Y S T E M F 3 – S e r i a l P o r t C o n f i g To configure the Dolphin 7200 terminal’s serial port, press F3 and the screen below will display.
- Page 116 C H A P T E R D O L P H I N A N D D E V E L O P M E N T S Y S T E M F4- Extra Setting Press F4 and the screen shown below will display. F1 - Treat all data as raw data Toggles between Treat all data as raw data and Look for a symbology ID to lead the data.
-
Page 117: Scanning A Barcode
C H A P T E R D O L P H I N A N D D E V E L O P M E N T S Y S T E M Scanning A Barcode The Dolphin Terminal comes with demonstration software that allows you to scan barcodes immediately. -
Page 118: Dolphin Utilities
C H A P T E R D O L P H I N A N D D E V E L O P M E N T S Y S T E M Dolphin Utilities A number of utilities are provided with your Dolphin terminal. The Utility programs are installed in the c:\dolphin\utils directory on your computer. - Page 119 C H A P T E R D O L P H I N A N D D E V E L O P M E N T S Y S T E M DCOMM2.EXE (Dolphin File Transfer Utility) DCOMM2.EXE is a Windows communication utility. It supports drag-and-drop file transfer using both Ymodem and Xmodem.
- Page 120 C H A P T E R D O L P H I N A N D D E V E L O P M E N T S Y S T E M • Reinstall/Upgrade the HHP Demo HBCFG.EXE (HomeBase Configuration Utility) HBCFG.EXE is a Windows utility that allows the user to change the baud rate setting for the Dolphin HomeBase.
- Page 121 N O T E yx {/c#] [/b#] [/m] [filename] When using YX on the Where: Dolphin 7200 filename: refers to file name to send, if not specified YX will receive a file terminal, only COM1 /c#: Specifies COM ports 1-4...
- Page 122 C H A P T E R D O L P H I N A N D D E V E L O P M E N T S Y S T E M Examples: yx /b57600 autoexec.bat yx /m yx /c2 The default baud rate for the YX.EXE utility is 57600.
-
Page 123: Dolphin Application Development
C H A P T E R D O L P H I N A N D D E V E L O P M E N T S Y S T E M The following Utilities are included in the Dolphin ROM image and are automatically loaded when the terminal boots. -
Page 124: Sample Applications
C H A P T E R D O L P H I N A N D D E V E L O P M E N T S Y S T E M Sample Applications A number of sample programs with source code have been provided with your Dolphin terminal. -
Page 125: Compiling The Sample Programs
C H A P T E R D O L P H I N A N D D E V E L O P M E N T S Y S T E M Compiling the Sample Programs Note: See the Development API Help file (DAPI.HLP) for complete information regarding the Dolphin Development Libraries, Samples and Compiling instructions. -
Page 126: Transferring Files To Or From Dolphin
Dolphin’s A drive. This program can be run by entering commands at the DOS prompt or by accessing a menu. When using YX on the Dolphin 7200 with Ir YX.EXE supports the following options: Only terminal, only COM1 is available... - Page 127 C H A P T E R D O L P H I N A N D D E V E L O P M E N T S Y S T E M Sending a File to the Dolphin Open the Dolphin File Transfer Program Configuration dialog box.
- Page 128 C H A P T E R D O L P H I N A N D D E V E L O P M E N T S Y S T E M • To send at 57600 baud rate, enter <YFF> at the DOS prompt. Using the Dolphin File Transfer Program and YX in Menu Mode You can also use YX in menu mode to send and receive files from the Dolphin to your PC and vice versa with the Dolphin File Transfer program and YX.EXE on the...
-
Page 129: Dolphin Evs Engine
C H A P T E R D O L P H I N A N D D E V E L O P M E N T S Y S T E M Double-click on the Dolphin File Transfer shortcut to open the program. Open the Configuration dialog box. -
Page 130: Dolphin Rom Image And Boot Loader
C H A P T E R D O L P H I N A N D D E V E L O P M E N T S Y S T E M Dolphin ROM Image and Boot Loader Upgrading the Dolphin ROM Image Important Notice: Before installing the Dolphin OS and Development System, you must remove all previous installations. -
Page 131: Upgrading The Dolphin Boot Loader
C H A P T E R D O L P H I N A N D D E V E L O P M E N T S Y S T E M SYS Utilities X.XX 9600 19200 38400 57600 Baud: 9600 Press 1 to download. -
Page 132: Chapter 10 Troubleshooting And Warranty Information Dolphin® 7200 Terminal
Chapter 10 Troubleshooting and Warranty Information Dolphin® 7200 Terminal Describes troubleshooting tips, solutions for problems you may encounter with the Dolphin 7200 terminal or HomeBase and warranty information. -
Page 133: Just In Case
T E R M I N A L Just In Case The Dolphin 7200 terminal and Dolphin HomeBase are both designed to provide years of trouble-free use. Both products are covered by a one-year limited warranty. This chapter includes troubleshooting tips, warranty information, describes how to obtain technical support. - Page 134 C H A P T E R T R O U B L E S H O O T I N G A N D W A R R A N T Y I N F O R M A T I O N F O R D O L P H I N 7 2 0 0...
- Page 135 C H A P T E R T R O U B L E S H O O T I N G A N D W A R R A N T Y I N F O R M A T I O N F O R D O L P H I N 7 2 0 0...
- Page 136 I N F O R M A T I O N F O R D O L P H I N 7 2 0 0 T E R M I N A L Troubleshooting with Dolphin 7200-2D If You Have This Try This: Problem/Symptom Image not readable or Move to an area with more light to take image.
- Page 137 C H A P T E R T R O U B L E S H O O T I N G A N D W A R R A N T Y I N F O R M A T I O N F O R D O L P H I N 7 2 0 0...
- Page 138 C H A P T E R T R O U B L E S H O O T I N G A N D W A R R A N T Y I N F O R M A T I O N F O R D O L P H I N 7 2 0 0...
- Page 139 C H A P T E R T R O U B L E S H O O T I N G A N D W A R R A N T Y I N F O R M A T I O N F O R D O L P H I N 7 2 0 0...
-
Page 140: Warranty Information
Who Is Covered By The Warranty Limited Warranty Welch Allyn Data Collection, Inc., d/b/a Hand Held Products ("HHP") warrants its products to be free from defects in materials and workmanship and to conform to HHP’s published specifications applicable to the products purchased at the time of shipment. - Page 141 Batteries returned to Hand Held Products in this reduced state may or may not be replaced under this warranty. Hand Held Products, Inc. extends these warranties only to the first end-users of the...
-
Page 142: How Problems Should Be Handled
Return Information N O T E If you purchased the product from an Authorized Hand Held Products Reseller, contact the Reseller with the unit’s serial number. Your Reseller will contact Hand You must have an RMA number to Held, on your behalf, to arrange for the unit to be serviced. - Page 143 Place the product in its original packaging with a copy of your original invoice and ship the product prepaid to the appropriate address below: North and South America, Asia, Pacific Rim Hand Held Products Product Service Department 7510 East Independence Blvd., #100...
-
Page 144: How To Extend Your Warranty
How To Extend Your Warranty Hand Held Products offers a variety of service plans on our hardware products. These agreements offer continued coverage for your equipment after the initial warranty expires. For more information, contact your Hand Held sales representative, customer account representative or the Product Service Marketing Manager or your Authorized Reseller. -
Page 158: Appendix B Bar Code Samples
Appendix B Bar Code Samples With the HHP Demo program, the Dolphin terminal is programmed to read these codes. Practice scanning each of the bar codes, and notice the LCD window after you scan each code. Code 39 (Code 3 of 9) EAN (UPC variation) Interleave 2 of 5 (I2of5) -
Page 159: Appendix C Dolphin 7200 2D Decoding Demo Menu Layout
Appendix C Dolphin 7200 2D Decoding Demo Menu Layout The flow diagram above shows the layout of the menus available in the 2D Decoding Demo. Shown below are screen shots of the different menus listed above. Example: Selecting ALD decoding mode. - Page 160 A P P E N D I X D O L P H I N 7 2 0 0 D E C O D I N G D E M O L A Y O U T S e t u p M e n u D i s p l a y O p t i o n s M e n u Display Options Menu S y m b o l o g i e s...
- Page 161 D e c o d i n g O p t i o n s D e c o d e M o d e The top of the screen will show the decode mode currently active on the Dolphin 7200 terminal. To set the mode, press: F1 for Standard Omni –...
- Page 162 A P P E N D I X D O L P H I N 7 2 0 0 D E C O D I N G D E M O L A Y O U T The terminal will return to the main screen after the mode is selected. C e n t e r i n g W i n d o w Press F2 for the Centering Window and the screen below will display.
- Page 163 A P P E N D I X D O L P H I N 7 2 0 0 D E C O D I N G D E M O L A Y O U T A L D ( A d v a n c e d L i n e a r D e c o d i n g ) W i n d o w Press F3 and the ALD window shown below will display: ALD mode searches for linear bar codes across the middle of the image.
-
Page 164: Appendix D Dolphin 7200 Scan Maps
Appendix D Dolphin 7200 Scan Maps... - Page 165 A P P E N D I X D O L P H I N 7 2 0 0 S C A N M A P S...
-
Page 166: Appendix E Iq Imaging Test Target
Appendix E IQ Imaging Test Target Make copies of this page to use with the Dolphin 7200-2D terminal IQ Imaging demo as described Chapter 6. -
Page 167: Appendix F Gs-Dos Commands
Appendix F GS-DOS Commands The Dolphin terminal ships with General Software DOS (GS-DOS). GS-DOS is compatible with Microsoft DOS (MS-DOS) and is optimized to run in a very small amount of memory. The following is a list of internal commands supported by GS-DOS: HELP BREAK CALL... - Page 168 A P P E N D I X D O S C O M M A N D S HELP The HELP command displays a list of the commands that are supported by the command interpreter. Syntax: HELP BREAK The BREAK command changes or displays how GS DOS handles break-ins by the user with ^C and CTL-BRK key sequences.
- Page 169 A P P E N D I X D O S C O M M A N D S CTTY The CTTY command changes the default console device Syntax: CTTY device Note: This command is not supported the Dolphin Terminal. DATE The DATE command displays the current date (month, day, date, and year) on the screen.
- Page 170 A P P E N D I X D O S C O M M A N D S ECHO The ECHO command has two functions; namely, control of the ECHO flag, and displaying messages in batch files. ECHO mode controls the command processor's echoing of commands in batch files.
- Page 171 A P P E N D I X D O S C O M M A N D S MD (MKDIR) The MD command creates a subdirectory in the root directory or a subdirectory. By using the MKDIR command, tree-structured file systems can be created. If a drive is specified, then the directory is created on the specified drive.
- Page 172 A P P E N D I X D O S C O M M A N D S RD (RMDIR) The RD command removes a subdirectory from a root directory or of a subdirectory. This command can only be used to delete directories, and cannot be used to delete files, even if they are inside the directory to be removed.
- Page 173 A P P E N D I X D O S C O M M A N D S SHIFT The SHIFT command allows access to multiple batch file arguments. The command shifts the contents of the 9 batch file arguments so that %2 is copies into %1, %3 is copies into %2 and so on.
- Page 174 A P P E N D I X D O S C O M M A N D S SYNC The SYNC command provides a synchronization checkpoint feature that enables a batch file to flush the file system's buffers to disk before doing something that might otherwise cause a disorderly shutdown Syntax: SYNC TIME...
- Page 175 A P P E N D I X D O S C O M M A N D S The VERIFY command changes or displays how GS DOS handles I/O to disk files and directory structures. If VERIFY is ON, then Embedded DOS-ROM verifies immediately that disk I/O is completed successfully before telling the user that it was.
-
Page 176: Appendix G Declarations Of Conformity
89/336/EEC. These standards are mentioned at point 4. The results of the tests are given in the report mentioned at point 5. 7. Authentication Signature in behalf of authorized company mentioned at point 2 : Signature On File J.H. Cottrell Jr., Managing Director, Hand Held Products Europe Date : _________________ Place : _________________... - Page 177 : 7510 East Independence Blvd. Charlotte, North Carolina 28227-9411 Country : United States of America Authorized by Manufacturer : Corporate Body: Trading As: Fleuri Kets V B.V. Hand Held Products Europe Kaatsheuvel Hondsruglaan 87d The Netherlands 5628 DB Eindhoven The Netherlands 3. Test Labs...
- Page 178 4. The results of the tests are given in the reports mentioned at point 5. 8. Authentication Signature on behalf of authorized Company mentioned at point 2: Signature on file J.H. Cottrell Jr., Managing Director, Hand Held Products, Europe Date : October 27 , 1998 Place: North Carolina, USA Page 2 of 2...
Need help?
Do you have a question about the Dolphin 7200 and is the answer not in the manual?
Questions and answers