Hand Held Products Dolphin 7200 User Manual
Handheld computer/bar code scanner
Hide thumbs
Also See for Dolphin 7200:
- User manual (181 pages) ,
- User manual (179 pages) ,
- User manual (2 pages)
Table of Contents
Advertisement
Quick Links
Download this manual
See also:
User Manual
Advertisement
Table of Contents
Troubleshooting

Related Manuals for Hand Held Products Dolphin 7200


Summary of Contents for Hand Held Products Dolphin 7200
- Page 1 ® Dolphin 7200 Mobile Computer User’s Guide...
- Page 2 Hand Held Products, Inc. (“Hand Held Products”) reserves the right to make changes in specifications and other information contained in this document without prior notice, and the reader should in all cases consult Hand Held Products to determine whether any such changes have been made. The information in this publication does not represent a commitment on the part of Hand Held Products.
-
Page 3: Table Of Contents
Using Dolphin for the First Time ...2-4 Inserting the Battery Pack ...2-5 Removing the Battery Pack...2-5 Turning the Dolphin On ...2-5 Turning the Dolphin Off ...2-6 Chapter 3 - Dolphin 7200 Basics System Features ...3-1 CPU ...3-1 Disk Drives ...3-1 Front Panel Features ...3-1 Light Emitting Diodes (LEDs)...3-1... - Page 4 About Dolphin 7200 RS-232 ...4-1 Cables ...4-1 Charging the Battery Through the RS-232 Port ...4-1 Sending and Receiving Data...4-2 Chapter 5 - Dolphin 7200 2D Mobile Computer About the Dolphin 7200 2D Mobile Computer...5-1 Supported Symbologies ...5-1 Reading Barcodes ...5-2 Capturing Images...5-3...
- Page 5 Front Panel ...8-2 Back Panel...8-3 Side Panels...8-4 Main Communications Port ...8-4 Multi-HomeBase Port ...8-4 Charging Batteries in the Dolphin 7200 HomeBase ...8-5 Charging a Dolphin Terminal ...8-5 Charging an Additional NiMH Battery Pack ...8-6 Deep-Cycling the Battery ...8-6 Communications ...8-6 Setting up the Dolphin HomeBase ...8-7...
- Page 6 Chapter 9 - Compact HomeBase Hub of the System ...9-1 Battery Management ...9-1 IrDA Optical Communications ...9-1 Convenient Storage ...9-1 Dolphin 7200 Compact HomeBase Parts and Functions...9-2 Front Panel...9-2 Back Panel ...9-3 Bottom Panel ...9-4 Baud Rate Switches ...9-4 Powering the Dolphin Terminal ...9-4 Charging a Dolphin Terminal...9-5...
- Page 7 Online Product Service and Repair Assistance...12-2 Technical Assistance ...12-2 Online Technical Assistance ...12-2 Limited Warranty ...12-3 Appendix A - Technical Specifications Dolphin 7200 Terminal Specifications...A-1 Appendix B - Bar Code Samples Code 39 (Code 3 of 9)... B-1 Code 128 ... B-1 UPC-A... B-1 Interleave 2 of 5 (I2of5) ...
- Page 8 Internal Commands Supported by GS-DOS... E-1 HELP... E-1 BREAK ... E-1 CALL ... E-1 CD (CHDIR) ... E-2 CLS ... E-2 COPY ... E-2 CTTY ... E-2 DATE ... E-2 DEL (ERASE or ERA) ... E-2 DELAY ... E-2 DIR... E-2 ECHO...
-
Page 9: Chapter 1 - Introduction
Introduction Congratulations on the purchase of your new Dolphin 7200 mobile computer! You have made a wise choice in selecting the Dolphin 7200, a device known worldwide for its ergonomic shape, light weight, versatility and single-handed data collection features. Ergonomics The patented shape allows true, one-handed operation and fits either hand comfortably. -
Page 10: Safety
Required Safety Labels Dolphin 7200 terminals use a low power Visible Laser to scan bar codes. Short-term exposure to CDRH Class II laser light is not known to be harmful. As with any bright light source, such as the sun, you should avoid direct eye exposure. -
Page 11: Canadian Notice
Caution: Any changes or modifications made to this device that are not expressly approved by Hand Held Products may void the user's authority to operate the equipment. -
Page 12: Regulatory And Safety Agency Approvals
(about 500 charge cycles for the 1500 mAh NiMH battery) or if the battery does not hold a charge. • If you are not sure the battery or charger is working properly, please send it to Hand Held Products or an authorized Hand Held Products service center, for inspection. -
Page 13: Chapter 2 - Getting Started
PC-compatible and is designed for easy, single-handed data collection. Accessories for the Dolphin The Dolphin 7200 is part of a data collection system that includes accessories specifically designed for vehicle, desktop and hub operations. Accessories available include serial and networkable communications/charging cradles, serial communications/ charging cables, desktop "gang chargers"... - Page 14 Dolphin 7200 RS-232 6' RS-232 Serial Cable Note: Use your Dolphin only with accessories supplied, recommended or approved by Hand Held Products, Inc. Use of non- approved accessories can be dangerous and will invalidate any warranty or liability claims. 2 - 2 Battery charging and/or communications cradle designed for in-transit applications.
-
Page 15: Dolphin 7200 Models
• Micro-DB9 RS-232 serial port Dolphin 7200 RS-232 Terminal The Dolphin 7200 RS-232 terminal is identical to the Dolphin 7200 Batch terminal except that it features a micro-DB9 RS-232 port on the back panel for serial data input/output and charging. -
Page 16: Bar Code Symbologies Supported
Step 1. Checking Your Package If you ordered a Dolphin 7200 Batch or 2D terminal, inspect the package to see that the following standard items and accessories (if ordered) are included: • Dolphin 7200 terminal •... -
Page 17: Inserting The Battery Pack
If you have a Dolphin 7200 RS-232 terminal and are using the communication/charging cable instead of a HomeBase to charge the battery, charge the terminal for 24 hours before initial use. After deep cycling the battery, you may charge the battery using one of these methods: •... -
Page 18: Turning The Dolphin Off
Note: If using the Dolphin for first time or if the terminal has been without a battery pack for more than 30 minutes and you are now inserting a battery, you may receive a CMOS error when the terminal boots up. Don't worry, the terminal is OK. This simply means that the internal back-up battery needs to be recharged and the date and time need to be reset. -
Page 19: Chapter 3 - Dolphin 7200 Basics
Dolphin 7200 Basics System Features The Dolphin's computing power is provided by a highly integrated AMD ELAN SC310 386SX 33 MHz microprocessor. Disk Drives The Dolphin contains two disk drives that provide storage for system files, applications, and data. A third drive is also present if you purchase the FLASH expansion option. -
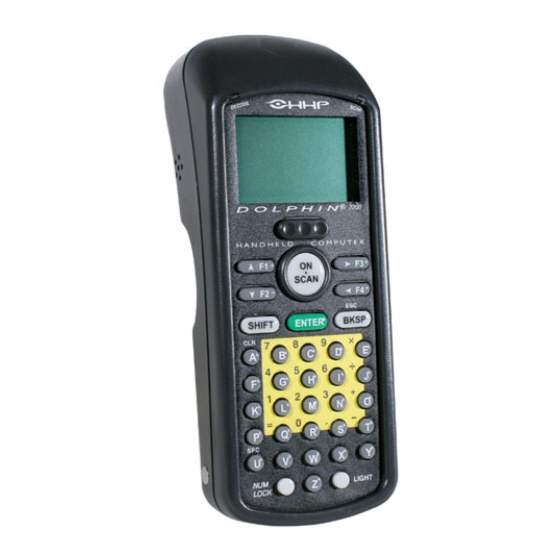
Page 20: Using The Alphanumeric Keypad
Using the Alphanumeric Keypad The Dolphin's alphanumeric, splash-resistant keypad has 36 epoxy coated keys. The keyboard's yellow background enhances the readability of the numeric and special character keys. The Dolphin's ON/SCAN key "wakes" the terminal from sleep mode. Its position also allows convenient one-handed bar code scanning. -
Page 21: Alphanumeric Key Combinations For Functions And Special Characters
Alphanumeric Key Combinations for Functions and Special Characters Use the key combinations listed below to access certain keypad functions or to use special characters that are not defined on the Dolphin keypad. Key Combinations Functions or Character The ESC function performs a cancel action. ESC (SHIFT + BKSP) The SPC function moves the cursor forward one space SPC (SHIFT + U) -
Page 22: Using The Numeric Keypad
Using the Numeric Keypad The Dolphin's numeric, splash-resistant keypad has 20 epoxy coated keys. The large, amber-color keys are large, easy-to-read, and comfortably spaced to help prevent errors in data entry. Digits can be entered without using the shift key. Though designed primarily for numeric data entry, you can use the SHIFT key to switch between numeric and alpha modes or use special characters. -
Page 23: Key Combinations For Functions And Special Characters
Icon Indicates Blinks while main battery in the Dolphin terminal is charging in the Dolphin 7200 HomeBase. Located in lower left-hand corner of the LCD. Blinks while the main battery in the Dolphin terminal is discharging when using the battery deep- cycling utility program. -
Page 24: Keyboard Mode
Keyboard Mode These symbols indicate which mode is operational on the keyboard and are located next to the battery charge indicator. Use the SHIFT key to toggle between numeric to alpha mode on Dolphin. Icon Indicates Which means that … Alpha mode Alphabetic characters are active Numeric mode... -
Page 25: Laser Engine
This feature allows a strap to be attached to the Dolphin terminal so that it can be conveniently secured around the wrist or hooked on to a belt. Not available on the Dolphin 7200 2D or the Dolphin 7200 RS-232 terminals. -
Page 26: Maintaining The Dolphin's Batteries
3.6V battery packs provided by Hand Held Products. The use of any other battery pack in the Dolphin 7200 terminal will void your warranty and may result in damage to the Dolphin terminal or battery. -
Page 27: Servicing The Battery Pack
You may also deep cycle the battery using the CycleBat battery utility conditioning software which is available from the Partners area of the Hand Held Products web site www.handheld.com. More information on this utility is available from the help file that comes with the software. -
Page 28: Resetting The Dolphin Terminal
Resetting the Dolphin Terminal Under normal circumstances, you should not need to reset the Dolphin terminal. However, if required, you can reset the terminal with one of the following methods: 1. Perform the Three Key Reset. The Dolphin terminal can be reset by pressing and releasing the SHIFT, ON/SCAN and BKSP keys. All three keys must be held down and released at the same time. -
Page 29: Chapter 4 - Dolphin 7200
The Dolphin 7200 handheld computer with micro-DB9 RS-232 port is a compact, high performance data collection terminal with standard connectivity at a low cost. Through the terminal's micro-DB9 RS-232 port, the Dolphin 7200 can be connected to a host computer to send and receive data. -
Page 30: Sending And Receiving Data
Sending and Receiving Data The Dolphin 7200 RS-232 terminal can be connected to a host computer to send and receive data via the micro-DB9 RS-232 port using the YX.EXE Utility or the Dolphin File Transfer Program. 1. Insert a battery pack into the battery well of the terminal. -
Page 31: Chapter 5 - Dolphin 7200 2D Mobile Computer
About the Dolphin 7200 2D Mobile Computer The Dolphin 7200 2D mobile computer features the IMAGETEAM 4250 Image Engine, a low power, high-resolution digital image engine for omni-directional and auto-discrimination reading and decoding of linear barcodes, stacked linear (PDF417) and 2D matrix codes. -
Page 32: Reading Barcodes
Reading Barcodes The omni-directional scanning capabilities of the Dolphin 7200 2D terminal greatly simplify operation and training and increase productivity. 1. Press the ON/SCAN button to project the scanner's bright red aiming beam 2. Center the aiming beam over the barcode. -
Page 33: Capturing Images
Lighting Conditions The Dolphin 7200 2D terminal is designed to read bar codes and take images in dim light conditions. It is suggested that you turn on the unit's electroluminescent display backlight when taking images in extreme low light conditions to help with aiming. -
Page 34: Dolphin Demo Main Screen
Dolphin Demo Main Screen When you start the program, this menu screen will be the first one you see. This screen allows you to access the demonstration programs listed or exit to DOS. All the Demo programs will return to this menu screen when exited. If there is no keyboard activity over a short period of time, press any key to go to the Dolphin Demo Main Screen. -
Page 35: F2 - Imaging Demo
F2 - Imaging Demo Press F2 and the screen shown below will display: To setup the imager, press F3. To Take an Image: 1. Press and hold the ON/SCAN button. Release the ON/SCAN button to capture the image when the desired image is displayed on the terminal screen. - Page 36 4. Press ENTER to return to the Scan the Test Target screen. Press F4 to exit the demo and return to the demo main menu. 5 - 6 Tracking Number: 231498324 Address: Hand Held Products 7520 E. Independence Blvd. Charlotte, NC 28227 Captured Image: Dolphin® 7200 User’s Guide...
-
Page 37: Chapter 6 - Dolphin Os And System Development Software
Default Installation Directories There are two install packages - one for the Dolphin 7200 2D and one for the Dolphin 7200 Batch and Laser configurations. Each configuration has its own default directory: c:\Dolph34\ is the default directory for the Dolphin 7200 2D. -
Page 38: Help File, Document And Utility Icons
Tapping this icon, … Provides important information not available at the time the manual was printed. Provides information on contacting Hand Held Products by Phone, Fax, Email, WWW and BBS. Provides additional information on the Dolphin OS and Development System. -
Page 39: Dolphin Utilities
Install only the most recent release of the Dolphin Boot Loader, loading an old version of the Boot loader can result in Dolphin becoming inoperable, and requiring the unit to be returned to Hand Held Products for repair. To Load or Reload the Dolphin's Bootloader: 1. -
Page 40: Dwizard.exe (Dolphin Upgrade Wizard)
If you do not specify command line arguments, DCOMM2.EXE will open a dialog that allows you to receive files or configure the default serial communications port, baud rate, communications protocol and download path. An 'Auto Execute' command line can also be specified in the configuration screen. The specified command line will be executed when a file is received. -
Page 41: Stl.exe
Forces HBCFG.EXE to display 'Please wait Dialog' Example: hbcfg /c1 /b57600 /I If no command line arguments are specified or an error is detected, HBCFG.EXE will open a dialog that allows the user to select the serial communications port, baud rate, or run a diagnostic. Note: Dip Switch 2 located on the back of the HomeBase must be set in the Up (PROGRAM) position for the baud rate to be programmed. -
Page 42: Zzz.exe
The default baud rate for the YX.EXE utility is 9600. For your convenience, batch files are included on the Dolphin terminal to make sending data at a higher baud rate easier. Note: When using YX on the Dolphin 7200 terminal, only COM1 is available. To send at 38400, enter... -
Page 43: Dolphin Application Development
Compiling Applications for the Dolphin Although the operating system on the Dolphin 7200 is DOS-compatible, it provides many unique features that are not built into most PCs. For example, it has an integrated bar code scanner. The Dolphin libraries provide an API that allows an application to use these features. -
Page 44: Building The Samples
Building the Samples There is one Microsoft Visual C\C++ version 1.52 project file (*.mak) for each sample application. There is also a Borland C++ version 5.0 project file, samples.ide. This project file will rebuild all sample applications. Consult the documentation for your compiler for information on the use of project files. -
Page 45: Transferring Files To Or From The Dolphin Terminal
In addition, YX.EXE is pre-loaded on the Dolphin's A drive. This program can be run by entering commands at the DOS prompt or by accessing a menu. Note: When using YX on the Dolphin 7200 terminal, only COM1 is available. For a sample, see YX.EXE... -
Page 46: Using The Dolphin File Transfer Program And Yx In Menu Mode
Using the Dolphin File Transfer Program and YX in Menu Mode You can also use YX in menu mode to send and receive files from the Dolphin to your PC and vice versa with the Dolphin File Transfer program and YX.EXE on the PC. Sending Files to the Dolphin To use a menu for sending files to the Dolphin, follow these steps: 1. -
Page 47: Dolphin Evs Engine
Dolphin ROM IMAGE and Bootloader. Loading an old version of the ROM IMAGE or Bootloader can make the Dolphin unstable or inoperable, and requiring you to return the unit to Hand Held Products for repair. Upgrading the Dolphin ROM Image The Dolphin terminal has a Bootloader incorporated that allows the developer to upgrade or reload the ROM IMAGE. -
Page 48: Upgrading The Dolphin Bootloader
ROM IMAGE or Bootloader. The Dolphin may become unstable or inoperable requiring you to return the unit to Hand Held Products for repair. Hand Held Products recommends that you use the Dolphin Upgrade WIZARD to update the Dolphin Boot Loader, ROM image and Demo Programs. Simply run DWIZARD and follow the instructions provided. -
Page 49: Chapter 7 - Troubleshooting
Troubleshooting Dolphin Terminal and HomeBase This table describes some of the common problems/symptoms and solutions that you could encounter while using your Dolphin terminal or Dolphin HomeBase. If you need further assistance with troubleshooting your terminal, contact your Hand Held Products Authorized Reseller. -
Page 50: Troubleshooting With Dolphin 7200-2D
ORANGE to GREEN. The CHARGING MAIN BATT LED is on, but the Dolphin terminal will not communicate. Troubleshooting with Dolphin 7200-2D Image is not readable … Because it is too dark Because it is distorted Because it is cut off Because of a dirty lens Because it is too small. -
Page 51: Chapter 8 - Dolphin Homebase
Battery Management The Dolphin 7200 HomeBase uses a charging method that senses when the battery pack is fully charged and then drops to a trickle charge to keep the battery pack at full capacity. The battery pack does not need to be discharged before recharging because this method protects the battery from damage caused by overcharging. -
Page 52: Dolphin 7200 Homebase Parts And Functions
Dolphin 7200 HomeBase Parts and Functions Front Panel Multi-Serial Port Dolphin Terminal Well You put the Dolphin in this well to communicate with a host device and to charge the Dolphin's batteries. LEDs There are three LEDs that you can use to monitor the status of battery charging and communications status: 1. -
Page 53: Back Panel
Charging Aux Batt LED Description Blinking orange LED Solid green LED Back Panel Auxiliary Battery Well Insert a battery into the well to charge a second battery and you will always have a spare. The auxiliary battery well can also service your battery pack. Configuration Switches Use these switches to select the network and communications modes for your Dolphin. -
Page 54: Side Panels
Side Panels There is a main communications port on one side and a multi-HomeBase-port on the other side: Main Communications Port Use a standard serial cable to connect this port to a host RS-232 device if the Dolphin HomeBase is the first unit of HomeBase network. -
Page 55: Charging Batteries In The Dolphin 7200 Homebase
Charging Batteries in the Dolphin 7200 HomeBase Use only the 3.6V battery packs provided by Hand Held Products. The use of any other battery pack in the Dolphin terminal will void your warranty and may result in damage to the Dolphin terminal or battery. -
Page 56: Charging An Additional Nimh Battery Pack
The Dolphin terminal and Dolphin HomeBase support RS-232 communications through the RS-232 (page 8-4) located on the side of the Dolphin 7200 HomeBase. This port translates the RS-232 signals from the host computer into infrared signals to communicate with the Dolphin terminal. -
Page 57: Setting Up The Dolphin Homebase
HomeBase /Host Port (DCE) With the Dolphin 7200 HomeBase, use the appropriate cable to connect each device to the Main Comm Port for a single Dolphin HomeBase or to the Multi-HomeBase Port if you are creating a Dolphin HomeBase network. -
Page 58: Setting The Baud Rate
RS-232 link is passed directly to and from the Dolphin terminal via the Infrared Link between the terminal and the HomeBase. Configuring a Single Dolphin 7200 HomeBase To prepare a single Dolphin HomeBase for communications, you must enter the Command Mode to configure the version number and select the baud rate. -
Page 59: Creating A Dolphin 7200 Homebase Network
Creating a Dolphin 7200 HomeBase Network This information applies only to the Dolphin 7200 HomeBase. The Dolphin 7200 Compact HomeBase is not networkable. Each HomeBase must have its own AC power adapter connected to a standard AC electrical socket. The group can be placed on a table or desk, or rail-mounted using the mounting holes on the two outside Dolphin HomeBase units. - Page 60 2. Baud Rate Selection, and 3. Device Selection. Address Assignment Use the Address Assignment command to establish unit IDs for each Dolphin HomeBase in your network. This must be done before a unit can be selected for communications. To establish an Address Assignment: 1.
-
Page 61: Communicating With The Dolphin Terminal
n is the ASCII number corresponding to the baud rate shown in the table below. For example, the string consists of the escape string and the command B6) would set the baud rate for the network to 19200. No response will be transmitted back to the host after executing this function. - Page 62 3. Start your application on the Dolphin terminal or the host computer. Data can then begin transmitting between the terminal and the devices connected to the Dolphin HomeBase. When data transfer begins, the COMM LED on the Dolphin HomeBase will blink red and green. If the HomeBase will not communicate with the Dolphin, check the port connections to ensure that the HomeBase is correctly configured.
-
Page 63: Chapter 9 - Compact Homebase
Battery Management The Dolphin 7200 Compact HomeBase uses a charging method that senses when the battery pack is fully charged and then drops to a trickle charge to keep the battery pack at full capacity. The battery pack does not need to be discharged before recharging because this method protects the battery from damage caused by overcharging. -
Page 64: Dolphin 7200 Compact Homebase Parts And Functions
Dolphin 7200 Compact HomeBase Parts and Functions Front Panel DOCK LED Dolphin Terminal Well The Compact HomeBase's front panel has one slot. Put the Dolphin terminal in this well to communicate with a host device and to charge the Dolphin's batteries. -
Page 65: Back Panel
Back Panel Power Supply Connector Use this connector to attach a power supply to the HomeBase. The power supply provides 12V DC input for communications and battery charging. RS-232 Communications Port Use a standard serial cable to connect this port to a host RS-232 device. Dolphin®... -
Page 66: Bottom Panel
Bottom Panel A Baud Rate DIP switch is located on the bottom of the HomeBase. The three-position DIP switch is used to select the communication baud rate. Switch position and the corresponding baud rates are shown in the chart below. Baud Rate Switches Baud Rate Switch 1... -
Page 67: Charging A Dolphin Terminal
Deep-Cycling Batteries For maximum battery life, Hand Held Products recommends that you deep- cycle (service) the battery twice before initial use and then, once a month thereafter. Since the Dolphin 7200 Compact HomeBase does not have deep-cycling capabilities, it is recommended that you use the Dolphin 7200 Multicharger or the Dolphin 7200 HomeBase. -
Page 68: Wall Mounting
Wall Mounting: The Compact HomeBase also has two DIN rail (7.5 X 35mm) slots on the back to allow for secure wall mounting of the unit if desired. When using right-angle style RS232 connector cable, the DIN rails may be mounted directly to the wall. When using standard RS232 connector cables, it is recommended that the rails be mounted to the wall using a 25mm (1 in.) spacer to allow for appropriate strain relief of the cables. - Page 69 In either case, after wall mounting, it is recommended that the cables be secured to the DIN rail through use of a wire tie to prevent damage to the Compact HomeBase unit in case accidental or excessive force is applied to the cables. Dolphin®...
-
Page 70: Setting Up For Communications
7 (RTS) 8 (CTS) With the Dolphin 7200 Compact HomeBase, connect each device to the RS-232 Communications Port on the back of the HomeBase. The Compact HomeBase cannot be networked. Connect the power supply to the Compact HomeBase. Plug the AC transformer into the Dolphin HomeBase 12 Volt DC power supply connector. -
Page 71: Communicating With The Dolphin Terminal
Communicating with the Dolphin Terminal To communicate with the Dolphin and any other devices connected to the Compact HomeBase: 1. Insert the Dolphin into the terminal well of the HomeBase. If the Dolphin is in sleep mode, it will awaken into active state. 2. - Page 72 9 - 10 Dolphin® 7200 User’s Guide...
-
Page 73: Chapter 10 - Dolphin Vehicle Base
You must connect the Dolphin VehicleBase to a power source for any type of operation. Hand Held Products recommends that you leave the Dolphin VehicleBase connected to its power source at all times, so that it is always ready to use. -
Page 74: Supplying Power To The Dolphin Vehiclebase
Supplying Power to the Dolphin VehicleBase The Dolphin VehicleBase can be powered from either a 12 or 24 volt DC source. Power is connected to the Power Connector (page 10-1) on the bottom panel. Two connection options are available: 1. Cigarette lighter adapter for 12 volt automotive systems and portable applications. 2. -
Page 75: Side Panel Features
Side Panel Features This section contains information regarding features located on the side of the Dolphin VehicleBase. COMM Dolphin Terminal Well The Dolphin terminal slides into this well during both battery charging and communications with the host device. COMM LED For the charging/communication version of the Dolphin VehicleBase, the COMM LED indicates the status of data transfer between the host device and the Dolphin terminal. -
Page 76: Inserting The Dolphin Terminal Into The Vehiclebase
The recommended temperature range is 10 to 35 C. Do not attempt to recharge any battery pack in the Dolphin terminal that is not manufactured by Hand Held Products especially for this device. To do so will void your warranty and can damage the Dolphin VehicleBase or the Dolphin terminal. -
Page 77: Cables For The Vehiclebase
Cables for the VehicleBase Standard Serial Cable The following information applies only to the charging/communication version of the Dolphin VehicleBase. The Dolphin VehicleBase provides a convenient interface that allows the Dolphin terminal to interface to a PC, printer, or any other standard RS-232 device;... - Page 78 10 - 6 Dolphin® 7200 User’s Guide...
-
Page 79: Chapter 11 - Dolphin Multicharger
Dolphin MultiCharger Introduction The Dolphin MultiCharger provides intelligent battery management for 10 Dolphin battery packs. Basic Features The Dolphin MultiCharger • Can charge as many as 10 Dolphin battery packs independently. • Charges 3.6V NiMH rechargeable battery packs. A two-level charging algorithm switches from fast charge to trickle charge when the battery is fully charged. -
Page 80: Top Panel
You must connect the Dolphin MultiCharger to a power source for any type of operation. Hand Held Products recommends that you leave the Dolphin MultiCharger connected to its power source at all times, so that it is always ready to use. -
Page 81: Inserting The Dolphin Battery Pack
The recommended temperature range is 10 to 35 C. Do not attempt to recharge a battery pack that is not manufactured by Hand Held Products especially for this device. To do so will void your warranty can damage the Dolphin MultiCharger. -
Page 82: Troubleshooting
The Red/Error LED comes on during charging. The Red/Error LED remains on, without a battery in the charging pocket. If problem persist, please contact Hand Held Products Technical Support. 11 - 4 Issue Check the power connections on the Dolphin MultiCharger. -
Page 83: Declaration Of Conformity
Declaration of Conformity Dolphin® 7200 User’s Guide 11 - 5... - Page 84 11 - 6 Dolphin® 7200 User’s Guide...
-
Page 85: Chapter 12 - Customer Support
Hand Held Products provides service for all its products through service centers throughout the world. To obtain warranty or non-warranty service, return the unit to Hand Held Products (postage paid) with a copy of the dated purchase record attached. Contact the appropriate location below to obtain a Return Material Authorization number (RMA #) before returning the product. -
Page 86: Online Product Service And Repair Assistance
Online Product Service and Repair Assistance You can also access product service and repair assistance online at www.handheld.com. Technical Assistance If you need assistance installing or troubleshooting, please call your Distributor or the nearest Hand Held Products technical support office: North America/Canada: Telephone: (800) 782-4263, option 4 (8 a.m. -
Page 87: Limited Warranty
(E) repair or service of the product by anyone other than Hand Held Products or its authorized representatives. This warranty shall extend from the time of shipment for the duration published by Hand Held Products for the product at the time of purchase ("Warranty Period"). - Page 88 Dolphin® 7200 User’s Guide 12 - 4...
-
Page 89: Appendix A - Technical Specifications
Technical Specifications Dolphin 7200 Terminal Specifications Batch Polycarbonate ABS Blend, Splash-resistant, one-piece module Case Material Length: 6.85 in. (17 cm) Dimensions Width: 2.63 in. (7 cm) Depth at handle: 1.62 in. (4 cm) Depth at front: 1.83 in. (5 cm) Patented shape one-handed operation;... - Page 90 Dolphin 7200 Terminal Specifications Batch GS-DOS architecture programmable with standard x86 development Operating System tools; Microsoft C/C++ libraries provided for non-PC standard functions (scan engine support, communication & power management) Environmental Specifications -10 to 50°C (14 to 122°F);Operates at -20° for a short time with little loss of LCD quality...
-
Page 91: Code 128
Dolphin 7200 Terminal Specifications Batch Code 3 of 9, Interleaved 2 of 5, EAN, Codabar, Code 128, Plessey Bar code symbol MSI, Code 11, Code 93, UPC types Digital Camera ---- CMOS Camera 4250 Image Engine ---- Image Engine Options Dolphin®... - Page 92 A - 4 Dolphin® 7200 User’s Guide...
-
Page 93: Upc-A
Bar Code Samples With the Demo program, the Dolphin terminal is programmed to read these codes. Practice scanning each of the bar codes, and notice the LCD window after you scan each code. Code 39 (Code 3 of 9) Correct Readout - BC321 Code 128 Correct Readout -... - Page 94 B - 2 Dolphin® 7200 User’s Guide...
-
Page 95: Appendix C - Decoding Demo Menu Layout
Decoding Demo Menu Layout 2D Decoding Demo Diagram The following flow diagram shows the layout of the menus available in the 2D Decoding Demo. Dolphin® 7200 User’s Guide C - 1... -
Page 96: 2D Decoding Demo Screen Shots
• Press F3 to select ALD Mode Setup Menu Display Options Menu Symbologies Configure the Dolphin 7200 for reading specific bar code symbologies as well as enabling, disabling, or defaulting all available symbologies. C - 2 Select what you would like to edit... -
Page 97: Decoding Options
Decoding Options Decode Mode The top of the screen will show the decode mode currently active on the Dolphin 7200 terminal. To set the Mode, Press: F1 - Standard Omni Hand Held Products' traditional search and decode routine. Gives full omni- directional decoding over the whole image area. -
Page 98: Centering Window
Centering Window Press F2 for the Centering Window and the screen below will display. This is the default setting for the Centering Window function. The Centering Window is used to keep the image engine from decoding the wrong symbol when you have several bar codes located close together. The following key presses configure this feature: Enables or disables centering window function Cycles the window setting through several predetermined sizes... -
Page 99: Ald Window
ALD Window Press F3 and the ALD window shown below will display: ALD mode searches for linear bar codes across the middle of the image. How much of the image is searched is controlled by the window size. This mode only works on linear symbologies and only decodes them horizontally. The following key presses configure this feature: F1 - Cycles through window sizes F2 - Use default sizes... - Page 100 C - 6 Dolphin® 7200 User’s Guide...
- Page 101 IQ Imaging Test Target Make copies of this page to use with the Dolphin 7200-2D terminal IQ Imaging demo (see F3 - I.Q. Imaging Demo on page 5-5). Dolphin® 7200 User’s Guide D - 1...
- Page 102 D - 2 Dolphin® 7200 User’s Guide...
-
Page 103: Internal Commands Supported By Gs-Dos
GS-DOS Commands The Dolphin terminal ships with General Software DOS (GS-DOS). GS-DOS is compatible with Microsoft DOS (MS-DOS) and is optimized to run in a very small amount of memory. Internal Commands Supported by GS-DOS HELP BREAK CD (CHDIR) CTTY DATE DELAY EXIT... -
Page 104: Cd (Chdir
Syntax: Call [d:] [pathname] [parameter1] [parameter2] […] CD (CHDIR) The CD command displays the current directory of the specified drive, or can change the current directory of the specified drive. If no drive is specified, then the default drive is used. Syntax: CD [drive:][pathname] The CLS command clears the terminal's screen and resets the cursor position to the upper-left hand corner of the screen. -
Page 105: Echo
Syntax: DIR [drive:][path] [wildcard-filename] ECHO The ECHO command has two functions; namely, control of the ECHO flag, and displaying messages in batch files. ECHO mode controls the command processor's echoing of commands in batch files. If ECHO mode is on, then commands read from batch files are automatically echoed to the screen before they are executed. -
Page 106: Prompt
Syntax: PAUSE PROMPT The PROMPT command maintains the PROMPT environment variable that is used by COMMAND.COM to display something before the user is asked to type-in a command. The default PROMPT variable is $n$g. This has the effect of showing the current drive letter followed by a "greater-than" sign: Syntax: PROMPT string RD (RMDIR) The RD command removes a subdirectory from a root directory or of a subdirectory. -
Page 107: Shift
Syntax: SET [keyword=[string]] SHIFT Displays or changes the optional switch character. Syntax: SWITCH [character] SYNC The SYNC command provides a synchronization checkpoint feature that enables a batch file to flush the file system's buffers to disk before doing something that might otherwise cause a disorderly shutdown Syntax: SYNC TIME The TIME command displays or changes the system time. - Page 108 Syntax: VOL [drive:] E - 6 Dolphin® 7200 User’s Guide...
- Page 109 : N/A : This Product was tested with the following: Dolphin 1 Terminal Bar Code Scanner Dolphin 1 Homebase : Hand Held Products, Inc. : 7510 E. Independence Blvd. #100 Charlotte, North Carolina 28227-9411 : United States Of America : Corporate Body: Trading as: Fleuri Kets V B.V.
- Page 110 2 : Signature On File J.H. Cottrell Jr., Managing Director, Hand Held Products Europe Date : _________________ Place : _________________ F - 2 Dolphin® 7200 User’s Guide...
- Page 111 : Auto ID : N/A : N/A : This product was tested with the following: Dolphin I Homebase. : Hand Held Products. Inc. : 7510 East Independence Blvd. Charlotte, North Carolina 28227-9411 : United States of America : Corporate Body: Trading As: Fleuri Kets V B.V.
-
Page 112: Test Report
: IRL TRA 24/5/242/1 : Spain : E/D.G.Tel./08/99/0221 : France : 980321PPO Signature on file J.H. Cottrell Jr., Managing Director, Hand Held Products, Europe Date : October 27, 1998 Place: North Carolina, USA Page 2 of 2 Revision C 98302120 98302120 Dolphin®... - Page 114 Hand Held Products, Inc. 700 Visions Drive P.O. Box 208 Skaneateles Falls, NY 13153-0208 ™ 7200-UG Rev F...
Need help?
Do you have a question about the Dolphin 7200 and is the answer not in the manual?
Questions and answers