
Related Manuals for Hand Held Products 7200/UG


Summary of Contents for Hand Held Products 7200/UG
- Page 1 H A N D H E L D P R O D U C T S Dolphin™ 7200 Handheld Computer and HomeBase™ User’s Guide 7200/UG Rev . C...
- Page 2 Microsoft Corporation. Spreadsheet Simplicity, Dolphin, Dolphin RF and HomeBase are trademarks or registered trademarks of Hand Held Products. Patents are pending for Spreadsheet Simplicity. iButton is a trademark of Dallas Semiconductor. Other product names mentioned in this document may be trademarks or registered trademarks of their respective companies and are hereby acknowledged.
-
Page 3: Table Of Contents
T T T T able of Contents able of Contents able of Contents able of Contents Before You Begin ... 7 Welcome... 7 Safety ... 8 Required Safety Labels... 8 RF Energy... 10 Statement of Agency Compliance... 10 FCC Class B Compliance Statement... 10 Canadian Notice ... - Page 4 Image Engine ... 32 Lanyard Eyelet for Optional Wrist Strap ... 32 Battery Well... 32 Reset Switch ... 32 Maintaining the Dolphin’s Batteries... 33 Internal NiMH Backup Battery... 33 NiMH Battery Pack ... 34 Storing Batteries ... 35 Chapter 3 Dolphin® 7200 RF Handheld Computer ... 36 About the Dolphin 7200 RF Handheld Computer...
- Page 5 Hub of the System ... 94 Dolphin 7200 HomeBase Parts and Functions ... 95 Charging Batteries In The Dolphin 7200 HomeBase ... 97 Charging Batteries In The Dolphin 7200 HomeBase ... 98 Setting Up For Communications ... 100 Setting up the Dolphin HomeBase ... 100 Configuring a Single Dolphin 7200 HomeBase...
- Page 6 Warranty Information ... 152 Who Is Covered By The Warranty ... 152 What’s Covered By The Warranty ... 152 What’s Not Covered By The Warranty ... 153 How Problems Should Be Handled ... 153 Return Information ... 153 How To Extend Your Warranty... 155 Technical Support...
-
Page 7: Before You Begin
Before You Begin Welcome ongratulations on the purchase of your new Dolphin 7200 handheld computer. You have made a wise choice in selecting the Dolphin 7200, a device known worldwide for its ergonomic shape, light weight, versatility and single-handed data collection features. The patented shape allows true, one-handed operation and fits either hand comfortably. -
Page 8: Safety
Safety The Dolphin 7200 handheld computer/bar code scanner meets or exceeds the requirements of all applicable standards organizations for safe operation. However, as with any electrical equipment, the best way to ensure safe operation is to know the possible risks. The following safety guidelines are designed to protect both you and others around you. - Page 9 Label for WLIF radio-equipped terminals Label for 802.11b radio-equipped terminals Figure 2 Safety Labels for Dolphin 7200 RF terminals Figure 3 Safety Labels for Dolphin 7200 2D terminals 9 9 9 9...
-
Page 10: Rf Energy
• Consult the dealer or an experienced radio or television technician for help. Caution: Any changes or modifications made to this device that are not expressly approved by Hand Held Products may void the user’s authority to operate the equipment. -
Page 11: Canadian Notice
Canadian Notice This equipment does not exceed the Class B limits for radio noise emissions as described in the Radio Interference Regulations of the Canadian Department of Communications. Le present appareil numerique n’emet pas de bruits radioelectriques depassant les limites applicables aux appareils numeriques de la classe B prescrites dans le Reglement sur le brouillage radioelectrique edicte par le ministere des Communications du Canada. -
Page 12: Regulatory And Safety Agency Approvals
Dallam Court Dallam Lane Warrington, Cheshire WA2 7LT England Hand Held Products shall not be liable for use of our product with equipment (i.e., power supplies, personal computers, etc.) that is not CE marked and does not comply with the Low Voltage Directive. -
Page 13: Batteries
• If you are not sure the battery or charger is working properly, please send it to Hand Hand Products or an authorized Hand Held Products service center, for inspection. The Dolphin handheld computer/bar code scanner meets or exceeds all applicable standards and has been manufactured to the highest level of quality. -
Page 14: Chapter 1 Getting Started
Chapter 1 Getting Started Summarizes the Dolphin’ s features, functions and accessories and getting it started for the first time. -
Page 15: About The Dolphin 7200 Handheld Computer
Dolphin HomeBase power adapter Dolphin HomeBase. Note: Use only power adapters approved for use by Hand Held Products. Failure to do so may result in improper operation or damage to the unit. 10 Slot Battery Charger for Dolphin four hours. -
Page 16: Dolphin 7200 Models And Options
C H A P T E R N O T E Contact your Value-Added Reseller for more information. For details about how to install or use any of these accessories, refer to the documentation provided with the Use your Dolphin only product. -
Page 17: Bar Code Symbologies Supported
C H A P T E R G E T T I N G These following options are available for the Dolphin 7200 terminal: Dolphin Batch 36-key alphanumeric keypad or key numeric keypad with shifted alpha characters Standard, High-Visibility, Long-Range or High Density scan engines 2 MB RAM with 2 MB non-volatile FLASH memory (expandable to 4, 6,... -
Page 18: Using Dolphin For The First Time
The terminal’s NiMH battery is shipped discharged of all power so you must charge it twice before initial before using for the first time. For maximum battery life, Hand Held Products use and then, once a recommends that you deep cycle the battery twice before initial use. To deep cycle, month thereafter. -
Page 19: Inserting The Battery Pack
After deep cycling the battery, you may charge the battery using one of these methods: • Place the battery in the auxiliary battery well on the Dolphin HomeBase™. Time to Charge: 3 hours • Place the battery in the 10-slot Dolphin multiple battery charger. Time to Charge: 3 hours •... -
Page 20: Turning The Dolphin On And Off
3 Turning the Dolphin On And Off Turning On the Dolphin Install the charged battery pack in the Dolphin. Hold the Dolphin in the palm of your hand so that you can press the ON/SCAN key easily with your thumb. Press the ON/SCAN key to turn the Dolphin on. - Page 21 To set the date on a numeric Dolphin: Press <SHIFT> to put the Dolphin in alpha mode. Enter <DATE> at the Dolphin’s DOS prompt. See the section called Using the Numeric Keypad in Chapter 2 for more information. Press <SHIFT> to put the Dolphin back in numeric mode. Enter the new date <mm-dd-yy>.
-
Page 22: Chapter 2 Dolphin Basics
Chapter 2 Dolphin Basics Describes system features and explains how to use the Dolphin’ s keypad, display, batteries, drives and scanner. -
Page 23: System Features
C H A P T E R System Features The Dolphin’s computing power is provided by a highly integrated AMD ELAN SC310 386SX 33 MHz microprocessor. Disk Drives The Dolphin contains two disk drives that provide storage for system files, applications, and data. -
Page 24: Liquid Crystal Display (Lcd)
Liquid Crystal Display (LCD) The alphanumeric, scrollable LCD consists of nine rows with 20 character positions per row and 119 x 73 graphics pixels, which are software addressable. The electroluminescent backlight allows you to view the display in low light conditions. To conserve power, the backlight is automatically turned off after 30 seconds. -
Page 25: Using The Alphanumeric Keypad
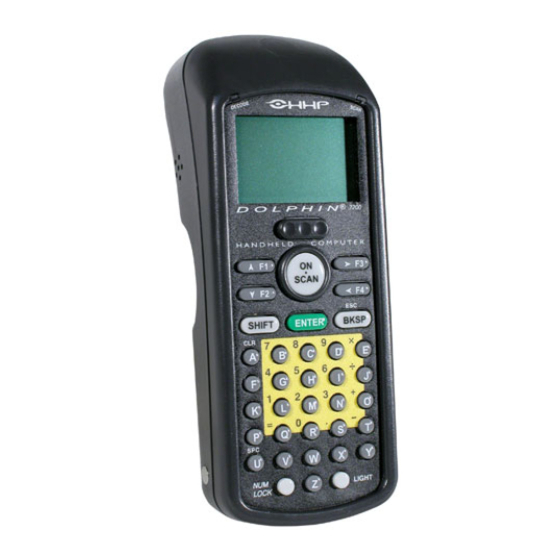
C H A P T E R D O L P H I N Using the Alphanumeric Keypad The Dolphin’s alphanumeric, splash-resistant keypad has 36 epoxy coated keys. The keyboard’s yellow background enhances the readability of the numeric and special character keys. -
Page 26: Key Combinations For Keypad Functions And Special Characters
Key Combinations For Keypad Functions and Special Characters Use the key combinations listed below to access certain keypad functions or to use special characters that are not defined on the Dolphin keypad. Key Combination ESC (SHIFT + BKSP SPC (SHIFT + U) CLR (SHIFT + A) SHIFT + F SHIFT + K... -
Page 27: Using The Numeric Keypad
Using the Numeric Keypad The Dolphin’s numeric, splash-resistant keypad has 20 epoxy coated keys. The large, amber-color keys are large, easy-to-read, and comfortably spaced to help prevent errors in data entry. Digits can be entered without using the shift key. Though designed primarily for numeric data entry, you can use the SHIFT key to switch between numeric and alpha modes or to use special characters. -
Page 28: Key Combinations For Keypad Functions And Special Characters
Key Combinations For Keypad Functions and Special Characters Key Combination ESC (SHIFT + BKSP) LIGHT (SHIFT + SP) CONTR (SHIFT + SP+SP) CALC Figure 6 Key Combinations and What They Do Entering Alpha and Special Characters Press the SHIFT key to switch the numeric keypad to alpha mode. This is indicated by the <ABC>... -
Page 29: Display Symbols
For example, to enter a letter “G” into the Dolphin terminal, press the SHIFT key to put the Dolphin in alpha mode. Press the “9” key once and the letter “G” will be entered. To enter a “T” into the Dolphin terminal, press the SHIFT key to put the Dolphin in alpha mode. - Page 30 C H A P T E R D O L P H I N B A S I C S Alpha mode -- alphabetic characters are active Numeric mode -- numeric characters are active...
-
Page 31: Back Panel Features
Back Panel Features This section describes features on the Dolphin’s back panel. The alphanumeric and numeric Dolphins have identical back panels. Laser Engine Battery Well Infrared Communications Port Figure 7 Dolphin Back Panel Lanyard Eyelet (not available on Dolphin RF) Reset Switch Battery Charging Contacts... -
Page 32: Laser Engine
C H A P T E R Laser Engine The Dolphin 7200 is currently available with five scanning options: The laser engine converts reflected light into a digital pattern that represents the bar code data. A clear window covers the laser engine to protect it from dust and dirt. Image Engine The Dolphin 7200 2D terminal is available with the following imaging options: •... -
Page 33: Maintaining The Dolphin's Batteries
Maintaining the Dolphin’s Batteries CAUTION: Use only the 3.6V battery packs provided by Hand Held Products. The use of any other battery pack in the Dolphin 7200 terminal will void your warranty and may result in damage to the Dolphin terminal or battery. -
Page 34: Nimh Battery Pack
Hand Held Servicing the Battery Pack Products recommends For maximum battery life, Hand Held Products recommends that you deep cycle the that you deep-cycle battery twice before initial use. It is also recommended that you service, or calibrate (service) the battery the battery once per month. -
Page 35: Storing Batteries
Storing Batteries To maintain top performance from batteries, follow the guidelines below when storing them: • Avoid storing batteries outside of the specified range of -4 to 104° F (-20 to 40°C) or in extremely high humidity. • For prolonged storage, do not keep batteries stored in the terminal. •... -
Page 36: Chapter 3 Dolphin® 7200 Rf Handheld Computer
Chapter 3 Dolphin® 7200 RF Handheld Computer... -
Page 37: About The Dolphin 7200 Rf Handheld Computer
About the Dolphin 7200 RF Handheld Computer Dolphin 7200 RF® terminal integrates the basic functionality of the Batch terminal with an 802.11b or a WLIF™ interface that allows the terminal to communicate with a host computer via a wireless local area network (WLAN). Both radio options operate in the 2.4 GHz frequency band. -
Page 38: Configuring Your 802.11B- Compliant Dolphin 7200 Rf Terminal
Configuring Your 802.11b- Compliant Dolphin 7200 RF Terminal The Dolphin 7200 RF Utilities program provides basic functions required to prepare your terminals for use. The program also includes a Scan Demo, Help, and an Inventory Control demo. When you cold-boot or reset the terminal, the title screen shown below appears. Press the <ENTER>... - Page 39 <ESC> and then the <ON/SCAN> Button to scan a bar code. F 2 - H e l p This option is an online help file with general information about using the Dolphin 7200 RF terminal, battery maintenance, contacting Hand Held Products, specifications and navigating through the help file. F1-Scan Menu...
- Page 40 F 3 - H H P D e m o The HHP Demo is a sample inventory control program. F 4 - U t i l i t i e s M e n u F3-HHP Demo F4-Utility Menu...
- Page 41 F1-COM Menu Use this menu to send and receive files when transmitting data via HomeBase or VehicleBase to the local area network. Press <F1> to send a file. Press <F2> to receive a file. For more information on sending or receiving files with the Dolphin 7200 HomeBase, see the section on Setting Up For Communications in Chapter 7.
- Page 42 F3-DOS Prompt Press <F3> to exit to the DOS prompt. F4-RF Menu Press <F4> and the menu below will appear. Use options from this menu to configure the Dolphin 7200 RF for use in your wireless local area network. F4-RF Menu...
- Page 43 C H A P T E R F1 RF Setup To configure the terminal for use in a local area network, press <F1> and enter the data for each of the options on the screen shown below: You cannot change the MAC address on the Dolphin terminal. Each terminal has its own unique factory-set MAC address.
- Page 44 C H A P T E R F2 SET NODE Press F2 to set a system name for the Dolphin 7200 RF terminal. Enter a value for the N O T E NODE option and press <ENTER>. Once the NODE is written, the Dolphin 7200 RF terminal must be reset to activate the new NODE.
- Page 45 Setting WEP Modes And Keys On The 802.11b Radio Card This section describes how to set WEP (Wired Equivalent Privacy) modes and keys on the Cisco® 802.11b radio card. WEP is used to encrypt and decrypt data signals transmitted between Wireless LAN (WLAN) devices.
- Page 46 C H A P T E R Running the WEP.BAT Utility This section describes usage and command line options for the WEP.BAT utility. Note: The WEP.BAT file must be run with the radio driver NOT loaded. Reboot the N O T E Dolphin 7200 RF terminal with the ON/SCAN key depressed so that the driver will Reset the Dolphin terminal not load.
- Page 47 Example 1: To configure WEP using the batch mode, create the keys.txt file using a text editor as shown: Sample ASCII keys.txt file for 40-bit encryption where x is the key code: ASCII xxxxx xxxxx xxxxx xxxxx xxxxx Sample HEX keys.txt file for 128-bit encryption where x is the key code: xxxxxxxxxxxxxxxxxxxxxxxxxx xxxxxxxxxxxxxxxxxxxxxxxxxx xxxxxxxxxxxxxxxxxxxxxxxxxx...
- Page 48 Example 2: To set the WEP keys using an ASCII character string via the Dolphin terminal keyboard, enter C:\> WEP ASCII 11111 X 33333 X There are four WEP keys to set. To skip a key code, enter < In the example above, only keys 1 and 3 have a value; 2 and 4 have no value. An ASCII character string of 5 characters sets 40-bit encryption and 13 characters sets 128-bit encryption on the terminal.
- Page 49 Example 4: To display the radio’s WEP settings, enter C:\>WEP STATUS Result: The terminal will displays the settings as shown below: WEP128 encryption Key 1 Len:13 Key 2 Len:13 Key 3 Len:13 Key 4 Len:13 key index is 1 (i.e. the active key) Note: The first line indicates the capability of the radio;...
-
Page 50: Wlif™-Compliant Dolphin 7200 Rf Terminal
WLIF™-Compliant Dolphin 7200 RF Terminal The WLIF-compliant Dolphin 7200 RF radio that uses frequency hopping spread spectrum technology compliant to the Proxim ® WLI Forum/OpenAir™ specification. The radio operates at a data rate of up to 1.6 megabits per second, with 15 independent channels available. Frequency hopping technology is inherently secure in that the signal hops among a variety of frequencies and, at any instant in time, the signal is broadcast on only one frequency. - Page 51 F 4 U t i l i t i e s M e n u Press <F4>, the following screen will appear: The F1, F2 and F3 functions on the Utility menu for WLIF-compliant terminals are the same as the 802.11b-compliant terminals. For more information, refer to the section on the Utility Menu in the configuring 802.11b terminals section.
- Page 52 C H A P T E R F1 RF Setup To configure the terminal for use in a local area network, press <F1> and enter the data for each of the options on the screen shown below. F1 SET SECURITY ID N O T E Press <F1>...
-
Page 53: Dolphin 7200 Rf Peripherals
C H A P T E R F3 R/W IP ADDRESS Press <F3> to enter the IP address. Once the IP Address is written, the Dolphin 7200 RF terminal must be reset to activate the new IP Address. The IP address is a 32-bit address assigned to hosts using TCP/IP. An IP address belongs to one of five classes (A, B, C, D, or E) and is written as four octets separated by periods (dotted decimal format). -
Page 54: Host Connectivity
Host Connectivity Hand Held Products offers several host connectivity options for Dolphin 7200 RF wireless LAN solutions. Direct Connect TN Client software is a thick-client solution that connects Dolphin 7200 RF TN5250 or TNVT terminal emulation using industry-standard TCP/IP protocol. -
Page 55: Thin-Client Terminal Emulation
Thin-Client Terminal Emulation Hand Held Products’ thin-client terminal emulation solution uses a Universal Gateway to provide host connectivity. The Universal Gateway connects to the hosts such as AS/400, ES/9000 and HP/6000 via Ethernet and communicates to the application via Ethernet for 3270, 5250 or telnet for DEC VT220 terminal emulation environments. -
Page 56: Terminal Emulation Keyboard Overlays
Terminal Emulation Keyboard Overlays There are host-specific keyboard overlays supporting all necessary program keys, character sets, and control and display functions. Alphanumeric 3270 Alphanumeric 5250 Alphanumeric VT220... - Page 57 C H A P T E R D O L P H I N 7 2 0 0 H A N D H E L D C O M P U T E R Numeric 3270 Numeric 5250 Numeric VT220...
-
Page 58: Chapter 4 Dolphin™ 7200 With Ibutton Reader Handheld Computer
Chapter 4 Dolphin™ 7200 with iButton Reader Handheld Computer Describes the iButton reader and how to use it. -
Page 59: About Dolphin With Ibutton Reader Handheld Computer
R E A D E R H A N D H E L D C O M P U T E R About Dolphin with iButton Reader Handheld Computer The Dolphin with iButton Reader handheld computer integrates the basic functionality of the Dolphin Batch terminal with iButton™... -
Page 60: Working With Ibuttons
R E A D E R H A N D H E L D C O M P U T E R Working with iButtons In order to communicate with an iButton, the Dolphin iButton reader must make proper contact with the iButton during the time frame of the communication session. Intermittent contact can result in slow data communication or the need for re- attempts. -
Page 61: Developing Applications With Dolphin With Ibutton Reader
EPROM devices Developing Applications with Dolphin with iButton Reader Hand Held Products has a Software Developer’s Kit (SDK) that includes the following: API for iButton functions that support the most commonly used iButton types and concern file handling and data manipulation of iButton specific features. May be used in conjunction with Dolphin Development System. -
Page 62: Chapter 5 Dolphin™ 7200 With Image-Capture Handheld Computer
Chapter 5 Dolphin™ 7200 with Image-Capture Handheld Computer... -
Page 63: About Dolphin 7200 With Image-Capture™ Handheld Computer
H A N D H E L D C O M P U T E R About Dolphin 7200 with Image-Capture™ Handheld Computer The Dolphin 7200 Image-Capture handheld computer incorporates a low-power, high-resolution camera to electronically capture and store images such as signatures, airbills, and damaged cartons. - Page 64 H A N D H E L D C O M P U T E R Press the ON/SCAN button to take an image. Use the live video image on the terminal screen as a guide for positioning and aiming the terminal at the target. You may find it helpful to start by moving the terminal further away and then in closer to the target.
-
Page 65: Lighting Conditions
H A N D H E L D C O M P U T E R Lighting Conditions Dolphin Image-Capture terminal is equipped with an internal lighting source to allow users to take images in dim light conditions. It is suggested that you turn on the unit’s electroluminescent backlight when taking images in extreme low light conditions to help with aiming. -
Page 66: Installing The Dolphin Image Capture Demo Software On The Host
H A N D H E L D C O M P U T E R 4. ICD client (ICD.EXE) This program runs on the Dolphin terminal and works in conjunction with the ICD server and ICD application. The ICD client allows you to take images, select the file type in which to save images read bar codes and transmit data to the host. -
Page 67: File Menu
H A N D H E L D C O M P U T E R HHP Dolphin Image Capture Server Note:: The image shown above was captured using the Dolphin Image-Capture handheld computer. This application is designed to work with the F2 – IMAGE CAPTURE option of the Dolphin Image-Capture client demonstration program. -
Page 68: Settings Menu
H A N D H E L D C O M P U T E R Print Select this option to print the current image. Exit Select this option to exit the program. Settings Menu The Communication option on the Settings menu allows you to configure the HomeBase for communications and select the COM port on your computer. - Page 69 H A N D H E L D C O M P U T E R Follow the directions in the dialog box and then click OK. The HomeBase configuration process will begin. When finished, click OK and the Communications Settings dialog box will close. About When you click the About option on the menu, the following box will appear to show the version number of your software.
- Page 70 H A N D H E L D C O M P U T E R Buttons View Images Select this button to open the Dolphin IC Saved Image Viewer program to view saved images. Save Image Select this button to save an image to the Saved Image Viewer. Print Select this button to print an image.
- Page 71 H A N D H E L D C O M P U T E R Dolphin Image Capture Viewer HHP Dolphin Image Capture Server and HHP Dolphin Image Capture Viewer When you select the View Images button, the Image Capture Viewer program opens. The program allows you to view images saved in the HHP Dolphin Image Capture Server Application.
-
Page 72: Delete All
H A N D H E L D C O M P U T E R Dolphin Image Capture Application HHP Dolphin Image-Capture Application The HHP Dolphin Image-Capture Application Demonstration works with the F4 - Package Deliver option of the Dolphin client software. After files have been downloaded from the terminal via HomeBase, the application window displays the tracking numbers scanned and images taken during the demo. -
Page 73: Dolphin Image-Capture Client Demonstration Software
H A N D H E L D C O M P U T E R Print Select this option to print the image shown in the program window. Exit Select this option to exit the program. Dolphin Image-Capture Client Demonstration Software The Dolphin Image-Capture terminal is shipped loaded with client demonstration software. -
Page 74: Main Menu
H A N D H E L D C O M P U T E R Main Menu Image Capture Demo Program Main Menu F1 AIMING DEMO This demo allows the user to practice aiming only, with the Dolphin with Image-Capture terminal. - Page 75 H A N D H E L D C O M P U T E R F2 Image Capture Demo Menu F1 BW /Crop Select this option to take images that are cropped and contain only black and white information. The image acquired is basically what you see on the terminal screen. Using this option yields images with the smallest file sizes.
- Page 76 H A N D H E L D C O M P U T E R Capturing Images After you have selected the compression and cropping option and opened the Dolphin Image Capture server program on your PC, follow these screen prompts to capture an image.
- Page 77 H A N D H E L D C O M P U T E R 4. The file transfer status screen will appear on the Dolphin terminal after you place it in the HomeBase. File Transfer Status Screen 5. After the transfer is complete, Dolphin Image-Capture terminal is ready to take another image.
- Page 78 H A N D H E L D C O M P U T E R F3 SCAN LABELS Press ON/SCAN Button to scan label. This option only demonstrates how the terminal scans bar codes. F4 PACKAGE DELIVER This menu option opens a package delivery demonstration application. The demonstration shows how the Dolphin IC computer’s image capture and barcode scanning functions are well-suited for delivery confirmation applications.
- Page 79 H A N D H E L D C O M P U T E R Press ENTER and the terminal will beep to indicate that you have successfully entered the tracking number. 2. The screen shown below will appear. Press and hold the ON/SCAN key to take an image or signature.
- Page 80 H A N D H E L D C O M P U T E R 4. When the image is saved, the terminal beeps and returns to the Package Deliver demo screen shown below and is ready for the next tracking number. F4 Package Delivery Demonstration Menu 5.
-
Page 81: Chapter 6 Dolphin 7200 2D Terminal
Chapter 6 Dolphin 7200 2D Terminal 222567-22... -
Page 82: About The Dolphin 7200 2D Hand Held Computer
About the Dolphin 7200 2D Hand Held Computer The Dolphin™ 7200 2D handheld computer features the IMAGETEAM ™ 4250 Image Engine, a low power, high-resolution digital image engine for omni-directional and auto-discrimination reading and decoding of linear barcodes, stacked linear (PDF417) and 2D matrix codes. -
Page 83: Reading Barcodes
Reading Barcodes The omni-directional scanning capabilities of the Dolphin 7200 2D terminal greatly simplify operation and training and increase productivity. To read a bar code: Press the ON/SCAN button to project the scanner’s bright red aiming beam Center the aiming beam over the barcode. The red SCAN LED illuminates when the user presses the ON/KEY key and the green DECODE LED illuminates when a bar code is successfully decoded. -
Page 84: Capturing Images
Capturing Images The image-capture process is a split-second operation for experienced users. By following the basic guidelines, new users can easily develop their own technique and, with practice, quickly learn to adapt it to different circumstances. The basic steps for acquiring images using the Dolphin 7200 2D terminal are: To aim, hold the Dolphin terminal horizontally at a 45°... -
Page 85: Dolphin 7200 2D Demo Software
Dolphin 7200 2D Demo Software The Dolphin 7200 2D terminal demonstration software program allows you to show how the terminal omni-directionally decodes all popular linear and 2D barcodes and OCR as well as its image capture capabilities. The software consists of two components – one that runs on the host computer and one that runs on the Dolphin terminal. - Page 86 Main Menu Dolphin 2D Imaging Demo Program Main Menu F1 AIMING DEMO This demo allows the user to practice aiming only, with the Dolphin 7200 2D terminal. Press F1 and follow the directions on the screen. This option does not store images on the terminal’s disk.
- Page 87 F2 Image Capture Demo Menu F1 BW /Crop Select this option to take images that are cropped and contain only black and white information. The image acquired is basically what you see on the terminal screen. Using this option yields images with the smallest file sizes. The pixel size of the image when cropped is 242 x 150 pixels.
- Page 88 Press the ON/SCAN key, aim and release it to take an image. After you scan the image, the terminal will beep, and the image taken will appear on the screen. If the image is acceptable, press the ENTER key to save the image and proceed to the next step.
- Page 89 The file transfer status screen will appear on the Dolphin 7200 2D terminal after you place it in the HomeBase. File Transfer Status Screen 5. After the transfer is complete, the Dolphin 7200 2D terminal is ready to take another image. Note: Be sure that the Dolphin Image Capture Server program is running on your PC before taking any images.
- Page 90 F4 PACKAGE DELIVERY This menu option opens a package delivery demonstration application. The demonstration shows how the Dolphin 7200 2D computer’s image capture and barcode scanning functions are well-suited for delivery confirmation applications. These dual functions link the signature with the barcode information for real proof of delivery.
- Page 91 C H A P T E R D O L P H I N 7 2 0 0 H A N D H E L D C O M P U T E R Scan Screen 3. After you have saved the image, the following screen will appear on the Dolphin display: Saving Image Screen...
- Page 92 4. When the image is saved, the terminal beeps and returns to the Package Deliver demo screen shown below and is ready for the next tracking number. F4 Package Delivery Demonstration Menu 5. When you are ready to transfer the captured signature and bar code information to your PC via the Host Download Software Program, press F1 and place the Dolphin 7200 2D terminal into the HomeBase.
-
Page 93: Chapter 7 Using The Dolphin 7200 Homebase
Chapter 7 Using the Dolphin 7200 HomeBase Summarizes the features of the Dolphin 7200 HomeBase and explains how to use it. -
Page 94: Hub Of The System
Hub of the System As the hub of your Dolphin system, the Dolphin 7200 HomeBase performs three important functions – battery management, communications and storage. Battery Management The Dolphin 7200 HomeBase uses a charging method that senses when the battery pack is fully charged and then drops to a trickle charge to keep the battery pack at full capacity. -
Page 95: Dolphin 7200 Homebase Parts And Functions
C H A P T E R Dolphin 7200 HomeBase Parts and Functions Dolphin Terminal Well Charging Main Batt LED Multi Serial Port N O T E The Charging Main Batt LED does not indicate the battery status of the Dolphin terminal. -
Page 96: Back Panel
C H A P T E R Charging Aux Batt LED Blinking red LED Blinking orange LED Solid green LED Back Panel N O T E The configuration Configuration switches are checked at Switches power up. Changes in There is an auxiliary battery well, two configuration switches, a discharge button, and a the switch settings will power supply connector: not be recognized until... -
Page 97: Side Panels
Use these switches to select the network and communications Configuration switches modes for your Dolphin. See Chapter 8 for more on the configuration switch settings. Service Aux Batt switch Press and hold this button for four seconds to service the battery in the auxiliary battery well. -
Page 98: Charging Batteries In The Dolphin 7200 Homebase
C H A P T E R Charging Batteries In The Dolphin 7200 HomeBase CAUTION: Use only the 3.6V battery packs provided by Hand Held Products. The use of any other battery pack in the Dolphin Terminal will void your warranty and may result in damage to the Dolphin Terminal or battery. -
Page 99: Charging An Additional Nimh Battery Pack
Deep-cycling the Battery For maximum battery life, Hand Held Products recommends that you deep- cycle (service) the battery twice before initial use and then, once a month thereafter. To deep-cycle, insert the battery into the HomeBase auxiliary battery well. Then, push and hold the Service Aux Batt button for at least 4 seconds. -
Page 100: Setting Up For Communications
Dolphin Terminal. The HomeBase RS-232 interface allows the Dolphin Terminal to communicate to a personal computer, modem, or any standard RS-232 device using a standard serial cable and communications software. Follow these steps to set up the Dolphin HomeBase and Dolphin Terminal for communications: Set up the Dolphin HomeBase. -
Page 101: Setting The Configuration Switches
Dolphin HomeBase 12 Volt DC power supply connector. The AC wall transformer provided can power only one Dolphin HomeBase. Hand Held Products recommends that you leave the Dolphin HomeBase connected to its power source at all times, so that it is always ready to use. -
Page 102: Setting The Baud Rate
Setting the Baud Rate You may use the HomeBase Configuration utility program to select the baud rate. The program can also be used to change the host system’s COM port and will run a diagnostic check for optimal communications. After changing the baud rate, you must power the HomeBase off and then on again. -
Page 103: Configuring A Single Dolphin 7200 Homebase
C H A P T E R Configuring a Single Dolphin 7200 HomeBase N O T E To prepare a single Dolphin HomeBase for communications, you must enter the The configuration Command Mode to configure the version number and select the baud rate. switches are checked at power up. -
Page 104: Creating A Dolphin 7200 Homebase Network
C H A P T E R U S I N G T H E ASCII Value Selected of “n” Baud Rate Figure 18 Baud Rate per Value of n Creating a Dolphin 7200 HomeBase Network This information applies only to the Dolphin 7200 HomeBase. The Dolphin 7200 Compact HomeBase is not networkable. - Page 105 C H A P T E R N O T E The configuration switches are checked at power up. Changes in the switch settings will not be recognized until power is turned off and back on. Programmer’s Note: When sending ID numbers to the Dolphin HomeBase, remember that numbers typed on the keyboard are ASCII numbers which will be converted to Hex when sent to the Dolphin HomeBase.
- Page 106 C H A P T E R Switch When Switch 2 is in the ‘PROGRAM’ position, the baud rate can be changed using the following procedure or by using the HomeBase Configuration Utility. Enter or send the escape and command strings: <ESC>HHPBn n is the ASCII number corresponding to the baud rate shown in the table below.
- Page 107 When data transfer begins, the COMM LED on the Dolphin HomeBase will blink red and green. A unit remains selected until another unit in the network is selected. For example, the string <ESC>HHPS3 would select the unit with ID number 3 for communications.
-
Page 108: Communicating With The Dolphin Terminal
C H A P T E R U S I N G T H E Communicating with the Dolphin Terminal To communicate with the Dolphin and any other devices connected to the HomeBase: Insert the Dolphin into the terminal well of the HomeBase. If the Dolphin is in sleep mode, it will awaken into active state. -
Page 109: Chapter 8 Using The Dolphin 7200 Compact Homebase
Chapter 8 Using the Dolphin 7200 Compact HomeBase Summarizes the features of the Dolphin 7200 Compact HomeBase and explains how to use it. -
Page 110: Hub Of The System
Hub of the System As the hub of your Dolphin system, the Dolphin 7200 Compact HomeBase performs three important functions – battery management, communications and storage. Battery Management The Dolphin 7200 Compact HomeBase uses a charging method that senses when the battery pack is fully charged and then drops to a trickle charge to keep the battery pack at full capacity. -
Page 111: Dolphin 7200 Compact Homebase Parts And Functions
Dolphin 7200 Compact HomeBase Parts and Functions Front Panel DOCK The Compact HomeBase’s front panel has one slot: You put the Dolphin in this well to communicate with a host Dolphin Terminal Well device and to charge the Dolphin’s batteries. LEDs There are two LEDs on the front panel of the HomeBase DOCK LED... -
Page 112: Bottom Panel
C H A P T E R Back Panel Power Supply Connector There is a power supply connector and an RS232 connector: Power supply connector HomeBase. The power supply provides 12V DC input for communications and battery charging. RS-232 Communications Port RS-232 device. -
Page 113: Powering The Dolphin Terminal
Baud Rate Switch 1 115200 57600 19200 9600 38400 4800 2400 Note: The HomeBase Configuration program cannot be used to select the baud rate on the Compact HomeBase. Powering the Dolphin Terminal When seated in the HomeBase, the Dolphin terminal receives the power it needs to charge the battery and to run its internal circuitry. -
Page 114: Deep-Cycling Batteries
Figure 19 Inserting the Dolphin terminal into the HomeBase Deep-Cycling Batteries For maximum battery life, Hand Held Products recommends that you deep- cycle (service) the battery twice before initial use and then, once a month thereafter. Since the Dolphin 7200 Compact HomeBase recommended that you use the Dolphin 7200 Multicharger or the Dolphin 7200 HomeBase. -
Page 115: Mounting The Dolphin 7200 Compact Homebase
Mounting the Dolphin 7200 Compact HomeBase The Dolphin 7200 Compact HomeBase may be desk or wall-mounted for convenience and storage. Desk Mounting: The Compact HomeBase has a DIN rail (7.5 X 35 mm) slot on the bottom to allow for secure desk attachment of the unit if desired (see figure 21). Wall Mounting: The Compact HomeBase also has two DIN rail (7.5 X 35mm) slots on the back to allow for secure wall mounting of the unit if desired (see figure 22). - Page 116 When using right-angle style RS232 connector cable, the DIN rails may be mounted directly to the wall. When using standard RS232 connector cables, it is recommended that the rails be mounted to the wall using a 25mm (1 in.) spacer to allow for appropriate strain relief of the cables (see figure 23).
-
Page 117: Setting Up For Communications
Terminal. The HomeBase RS-232 interface allows the Dolphin terminal to communicate to a personal computer, modem, or any standard RS-232 device using a standard serial cable and communications software. Follow these steps to set up the Dolphin HomeBase and Dolphin Terminal for communications: Set up the Dolphin Compact HomeBase. - Page 118 Dolphin HomeBase 12 Volt DC power supply connector. The AC wall transformer provided can power only one Dolphin Compact HomeBase. Hand Held Products recommends that you leave the Dolphin Compact HomeBase connected to its power source at all times, so that it is always ready to use.
-
Page 119: Communicating With The Dolphin Terminal
C H A P T E R U S I N G T H E Communicating with the Dolphin Terminal To communicate with the Dolphin and any other devices connected to the Compact HomeBase: Insert the Dolphin into the terminal well of the HomeBase. If the Dolphin is in sleep mode, it will awaken into active state. -
Page 120: Chapter 9 Learning About The Dolphin Os And Development System Software
Chapter 9 Learning About the Dolphin OS and Development System Software Explains how to use and manage the software accompanying the Dolphin 7200 terminal. -
Page 121: Dolphin Os And Development System
Dolphin OS and Development System Important Notice : Before installing the Dolphin OS and Development System it is important that you remove all previous installations. To remove the previous installations, delete the c:\dolphin directory and all files contained within. You should also delete the Dolphin Group or Folder. Only install the most recent release of the Dolphin ROM IMAGE and Boot Loader, loading an old version of the ROM IMAGE or Boot loader can result in Dolphin becoming unstable or inoperable, and requiring the unit to be returned to HHP for repair. - Page 122 Directory c:\dolphin\ C:\dolphin\bootldr c:\dolphin\devtools C:\dolphin\wizard c:\dolphin\hhpdemo c:\dolphin\romimage c:\dolphin\utils c:\dolphin\devtools\samples\rfdemo\ server c:\dolphin\devtools\samples\rfdemo\ client Note: All future references to directories assume that the user has accepted the installation default directory. The default installation directory is “c:\dolphin”. Figure 21 Directories Created by Dolphin OS & Development System Set-up Program Contents Default installation directory, containing HHP Help and Read Me...
-
Page 123: Help File, Document And Utility Icons
Help File, Document and Utility Icons The Dolphin OS and Development System set up program will set up a Dolphin group or folder and install the following Help, Document and Utility icons. The Read Me First Icon provides important information not available at the time the manual was printed. -
Page 124: Dolphin Hhp Demo Program
Press any key and the following prompt should appear on the display: Note: If the screen illustrated above does not appear on your Dolphin terminal, the HHP Demo Application has been removed from your terminal. Hand Held Products F1 - Scan F2 - Help... - Page 125 HHP Scan Demo Screen F 2 – H e l p M e n u Press F2 to access the Help Menu. The Help Menu contains information about the Dolphin terminal, Specifications and contacting Hand Held Products. Dolphin Help Menu General Battery Maint.
- Page 126 F 3 – H H P D E M O Press F3 to load the HHP Inventory Control sample program. This application uses a lookup table to validate item numbers and display part descriptions. The data entered is written to a file, and can be transferred via Xmodem to a computer. F1 - Enter Data F2 - Transfer Data F3 - Receive Lookup...
- Page 127 F4- Scan Set-up F 4 – U t i l i t y M e n u Press F4 to load the Utility Menu. The Utilities Menu has four options as described below: F1 –COM Menu F1 to Send File from the Dolphin terminal to a host system (PC) via the Press Ymodem protocol at 57600 baud rate.
-
Page 128: Scanning A Barcode
Scanning A Barcode The Dolphin Terminal comes with demonstration software that allows you to scan barcodes immediately. A sample barcode is illustrated below for you to use for practice. Hold the Dolphin terminal approximately 2 inches away from the sample barcode. Press the ON/SCAN key to begin scanning. -
Page 129: Dolphin Utilities
C H A P T E R Dolphin Utilities A number of utilities are provided with your Dolphin terminal. The Utility programs are installed in the c:\dolphin\utils directory on your computer. N O T E BMP2LCD.EXE See the BMP2LCD.EXE is a Windows tool that allows developers to create a bitmap data Development API structure from a standard Windows™... - Page 130 DCOMM.EXE DCOMM.EXE is a Windows communication utility. It supports drag-and-drop file transfer using both Ymodem and Xmodem. Usage : dcomm [/c#] [/b#] [/y] [/x] [filename1…n] Where: Specifies COM port, where #=1-4 Specifies Baud Rate, where #=9600, 19200, 38400 or 57600 Specifies Xmodem protocol Specifies Ymodem protocol Automatic mode, waits and receives all files that are sent...
- Page 131 • Upgrade the terminal Boot Loader • Upgrade the terminal ROM Image (BIOS, A Drive Image) • Reinstall/Upgrade the HHP Demo HBCFG.EXE HBCFG.EXE is a Windows utility that allows the user to change the baud rate setting for the Dolphin HomeBase. HBCFG.EXE supports the following command line arguments: Usage: hbcfg [/c#] [/I] [/b#]...
- Page 132 Note : Dip Switch 2 located on the back of the HomeBase must be set in the Up (PROGRAM) position for the baud rate to be programmed. The HomeBase power must be cycled (turned off and on) for the new dip switch settings to be recognized.
- Page 133 C H A P T E R YX.EXE YX.EXE is a DOS command line Ymodem communication tool for the Dolphin terminal or a PC. YX.EXE supports the following options: Usage: N O T E When using YX on the Where: Dolphin 7200 terminal, only COM1 is available...
-
Page 134: Dolphin Application Development
C H A P T E R D O L P H I N The following Utilities are included in the Dolphin ROM image and are automatically loaded when the terminal boots. They are NOT included on the Dolphin OS and Development System Disk. -
Page 135: Sample Applications
C H A P T E R D O L P H I N Sample Applications A number of sample programs with source code have been provided with your Dolphin terminal. The sample programs are installed in the c:\dolphin\devtools\samples directory on your desktop computer. Application Description GRAPH... -
Page 136: Compiling The Sample Programs
Compiling the Sample Programs Note: See the Development API Help file (DAPI.HLP) for complete information regarding the Dolphin Development Libraries, Samples and Compiling instructions. Microsoft In order for an application to use Dolphin’s unique features, you must add a Dolphin library to the application’s project. -
Page 137: Transferring Files To Or From Dolphin
C H A P T E R Transferring Files to or from Dolphin Transferring files between your Dolphin terminal and a desktop PC is easy with the YX.EXE utility or the Dolphin File Transfer program. Using the YX.EXE Utility The YX.EXE utility, installed in the directory c:\dolphin\utils, performs file transfers using Ymodem batch protocol. -
Page 138: Sending A File To The Dolphin
C H A P T E R Sending a File to the Dolphin Open the Dolphin File Transfer Program Configuration dialog box. Check to make sure the baud rate is set at 57600. This is the default for YX.EXE. Close N O T E the Configuration dialog box and exit the Dolphin File Transfer program. -
Page 139: Using The Dolphin File Transfer Program And Yx In Menu Mode
C H A P T E R • To send at 38400 baud rate, enter <YF> at the DOS prompt instead of <YX>. • To send at 57600 baud rate, enter <YFF> at the DOS prompt. Using the Dolphin File Transfer Program and YX in Menu Mode You can also use YX in menu mode to send and receive files from the Dolphin to your PC and vice versa with the Dolphin File Transfer program and YX.EXE on the Sending Files to the Dolphin... -
Page 140: Dolphin Evs Engine
Sending Files From the Dolphin To Your PC Double-click on the Dolphin File Transfer shortcut to open the program. Open the Configuration dialog box. Check to make sure the baud rate is set at 57600. Enter <YX /M> at the Dolphin terminal’s DOS prompt. Press <ENTER>... - Page 141 C H A P T E R D O L P H I N A N D D E V E L O P M E N T S Y S T E M...
-
Page 142: Dolphin Rom Image And Boot Loader
Dolphin ROM Image and Boot Loader Upgrading the Dolphin ROM Image Important Notice: Before installing the Dolphin OS and Development System, you must remove all previous installations. To do this, delete the C:\DOLPHIN directory and all files contained within as well as the Dolphin Group or Folder. Only install the most recent release of the Dolphin ROM IMAGE and Boot Loader. -
Page 143: Upgrading The Dolphin Boot Loader
C H A P T E R Upgrading the Dolphin Boot Loader Note: We recommend that you use the Dolphin Upgrade WIZARD to update the Dolphin Boot Loader, ROM image and Demo application. Simply run DWIZARD and follow the instructions provided. -
Page 144: Chapter 10 Troubleshooting And Warranty Information Dolphin 7200 Terminal
Chapter 10 Troubleshooting and Warranty Information Dolphin 7200 Terminal Describes troubleshooting tips, solutions for problems you may encounter with the Dolphin 7200 terminal or HomeBase and warranty information. -
Page 145: Just In Case
If you have problems with either the Dolphin terminal or HomeBase, review the list of symptoms and solutions included in this chapter. If the problem isn’t listed in this chapter, contact your Reseller or Hand Held Products’ Technical Support Department for assistance. - Page 146 I N F O R M A T I O N F O R D O L P H I N If You Have This Try This: Problem/Symptom The Dolphin terminal The bar code may be out of spec. Try reading some of the bar code will not scan a bar code.
- Page 147 I N F O R M A T I O N F O R D O L P H I N If You Have This Try This: Problem/Symptom The ‘CHARGING The NiMH battery pack may need to be replaced. Insert a new AUXBATT’...
- Page 148 I N F O R M A T I O N F O R D O L P H I N Troubleshooting with Dolphin 7200 with Image-Capture If You Have This Try This: Problem/Symptom Image not readable or Move to an area with more light to take image. too dark Black &...
- Page 149 I N F O R M A T I O N F O R D O L P H I N If You Have This Try This: Problem/Symptom Image not readable, cut You are holding terminal too close to subject. Hold the terminal at a 90 degree angle and move it further away from the subject.
- Page 150 I N F O R M A T I O N F O R D O L P H I N If You Have This Try This: Problem/Symptom Image not readable; too You are holding the terminal too far away from the subject. Hold small.
-
Page 151: Resetting The Dolphin Terminal
I N F O R M A T I O N F O R D O L P H I N Resetting The Dolphin Terminal Under normal circumstances, you should not need to reset the Dolphin terminal. However, if required, you can reset the terminal with one of the following methods: Perform the “Three Key Reset.”... -
Page 152: Warranty Information
Warranty Information Who Is Covered By The Warranty The Dolphin 7200 terminals and HomeBases offered by Hand Held Products, Inc. (HHP) are covered –by at least a one-year limited warranty. (See table below for the configuration of Dolphin 7200 you have purchased) Hand Held Products, Inc. extends this warranty only to the first end-user of the product. -
Page 153: What's Not Covered By The Warranty
Return Information the Pacific Rim. If you purchased the product from an Authorized Hand Held Products Reseller, contact the Reseller with the unit’s serial number. Your Reseller will contact Hand Held, on your behalf, to arrange for the unit to be serviced. - Page 154 For your protection, we recommend you insure any equipment being sent to HHP. 7 2 0 0 T E R M I N A L Hand Held Products Product Service Department Charlotte, NC 28227-9411 Hondsruglaan 87D...
-
Page 155: How To Extend Your Warranty
F O R D O L P H I N After repair or replacement of the equipment, Hand Held Products will ship the product, at our cost, to your location. Non-warranty repairs will be returned, at the customer’s expense, unless otherwise requested. Units currently under a service agreement will be shipped per the service agreement. -
Page 168: Appendix B Bar Code Samples
Appendix B Bar Code Samples With the HHP Demo program, the Dolphin terminal is programmed to read these codes. Practice scanning each of the bar codes, and notice the LCD window after you scan each code. Code 39 (Code 3 of 9) EAN (UPC variation) Interleave 2 of 5 (I2of5) -
Page 169: Appendix C Gs-Dos Commands
Appendix C GS-DOS Commands The Dolphin terminal ships with General Software DOS (GS-DOS). GS-DOS is compatible with Microsoft DOS (MS-DOS) and is optimized to run in a very small amount of memory. The following is a list of internal commands supported by GS-DOS: HELP BREAK CD (CHDIR) - Page 170 HELP The HELP command displays a list of the commands that are supported by the command interpreter. HELP Syntax: BREAK The BREAK command changes or displays how GS DOS handles break-ins by the user with ^C and CTL-BRK key sequences. If BREAK is ON, then GS DOS will break out of a running program or batch file when the ^C or CTL-BRK keys are pressed.
- Page 171 CTTY The CTTY command changes the default console device CTTY device Syntax: Note: This command is not supported the Dolphin Terminal. DATE The DATE command displays the current date (month, day, date, and year) on the screen. If a user specifies a new date on the command line, then DATE will change the date to the one specified.
- Page 172 ECHO The ECHO command has two functions; namely, control of the ECHO flag, and displaying messages in batch files. ECHO mode controls the command processor's echoing of commands in batch files. If ECHO mode is on, then commands read from batch files are automatically echoed to the screen before they are executed.
- Page 173 MD (MKDIR) The MD command creates a subdirectory in the root directory or a subdirectory. By using the MKDIR command, a tree-structured file systems can be created. If a drive is specified, then the directory is created on the specified drive. Otherwise, it is created on the default drive.
- Page 174 RD (RMDIR) The RD command removes a subdirectory from a root directory or of a subdirectory. This command can only be used to delete directories, and cannot be used to delete files, even if they are inside the directory to be removed. Conversely, the DEL command cannot delete directories;...
- Page 175 The SET command displays the entire environment space (one variable per line), or changes the assignment of one variable in the environment space. If no operands are specified, then the SET command simply displays all of the environment variables in the environment space.
- Page 176 SYNC The SYNC command provides a synchronization checkpoint feature that enables a batch file to flush the file system's buffers to disk before doing something that might otherwise cause a disorderly shutdown SYNC Syntax: TIME The TIME command displays or changes the system time. If no parameter is specified, then the current system time is displayed, and the user is queried for the new system time.
- Page 177 The VERIFY command changes or displays how GS DOS handles I/O to disk files and directory structures. If VERIFY is ON, then Embedded DOS-ROM verifies immediately that disk I/O is completed successfully before telling the user that it was. This is accomplished by writing data directly to disk, without temporarily storing it in a file system or disk driver cache.
-
Page 178: Appendix D Declarations Of Conformity
:Generic Immunity for Res./Comm./Lt. Industrial :Electrostatic Discharge Immunity :Radiated EMI Field Immunity (IEC 801-3) :Fast Transient / Burst Immunity Signature On File J.H. Cottrell Jr., Managing Director, Hand Held Products Europe _________________ Place : _________________ Hondsruglaan 87d The Netherlands EN 55022... -
Page 179: Declaration Of Conformity
(Notified Body number) The technical documentation relevant to the above equipment can be made available for inspection on application to: Hand Held Products UK Ltd, Dallam Court, Dallam Lane, Warrington Cheshire, WA2 7LT, UK (name and address of EU representative) -
Page 180: Test Report
: Hungary : 1705-2/99 : Greece : Ireland : Spain : France Signature on file J.H. Cottrell Jr., Managing Director, Hand Held Products, Europe Date : October 27 , 1998 Place: North Carolina, USA Page 2 of 2 Revision C 98302120...
Need help?
Do you have a question about the 7200/UG and is the answer not in the manual?
Questions and answers