Table of Contents
Advertisement
Quick Links
Advertisement
Table of Contents

Related Manuals for Hand Held Products 7400/7450


Summary of Contents for Hand Held Products 7400/7450
- Page 1 Dolphin® 7400/7450 Hand Held Computer ™ User’s Guide...
- Page 2 Disclaimer Hand Held Products, Inc. d/b/a HHP (“HHP”) reserves the right to make changes in specifications and other information con- tained in this document without prior notice, and the reader should in all cases consult HHP to determine whether any such changes have been made.
- Page 3 ../graphics/7400_Mouse Pointer.tif @ 72 dpi 7 ../graphics/7400_rearview_with_phonejack.jpg @ 300 dpi 8 ../graphics/7450_bottom.tif @ 150 dpi 7 ../graphics/7450_rubber_bumpers.tif @ 150 dpi 8 ../graphics/80211b_7400_safety label.tif @ 300 dpi 3 ../graphics/Aironet Client Utility_NEW.jpg @ 300 dpi 3 ../graphics/barcodes.jpg @ 300 dpi 2 ../graphics/CE168_Spectrum.jpg @ 300 dpi 5 ../graphics/CE336 Cisco.jpg @ 300 dpi 6 ../graphics/convertfromCPTtoJPEG/Copy of 7400_CommunicationProperties.tif @ 150 dpi 10, 6 ../graphics/convertfromCPTtoJPEG/Copy of 7400_CommunicationPropertiesChangeConnection.tif @...
- Page 4 ../graphics/Scan Maps - 7400/74007450LRLIN_MAP.jpg @ 300 dpi 3 ../graphics/Scan Maps - 7400/74007450LRPDF_MAP.jpg @ 300 dpi 3 ../graphics/Scan Maps - 7400/7400ALRlinear.jpg @ 300 dpi 2 ../graphics/Scan Maps - 7400/7400HDlinear.jpg @ 300 dpi 1 ../graphics/Scan Maps - 7400/7400HDPDF417Matrix.jpg @ 300 dpi 1 ../graphics/Scan Maps - 7400/7400LXlinear.jpg @ 300 dpi 2 ../graphics/Scan Maps - 7400/7400LXPDF417Matrix.jpg @ 300 dpi 2 ../graphics/Spectrum24 Easy Setup.jpg @ 300 dpi 4...
-
Page 5: Table Of Contents
If Your Dolphin 7400/7450 has a radio ...1-3 FCC Compliance...1-4 Regulatory and Safety Agency Approvals...1-5 Dolphin 7400/7450 RF Spectrum24® 3021 R&TTE Compliance Statement...1-5 Dolphin 7400/7450 RF Cisco® 352 R&TTE Compliance Statement ...1-6 Batteries ...1-6 Care and Cleaning of the Dolphin ...1-7 Chapter 2 - Getting Started Accessories for the Dolphin 7400/7450 ...2-1... - Page 6 Using the Power Control Panel ...3-10 Servicing the Battery Pack ...3-11 Charging the Battery Pack ...3-12 Storing Batteries...3-12 Chapter 4 - Using the Dolphin 7400/7450 Entering Data ...4-1 Via the Touch screen Input ...4-1 Via the Keyboard ...4-1 Using the Image Reader ...4-1 Communication ...4-3...
- Page 7 Configuring The Dolphin 7400/7450 RF Terminal...5-2 Client Utilities for the Cisco Configuring the Cisco Configuring the Symbol Host Connectivity ...5-5 Chapter 6 - Dolphin Charging/Communication Cradles Hub of the System ...6-1 Power Conditioning ...6-1 Convenient Storage ...6-1 Dolphin Charging/Communication Cradle Parts & Functions...6-2 HomeBase/IntelliBase/USB HomeBase ...6-2...
- Page 8 Setting Up For Communications with the Mobile IntelliBase/Mobile Base...8-7 Installing The Dolphin Mobile IntelliBase ...8-7 Installing The Dolphin Mobile Base ...8-8 Configuring the Dolphin Terminal ...8-10 Chapter 9 - Developing Applications Chapter 10 - Warranty, Support and Service Limited Warranty ...10-1 How Problems Should Be Handled ...10-1 Return Information ...10-1 How To Extend Your Warranty ...10-3...
-
Page 9: Chapter 1 - Introduction
Introduction Congratulations on the purchase of your new Dolphin® 7400/7450 hand held computer. You have made a wise choice in selecting the Dolphin, a device known worldwide for its ergonomic shape, light weight and single-handed data collection features. The patented shape of the Dolphin 7400 allows true, one-handed operation and fits either hand comfortably, while the Dolphin 7450’s integrated pistol-grip handle provides comfortable ergonomics and intuitive point-and-shoot scanning for extended... -
Page 10: Safety
Required Safety Labels Batch Terminals The following is the required safety label that appears on the back panel of Dolphin 7400/7450 batch terminals equipped with an imager: The following is the required laser safety label that appears on the back panel of Dolphin 7400/7450 batch terminals equipped... -
Page 11: If Your Dolphin 7400/7450 Has A Radio
(ANSI) and has been recommended for adoption by the Federal Communications Commission (FCC). The following is the the required safety label that appears on the back panel of the Dolphin 7400/7450 RF terminals equipped with a Cisco® 352 radio and an imager: The following is the the required safety label that appears on the back panel of the Dolphin 7400/7450 RF terminals equipped with a Spectrum24®... -
Page 12: Fcc Compliance
FCC Compliance Dolphin 7400/7450 Batch Terminal The Dolphin 7400/7450 Batch complies with part 15 of the FCC rules. Operation is subject to the following two conditions: 1. Devices may not cause harmful interference. 2. Devices must accept any interference received, including interference that may cause undesired operation. -
Page 13: Regulatory And Safety Agency Approvals
336/EEC Electromagnetic Compatibility Directive and the 73/23/EEC Low Voltage Directive. Dolphin 7400/7450 RF Spectrum24® 3021 R&TTE Compliance Statement The Hand Held Products Dolphin 7400RF and Dolphin 7450RF are in conformity with all essential requirements of the R&TTE Directive (1999/5/EC). This equipment has been assessed to the following standards: Parameter R&TTE... -
Page 14: Dolphin 7400/7450 Rf Cisco® 352 R&Tte Compliance Statement
Dolphin 7400/7450 RF Cisco® 352 R&TTE Compliance Statement The Hand Held Products Dolphin 7400RF and Dolphin 7450RF are in conformity with all essential requirements of the R&TTE Directive (1999/5/EC). This equipment has been assessed to the following standards: Parameter R&TTE This product is marked with Directive, 1999/5/EC. -
Page 15: Care And Cleaning Of The Dolphin
• Excessive discharge damages a battery. Recharge the battery when your Dolphin indicates low battery power. • Although your battery can be recharged many times, it will eventually be depleted. Replace it after the recommended usage period (about 600 charge cycles for the 2700 mAh NiMH battery) or if the battery is unable to hold an adequate charge. •... - Page 16 1 - 8...
-
Page 17: Chapter 2 - Getting Started
The terminal is equipped with a StrongARM™ 206MHz RISC processor built to run the Windows® CE™ operating system. Dolphin 7400/7450 hand helds are available with different types of 2D imagers, wireless radios, and memory configurations to meet most any automated data collection requirement. Dolphin 7400 hand held computers may also be equipped with a low power, high speed, V.90 56K FAX/modem to allow communications via an... -
Page 18: Image Engine Options And Bar Code Symbologies Supported
Laser Engine Options and Symbologies Supported Dolphin 7400/7450 terminals may be equipped with an Advanced Long Range (ALR) laser engine. The ALR engine reads 30mil bar codes from 2.75 to 8 ft (0.83 to 2.4 m) and 100mil reflective bar codes out to 30 ft (9.1 m), making it ideal for use in warehouse applications. -
Page 19: Charging The Main Battery And Backup Battery
The terminal’s NiMH battery is not conditioned at the factory and is shipped discharged of all power and inserted in the Dolphin terminal. Although the Dolphin 7400/7450 terminal is received with the battery inserted, it is NOT ready for charging and/or WARNING deep-cycling. -
Page 20: Turning The Dolphin On And Off
Turning the Dolphin On For the First Time Turning on the Dolphin 7400/7450 for the first time is a cold boot. Follow these steps to turn on your Dolphin 7400/7450 terminal. 1. Install the charged battery pack in the Dolphin. -
Page 21: Calibrating The Screen
Calibrating the Screen If your Dolphin 7400/7450 is equipped with a touch screen, you must calibrate the screen after a cold boot. Calibration can also be performed by opening the "Stylus" folder in the Control Panel directory and choosing the "Calibration" tab. Follow the directions on the screen to calibrate the screen and keep the following points in mind: •... -
Page 22: Setting The Date/Time
Setting the Date/Time Use the Windows® CE Date/Time function to set the correct date and time for your Dolphin 7400/7450 terminal. Use the Dolphin 7400/7450 mouse utility to navigate through the screens if your terminal does not have a touchscreen. For more information about the mouse utility, see Navigating the Keyboard in Chapter 4. -
Page 23: Setting Up Communications With Detectoid
Setting Up Communications with Detectoid™ The Detectoid™ Communication Utility makes it easier to set-up communications between your PC and Dolphin 7300, 7400 or 7450 terminal. The utility has two components: DetectoidPC™ for setting up ActiveSync® on the PC and DetectoidCE™ for setting communication parameters on the Dolphin terminal. -
Page 24: Using Detectoidpc™ And Detectoidce
Using DetectoidPC™ and DetectoidCE™ Use DetectoidPC to configure the ActiveSync® settings on your PC for communication with a Dolphin terminal. Detectoid PC sets the baud rate and configures the COM port for ActiveSync. Once the settings are configured, you can save them and your PC is always ready to connect with the Dolphin terminal. -
Page 25: Detectoidce
DetectoidCE After running DetectoidPC, start Detectoid CE on the Dolphin terminal selecting Start>Programs>HHP>DetectoidCE. DetectoidCE will attempt to find the connection with the PC. If successful, the discovered settings will be saved and the Communications Properties Launch window shown below will then display on your Dolphin. The default is “Start ActiveSync when the unit is docked or connected.”... -
Page 26: Configuring The Modem
Follow these steps to establish a connection for the first time after configuring the settings: 1. Select Launch ActiveSync in the DetectoidPC window. 2. Start ActiveSync on the Dolphin terminal. Once parameters are configured and saved, you do not need to run DetectoidPC again unless you need to change the ActiveSync settings or cold-boot the terminal. - Page 27 For information on using the modem, see Using the Modem in Chapter 4. 5 Verifying that Dolphin 7400/7450 is Working Properly After the main battery pack is charged and installed and you have calibrated the the screen and set the time and date, the Dolphin 7400 terminal is ready to use.
- Page 28 Resetting the Dolphin (Warm Boot) There are times when you may need to warm boot the Dolphin 7400/7450 terminal, such as after loading a software application that requires a warm boot after installing new software. To warm boot the Dolphin 7400 terminal: 1.
-
Page 29: Chapter 3 - Dolphin 7400/7450 Overview
The compact flash card socket is not user accessible, to preserve the terminal’s environmental rating. Radio Options Dolphin 7400/7450 terminals have one Type II PCMCIA card slot to allow for an interface with wireless network adapter cards. Radio cards currently certified include the Cisco® 342 (FCC #LDK102035) and Cisco® 352 (FCC #HD5-7400-352) series network cards as well as the Spectrum24®... -
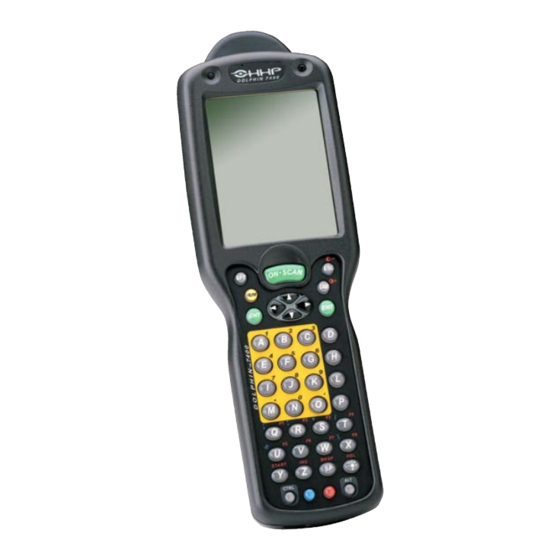
Page 30: Front Panel Features
Front Panel Features This section describes features on the Dolphin 7400/7450 terminal front panel. Decode LED Cursor Key Keypad with epoxy- coated keys 3 - 2 Scan LED 1/4 VGA Display (Optional Touchscreen) ON/SCAN Key... -
Page 31: Leds
Audio Signals The Dolphin 7400/7450 terminal has an internal speaker that sounds audio signals as you scan bar code labels and enter data. Signals are emitted at a sound level of 80 dB sound pressure level at two feet. The operating frequency range is 500 Hz up to 8 kHz. -
Page 32: Keyboard
Keyboard The Dolphin 7400/7450 terminal’s keyboard features epoxy-coated keys and is backlit for easy use in dark and dim lighting conditions. The keyboard’s yellow background enhances the readability of the numeric keys. The centrally located ON/SCAN key and other important keys allow for easy imaging, bar code scanning and application navigation. All keyboard versions are suited for right-handed and left-handed use. -
Page 33: Back Panel Features
Dolphin 7400/7450 by adding additional capabilities, such as digital image capture, signature capture and reading OCR characters. Digital images taken with the 7400/7450 terminal have a maximum image size of 640 x 480 pixels and may have up to a 256 gray scale image definition. Files formats supported for image storage include Bitmap (bmp), JPEG (jpg) and Portable Network Graphics (png). -
Page 34: Laser Engine
Laser Engine Dolphin 7400/7450 terminals are also available with an optional Advanced Long Range (ALR) laser scanner for long range scanning applications prevelant in warehousing and distribution centers. A clear window with anti-reflective, scratch-proof coating covers the image/laser engine to protect it from dust and dirt. -
Page 35: Dolphin 7450
Dolphin 7450 The bottom cover of the Dolphin 7450 terminal is similar to the Dolphin 7400 as described in the previous section with the following exceptions: the pistol-grip handle with imager/scanner trigger and the rubber bumpers. All versions of the 7450 terminal have similar bottom covers except for the safety labels specific to how the terminal is equipped. -
Page 36: Rubber Nose Bumpers
Micro-DB9 RS-232 Port The industry-standard RS-232 port allows the user to connect with peripherals, such as printers, serial modems and desktop computers for serial communication to the Dolphin 7400/7450 terminal. The maximum speed is 115kbps with seven baud rate settings. -
Page 37: Phone Jack (7400 Only)
CAUTION: Only connect the modem to an analog phone line. Connecting to a digital PBX phone line could result in damage to the modem. Power 5 VDC Port This port connects the Dolphin 7400/7450 to DC power for powering peripheral devices and charging the main and backup batteries. Power is fed through the RS-232 communications port. Batteries CAUTION: Use only the 3.6V battery packs provided by HHP. -
Page 38: Managing Battery Power
Managing Battery Power Data and files saved on the Dolphin 7400/7450 terminal may be stored in RAM, so it is important to maintain a continuous power supply to the terminal. When the main battery pack becomes low, the Low Battery Charge icon will appear in the notification tray at the bottom of the screen. -
Page 39: Servicing The Battery Pack
Using the Battery Conditioning Utility The Battery Conditioning Utility is used to condition or deep cycle a battery in the Dolphin 7400/7450 terminal. The discharge/ charge cycle minimizes battery memory effects and ensures the battery data is correct. A complete discharge/charge cycle may take up to 15 hours for a fully charged battery. -
Page 40: Charging The Battery Pack
Charging the Battery Pack You can charge the Dolphin’s main battery pack with one of the following methods: • Place the battery pack in the Dolphin 7400/7450 terminal and then place the terminal in the terminal well of a charging/ communication cradle. -
Page 41: Chapter 4 - Using The Dolphin 7400/7450
Via the Keyboard Data can be entered into the Dolphin 7400/7450 terminal via the keyboard. The Dolphin 7400 has three keyboard options: 43- key alpha/numeric, 35-key numeric/alpha, and 56-key full alpha/numeric. -
Page 42: Reading A Bar Code
Reading A Bar code 1. Press the ON/SCAN button on the 7400 or the Scan Trigger on the 7450 to project the scanner’s bright red or green aim- ing beam. The aiming beam should be oriented in line with the bar code to achieve the quickest read. A range of 4-10 inches (10-25 cm) is recommended. -
Page 43: Capturing Images
Dolphin 7400 and 7450 terminals. Via the IrDA Port The IrDA port allows the Dolphin 7400/7450 to send data via pulses of light to and from other IrDA-compliant devices, such as printers and PCs. Via the Radio The Dolphin 7400/7450 RF may be equipped with a 2.4 GHz 802.11b-compliant direct sequence or frequency hopping... -
Page 44: Software Communication Programs
Software Communication Programs Microsoft® ActiveSync® In the Dolphin 7400/7450 development environment, Microsoft® ActiveSync® is a tool for developers. It allows CE devices like the 7400/7450 to connect to and exchange data with a desktop computer. Short for Remote Access Services, a feature built into Windows NT® that enables users to log into an NT-based LAN using a modem, X.25 connection or WAN link. -
Page 45: Using The Cursor Keys
Using the Cursor Keys Use the cursor keys to navigate around on an application screen. The use of these keys can vary depending on the application. To Use This Cursor Key Arrow up Arrow down Arrow right Arrow left Cursor Keys Press Description Moves cursor up one row... -
Page 46: Using The Modifier Keys
Modifier Keys All three versions of the Dolphin 7400/7450 keyboard feature the standard PC keyboard modifier keys, Alt, Ctl and Shift. For single-handed operation, the Shift key only modifies the next key pressed; it must be pressed and released before each key you wish to modify. -
Page 47: Key Combinations
Appendix A for the key combinations used to access these functions and special characters on your terminal. Navigating the Keyboard The Dolphin 7400/7450 terminals have a mouse utility to simplify navigating around the screen, especially for non-touchscreen equipped terminals.* *Exit the mouse utility prior to adjusting the contrast. -
Page 48: Using The Modem
Using the Modem If your Dolphin 7400 is equipped with the optional integrated modem, you can allow communications via an analog phone line for dial-up applications. A phone jack is built into the back of the Dolphin 7400. The optional integrated modem is not available on the Dolphin 7450 terminal. -
Page 49: Chapter 5 - Dolphin 7400/7450 Rf Terminal
(WLAN). Dolphin 7400/7450 terminals have one Type II PCMCIA card slot to allow for an interface with either the Cisco® 2.4 GHz 802.11b DSSS WLAN radio or Symbol® Technologies Spectrum24 FHSS 2Mb WLAN radio. -
Page 50: Configuring The Dolphin 7400/7450 Rf Terminal
Configuring The Dolphin 7400/7450 RF Terminal When you cold-boot the Dolphin 7400/7450 RF terminal, the red LED comes on and the green LED blinks, and after approximately 3 seconds, the welcome screen shown below will appear. Dolphin Welcome Screen Press <Enter> and you will be prompted to calibrate the screen and set the time and date. Refer to the section on Calibrating the Screen, Setting the Date/Time in Chapter 2 for additional information. -
Page 51: Configuring The Cisco Dsss Wlan Radio
Configuring the Cisco ® DSSS WLAN Radio The Aironet Client Utility (ACU) enables you to change the configuration parameters of the Cisco DSSS WLAN radio. Exit the HHP demo screen. Go to Start>Programs>Cisco>Client Utility. Double-tap the Client Utility (ACU) icon and the screen shown below displays. -
Page 52: Configuring The Symbol
Configuring the Symbol ® Spectrum24 ® FHSS WLAN Radio Exit the HHP demo screen to continue with configuring the radio card. Go to Start>Settings>Control Panel. Double-tap the Spectrum24® FH Settings icon and the Spectrum24 Easy Setup screen shown below displays. Spectrum24 Easy Setup To configure the radio card: 1. -
Page 53: Host Connectivity
Host Connectivity HHP offers several host connectivity options for Dolphin 7400/7450 RF wireless LAN solutions. Direct Connect TN Client software is a thick-client solution that connects Dolphin 7400 RF computers directly to host applications via TN3270, TN5250 or TNVT terminal emulation using industry-standard TCP/IP protocol. Another option is a three-tier client server solution, or thin- client implementation, for 3270, 5250 and VT100/220 terminal emulation that uses a Universal Gateway. - Page 54 5 - 6...
-
Page 55: Chapter 6 - Dolphin Charging/Communication Cradles
Dolphin Charging/Communication Cradles Hub of the System As the hub of your Dolphin system, Dolphin Charging/Communication cradles perform three important functions – power conditioning, communications and storage. Four versions of the charging/communications cradle are available: • HomeBase for communicating with PC-based equipment using a half duplex serial mode •... -
Page 56: Dolphin Charging/Communication Cradle Parts & Functions
Dolphin Charging/Communication Cradle Parts & Functions Front Panel HomeBase/IntelliBase/USB HomeBase Terminal Well DOCK LED Front View of HomeBase/IntelliBase/USB HomeBase Dolphin Terminal Well Place the Dolphin in this well to communicate with a host device and to charge the Dolphin’s battery. LEDs There are two LEDs on the front panel of the HomeBase/IntelliBase/USB HomeBase. -
Page 57: Intellibase
IntelliBase+ Terminal Well DOCK LED Front View of IntelliBase+ Dolphin Terminal Well Place the Dolphin in this well to communicate with a host device and to charge the Dolphin’s battery. LEDs There are three LEDs on the front panel of the IntelliBase+. 1. -
Page 58: Back Panel
3. COMM LED Indicates the status of data transfer between the Host Device and the Dolphin Terminal as described below: Comm LED Red LED Green LED Orange LED Back Panel HomeBase/IntelliBase Power Supply Connector There is a 5V DC power supply connector and an RS-232 connector: Power supply connector Use this connector to attach a power supply to the HomeBase. - Page 59 IntelliBase+ Condition Button Power Supply Connector Rear View of Dolphin IntelliBase+ Power supply connector Use this connector to attach a power supply to the HomeBase. The power supply provides 5V DC input for communications and battery charging. RS-232 Communications Port Use a standard serial cable to connect this port to a host RS-232 device. Auxiliary Battery Well Insert a battery into the well to charge or condition and calibrate a battery pack.
-
Page 60: Bottom Panel Of Homebase/Intellibase/Intellibase
USB HomeBase Power Supply Connector Rear View of Dolphin USB HomeBase There is a 5V DC power supply connector and a USB connector: Power supply connector Use this connector to attach a power supply to the HomeBase. The power supply provides 5V DC input for communications and battery charging. - Page 61 Baud Rate Switch Bottom View of HomeBase/IntelliBase/IntelliBase+ Baud Rate Switch 1 115200 57600 38400 19200 9600 4800 2400 Table 2: HomeBase Switch Settings Baud Rate Switch 1 115200 57600 38400 19200 9600 Table 3: IntelliBase/IntelliBase+ Switch Settings Switch 2 Switch 3 Switch 2 Switch 3 Switch 4...
-
Page 62: Powering The Dolphin Terminal
Powering the Dolphin Terminal Dolphin charging/communication cradles provide power to the intelligent battery charging system incorporated into Dolphin terminals. This charging method protects the battery from being damaged by overcharging. Therefore, Dolphin terminals may be stored indefinitely in the charging/communication cradles without damage to the terminals, battery packs, or peripherals. To charge a Dolphin terminal, follow these steps: 1. -
Page 63: Installing The Charging/Communication Cradle
Installing The Charging/Communication Cradle To install and use the HomeBase, IntelliBase or IntelliBase+, you need the following equipment: • HomeBase/IntelliBase/IntelliBase+ with power supply • Serial cable Set the Dolphin HomeBase/IntelliBase/IntelliBase+ on a dry, stable surface, such as a desktop near an electrical outlet. Be sure to provide enough workspace with good lighting for the user to view and operate the Dolphin terminal while it is in the HomeBase/ IntelliBase. -
Page 64: Configuring The Dolphin Terminal For Communications
Infrared for a HomeBase connection; and IrDA for IntelliBase/IntelliBase+ connection or USB HomeBase IrDA connection and click OK. 4. Place the Dolphin in the cradle. 5. On the Dolphin 7400/7450 desktop, double-tap on ActiveSync. 6 - 10 Communications Properties... - Page 65 Change Connection Screen 6. In the ActiveSync connection settings, add check mark to "Allow serial cable or infrared connection to this COM port" and select "Infrared Port (IR)" for the COM port as shown below. 6 - 11...
-
Page 66: Setting Up For Communications With The Usb Homebase
ActiveSync Connection Settings To configure the Dolphin 7400/7450 terminal for communications, see the previous section on Configuring the Dolphin Terminal. Setting Up For Communications With The USB HomeBase To use the USB HomeBase, you need the following equipment: • USB HomeBase with power supply •... - Page 67 In the "Locate Drive Files" dialog, check the CD-ROM drives check box and insert the driver CD provided into the CD tray on your PC. There are sub-directories in this directory for each type of Windows OS supported. Select stirusb.sys file in the correct sub-directory for your PC: •...
-
Page 68: Communicating With The Dolphin Terminal
To configure the Dolphin 7400/7450 terminal for communications, see the previous section on Configuring the Dolphin Terminal. Communicating with the Dolphin Terminal To communicate with the Dolphin and any other devices connected to the Dolphin Charging/Communication cradle: 1. Insert the Dolphin into the terminal well of the HomeBase/IntelliBase/USB HomeBase. If the Dolphin is in sleep mode, it will awaken into active state. -
Page 69: Mounting The Homebase/Intellibase/Usb Homebase
Mounting the HomeBase/IntelliBase/USB HomeBase The HomeBase, IntelliBase, and USB HomeBase may be desk or wall-mounted for convenience and storage. The IntelliBase+ may be desk-mounted as long as room is allowed for accessibility to the auxiliary battery well. Desk Mounting: Dolphin charging/communication cradles have a DIN rail (7.5 X 35 mm) slot on the bottom to allow for secure desk attachment of the unit if desired. - Page 70 When using right-angle style RS-232 connector cable, the DIN rails may be mounted directly to the wall. When using standard RS-232 connector cables, it is recommended that the rails be mounted to the wall using a 25mm (1 in.) spacer to allow for appropriate strain relief of the cables.
-
Page 71: Chapter 7 - Dolphin® Quadcharger
This device fully charges as many as four NiMH batteries in 2.5 hours. Charging slots work independently to control charging and discharging of individual battery packs. The QuadCharger is compatible with all models in the Dolphin® 7400/7450 family of hand held computers. -
Page 72: Rear Panel
3. Insert batteries CAUTION: Do not attempt to recharge any battery pack in the Dolphin 7400/7450 QuadCharger that is not manufactured by HHP especially for this device. To do so will void your warranty and could damage the Dolphin 7400/7450 QuadCharger. -
Page 73: Servicing The Battery Pack
The LEDs indicate the charging status of batteries as described in the chart shown on the next page: Status LED Green Orange To remove a battery pack, push the locking tab down and pull the battery out from the charging pocket with a hinging motion. Servicing The Battery Pack To service battery packs, insert batteries into the charging pockets and press the Condition button. -
Page 74: Troubleshooting
Troubleshooting If you encounter problems with your Dolphin QuadCharger, refer to chart below for possible solutions. If problems persist, please contact HHP Technical Support. Problem The “CHARGING” LED does not come on when I insert a battery pack into the Dolphin QuadCharger The red status LED comes on during charging. -
Page 75: Chapter 8 - Dolphin Mobile Charging/Communication Cradles
Dolphin Mobile Charging/Communication Cradles As the hub of Dolphin mobile data collection systems, Dolphin Mobile Charging/Communication cradles perform three important functions – power conditioning, communications and storage. Two versions of the mobile charging/communication cradles are available: Dolphin Mobile IntelliBase™ for use with in-transit data collection applications. Dolphin Mobile Base for use with in-premise warehouse data collection applications. -
Page 76: Mobile Intellibase And Mobile Base Parts And Functions
Mobile IntelliBase and Mobile Base Parts and Functions Front Panel The front panel of the Mobile IntelliBase and the Mobile Base has one slot: 8 - 2 Spring-Arm Assembly DOCK LED COMM Front Panel of Dolphin Mobile IntelliBase Terminal Well... - Page 77 Dolphin Terminal Well Place the Dolphin in the well to communicate with a host device and/or to charge the Dolphin’s battery. LEDs There are two LEDs on the front panels of the Mobile IntelliBase and Mobile Base charging/communication cradles. 1. Dock LED Turns solid green when the Dolphin terminal is properly seated into the Dolphin Mobile IntelliBase. 2.
-
Page 78: Rear Panel
Rear Panel Power Supply Connector Rear Panel of Dolphin Mobile IntelliBase 8 - 4 Mounting Bracket RS-232 Communications Port... - Page 79 RS-232 Communications Port Rear Panel of Dolphin Mobile Base The power supply connector and RS-232 connector are located on the back panel of the unit: Power supply connector Use this connector to attach a power supply to the charging/communications cradle. The power supply provides power for communications and battery charging.
-
Page 80: Bottom Panel Of Mobile Intellibase/Mobile Base
Bottom Panel of Mobile IntelliBase/Mobile Base A four-position Baud Rate switch, located on the bottom of the Mobile IntelliBase, is used to select the communication baud rate. Switch positions and the corresponding baud rates are shown in the chart below. Baud Rate Switch 1 115200... -
Page 81: Setting Up For Communications With The Mobile Intellibase/Mobile Base
Setting Up For Communications with the Mobile IntelliBase/Mobile Base The Mobile IntelliBase RS-232 interface allows the Dolphin terminal to communicate to a personal computer, modem, or any standard RS-232 device using a standard serial cable and communications software. The IrDA 1.0 software stack is integrated into the Mobile IntelliBase/Mobile Base to allow communication between the cradle and devices such as modems or printers that are not IrDA ready or do not communicate with a half duplex serial protocol. -
Page 82: Installing The Dolphin Mobile Base
Installing The Dolphin Mobile Base The Mobile Base has two mounting options - a clamp style for in-premise applications and a standard RAM mount for other mobile applications that allow the Mobile Base to be mounted according to specific needs. The spring-arm assembly holds the terminal securely in place. -
Page 83: Setting The Baud Rate
Connecting the Cables Connect the Mobile IntelliBase/Mobile Base to the host computer or other device by plugging an RS-232 serial cable into the RS- 232 Communications Port on the rear of the cradle. Plug the other end of the RS-232 serial cable into the correct port on the host RS-232 device. -
Page 84: Configuring The Dolphin Terminal
Configuring the Dolphin Terminal The Communications Properties must be configured on Dolphin 7400/7450 terminal in order for it to communicate with the Mobile IntelliBase/Mobile Base. To set Communications Properties: 1. Select Start>Settings>Control Panel>Communication Settings. 2. Select the PC Connection tab. -
Page 85: Chapter 9 - Developing Applications
Developing Applications Applications for the Dolphin 7400/7450 hand held computer are developed for the Microsoft® Windows® CE environment. Microsoft® Windows CE is a compact, highly efficient, scalable operating system created for embedded systems and products. Its modular design allows developers flexibility to customize it for a variety of small footprint and mobile 32-bit devices. Windows CE supports various hardware peripherals, devices and networking systems. - Page 86 9 - 2...
-
Page 87: Chapter 10 - Warranty, Support And Service
Limited Warranty Hand Held Products, Inc., d/b/a HHP ("HHP") warrants its products to be free from defects in materials and workmanship and to conform to HHP’s published specifications applicable to the products purchased at the time of shipment. This warranty does not cover any HHP product which is (i) improperly installed or used;... - Page 88 North America: (TEL) (800)-782-4263 (FAX) (704)-566-9904 Latin America (TEL) (239)-263-7600 (FAX) (239)-263-9689 Europe, Middle East and Africa: TEL) Int+31 (0) 40 29 01 600 (FAX) Int+31 (0) 40 24 25 672 The United Kingdom: (TEL) Int+44 (0) 1 925 240055 or Int+353 1 216 0070 (FAX) Int+44 (0) 1 925 631280 or Int+353 1 925 6353 Asia/Pacific: (TEL) Int+852-2511-3050 or 2511-3132...
-
Page 89: How To Extend Your Warranty
North and South America: Products Services Department 7510 East Independence Blvd., #100 Charlotte, NC 28227-9411 Europe, Middle East and Africa : Nijverheidsweg 9 5627 BT Eindhoven The Netherlands The United Kingdom : Dallam Court Dallam Lane Warrington Cheshire WA2 7LT United Kingdom Asia/Pacific 10/F Tung Sun Commercial Centre... - Page 90 North America: (TEL) 1-(800) 782-4263 8 a.m. and 6 p.m., Eastern Time, Monday through Friday support@hhp.com Europe, Middle East and Africa: (TEL) Int+31-40 242 4486 9 a.m. - 5 p.m., Central European Time, Monday through Friday euro_support@hhp.com The United Kingdom: (TEL)+44 1925 240055 9 a.m.
- Page 91 10 - 5...
- Page 92 10 - 6...
- Page 93 10 - 7...
- Page 94 10 - 8...
- Page 95 Appendix A Use the keyboard shortcuts in the chart below to navigate the Dolphin 7400 and 7450 terminal keyboards. CTRL + C CTRL + X CTRL + V CTRL + Z DELETE CTRL + RIGHT ARROW CTRL + LEFT ARROW CTRL + DOWN ARROW CTRL + UP ARROW SHIFT with any of the arrow keys...
-
Page 96: Using The Modifier Keys
Using the Modifier Keys The Dolphin 7400/7450 terminal keyboard features the standard Windows modifier keys, Alt, Ctrl and Shift. The Shift key only modifies the next key pressed; it must be pressed before each key you wish to make lower case. For multiple lower case characters, hold the Shift key down with one hand while typing with the other. -
Page 97: Key Combinations
* Exit the mouse utility prior to adjusting the contrast. Key Combinations Use the key combinations listed below to access certain keyboard functions or to use special characters that are not defined on the 43-key version of the Dolphin 7400/7450 keyboard. Key/Key Combination NUM + SFT + A... -
Page 98: 35 Key Numeric/Alpha
Key/Key Combinations Key/Key Combinations NUM + ALT + 3 + 9* NUM + ALT + 3 + 4* *Hold the ALT key down as you type in the numbers. 35 Key Numeric/Alpha Blue Key Functions & Characters For 35-Key Numeric/Alpha Keyboard Key Combination Double tap Blue key Blue key + 0 (zero) -
Page 99: Key Combinations
Key Combinations Use the key combinations listed below to access certain keyboard functions or to use special characters that are not defined on the 35-key version of the Dolphin keyboard. Key/Key Combination ALPHA + SFT + 1 ALPHA + SFT + 2 ALPHA + SFT + 3 ALPHA + SFT + 4 ALPHA + SFT + 5... - Page 100 Key Combination Key Combination 11 - 6 Blue Key Functions & Characters For 56-Key Full Alpha Numeric Keyboard Blue key + , Blue key + A Blue key + B Blue key + C Blue key + D Blue key + E Blue key + F Red Key Functions &...
-
Page 101: Key Combinations
Key Combination * Exit the mouse utility prior to adjusting the contrast. Key Combinations Use the key combinations listed below to access certain keyboard functions or to use special characters that are not defined on the 56-key version of the Dolphin keyboard. Key/Key Combination Red Key Functions &... - Page 102 Miscellaneous Key Combinations Key/Key Combinations Function/Special Characters ALT + 3 + 9* ‘ ALT + 3 + 4* “ *Hold the ALT key down as you type in the numbers. 11 - 8...
- Page 103 Appendix B Dolphin 7400/7450 Scan Maps 12 - 1...
- Page 104 12 - 2...
- Page 105 12 - 3...
- Page 106 12 - 4...
- Page 107 ™ 7400/UG Rev L...
Need help?
Do you have a question about the 7400/7450 and is the answer not in the manual?
Questions and answers