
Subscribe to Our Youtube Channel
Related Manuals for Kramer VM-4Hxl


Summary of Contents for Kramer VM-4Hxl
-
Page 1: User Manual
K R A ME R E LE CT R O N IC S L T D . USER MANUAL MODEL: VM-4Hxl 4 HDMI Distributor P/N: 2900-000673 Rev 3... -
Page 3: Table Of Contents
Acquiring an EDID Acquiring the EDID from a Selected Output Restoring the Default EDID Acquiring the Auto EDID Technical Specifications Figures Figure 1: VM-4Hxl 1:4 HDMI Distributor Front Panel Figure 2: Connecting the VM-4Hxl 1:4 HDMI Distributor VM-4Hxl – Contents... -
Page 4: Introduction
Scan Converters and Scalers; GROUP 8: Cables and Connectors; GROUP 9: Room Connectivity; GROUP 10: Accessories and Rack Adapters and GROUP 11: Sierra Products. Congratulations on purchasing your Kramer VM-4Hxl 1:4 HDMI Distributor, which is ideal for the following typical applications: •... -
Page 5: Getting Started
Avoid interference from neighboring electrical appliances that may adversely influence signal quality • Position your Kramer VM-4Hxl away from moisture, excessive sunlight and dust This equipment is to be used only inside a building. It may only be connected to other equipment that is installed inside a building. -
Page 6: Safety Instructions
Kramer Electronics has made arrangements with the European Advanced Recycling Network (EARN) and will cover any costs of treatment, recycling and recovery of waste Kramer Electronics branded equipment on arrival at the EARN facility. For details of Kramer’s recycling arrangements in your particular country go to our recycling pages at http://www.kramerelectronics.com/support/recycling/. -
Page 7: Overview
Five HDMI connectors, four output status LEDs and EDID read and select buttons The VM-4Hxl is housed in a 19" 1U rack-mountable enclosure, and is fed from a 100-240V AC universal switching power supply. Defining the VM-4Hxl 1:4 HDMI Distributor This section defines the VM-4Hxl. -
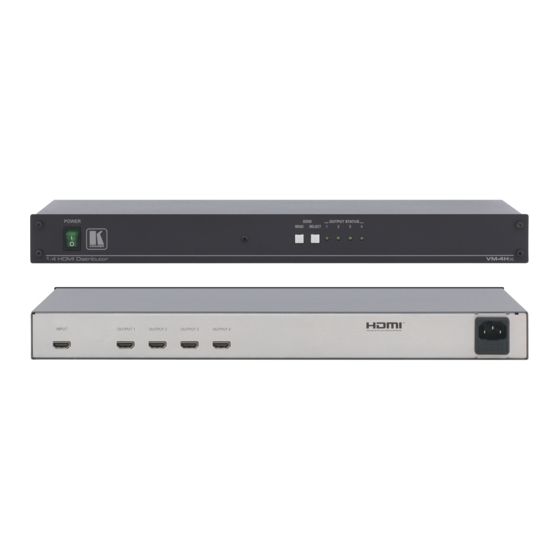
Page 8: Figure 1: Vm-4Hxl 1:4 Hdmi Distributor Front Panel
Figure 1: VM-4Hxl 1:4 HDMI Distributor Front Panel Feature Function POWER Switch Illuminated switch for turning the unit ON or OFF EDID READ Button Press to read the EDID of the selected display EDID SELECT Button Select the desired display for EDID information OUTPUTS LEDs LEDs light when an output(s) is connected and active;... -
Page 9: Installing In A Rack
Installing in a Rack This section provides instructions for rack mounting the unit. VM-4Hxl - Installing in a Rack... -
Page 10: Connecting The Vm-4Hxl
Connecting the VM-4Hxl Always switch off the power to each device before connecting it to your VM-4Hxl. After connecting your VM-4Hxl, connect its power and then switch on the power to each device. To connect the VM-4Hxl as illustrated in the example in Figure 1. -
Page 11: Figure 2: Connecting The Vm-4Hxl 1:4 Hdmi Distributor
Figure 2: Connecting the VM-4Hxl 1:4 HDMI Distributor VM-4Hxl - Connecting the VM-4Hxl... -
Page 12: Acquiring An Edid
Acquiring an EDID The VM-4Hxl initially operates with the default EDID. This means that you can turn ON the power before connecting any of the acceptors or the source. You can acquire the EDID by sending the: • EDID from a selected output to the input (see Section 6.1) -
Page 13: Acquiring The Auto Edid
1. Press the SELECT button several times until the OUTPUT LEDs flash in sequence. 2. Press the READ button. The READ button illuminates. The auto EDID is stored in the non-volatile memory when the READ button no longer illuminates as well as the output LEDs. VM-4Hxl - Acquiring an EDID... -
Page 14: Technical Specifications
-40° to +70°C (-40° to 158°F) HUMIDITY: 10% to 90%, RHL non-condensing DIMENSIONS: 19" x 7" x 1U (W, D, H) rack mountable WEIGHT: 2.5kg. (5.5lbs) approx. ACCESSORIES: Power cord, rack “ears” Specifications are subject to change without notice at http://www.kramerelectronics.com VM-4Hxl - Technical Specifications... - Page 16 For the latest information on our products and a list of Kramer distributors, visit our Web site where updates to this user manual may be found. We welcome your questions, comments, and feedback. Web site: www.kramerelectronics.com E-mail: info@kramerel.com SAFETY WARNING...
Need help?
Do you have a question about the VM-4Hxl and is the answer not in the manual?
Questions and answers