Table of Contents
Advertisement
Quick Links
Advertisement
Table of Contents

Related Manuals for DigiDesign 3


Summary of Contents for DigiDesign 3
-
Page 1: Getting Started
Getting Started 003™ & 003 Rack Version 7.3... - Page 2 Copyright © 2007 Digidesign, a division of Avid Technology, Inc. All rights reserved. This guide may not be duplicated in whole or in part without the express written consent of Digidesign. Avid, Digidesign, 003, and Pro Tools are either trademarks or registered trademarks of Avid Technology, Inc.
- Page 3 Any modifications to the unit, unless expressly approved by Digidesign, could void the user's authority to operate the Compliance Statement equipment. The model 003 and 003 Rack comply with the following standards regulating interference and EMC: • FCC Part 15 Class B Canadian Compliance Statement: •...
- Page 4 UL Standards: UL60065 7th /IEC 60065 7th is required when the apparatus has been damaged in any way, and Canadian CAN/CSA C22.2 60065:03. Digidesign Inc., has such as power-supply cord or plug is damaged, liquid has been been authorized to apply the appropriate UL & CUL mark on its spilled or objects have fallen into the apparatus, the apparatus compliant equipment.
-
Page 5: Table Of Contents
Connecting 003 or 003 Rack to the Computer ....... . . - Page 6 Getting Sound In and Out of Your 003 or 003 Rack ......
- Page 7 003 Top Panel Shortcuts ........
- Page 8 Before You Call Digidesign Technical Support ........
-
Page 9: Chapter 1. Installation Quickstart
Mac Installation Overview Overview (Mac OS X Systems Only) (Windows Systems Only) Installing 003 or 003 Rack on a Mac includes the following steps: Installing 003™ or 003 Rack on a Windows computer includes the following steps: “Mac System Optimization” on page 17. - Page 10 003 & 003 Rack Getting Started Guide...
-
Page 11: Chapter 2. Welcome To 003 And 003 Rack
Pro Tools workstations for mu- sic, sound design, and multimedia production. Audio and MIDI Features The 003 and 003 Rack units provide the follow- 003 and 003 Rack Packages ing input and output capacity: • Up to 18 channels of I/O... - Page 12 Control Surface Features of tape or CD input sources. (003 Only) • Two 1/4-inch stereo headphone outputs 003 provides an integrated control surface that (Headphone 1 and 2) with level controls. includes the following: Headphone 2 can monitor Main Outputs 1–2 like Headphone 1, or be switched to monitor •...
-
Page 13: Pro Tools Le Capabilities
Pro Tools LE Capabilities System Requirements Pro Tools LE™ on Windows or Mac provides the 003 and 003 Rack can be used with a Digide- following capabilities with 003 and 003 Rack: sign-qualified Windows or Mac computer run- ning Pro Tools LE software. -
Page 14: Digidesign Registration
Pro Tools LE software, make basic connec- sign-qualified drives. This is a separate physical tions to your 003 or 003 Rack interface (to get drive from your internal system drive, and needs sound in and out of your interface), and do com- to meet the specifications listed on our website. -
Page 15: About Www.digidesign.com
Digidesign; sign up for a Pro Tools demo. Cross References point to related sections in this guide and other Digidesign guides. To learn more about these and other resources available from Digidesign, visit the Digidesign website (www.digidesign.com). Chapter 2: Welcome to 003 and 003 Rack... - Page 16 003 & 003 Rack Getting Started Guide...
-
Page 17: Chapter 3. Windows Configuration
Required Optimizations Installation Overview To ensure optimum performance with Pro Tools LE, configure the following settings Installing 003 or 003 Rack on a Windows com- before you install Pro Tools hardware and soft- puter includes the following steps: ware. “Windows System Optimization” on page 9. - Page 18 Cool N’Quiet in the System BIOS (in Control Panel. See the manufacturer’s in- the Cool & Quiet Configuration section). See structions for details. the manufacturer’s documentation for in- structions on disabling this power option, if necessary. 003 & 003 Rack Getting Started Guide...
- Page 19 Restart the computer for the changes to take If applicable, disable any networking cards effect. (other than a FireWire card, if you are using one to connect 003 or 003 Rack or any FireWire Disabling Hyper-Threading drives to your system). When working with RTAS plug-ins, Pro Tools...
-
Page 20: Connecting 003 Or 003 Rack To The Computer
Pro Tools. Some Before installing Pro Tools LE software, you startup applications may be consuming unnec- need to connect 003 or 003 Rack to the com- essary CPU resources, and can be turned off. puter. -
Page 21: Connecting Firewire Drives
003 Rack. This will prevent hard drive errors does not support maximum track count. and data loss in case 003 or 003 Rack is powered For information on supported PCI/PCM- off. -
Page 22: Installing Pro Tools Le
Mac OS Ex- Turn on unit. Press the Power switch on the tended disks. back panel of the 003 or the front panel of the DigiTranslator DigiTranslator™ is a software op- 003 Rack. After a short power-up sequence, the... -
Page 23: Additional Software On The Pro Tools Installer Disc
The Digidesign ASIO Driver and WaveDriver (www.digidesign.com). Windows System Audio Driver let you use your 003 or 003 Rack hardware interface with third- To install QuickTime: party applications that support the ASIO Driver Visit www.apple.com and go to the Quick- or WaveDriver MME (Multimedia Extension). -
Page 24: Removing Pro Tools Le
To install the demo session: Insert the Pro Tools LE Installer disc into your DVD drive. From your DVD drive, locate and open the Ad- ditional Files/Pro Tools LE Demo Session In- staller folder. 003 & 003 Rack Getting Started Guide... -
Page 25: Chapter 4. Mac Configuration
Administrator privileges in Mac OS X, Installation Overview see your Apple OS X documentation. Installing 003 or 003 Rack on a Mac includes the Do not use the Mac OS X automatic following steps: Software Update feature, as it may upgrade your system to a version of Mac OS that has “Mac System Optimization”... - Page 26 Disabling Spotlight indexing will cause the Find function in Mac OS X to no longer work. You will no longer be able to search for files on drives set to private. 003 & 003 Rack Getting Started Guide...
-
Page 27: Installing Pro Tools Le
Applications/Utilities. MIDI I/O Driver The MIDI I/O Driver is required Select the volume in the left column of the if you are using the Digidesign MIDI I/O. Disk Utility window. MP3 Export Option The MP3 Export Option lets Click Enable Journaling in the toolbar. - Page 28 Insert the Pro Tools LE Installer disc in your only. It cannot be used with other applica- DVD drive. tions when Pro Tools is launched with 003 On the Installer disc, locate and double-click or 003 Rack. “Install Pro Tools LE.”...
-
Page 29: Connecting 003 Or 003 Rack To The Computer
FireWire hard drives directly to your computer and not to 003 or 003 Rack. This will prevent hard drive errors and data loss in case 003 or 003 Rack is powered off. To yield higher performance from audio drives, enable journaling. -
Page 30: Removing Pro Tools
Devices to 003 or 003 Rack tem files needed for compatibility with some Avid products. Use Safe Uninstall if you are us- The second FireWire port on 003 or 003 Rack is ing an Avid application or preparing to update available for daisy-chaining FireWire devices to a .cs release. -
Page 31: Chapter 5. Launching And Configuring Pro Tools Le
Pro Tools system communicate properly with Turn off your computer. each other, you need to start them in a particu- Turn off the 003 or 003 RAck. lar order. Turn off any MIDI interfaces, MIDI devices, or Start up your Pro Tools system in this order: synchronization peripherals. -
Page 32: Launching Pro Tools Le
If the message does not go away, power • Locate and double-click the Pro Tools LE off 003 or 003 Rack and then power it on again. application on your hard drive. If you get a warning dialog about updating the firmware for your hardware, follow the Configuring Pro Tools LE... - Page 33 Hardware Buffer Size RTAS Processors The Hardware Buffer Size (H/W Buffer Size) con- The RTAS Processors setting determines the trols the size of the buffer used to handle host number of processors in your computer allo- processing tasks such as Real-Time AudioSuite cated for RTAS plug-in processing.
- Page 34 H/W Buffer Size, or at least 128 samples (which ever is greater). If you are on a slower computer, you may not want to enable this option since doing so can adversely affect performance. 003 & 003 Rack Getting Started Guide...
-
Page 35: Midi Studio Setup
The Minimize Additional I/O Latency option is To change the DAE Playback Buffer Size: only available if the Ignore Errors During Play- Choose Setup > Playback Engine. back/Record option is enabled. From the DAE Playback Buffer pop-up menu, select a buffer size. To enable RTAS error suppression: Click OK. - Page 36 New Session 003 or 003 Rack that is receiving your clock sig- dialog. See the Pro Tools Reference Guide for nal: S/PDIF (RCA), Optical, or Word Clock. If details.
- Page 37 To select the Clock Source: Optical Format Choose Setup > Hardware. The Optical port can be set for eight channels of ADAT Optical I/O (supporting up to 48 kHz) or Choose the clock source from the Clock two channels of S/PDIF Optical I/O. The Optical Source pop-up menu.
- Page 38 The I/O Setup dialog provides a graphical Click OK. representation of the inputs, outputs, and signal routing of the 003 and 003 Rack. See the Pro Tools Reference Guide (or choose Help > Pro Tools Reference Guide) for more Pro Tools LE has default I/O Setup settings that information on renaming I/O paths.
-
Page 39: Chapter 6. 003 Top Panel
“Open or create a new session.” When a session is being 003 can be in any of five states when it is on: launched, the display changes to “Loading a ses- • Standby mode sion.”... - Page 40 MIDI Mode If Mute is disabled (unlit), press the Monitor Mute switch. 003 is in this mode when either the MIDI Map A Launch your third party audio application. or B switch is enabled (lit). In this mode, 003 functions as a MIDI control surface for external Disable the Monitor Mute switch (unlit).
-
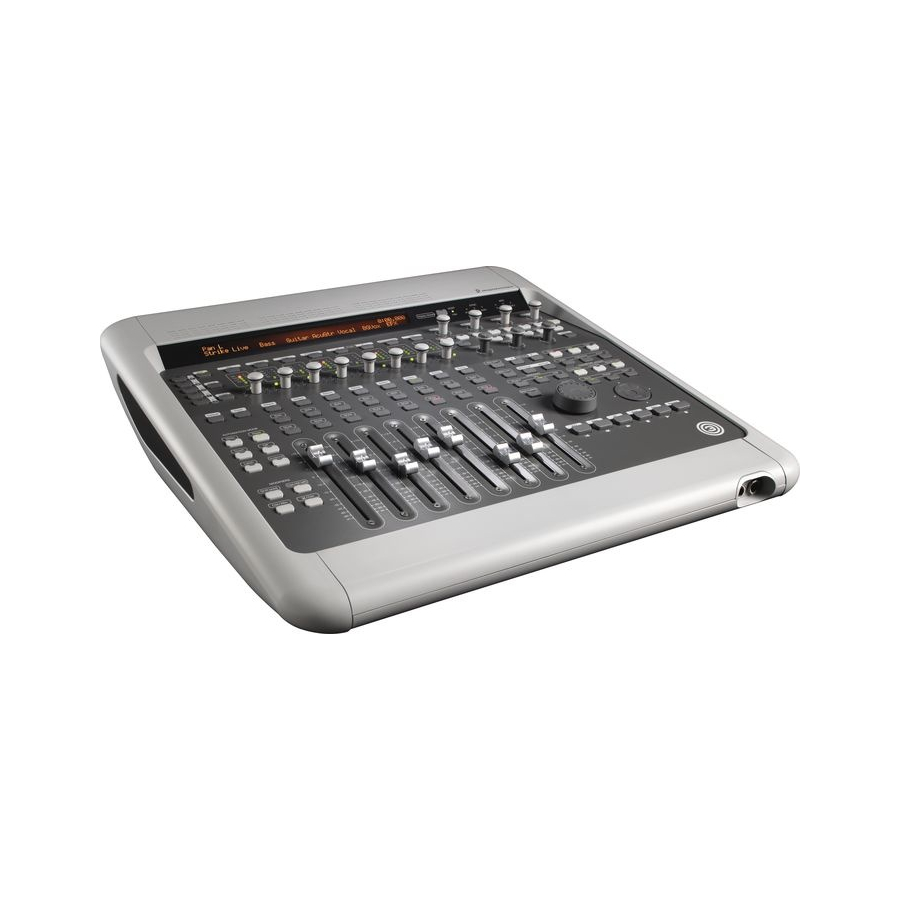
Page 41: 003 Top Panel Overview
003 Top Panel Overview Figure 1 identifies each of the main 003 control sections. The 003 top panel is arranged in sections of controls with related functions. The Fader section in- cludes standard channel strip controls, similar to any small-format mixer. The Console/Channel View section provides powerful multi-state controls for viewing and controlling inserts, plug-ins and sends in Pro Tools. -
Page 42: Display Section
Display Section The top portion of the 003 includes an LCD display, Display mode switch, and status indicators. MIDI Data indicators Host “1394” status indicator LCD display Display Mode switch Sync indicators 003 LCD, Display Mode switch, and status indicators... - Page 43 • Full names of items with more than 6 charac- ters can be temporarily displayed in the LCD. If none of the Sync LEDs are lit, 003’s clock See “Displaying Full Names of Tracks, Insert source is set to internal.
-
Page 44: Fader Section
Mode” on page 98. Muting Fader Movement Channel Fader Because 003 faders are motorized, they move to follow automation when playing back and re- cording (when the track is set to an automation read or write mode, and not Off). During critical... - Page 45 Console View Depending on the Console View For more information, see “Muting Fader (Pan, Send, or Insert), 003 can be used to do the Movement” on page 100. following: • Select tracks or inserts on a particular chan- Channel Solo/Mute Switches nel for editing.
- Page 46 When the Meter switch is set to Left or Right, these meters display track level. When the Meter switch is set to Auto (Automation), the meter in- dicator corresponding to the track’s current Au- tomation mode is lit. 003 & 003 Rack Getting Started Guide...
- Page 47 When the Rec Arm switch is enabled (flashing), When you toggle through the three Meter 003 is in Record Arming mode. In this mode, switch modes, the corresponding Meter switch channels can be armed (record-enabled) or dis-...
- Page 48 Additonally, in certain views, the rotary encoders are available to con- trol another parameter. Flip mode is not available in Pan View. See “Using Flip Mode” on page 98 for more information. 003 & 003 Rack Getting Started Guide...
-
Page 49: Console/Channel View Section
Pro Tools workflows, see face. Chapter 11, “Pro Tools Mode with 003.” 003 is in Console View when any of the Console There are three Console Views, based on their View switches (Pan, Send, or Insert) is lit in the corresponding switch name: Console View section. - Page 50 Main Counter. Channel View switches Insert Switch When enabled (lit), 003 is in Insert 003 is in Channel View when any of the first View. In this view, the bottom row of the LCD four Channel View Select switches (EQ, Dynam-...
- Page 51 Main Counter. The bottom row shows track names. Pan/Send Switch When enabled (flashing), 003 is in Channel View. In this view, 003 identifies channels with sends assigned to them by illumi- nating their Channel Select switches. The top row of the LCD shows “Select Pan Send A–E”...
-
Page 52: Transport And Navigation Controls
Transport and Navigation Controls The 003 provides a standard set of Transport controls that mirror Pro Tools on-screen controls (when in Pro Tools mode) and conform to standard MMC commands for controlling other devices (in MIDI mode). Navigation keys and shortcut switches support Pro Tools zooming, banking, and navigation features. - Page 53 (no shuttling) when you re- lease the wheel. These multi-purpose keys and switches control the display of Pro Tools tracks on the 003 con- For more information, see “Navigating with trol surface, on-screen zoom functions, and the Shuttle/Jog Wheel” on page 96.
- Page 54 Bank Switch When enabled (lit), the Arrow keys Loop Rec Switch Toggles Loop Record mode on let you bank 003 fader strips to the previous or and off next eight tracks. You can also control and ad-...
- Page 55 MIDI Map A and B Switches When one of these as fader movement and LEDs) and reset MIDI switches is enabled (lit), 003 is in MIDI mode. In mappings to their factory presets. The Utility this mode, 003 functions as a MIDI control sur- switch is unavailable in Pro Tools mode.
-
Page 56: Automation Section
Write, Touch, or Latch, and at least one chan- Shift (Add) switch nel’s Automation mode is set to Off. Multiple LEDs light when there are channels Ctrl/Win switch with different Automation modes. Command/Ctrl switch 003 keyboard modifier keys 003 & 003 Rack Getting Started Guide... -
Page 57: Mic/Di Input Controls
(switchable ing your computer’s keyboard or mouse. in pairs, for Inputs 1–2 and Inputs 3–4). The For a list of 003 shortcuts, see “003 Top phantom power switches are on the back panel. Panel Shortcuts” on page 101. -
Page 58: Monitor Section
1/4-inch stereo headphone connectors. 2 Output to mirror Output pair 3–4. The jacks are located on the front of the 003. Aux In (to Monitor) Switch This switch routes the Aux In input pair directly to the Main Mon- itor and Headphone Outputs. -
Page 59: Chapter 7. 003 Rack Front Panel
7 003 Rack Front Panel The 003 Rack front panel includes controls for Power Switch Inputs 1–4, options for routing outputs and The Power switch is located on the front panel. monitoring alternate input sources, and indica- tors for connections status, sync source, and MIDI data. -
Page 60: Mic/Di Input Controls
Pro Tools without the need to repatch any ca- bles. When Aux In to 7/8 is enabled (lit), Analog In- puts 7–8 are disabled. 3/4-HP2 Switch This switch sets Headphone 2 Output to mirror Output pair 3–4. 003 & 003 Rack Getting Started Guide... -
Page 61: Status Indicators
Alt CR (Control Room) Switch This switch mutes lished, the respective LED flashes. the Main Monitor output and routes the signal If none of the Sync LEDs are lit, 003 Rack’s clock to the Alt CR output. source is set to Internal. - Page 62 003 & 003 Rack Getting Started Guide...
-
Page 63: Chapter 8. 003 And 003 Rack Back Panels
The 003 and 003 Rack have identical connec- I/O ports, support sample rates of 44.1, 48, 88.2, tors. The 003’s Power switch is on its back panel, and 96 kHz. The Optical port can be set for eight whereas the 003 Rack’s Power switch is on its channels of ADAT Optical I/O (supporting up to front panel. -
Page 64: Analog Inputs
Gain control (located on the top panel of 003, Gain is controlled by the corresponding Input and on the front panel of 003 Rack). The source Gain knob (located on the top panel of 003, and (Mic, Line, or DI) is chosen using the Mic/DI on the front panel of 003 Rack). -
Page 65: Analog Outputs
Aux In to 7/8 switch is enabled (lit). Monitor gain level is controlled by the Monitor Analog Outputs Level control (located on the top panel of 003, and on the front panel of 003 Rack). Main Analog Outputs 1–8 Monitor output can be muted and the signal... - Page 66 CD recorders and DAT recorders. For highest digital signal integrity, and lower jitter, When the 003 or 003 Rack is on, its Optical Out use 75 Ohm coaxial cable for S/PDIF transfers port emits a red light. and keep the cable length to a maximum of 10 meters.
- Page 67 Pro Tools LE, and is recognized reliability that makes it ideal for audio applica- automatically by MIDI Studio Setup (Windows) tions (such as Pro Tools with 003 or 003 Rack). and Audio MIDI Setup (Mac). These connectors FireWire devices can be daisy-chained together accept standard 5-pin MIDI cables.
-
Page 68: Power Switch
003 (003 Back Panel Only) or 003 Rack. This will prevent hard drive errors and data loss in case the 003 or 003 Rack unit is The Power switch for 003 is located on its back powered off. -
Page 69: Chapter 9. Making Studio Connections
To adjust headphone levels: ternal sound system (such as powered monitors or a home stereo) to 003 or 003 Rack. Sound Adjust the Headphone 1 or 2 Level knobs. from 003 and 003 Rack cannot be played through your computer’s speakers or your com-... - Page 70 Outs” on page 67 TS connectors used by 003 and 003 Rack to the RCA connectors on your To mirror 003 or 003 Rack Outputs 1–2 on the S/PDIF outputs: home stereo. Open the Pro Tools session whose channel Main Monitor Outputs L and R play the audio outputs you want to mirror.
-
Page 71: Connecting A Microphone
003 and 003 Rack); other microphones use a 1/4-inch connector. If you have a choice, use an XLR connector to connect the micro- phone to the 003 or 003 Rack to yield better re- DI Inputs 1–4 sults. -
Page 72: Phantom Power
If your microphone requires phantom power, make sure the microphone is connected, then press the Phantom Power switch (labeled 48V) on the back of the 003 or 003 Rack for the corre- sponding input pair. 003 & 003 Rack Getting Started Guide... -
Page 73: Connecting Instruments To 003 Or 003 Rack
Each Phantom Power switch sends 48V to its Press the Mic/DI switch (located on the top corresponding input pair. panel of the 003, and on the front panel of the 003 Rack) for the corresponding input so that it is in the DI (lit) position. - Page 74 On 003 and 003 Rack, DI Inputs 1–4 support To use a keyboard or mixer with 003 or 003 Rack: low-level instruments and line-level instru- On the back of the 003 or 003 Rack, plug your ments. Analog Inputs 5–8 support line-level in- keyboard, mixer, or other audio source into any struments only.
-
Page 75: Connecting Equipment With Digital Ins And Outs
Mic/DI switch (located on the top panel of the Digital Ins and Outs 003, and on the front panel of the 003 Rack) for the corresponding input so that it is in the DI 003 and 003 Rack each provide up to ten digital (lit) position. -
Page 76: Word Clock
Clock In and Out connectors to the appropriate Connect the Optical input on the Optical de- ports on the other Word clock-capable devices vice to the Optical Out port on the 003 or 003 in your studio. Rack. (When 003 or 003 Rack is on, its Optical Out port emits a red light.) -
Page 77: Using External Effects Devices
You can send and return signals to analog de- vices using the analog inputs and outputs on the 003 and the 003 Rack. You can also send and re- Pro Tools LE as Word Clock Slave turn a digital signal to an external device that... -
Page 78: Monitoring And Recording From Alternate Sources
If necessary, change the sample rate of the digi- pressing the Aux In switch (located on the top tal device. panel of 003, and on the front panel of 003 Click OK. Rack) so that it is enabled (lit). If you want to monitor the signal through the You can use the I/O Setup dialog (Setup >... -
Page 79: Recording From A Digital Device
(located on the top panel of 003, and on the vice and connected to the Optical ports, se- front panel of 003 Rack) so that it is enabled (lit). lect S/PDIF. • If the external digital device is an ADAT When the Aux In to 7–8 switch is enabled, In-... -
Page 80: Connecting A Recorder For Mixdowns
Connect your recorder’s inputs to the Alt Monitor Outputs (or any other output pair) on The MIDI ports on 003 and 003 Rack let you take the back of the 003 or the 003 Rack. These out- advantage of all the MIDI features of puts are 1/4-inch jacks. - Page 81 Monitoring MIDI Instruments with 003 or 003 Rack If you have a MIDI instrument that has analog outputs, you can connect it to the 003 or 003 Rack to monitor its output. To connect your MIDI instrument for monitoring in Pro Tools: Connect the MIDI instrument’s audio output...
- Page 82 003 & 003 Rack Getting Started Guide...
-
Page 83: Chapter 10. Common Tasks With Pro Tools Le
Pro Tools session, then prepare an audio track for recording. To create a Pro Tools session: New Session dialog Verify the connections between your 003 or 003 Rack and your instrument or microphone. Choose the audio drive where you want to save your session. - Page 84 1 Stereo Audio Track in Sam- can accept. On the 003 and 003 Rack, the ples if your source is stereo. Mic and DI switch LEDs blink rapidly when the input is clipping.
-
Page 85: Importing Audio From A Cd
Click Stop in the Transport window or press In the Workspace browser, click the Audio CD the Spacebar when you are finished recording. icon to show the files on the CD. Click the speaker icon in the Waveform col- To play back a recorded track: umn to audition the audio file. -
Page 86: Creating An Audio Cd From A Pro Tools Session
(or on a track), plus Guide.) an additional amount of time to avoid cutting off any reverb tails that might continue past the end of the last region. Audio session highlighted and ready to bounce 003 & 003 Rack Getting Started Guide... - Page 87 Choose “Convert after Bounce,” and click Click Save. Bounce. Pro Tools begins bouncing to disk. Pro Tools bounces are done in real time, so you hear audio playback of your mix during the bounce process (though you cannot adjust it). Bouncing to Disk dialog Burning a CD Bounce options for creating CD burnable tracks...
-
Page 88: Recording Midi In A Pro Tools Session
Pro Tools system must be config- ured for MIDI. See Appendix A, “Configuring MIDI Studio Setup (Windows Only)” or Appendix B, “Configuring AMS (Mac OS X Only).” MIDI Input selector in an Instrument track 003 & 003 Rack Getting Started Guide... - Page 89 Do one of the following, depending on the If you are using an external MIDI device and type of instrument you are using: have connected its audio output to your audio interface for monitoring in Pro Tools, click the • If you are using an instrument plug-in, Input selector of the Instrument track and click an Insert selector and insert the plug- choose the corresponding audio input.
- Page 90 You can also record to a selection in a track or from the cursor location in the Edit window. Click Record in the Transport window. Return to Zero Fast Forward Play Go to End Rewind Stop Record Online Transport window 003 & 003 Rack Getting Started Guide...
-
Page 91: Chapter 11. Pro Tools Mode With 003
11 Pro Tools Mode with 003 In Pro Tools mode, the 003 can be used as a con- To put 003 in Pro Tools mode: trol surface for your Pro Tools sessions. Make sure the 003 unit is properly connected to the computer and powered on. -
Page 92: Working In Console View
Pan View Workflows Working in Console View When the Pan switch is enabled (lit), 003 is in Console View provides a global view of a given Pan View. This is the default View when you control type across the 003 (such as send A for first open a Pro Tools session. - Page 93 (unlit) track. To rename a track: All tracks between the first track selected and the Press the Pan switch to put 003 in Pan View. additional track will also be selected. Double-press the Channel Select switch for To remove subsequent tracks in range of selected the track you want to rename.
- Page 94 To display the controls for a plug-in: operation: Press the Insert switch (Console View section) Press the Send switch to put 003 in Send View. to put 003 in Insert View. Press the Channel Select switch under a send Press the corresponding Insert/Send Position name to toggle its pre- and post-fader setting.
-
Page 95: Working In Channel View
Press a lit Channel Select switch. gle channel. Controls for the first EQ plug-in on that track 003 is in Channel View when any of the first are assigned to the rotary encoders and dis- four Channel View Select switches (EQ, Dynam- played in the LCD. - Page 96 Switched controls (such as Master Bypass If a plug-in window is open on-screen, it will up- or Phase Invert) are controlled by Channel Se- date to reflect the plug-in selected on the 003. lect switches. To display additional pages of plug-in controls Insert Workflows in Channel View...
- Page 97 Press the Channel Select switch for the track To display the sends on a track: with sends that has panning you want to adjust. Press the Pan/Send switch to put 003 in Chan- Do one of the following: nel View.
-
Page 98: Display Options In Console And Channel View
LCD (Console Pan View): display. Press the Pan switch to put 003 in Pan View. – or – Hold the Display Mode switch. The lower row In Insert View, when editing plug-in parame-... -
Page 99: Navigating And Editing Values In Entry Fields
LCD shows the channel pan setting in the first fader strip and send levels for the cur- Press the Send switch to put 003 in Send View. rently-selected channel in fader strips 3–8. Hold the Display Mode switch. The lower row... -
Page 100: Assigning Pro Tools Paths (Input, Output, Sends, Inserts)
Use the rotary encoder to navigate through (Input, Output, Sends, Inserts) the available input or output paths in the sub- menu. Channel inputs, outputs, inserts, and sends can be assigned directly from the 003 in Assign mode. 003 & 003 Rack Getting Started Guide... - Page 101 Select switch if you need to return to – or – the previous menu level. • Press the flashing ESC switch to cancel the • Press the flashing ESC switch to cancel the removal and restore the assignment. assignment. Chapter 11: Pro Tools Mode with 003...
- Page 102 • Press the flashing ESC switch to cancel the nel Select switch to display the name of the assignment. current path type in the main menu. The main menu includes a dash (“–”) for no as- signment, plugin (plug-in), and I/O. 003 & 003 Rack Getting Started Guide...
-
Page 103: Working With Output Windows
To toggle a send’s pre- and post-fader operation: to the main menu for assigning inserts. This menu includes a dash (“–”) for no assignment, Press the Send switch to put 003 in Send View. plugin (plug-in), and I/O. Press a Channel Select switch for the send... -
Page 104: Recording
MIDI resolution. To play backwards at a variable rate: Rotate the outer Shuttle ring counter-clock- To zoom in horizontally for all tracks: wise. Press the Zoom switch. Press the Right Arrow key. 003 & 003 Rack Getting Started Guide... -
Page 105: General Editing
Press the Bank or Nudge switch. Hold Shift and press the Up or Down Arrow Undoing Pro Tools Operations key. You can undo Pro Tools operations from 003. Setting Selection Start and End (See the Pro Tools Reference Guide for details on multiple undo capabilities.) -
Page 106: Working With Memory Locations
Locations switches. Do one of the following: Pro Tools Memory Locations (Markers) can be created directly from 003 during playback or • Press the Channel Select switch that corre- while the Transport is stopped. sponds to the Memory Location. – or –... - Page 107 Banking Channels on 003 To assign a stereo send channel to a rotary encoder: To move the display of tracks on 003 forward or While in Send Flip mode, press the Meter backward eight channels at a time: switch immediately to the right of the rotary en- Press the Bank switch.
-
Page 108: Working With Automation
Banking Master Faders Working with Automation To bank all Master Fader tracks in the current The Automation mode can be set from 003 for a session to the right-hand side of the control single track, all selected tracks, or all tracks in surface: the session. -
Page 109: 003 Top Panel Shortcuts
003 Top Panel Shortcuts 003 provides shortcuts for many common 003 tasks in Pro Tools mode. Display Options Display Options Shortcuts Task Shortcut Display full name of a track in top LCD row Hold Display and press Channel Select switch for a track... - Page 110 Open or close track Output window (Pan View) Hold Ctrl/Win and press Channel Select switch for a track Open or close multiple track Output windows Hold Ctrl/Win+Shift (Add) and press Channel Select (Pan View) switch for each track 003 & 003 Rack Getting Started Guide...
- Page 111 Editing Shortcuts Task Shortcut Extend cursor or selection (Bank or Nudge Shift (Add)+Up or Down Arrow key mode) Reset fader to is default setting Hold Default and press Channel Select switch for a track Chapter 11: Pro Tools Mode with 003...
- Page 112 Hold Option/Alt All and press Automation switch (Write, Touch, Latch, Read, or Off) Set Automation mode for all selected tracks Hold Option/Alt All+Shift (Add) and press Automation switch (Write, Touch, Latch, Read, or Off) 003 & 003 Rack Getting Started Guide...
-
Page 113: Appendix A. Configuring Midi Studio Setup (Windows Only)
appendix a Configuring MIDI Studio Setup (Windows Only) MIDI Studio Setup Window MIDI Studio Setup The MIDI Studio Setup window is organized MIDI Studio Setup (MSS) lets you configure the into three sections. Interface controls are at the MIDI controllers and sound modules that are top of the window. - Page 114 Instrument list, the Properties sec- derived from the XML-based MIDI device files. tion changes to reflect the properties of the se- lected instrument. For more information, see “MIDI Patch Name Support” on page 107. 003 & 003 Rack Getting Started Guide...
-
Page 115: Midi Patch Name Support
Name Support” on page 107. MIDI devices. These files reside in directories, sorted by manufacturer, in Program Files\ Input Port Common Files\Digidesign\MIDI Patch Names\ Digidesign. The Input Port pop-up menu displays a list of available MIDI interface input ports. The MIDI... - Page 116 Patch Select dialog with patch names Once patch names have been imported into Pro Tools, they are available for that MIDI de- vice in all sessions. 003 & 003 Rack Getting Started Guide...
-
Page 117: Appendix B. Configuring Ams (Mac Os X Only)
appendix b Configuring AMS (Mac OS X Only) Click the MIDI Devices tab. AMS scans your Audio MIDI Setup system for connected MIDI interfaces. If your MIDI interface is properly connected, it appears Pro Tools recognizes the ports on your MIDI in- in the window with each of its ports numbered. - Page 118 Manufacturer or Model names for any of your external MIDI devices is not available in the AMS Manufacturer and Model pop-up menus, you can add them by editing the .middev file in any text editor (such as TextEdit). 003 & 003 Rack Getting Started Guide...
- Page 119 Click the More Properties arrow to expand the Click the device image. The window expands dialog, then enable the appropriate MIDI chan- to show images for various MIDI devices (such nels (1–16) for the Transmits and Receives op- as keyboards, modules, interfaces, and mixers). tions.
-
Page 120: Patch Name Support
MIDI patch name files (.midnam) can be ed- ited in any text editor, or you can use third party patch librarian and editor software to create your own custom patch names. Patch Select button, Mix window 003 & 003 Rack Getting Started Guide... -
Page 121: Appendix C. Utility Mode (003 Only)
Utility Mode (003 Only) 003 is in this mode when the Utility switch is Navigating Utility Mode enabled (flashing). In Utility mode, you can run When running a Utility mode test, you can re- pre-programmed diagnostic tests of the 003 turn to the previous Utility page or exit the test unit. -
Page 122: Viewing Firmware Version Data
The LCD shows the first page of Utility tests. To exit the test at anytime, press any switch. Select the LCD test by pressing the flashing Dynamics switch. The 003 automatically scrolls all of its character sets across the LCD display. 003 & 003 Rack Getting Started Guide... -
Page 123: Switch Test
Select the Test menu by pressing the flashing To exit the test at anytime, press any switch. Insert switch. The LCD shows the first page of Utility tests. Appendix C: Utility Mode (003 Only) -
Page 124: Vegas Mode
(flashing), press it. Select the Test menu by pressing the flashing Insert switch. The LCD shows the first page of Utility tests. Select the Fader menu by pressing the flashing Page Right switch. 003 & 003 Rack Getting Started Guide... -
Page 125: Midi Test
To test MIDI input and output connections: tested. See “Making Studio Connections” on On the back of the 003, connect a standard 5- page 61 for information on connecting devices. pin MIDI cable from the MIDI In port to the MIDI Out 1. - Page 126 Analog Output 2, and so on). Enter Utility mode. If the Utility switch is not Sgnl 003 generates a 440 Hz sine wave enabled (flashing), press it. on all analog and digital outputs. Select the Test menu by pressing the flashing Level is adjustable from 0 dB to –42 dB with the rotary encoder in...
-
Page 127: Appendix D. Hard Drive Configuration And Maintenance
Beat Detective in a session. For complete hard drive requirements, see the Digidesign website (www.digidesign.com). Appendix D: Hard Drive Configuration and Maintenance... -
Page 128: Formatting An Audio Drive
IDE/ATA/SATA Hard Drives Disk Management window (Windows XP) A qualified internal IDE/ATA/SATA drive may be used as a dedicated audio drive. For complete information on track count with internal drives, see the Digidesign website (www.digidesign.com). 003 & 003 Rack Getting Started Guide... - Page 129 • When prompted, select the partition type. • In the Format window, name the volume. • Choose a file system. For optimum perfor- Digidesign recommends using Primary par- mance, audio drives should be formatted as titions, instead of Extended partitions.
-
Page 130: Partitioning Drives
Avoid distributing audio files within a ses- The drive appears on the Desktop with the new sion over different partitions on the same volume name. drive since this will adversely affect drive performance. 003 & 003 Rack Getting Started Guide... -
Page 131: Defragmenting An Audio Drive
Optimizing (Defragmenting) Drives Defragmenting an Audio Drive To prevent fragmentation, you can optimize your drive, which rearranges your files into a Mac Systems contiguous format. Most optimizing software lets you run a check on a drive to find out the When working with larger files (such as video), percentage of fragmentation. -
Page 132: Using Mac Drives On Windows Systems
Pro Tools Reference Guide. Formatting and Maintaining HFS+ Drives To format and partition any drives as HFS+, con- nect the drives to a Mac computer and use the Apple OS X Disk Utility. 003 & 003 Rack Getting Started Guide... -
Page 133: Hard Disk Storage Space
Hard Disk Storage Space Mono audio tracks recorded with 16-bit resolution at 44.1 kHz (CD quality) require approximately 5 MB of hard disk space per minute. The same tracks recorded with 24-bit resolution require about 7.5 MB per minute. Stereo audio tracks recorded with 16-bit resolution at 44.1 kHz (CD quality) require approximately 10 MB of hard disk space per minute. - Page 134 14 GB 15.6 GB 21 GB 23.2 GB 32 mono tracks, 5 minutes 1600 MB 1766 MB 2.4 GB 2.6 GB 32 mono tracks, 60 minutes 18.8 GB 20.8 GB 28 GB 30.8 GB 003 & 003 Rack Getting Started Guide...
-
Page 135: Appendix E. Troubleshooting
Check to be sure your computer has the re- quired amount of RAM to launch Pro Tools. See the Digidesign website (www.digidesign.com). Try a complete restart. Turn off your audio in- terfaces, computer peripherals and your com- puter, and then turn them on again in the proper sequence. -
Page 136: Performance Factors
Website (www.digidesign.com) This is your best Screen Savers Screen saver software should be online source for information to help you get completely disabled on your computer before the most out of your Pro Tools system. running Pro Tools. 003 & 003 Rack Getting Started Guide... - Page 137 • Video Capture cards (manufacturer, model) System Information To verify that your hardware is qualified for use with your Pro Tools system, visit the Digidesign Computer website (www.digidesign.com). • Make, model, processor speed • Amount of system RAM Other Software •...
- Page 138 003 & 003 Rack Getting Started Guide...
-
Page 139: Index
Numerics AC power connector 60 1394 LED 35 ADAT connecting (Mac) 21 connecting 68, 72 connecting (Windows) 12 LED (003 Rack) 53 Display section 34 LED (003) 35 Fader section 36 Optical I/O 58 features 3, 4 additional software Headphone jacks 50... - Page 140 67, 72 Clean Uninstall (Mac) 22 Direct Inject inputs 56 ClearType font smoothing (Windows), disabling 10 Direct Interface inputs 56 Clock Source 28 Display Mode switch 35 compatibility information 5 003 & 003 Rack Getting Started Guide...
- Page 141 119 connecting other devices (Mac) 22 Dynamics plug-ins connecting other devices (Windows) 14 cycling through 88 connection status (003 Rack) 53 displaying all on a track 87 connection status (003) 35 displaying controls 88 port 59 Dynamics switch 42...
- Page 142 Jog mode 45 importing audio from a CD 77 Shuttle mode 45 Input 1–4 Gain controls journaling (Mac), enabling 19 003 49 003 Rack 52 Input switch 40 Kensington Lock port 59 key commands 7 003 & 003 Rack Getting Started Guide...
- Page 143 Pro Tools mode 31 Mic Inputs 1–4 56 Standby mode 31 Third Party Software mode 32 Mic/DI Utility mode 32, 113 controls (003 Rack) 52 modifier keys 49 controls (003) 49 switches (003 Rack) 52 Command 48 switches (003) 49...
- Page 144 (Mac) 20 mirroring 62 demo session (Windows) 16 Optical 58 guides 6 S/PDIF 58 hardware settings 28 importing audio for a CD 77 installing (Mac) 19 installing (Windows) 14 launching 24 003 & 003 Rack Getting Started Guide...
- Page 145 LED (003) 35 Safe Uninstall (Mac) 22 sample rate 55 default 28 QuickPunch switch 46 Save switch 47 QuickStart installation 1 saving a session (003) 83 QuickTime installation (Windows) 15 screen savers 128 scrolling the Edit window 97 SCSI requirements 120 Index...
- Page 146 115 Alt CR (003) 50 Undo 47 Automation modes 48 Utility 47 Aux In (to Monitor) (003 Rack) 53 Zoom switch 46 Aux In (to Monitor) (003) 50 Aux In to 7/8 (003 Rack) 52 SYNC LEDs Aux In to 7/8 (003) 50...
- Page 147 46 Touch test 116 Word Clock tracks In and Out ports 59 adding comments 92 LED (003 Rack) 53 decreasing number of 91 LED (003) 35 increasing number of 91 Pro Tools as master 68 naming 92...
- Page 148 Channel View 87 in Console View 84, 87 in Insert View (Console View) 86 in Pan View 84 in Send View 85 Write Automation LED 48 switch 48 Zoom switch 46 zooming 96 003 & 003 Rack Getting Started Guide...
- Page 150 DIGIDESIGN TECHNICAL SUPPORT (USA) PRODUCT INFORMATION (USA) INTERNATIONAL OFFICES Visit the Digidesign website 2001 Junipero Serra Boulevard Tel: 650.731.6100 Tel: 800.333.2137 for contact information Daly City, CA 94014-3886 USA Fax: 650.731.6384 Tel: 650.731.6300 Fax: 650.731.6399...
Need help?
Do you have a question about the 3 and is the answer not in the manual?
Questions and answers
Record tracks,mixdown tracks,cd burn using audacity digidesign 003 mixer
@Lamont taylor jr
To record, mix down tracks, and burn CDs using Audacity with the DigiDesign 003 mixer, follow these steps:
1. Recording Tracks:
- Connect microphones or instruments to the DigiDesign 003.
- Ensure the 003 is set up as the audio input device in Audacity.
- In Audacity, select the correct input source (from the 003) and press Record to capture audio.
- The 003 offers 16 MIDI input and 32 MIDI output channels, and supports up to 64 audio tracks and 32 instrument tracks per session when used with compatible software like Pro Tools LE.
2. Mixing Down Tracks:
- Use Audacity’s editing tools to arrange and process tracks.
- Apply effects or automation as needed.
- Mix all tracks down to a single stereo file by using the “Export” function and selecting WAV or AIFF format for high-quality output.
3. Burning CDs:
- After exporting the final mix, use a CD burning program (e.g., iTunes, Roxio, or CDex) to write the WAV or AIFF file to a CD.
- The Superscope PSD 300 can also be used to burn CDs directly if available, as it includes a CD-R/RW recorder and supports microphone input.
Note: While Audacity can record and mix, burning CDs requires a separate CD burning application or hardware.
This answer is automatically generated
My Digidesign 3 interface board won't power up. Not the cord, is there a fuse? Bought it in 2010.