Table of Contents
Advertisement
Advertisement
Table of Contents

Subscribe to Our Youtube Channel
Related Manuals for DigiDesign Mbox 2 Mini


Summary of Contents for DigiDesign Mbox 2 Mini
-
Page 1: Setup Guide
Setup Guide Mbox 2 Mini ® Version 8.0.x... - Page 3 C|24, Command|8, Control|24, D-Command, D-Control, D-Fi, D-fx, D-Show, D-Verb, DAE, Digi 002, DigiBase, DigiDelivery, Digidesign, Digidesign Audio Engine, Digidesign Intelligent Noise Reduction, Digidesign TDM Bus, DigiDrive, DigiRack, DigiTest, DigiTranslator, DINR, D-Show, DV Toolkit, EditPack, This symbol on the product or its packaging indicates that this Eleven, Hybrid, Impact, Interplay, M-Audio, MachineControl, product must not be disposed of with other waste.
- Page 4 NOTE: This equipment has been tested and found to comply with the limits for a Class B digital device, pursuant to Part 15 This model Digidesign Mbox 2 Mini complies with the of the FCC Rules. These limits are designed to provide...
- Page 5 Cet appareil numérique de la classe B est conforme à la norme NMB-003 du Canada. Australian Compliance European Compliance Digidesign is authorized to apply the CE (Conformité Europénne) mark on this compliant equipment thereby declaring conformity to EMC Directive 89/336/EEC and Low Voltage Directive 73/23/EEC.
-
Page 7: Table Of Contents
Mbox 2 Mini Features ........ - Page 8 Mbox 2 Mini Front Panel Features ........
- Page 9 About www.digidesign.com ........
- Page 10 Mbox 2 Mini Setup Guide...
-
Page 11: Chapter 1. Welcome To Mbox 2 Mini
Mbox 2 Mini and Pro Tools LE provides your USB-equipped computer with two channels of analog audio input, two analog monitor outputs, and one headphone output. Mbox 2 Mini includes one professional-quality mic preamp and 24-bit analog-to-digital and digital-to-ana- log converters. -
Page 12: Pro Tools Le Capabilities
• Zero-latency analog record monitoring with Mix knob for adjustable balance between input and playback. • USB-powered operation. Mbox 2 Mini may not function properly if connected to a USB hub. Connect Mbox 2 Mini to a separate, dedicated USB port. Pro Tools LE Capabilities Pro Tools LE on Mac or Windows provides the following capabilities with Mbox 2 Mini: •... -
Page 13: System Requirements And Compatibility
System Requirements and Compatibility Mbox 2 Mini can be used with a qualified Mac or Windows computer running Pro Tools LE software. A DVD drive is required to use the Pro Tools Installer disc. We can only assure compatibility and provide support for hardware and software we have tested and approved. - Page 14 For more information, see Appendix C, “Hard Drive Configuration and Maintenance.” Avoid Recording to the System Drive Recording to your system drive is not recommended. Recording and playback on a system drive may result in lower track counts and fewer plug-ins. Mbox 2 Mini Setup Guide...
-
Page 15: Conventions Used In This Guide
Important Notices include information that could affect your Pro Tools session data or the per- formance of your Pro Tools system. Shortcuts show you useful keyboard or mouse shortcuts. Cross References point to related sections in the Pro Tools Guides Chapter 1: Welcome to Mbox 2 Mini 5... - Page 16 Mbox 2 Mini Setup Guide...
-
Page 17: Chapter 2. Installing Pro Tools On Mac
3 Configuring your system for improved performance (see Chapter 4, “Configuring Your Pro Tools System”) 4 Making audio connections to the Mbox 2 Mini (see Chapter 6, “Making Hardware Connec- tions” for details). Chapter 2: Installing Pro Tools on Mac 7... -
Page 18: Installing Pro Tools Le And Connecting Your Interface
Before connecting your Pro Tools LE interface to the computer, you need to install Pro Tools LE software. Do not start this procedure with your Mbox 2 Mini connected to your computer. To Install Pro Tools LE 1 Make sure you are logged in as an Administrator for the account where you want to install Pro Tools. - Page 19 10 When installation is complete, click Restart. 11 Connect the small end of the included USB cable to the USB port on Mbox 2 Mini. Con- nect the other end of the USB cable to any available USB port on your computer.
-
Page 20: Launching Pro Tools Le
(The code begins with the letters DIGI.) To authorize Pro Tools LE software: 1 Make sure the Mbox 2 Mini is connected to your computer. 2 Click the Pro Tools LE icon in the Dock (or double-click the application icon in the Pro Tools folder inside the Digidesign folder). - Page 21 3 Enter the authorization code in the dialog (making sure to type it exactly as printed, and ob- serving any spaces and capitalization), then click Validate. (Your authorization code is located on the inside front cover of this guide.) Use the Quick Start dialog to do one of the following: •...
-
Page 22: Additional Software On The Pro Tools Installer Disc
Guide. Standalone Mbox 2 Mini CoreAudio Driver The Mbox 2 Mini CoreAudio Driver can be installed as a standalone driver on Mac systems that do not have Pro Tools software installed. For information on installing and configuring the standalone version of the Mbox 2 Mini CoreAudio Driver, see the CoreAudio Drivers Guide. - Page 23 Pro Tools Demo Session The Pro Tools LE Installer disc includes a demo session that you can use to verify that your sys- tem is working. The demo session for Pro Tool LE is named “Filtered Dreams.” Before installing the demo session to your audio drive, make sure the drive is configured as de- scribed in “Formatting an Audio Drive”...
-
Page 24: Uninstalling Pro Tools
Avid products. Use Safe Uninstall if you are using an Avid application or preparing to update to a Customer Support release. Clean Uninstall Removes all Pro Tools files, including system files, Digidesign plug-ins, and MIDI patch names. Use Clean Uninstall whenever you are preparing to upgrade, or to trou- bleshoot from a clean system. -
Page 25: Chapter 3. Installing Pro Tools On Windows
3 Configuring your system for improved performance (see Chapter 4, “Configuring Your Pro Tools System”). 4 Making audio connections to the Mbox 2 Mini (see Chapter 6, “Making Hardware Connec- tions” for details). Chapter 3: Installing Pro Tools on Windows 15... -
Page 26: Installing Pro Tools Le And Connecting Your Interface
Before connecting your Pro Tools LE interface to the computer, you need to install Pro Tools LE software. Do not start this procedure with your Mbox 2 Mini connected to your computer. To install Pro Tools LE: 1 Start Windows, logging in with Administrator privileges. For details on Administrator priv- ileges, refer to your Windows documentation. - Page 27 8 When prompted, connect the small end of the included USB cable to the USB port on the Mbox 2 Mini. Connect the other end of the cable to any available USB port on your computer. Mbox 2 Mini may not function properly if connected to a USB hub. Connect Mbox 2 Mini to a separate, dedicated USB port.
- Page 28 11 When installation is complete, click Finish and restart your computer. If the USB LED on the front panel of the Mbox 2 Mini does not illuminate after restarting the computer, try unplugging the USB cable from the Mbox 2 Mini USB port and plugging it back in.
-
Page 29: Launching Pro Tools Le
(The code begins with the letters DIGI.) To authorize Pro Tools LE software: 1 Make sure the Mbox 2 Mini is connected to your computer. 2 Double-click the Pro Tools LE shortcut on your desktop (or the application icon in the Pro Tools folder inside the Digidesign folder). - Page 30 • Create a new session from template. • Create a new blank session. • Open any other session on your system. Quick Start dialog For more information on the Quick Start dialog and session templates, see the Pro Tools Reference Guide. Mbox 2 Mini Setup Guide...
-
Page 31: Additional Software On The Pro Tools Installer Disc
Additional Software on the Pro Tools Installer Disc The Pro Tools Installer disc provides additional software for your system, including audio driv- ers (for playing other audio applications through your Digidesign hardware) and a Pro Tools demo session. Refer to your Pro Tools Installer disc for additional software and installers. - Page 32 Drivers Guide. Standalone Windows Audio Drivers Digidesign Windows Audio Drivers can be installed on Windows systems that do not have Pro Tools software installed. Use the standalone version of the Digidesign Windows Audio Drivers installer (Digidesign Audio Drivers Setup.exe), which is available on the Pro Tools In- staller disc.
-
Page 33: Uninstalling Pro Tools
To uninstall Pro Tools from your computer: 1 Start Windows, logging in with Administrator privileges. For details on Administrator priv- ileges, refer to your Windows documentation. 2 Go to C:\Program Files\Digidesign\Pro Tools\Pro Tools Utilities and double-click Uninstall Pro Tools.exe. 3 Click Next. - Page 34 Mbox 2 Mini Setup Guide...
-
Page 35: Chapter 4. Configuring Your Pro Tools System
chapter 4 Configuring Your Pro Tools System After you have connected your system and installed Pro Tools software, you are ready to start up and configure your Pro Tools system. Starting Up or Shutting Down Your System To ensure that the components of your Pro Tools system communicate properly with each other, you need to start them in a particular order. -
Page 36: Configuring Pro Tools Le Software
In most cases, the default settings for your system provide optimum performance, but you may want to adjust them to accommodate large or processing-intensive Pro Tools sessions. Mbox 2 Mini Setup Guide... - Page 37 Playback Engine dialog for Mbox 2 Mini (Structure installed) In most cases, the default settings for your system provide optimum performance, but you may want to adjust them to accommodate large or processing-intensive Pro Tools sessions. Hardware Buffer Size The Hardware Buffer Size (H/W Buffer Size) controls the size of the buffer used to handle host ™...
- Page 38 Limit settings to achieve the best results. For example, to improve screen response in a me- dium-sized session using a moderate number of RTAS plug-ins, try reducing the number of RTAS plug-ins, but keep the CPU Usage Limit set to its maximum on a single processor sys- tem. Mbox 2 Mini Setup Guide...
- Page 39 To set the number of RTAS Processors: 1 Choose Setup > Playback Engine. 2 From the RTAS Processors pop-up menu, select the number of available processors you want to allocate for RTAS plug-in processing. The number of processors available varies depending on how many processors are available on your computer: •...
- Page 40 However, a lower setting may make it difficult to play or record tracks reliably with sessions containing a large number of tracks or a high density of edits, or with systems that have slower or heavily fragmented hard drives. Mbox 2 Mini Setup Guide...
- Page 41 DAE Playback Buffer Size settings higher than 1500 msec (Level 2) allow higher track count, higher density of edits in a session, or the use of slower hard drives. However, a higher setting may increase the time lag when starting playback or recording, or cause a longer audible time lag while editing during playback.
- Page 42 Plug-in Streaming Buffer Size settings lower than 250 msec (Level 2) reduce the amount of system memory used for sample playback and frees up memory for other system tasks. How- ever, audio quality of sample playback may decrease. Mbox 2 Mini Setup Guide...
- Page 43 Plug-in Streaming Buffer Size settings higher than 250 msec (Level 2) improve the audio quality of sample playback, but they also decrease the amount of memory available for other system tasks, such as RTAS processing. Using a larger Plug-in Streaming Buffer Size leaves less system memory for other tasks. The de- fault setting of 250 ms (Level 2) is recommended unless you are experiencing problems with the audio quality of sample playback.
- Page 44 New Session dialog. (See the Pro Tools Reference Guide for details.) To change the default Sample Rate: 1 Choose Setup > Hardware. Hardware Setup dialog for Mbox 2 Mini 2 Select the sample rate from the Sample Rate pop-up menu. 3 Click OK.
- Page 45 Clock Source The Pro Tools Hardware Setup dialog is set to Internal, which supports recording analog sig- nals directly into Mbox 2 Mini analog inputs 1–2. Configuring I/O Setup Using the I/O Setup dialog, you can label Pro Tools LE input, output, insert, and bus signal paths.
-
Page 46: Optimizing A Mac System For Pro Tools
Do not use the Mac OS X automatic Software Update feature, as it may upgrade your system to a version of Mac OS that has not yet been qualified for Pro Tools. For details on qualified versions of Mac OS, see the latest compatibility information on our website (www.digide- sign.com/compatibility). Mbox 2 Mini Setup Guide... - Page 47 Turning Off Software Update To turn off the Software Update feature: 1 Choose System Preferences from the Apple menu and click Software Update. 2 Click the Scheduled Check tab and ensure Check for updates is deselected. Turning Off Energy Saver To turn off the Energy Saver feature: 1 Choose System Preferences from the Apple menu and click Energy Saver.
- Page 48 For a complete list of Pro Tools keyboard shortcuts, see the Keyboard Shortcuts Guide (Help > Keyboard Shortcuts). To disable or reassign Mac OS X keyboard shortcuts: 1 Choose System Preferences from the Apple menu and click Keyboard & Mouse. 2 Click the Keyboard Shortcuts tab. Mbox 2 Mini Setup Guide...
- Page 49 3 Do one of the following: • Deselect the Mac OS X options that conflict with Pro Tools keyboard shortcuts. – or – • Assign different, non-conflicting keyboard shortcuts to the corresponding Mac OS X op- tions. Reassign Spaces Keyboard Shortcuts If you want to use Spaces, you should reassign the Spaces keyboard shortcuts to avoid conflicts with important Pro Tools keyboard shortcuts.
- Page 50 1 Launch the Disk Utility application, located in Applications/Utilities. 2 Select the volume in the left column of the Disk Utility window. 3 Click Enable Journaling in the toolbar. For optimum performance, audio drives should be formatted as Mac OS Extended (Journaled) Mbox 2 Mini Setup Guide...
-
Page 51: Optimizing A Windows System For Pro Tools
Optimizing a Windows System for Pro Tools To ensure optimum performance with Pro Tools LE, configure your computer before using Pro Tools hardware and software. For Mac System Optimization, see “Optimizing a Mac System for Pro Tools” on page 36. Before configuring your computer, make sure you are logged in as an Administrator for the ac- count where you want to install Pro Tools. - Page 52 8 Select the value in the Setting (Minutes) field and press Backspace on your computer key- board. 9 Press Enter. The hard disk setting changes to Never and the Power Options dialog closes. 10 In the Edit Plan Settings window, click Save changes and close the window. Mbox 2 Mini Setup Guide...
- Page 53 To configure Windows Power Management (Windows XP): 1 Choose Start > Control Panel. 2 Double-click Power Options. 3 Click the Power Schemes tab. 4 From the Power Schemes pop-up menu, select Always. 5 Verify that the following settings are set to Never: •...
- Page 54 3 In the Device Manager window, double-click Network adapters, then double-click the Net- work Adapter card you want to disable. 4 Under the General tab, choose Do not use this device (disable) from the Device Usage pop-up menu, and click OK. 5 Close the Computer Management window. Mbox 2 Mini Setup Guide...
- Page 55 Adjusting Processor Scheduling To adjust Processor Scheduling performance: 1 Right-click Computer (Windows Vista) or My Computer (Windows XP) and choose Properties. 2 in the System Properties window, click the Advanced tab. 3 Under the Performance section, click the Settings button. 4 In the Performance Options window, click the Advanced tab.
- Page 56 Pro Tools performance has increased before you deselect Don't show this message again. If per- formance has not changed, run “msconfig” and return your computer Startup Selection back to Normal Startup - load all device drives and services. Alternatively, try disabling Startup items and non-essential processes individually Mbox 2 Mini Setup Guide...
-
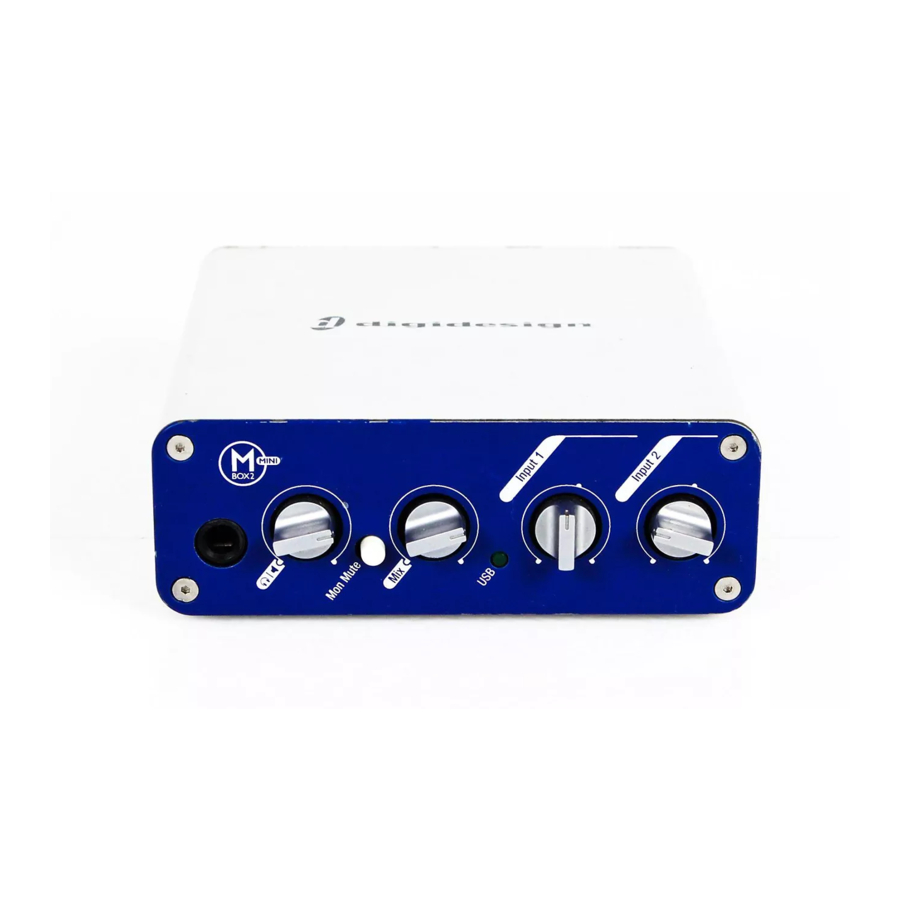
Page 57: Chapter 5. Mbox 2 Mini Hardware Overview
5 Mbox 2 Mini Hardware Overview Mbox 2 Mini Front Panel Features The Mbox 2 Mini front panel provides the following features: Headphone/Monitor Input 1 Input 2 Output Level Mix (Ratio) Gain Gain Headphone Output Monitor Mute Figure 1. Mbox 2 Mini front panel Headphone Output Use the Headphone Output to connect a stereo headphone with a 1/4-inch stereo connector. - Page 58 Mix (Ratio) Control Mbox 2 Mini gives you the ability to monitor your analog input signals while recording, with- out the delay incurred by A/D/A converters and host-based processing. This zero-latency analog monitoring is controlled with the Mix knob, which you can use to blend and adjust the monitor ratio between Mbox 2 Mini analog inputs and Pro Tools play- back.
-
Page 59: Mbox 2 Mini Back Panel Features
Mbox 2 Mini Back Panel Features The Mbox 2 Mini back panel provides the following features: Monitor Outputs Line/DI Kensington Input Input 1 Lock port Mic/DI Line/DI Phantom Input 2 Power port Figure 2. Mbox 2 Mini back panel Input 1 Section Mic and Line/DI Inputs The Input 1 section includes Mic (XLR) and Line/DI inputs. - Page 60 If you are not sure about the phantom power requirements for your microphone, consult your microphone’s documentation or contact the manufacturer. When using phantom power, Mbox 2 Mini’s maximum current per microphone is 4 mA. Input 2 Section Input 2 Line/DI Input The Input 2 section includes one Line/DI input.
- Page 61 This standard USB v1.1 connector is used to connect your computer to the Mbox 2 Mini. One standard USB cable is included with your system. The Mbox 2 Mini is compatible with USB 2.0 ports. However, the USB 2.0 bus will switch to the slower USB v.1.1 speed to accommodate Mbox 2 Mini.
- Page 62 Mbox 2 Mini Setup Guide...
-
Page 63: Chapter 6. Making Hardware Connections
Mbox 2 Mini cannot be played through your computer’s speakers or your computer’s sound output. Connecting Headphones On the front panel of the Mbox 2 Mini is a 1/4-inch jack to connect headphones.Use the Headphone and Monitor Output Level control to adjust headphone and monitor volume. To connect headphones: Connect headphones with a 1/4-inch stereo connector (or adapter) to the Headphone jack. -
Page 64: Connecting Audio Inputs
Mbox 2 Mini” on page 55, and “Connecting Instruments to the Mbox 2 Mini” on page 57. Overview of Analog Inputs Mbox 2 Mini provides a total of two channels of analog input on the back panel. These are la- belled Inputs 1 and 2. Input 1 Input 1 provides Mic and Line/DI input connectors. -
Page 65: Connecting A Microphone To The Mbox 2 Mini
Connecting a Microphone to the Mbox 2 Mini Mic Cables and Connectors There are several ways to use Mbox 2 Mini with a microphone, depending on the type of mi- crophone and cable you use. Some microphone cables use an XLR connector to attach a microphone to an input (such as those on the Mbox 2 Mini);... - Page 66 4 On the front of the Mbox 2 Mini, turn the Mix control fully left to Input. 5 On the front of the Mbox 2 Mini, carefully turn the Input 1 Gain control to the right to in- crease the input level of your microphone signal.
-
Page 67: Connecting Instruments To The Mbox 2 Mini
3 On the front of the Mbox 2 Mini, turn the Mix control fully left to Input. 4 On the front of the Mbox 2 Mini, carefully turn the input’s Gain control to the right to in- crease the input level of your guitar. - Page 68 Mbox 2 Mini Setup Guide...
-
Page 69: Appendix A. Configuring Ams (Mac Os X Only)
appendix a Configuring AMS (Mac OS X Only) Audio MIDI Setup Pro Tools recognizes the ports on your MIDI interface as generic ports. With Mac OS X, you use Apple’s Audio MIDI Setup (AMS) utility to identify external MIDI devices connected to your MIDI interface and configure your MIDI studio for use with Pro Tools. - Page 70 “cable” to the input arrow of the cor- responding port of the MIDI interface. Making MIDI input and output connections (Digidesign Command|8 shown) 6 Click the arrow for the appropriate input port of the device and drag a cable to the output arrow of the corresponding port of the MIDI interface.
- Page 71 Root/Library/Audio/MIDI Devices. Pro Tools installs a file that contains infor- mation for many commercially available MIDI devices, named “Digidesign Device List.mid- dev.” If the Manufacturer or Model names for any of your external MIDI devices is not available in the AMS Manufacturer and Model pop-up menus, you can add them by editing the .middev...
- Page 72 3 Click the More Properties arrow to expand the dialog, then enable the appropriate MIDI channels (1–16) for the Transmits and Receives options. (These determine which channels the device will use to send and receive MIDI.) Enabling MIDI channels Mbox 2 Mini Setup Guide...
- Page 73 4 Click the device image. The window expands to show images for various MIDI devices (such as keyboards, modules, interfaces, and mixers). Select an icon for your device. Selecting a device icon To use your own custom icons, you can place TIFF image files in /Library/Audio/MIDI Devices/ Generic/Images, and they will appear as choices in the AMS device window 5 Click OK.
-
Page 74: Midi Patch Name Support
MIDI devices. Pro Tools installs MIDI patch name files (.midnam) for the factory default patch names of many common MIDI devices. These files reside in directo- ries, sorted by manufacturer, in /Library/Audio/MIDI Patch Names/Digidesign. To import MIDI patch names into Pro Tools: 1 Verify the MIDI Device name in the Audio MIDI Setup window (see “Audio MIDI Setup”... - Page 75 Change button Patch Select dialog 5 In the Open dialog, navigate to /Library/Audio/MIDI Patch Names/Digidesign/<name of manufacturer>, and select the MIDI Patch Name file (.midnam) for the MIDI device. 6 Click Open. The Patch Select dialog is populated with patch names and the Patch Name Bank pop-up menu appears in the upper left hand corner of the window.
- Page 76 Mbox 2 Mini Setup Guide...
-
Page 77: Appendix B. Configuring Midi Studio Setup (Windows Only)
appendix b Configuring MIDI Studio Setup (Windows Only) MIDI Studio Setup MIDI Studio Setup (MSS) lets you configure the MIDI controllers and sound modules that are connected to your system, and control the routing of MIDI data between your MIDI equip- ment and Pro Tools. - Page 78 Pro Tools. Check the documentation that came with your MIDI interface for more in- formation. Instrument List The Instrument list contains all the currently defined instruments. Selecting an instrument in the list displays that instrument’s properties in the Properties section of the window. Mbox 2 Mini Setup Guide...
- Page 79 Properties Section The Properties section lets you edit information for new instruments, or instrument currently selected in the Instrument list. MIDI Studio Setup Properties section When a previously defined instrument is selected in the Instrument list, the Properties section changes to reflect the properties of the selected instrument. To define an instrument with MIDI Studio Setup: 1 Choose Setup >...
- Page 80 MIDI data is sent from the external MIDI device specified in the Instrument Name field into your MIDI interface. If you set the input port to None, the defined instrument will not appear as a choice in a MIDI Input selector. Mbox 2 Mini Setup Guide...
-
Page 81: Midi Patch Name Support
MIDI devices. Pro Tools installs MIDI patch name files (.midnam) for the factory default patch names of many common MIDI devices. These files reside in directo- ries, sorted by manufacturer, in Program Files\ Common Files\Digidesign\MIDI Patch Names\ Digidesign. - Page 82 3 Click the MIDI track’s Patch Select button. Patch Select button, Patch Select button, (Mix window) (Edit window) Patch Select button, Edit window 4 In the Patch Select dialog, click Change. Change button Patch Select dialog Mbox 2 Mini Setup Guide...
- Page 83 5 In the Open dialog, navigate to Program Files\Common Files\Digidesign\MIDI Patch Names\Digidesign\<name of manufacturer>, and select the MIDI Patch Name file (.midnam) for the MIDI device. 6 Click Open. The Patch Select dialog is populated with patch names and the Patch Name Bank pop-up menu appears in the upper left hand corner of the window.
- Page 84 Mbox 2 Mini Setup Guide...
-
Page 85: Appendix C. Hard Drive Configuration And Maintenance
appendix c Hard Drive Configuration and Maintenance It is recommended that you start with a newly formatted external or secondary internal audio drive. You should also periodically defragment your audio drive to ensure continued system performance. Always back up any important data on your drive before formatting it, as it will erase all data on the drive. -
Page 86: Formatting An Audio Drive
Pro Tools. For complete information on track count and the supported number and configuration of SCSI drives, visit our website (www.digidesign.com/compatibility). FireWire Hard Drives Qualified FireWire drives are supported for audio playback and recording with Pro Tools. On systems without Fire Wire ports, a qualified FireWire host adapter is recommended. - Page 87 To format an audio drive: 1 Launch the Disk Utility application, located in Applications/Utilities. Disk Utility (Mac OS X) 2 Click the Erase tab. 3 Select the drive you want to initialize in the column on the left side of the window. If the drive contains existing data, be sure to back up all data before erasing and formatting the drive.
- Page 88 Healthy volumes are volumes that have previously been partitioned and formatted. • In the Disk Management window, right-click the hard drive you will use for audio and choose Format. • In the Format window, name the volume. Mbox 2 Mini Setup Guide...
- Page 89 • Choose a file system. For optimum performance, audio drives should be formatted as NTFS. • Select “Perform a quick format.” • Make sure “Enable file and folder compression” is not selected. • Set the Allocation unit size to Default. •...
-
Page 90: Partitioning Drives
When working with larger files (such as video), you can limit fragmentation by backing up your important files to another disk, erasing the files from the original hard disk, then copying the files back, instead defragmenting the drive. Mbox 2 Mini Setup Guide... - Page 91 Window Systems Periodically defragment audio drives to maintain system performance. For maximum recording and playback efficiency, data should be written to your hard drive in a contiguous fashion—minimizing the seek requirements to play back the data. Unfortu- nately, your computer can’t always store the sound files in this way and must write to disk wherever it can find space.
- Page 92 2 Under Storage, choose Disk Defragmenter. 3 In the Disk Defragmenter window, choose the drive you want to defragment 4 Click the Defragment button and follow the on-screen instructions. When defragmenting is complete, close the Computer Management window. Mbox 2 Mini Setup Guide...
-
Page 93: Using Mac Drives On Windows Systems
Using Mac Drives on Windows Systems Pro Tools for Windows lets you record and play back sessions directly from a Mac-formatted (HFS+) drive connected to a Windows system. This functionality requires that all Mac session and audio files be stored on Mac-formatted drives. During Pro Tools installation, make sure to select the Mac HFS+ Disk Support option. -
Page 94: Hard Disk Storage Space
24 mono tracks, 60 minutes 7 GB 7.8 GB 10.5 GB 11.6 GB 32 mono tracks, 5 minutes 800 MB 883 MB 1.2 GB 1.3 GB 32 mono tracks, 60 minutes 9.4 GB 10.4 GB 14 GB 15.4 GB Mbox 2 Mini Setup Guide... -
Page 95: Appendix D. Troubleshooting
appendix d Troubleshooting Backing Up Your Work It is highly recommended that you back up your work on a regular basis, and especially before making changes to your system configuration. Backing Up Your Session Data Back up your session and audio data frequently. There are a variety of media that are suited to back up projects of various sizes, including additional hard drives, CD/DVD burners, auto- mated tape backup systems, and high-capacity optical drives. -
Page 96: Common Issues
• Close any error message. • Double-click the Pro Tools application. • In Pro Tools, choose File > Open Session to open the session. Reinstall the Pro Tools application, using the Pro Tools Installer disc. Mbox 2 Mini Setup Guide... -
Page 97: Performance Factors
Audio Interface Is Not Recognized Problem When you launch Pro Tools it does not recognize an audio interface, or a connected audio in- terface is not available. Possible Solutions Turn off your computer and check to be sure your cables are properly and securely con- ... -
Page 98: Before You Call Technical Support
Before You Call Technical Support Register Your System Register your purchase immediately after reviewing the Digidesign Registration Information Card included with every Pro Tools system. Registering your purchase is the only way you be- come eligible to receive complimentary technical support and future upgrade offers. Register- ing is one of the most important steps to complete as a new user. - Page 99 Digidesign Software • Pro Tools software version • Plug-in versions • Other Digidesign software • Additional plug-ins from Digidesign Development Partners Other Hardware Refer to the manufacturer’s documentation for operational details. The most common hardware additions include: • 1394 (FireWire) cards for Windows systems (manufacturer, model) •...
- Page 100 Mbox 2 Mini Setup Guide...
-
Page 101: Appendix E. Resources
In addition to any printed guides included with your system, PDF versions of the printed guides and many additional Pro Tools guides and Read Mes are installed automatically during Pro Tools installation. The Digidesign PDFs are located in the Digidesign/Documentation folder on your local drive. - Page 102 To view or print PDF guides, you can use Adobe Reader or Apple Preview (Mac only). Read Me Files These contain late-breaking information and known issues pertaining to Pro Tools software and hardware configurations. Read Me files are installed in Documentation folder when you install Pro Tools. Mbox 2 Mini Setup Guide...
-
Page 103: About Www.digidesign.com
Digidesign User Conference (DUC). Go to: http://duc.digidesign.com • For questions about installation, visit our online Answerbase. Go to: http://www.digidesign.com/answerbase • If you can’t find your answer on the DUC or Answerbase, contact Digidesign email support. Go to: http://www.digidesign.com/tsr Appendix E: Resources 93... - Page 104 Mbox 2 Mini Setup Guide...
-
Page 105: Index
Windows 19 requirements 4 SCSI requirements 76 space requirements 84 Hardware Buffer Size 27 Cache Size 31 headphones connecting Mbox 2 Mini gain control 47 Mac 9 output 47 CoreAudio driver (Mac) 12 CPU Usage Limit 29 I/O Setup Windows 35... - Page 106 (Windows) 67 MIDI Studio Setup (MSS) (Windows) 67 QuickTime Minimize Additional I/O Latency option 30 installing (Windows) 19 mix control (Mbox 2 Mini) 48 monitoring 48 ratio control (Mbox 2 Mini) 48 removing Pro Tools network cards (Windows), disabling 44...
- Page 107 system settings Cache Size 31 CPU Usage Limit 29 DAE Playback Buffer Size 30 Hardware Buffer Size 27 I/O Setup 35 Plug-in Streaming Buffer 33 Plug-in Streaming Buffer Size 32 Sample Rate 34 System Memory Allocation 32 technical support 88 uninstalling Pro Tools Mac 14 Windows 23...
- Page 108 DIGIDESIGN TECHNICAL SUPPORT PRODUCT INFORMATION (USA) For company and product information, 2001 Junipero Serra Boulevard Visit the Digidesign Online Support Center visit us on the web at www.digidesign.com Daly City, CA 94014-3886 USA at www.digidesign.com/support...
Need help?
Do you have a question about the Mbox 2 Mini and is the answer not in the manual?
Questions and answers