Table of Contents
Advertisement
Getting Started with
Digi 002 & Digi 002 Rack
Version 6.7 for LE Systems on Windows or Macintosh
Digidesign
2001 Junipero Serra Boulevard
Daly City, CA 94014-3886 USA
tel: 650·731·6300
fax: 650·731·6399
Technical Support (USA)
tel: 650·731·6100
fax: 650·731·6384
Product Information (USA)
tel: 650·731·6102
tel: 800·333·2137
International Offices
Visit the Digidesign Web site
for contact information
Web Site
www.digidesign.com
Advertisement
Table of Contents

Related Manuals for DigiDesign Digi 002


Summary of Contents for DigiDesign Digi 002
- Page 1 Getting Started with Digi 002 & Digi 002 Rack Version 6.7 for LE Systems on Windows or Macintosh Digidesign 2001 Junipero Serra Boulevard Daly City, CA 94014-3886 USA tel: 650·731·6300 fax: 650·731·6399 Technical Support (USA) tel: 650·731·6100 fax: 650·731·6384 Product Information (USA) tel: 650·731·6102...
- Page 2 Copyright This guide is copyrighted ©2004 by Digidesign, a division of Avid Technology, Inc. (hereafter “Digidesign”), with all rights reserved. Under copyright laws, this guide may not be duplicated in whole or in part without the written consent of Digidesign.
- Page 3 Communications & Safety Regulation Information Compliance Statement The model Digi 002 complies with the following standards regulating interference and EMC: • FCC Part 15 Class B • EN55022 • EN55024 • AS/NZS 3548 Class B • CISPR 22 Class B...
- Page 4 This equipment has been tested to comply with USA and Canadian safety certification in accordance with the specification of UL Standards : UL1419 and Canadian CAN C22.2NO.1-98, IEC60950. Digidesign Inc., has been authorized to apply the appropriate UL & CUL mark on its compliant equipment.
-
Page 5: Table Of Contents
Windows System Settings ..........8 Connecting Digi 002 or Digi 002 Rack to the Computer ......10 Connecting FireWire Drives . - Page 6 Optional Software on the Pro Tools Installer CD-ROM......23 Connecting Digi 002 or Digi 002 Rack to the Computer ......24 Connecting FireWire Drives .
- Page 7 Connecting Digi 002 or Digi 002 Rack to a Computer......57...
- Page 8 Configuring the Digidesign CoreAudio Driver ........
-
Page 9: Chapter 1. Welcome To Digi 002 And Digi 002 Rack
A/D converters supporting up to 24-bit, 96 kHz audio • Digi 002 or Digi 002 Rack unit (depending on which product you have purchased) • 48V phantom power on mic preamps, switch- able in channel pairs •... - Page 10 (Digi 002 Only) • 1 MIDI In port and 2 MIDI Out ports, provid- Digi 002 can be used as a stand-alone 8-channel ing up to 16 channels of MIDI input and up to digital mixer with the following features: 32 channels of MIDI output •...
-
Page 11: Pro Tools Le Capabilities
Pro Tools LE Capabilities System Requirements Pro Tools LE software provides the following ca- Digi 002 and Digi 002 Rack can be used with a pabilities with Digi 002 and Digi 002 Rack: Digidesign-qualified Windows or Macintosh computer running Pro Tools LE software. - Page 12 1.6 GB 1.8 GB 2.4 GB 2.8 GB 5 minutes 32 mono tracks 9.4 GB 10.4 GB 14 GB 15.5 GB 18.8 GB 20.8 GB 28 GB 31 GB 60 minutes Getting Started with Digi 002 & Digi 002 Rack...
-
Page 13: Digidesign Registration
About the Pro Tools Guides • Digidesign Plug-Ins Guide explains how to use optional Digidesign plug-ins. This Getting Started with Digi 002 & Digi 002 Rack Guide explains how to install and use Digi 002 • DigiBase Guide provides details on using... -
Page 14: About Www.digidesign.com
Shortcuts show you useful keyboard or mouse shortcuts. To learn more about these and other resources available from Digidesign, visit the Digidesign Web site (www.digidesign.com). Cross References point to related sections in other Digidesign guides. Getting Started with Digi 002 & Digi 002 Rack... -
Page 15: Chapter 2. Windows Configuration
Installation Overview be off. If your computer is on, power it Installing the Digi 002 or Digi 002 Rack on a down. Windows computer includes the following To set up and test the Digi 002:... -
Page 16: Windows System Settings
Hyper-Threading in the BIOS. the channel inputs, “In1” through “In8.” Refer to your computer’s documentation for To return Digi 002 to Standby mode, press the steps on how to enter your computer’s BIOS and Standalone switch a second time. The Channel disable Hyper-Threading. - Page 17 Click OK. • Turn off any non-essential USB devices This sets System Standby, System Hibernate, while using Digi 002 or Digi 002 Rack. and “Turn off hard disks” to Never. • If your video display card supports it, en- able Bus Mastering in the manufacturer’s Disable ClearType Font Smoothing Control Panel.
-
Page 18: Connecting Digi 002 Or Digi 002 Rack To The Computer
• Plug the other end of the FireWire cable into an available FireWire port on your To connect the Digi 002 or Digi 002 Rack to your computer. computer: • Plug the other end of the cable into an... -
Page 19: Installing Pro Tools Le
4-Pin FireWire Cable Wait for the Found New Hardware Wizard di- alog to appear and leave it open (do not press Digi 002 and Digi 002 Rack include a 6-pin to 6- Next). pin FireWire cable. Some Windows laptops in- clude a 4-pin FireWire port. -
Page 20: Optional Software On The Pro Tools Installer Cd-Rom
Digidesign hardware. To use Digidesign WaveDriver without Pro Tools, use the stand-alone version of the Digidesign WaveDriver. The stand- alone version of Digidesign WaveDriver is available on the Digidesign Web site (www.digidesign.com) Getting Started with Digi 002 & Digi 002 Rack... - Page 21 Pro Tools Demo Session To share Pro Tools sessions between Macintosh and Windows systems, select the “Enforce The Pro Tools LE Installer CD includes a demo Mac/PC Compatibility” option when creating session that you can use to verify that your sys- the session, or when saving a session copy to a tem is working.
-
Page 22: Launching Pro Tools Le
Pro Tools cannot communicate with Digi 002 or Digi 002 Rack. In this case, wait up to 30 sec- onds. If the message does not go away, discon- nect then reconnect Digi 002 or Digi 002 Rack and click OK. -
Page 23: Configuring Pro Tools Le
In most cases, the default settings for your sys- tem provide optimum performance, but you may want to adjust them to accommodate large Playback Engine dialog (Digi 002 shown) or processing-intensive Pro Tools sessions. From the H/W Buffer Size pop-up menu, select Hardware Buffer Size the audio buffer size, in samples. - Page 24 Hardware Setup dialog (Digi 002 shown) Choose Setups > Playback Engine. Select the sample rate from the Sample Rate pop-up menu. From the DAE Playback Buffer pop-up menu, select a buffer size. Click OK. Click OK. Getting Started with Digi 002 & Digi 002 Rack...
- Page 25 To select the clock source: Internal if you are synchronizing the external Choose Setups > Hardware Setup. device to Digi 002 or Digi 002 Rack. If you are synchronizing the Pro Tools clock to the exter- Choose the clock source from the Clock nal device, select ADAT, RCA (S/PDIF) or Optical Source pop-up menu.
-
Page 26: Hard Drive Configuration And Maintenance
Disk Cleanup (or an equivalent utility) to asses the condition of drives and, if necessary, For more information on Ghost, visit the Sy- delete temporary files and other unused data. mantec Web site (www.symantec.com) Getting Started with Digi 002 & Digi 002 Rack... -
Page 27: Removing Pro Tools On Windows Xp
Launch Add or Remove Programs. system performance. From the Currently installed programs list, se- To defragment an audio drive: lect Digidesign Pro Tools LE. Right-click My Computer and choose Man- Click the Change/Remove button. age. Follow the onscreen instructions to remove Under Storage, choose Disk Defragmenter. - Page 28 Getting Started with Digi 002 & Digi 002 Rack...
-
Page 29: Chapter 3. Macintosh Configuration
Installation Overview be off. If your computer is on, power it Installation of the Digi 002 or Digi 002 Rack on down. a Macintosh includes the following steps: To set up and test the Digi 002: “Testing Digi 002”... -
Page 30: Apple System Settings For Mac Os X
Close the Software Update dialog box. the channel inputs, “In1” through “In8.” Proceed to “Installing Pro Tools LE” on To return Digi 002 to Standby mode, press the page 22. Standalone switch a second time. The Channel Scribble Strips on the unit will show “Exit Standalone Mode?”... -
Page 31: Optional Software On The Pro Tools Installer Cd-Rom
Audio MIDI Setup (AMS) Stand-Alone CoreAudio Driver Installer (Optional) This version of Digidesign CoreAudio Driver can be installed on Digidesign-qualified Pro Tools If you plan to use any MIDI devices with systems running on Macintosh (for example, if Pro Tools, configure your MIDI setup with the the CoreAudio Driver was uninstalled), or it can Apple Audio MIDI Setup (AMS) utility. -
Page 32: Connecting Digi 002 Or Digi 002 Rack To The Computer
• Plug the other end of the FireWire cable into an available FireWire port on your To connect the Digi 002 or Digi 002 Rack to your computer. computer: • Plug the other end of the FireWire cable... -
Page 33: Launching Pro Tools Le
Upgrading Guide . 4-pin FireWire Cable To authorize Pro Tools LE software: Digi 002 and Digi 002 Rack include a 6-pin to Double-click the Pro Tools LE application (lo- 6-pin FireWire cable. Some Windows laptops in- cated in the Pro Tools folder, inside the Digide- clude a 4-pin FireWire port. -
Page 34: Configuring Pro Tools Le
Pro Tools cannot communicate with Digi 002 or From the H/W Buffer Size pop-up menu, select Digi 002 Rack. In this case, wait up to 30 sec- the audio buffer size, in samples. onds. If the message does not go away, discon- nect then reconnect Digi 002 or Digi 002 Rack and click OK. - Page 35 From the CPU Usage Limit pop-up menu, se- system, and configure the digital inputs on the lect the percentage of CPU processing you want Digi 002 or Digi 002 Rack. to allocate to Pro Tools. Click OK. Default Sample Rate...
- Page 36 If you are re- S/PDIF format device to the RCA S/PDIF In con- cording directly into Pro Tools, you will usually nector on the back of the Digi 002 or Digi 002 use the Internal setting. If you are transferring Rack.
- Page 37 Choose Setups > I/O Setup. vides options for ignoring these messages dur- ing playback and recording. When enabled, Pro Tools sends an audible pop to the Digi 002 or Digi 002 Rack hardware outputs, instead of dis- playing a buffer underrun error message. These pops are not written to disk.
-
Page 38: Hard Drive Configuration And Maintenance
In the Installer window, choose Uninstall from the pop-up menu, and click Uninstall. Follow the on-screen instructions to remove Pro Tools. When finished, click Quit to close the Installer window. Getting Started with Digi 002 & Digi 002 Rack... -
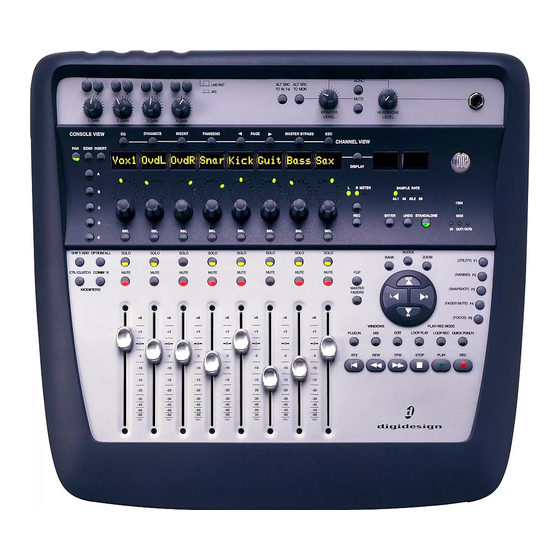
Page 39: Chapter 4. Digi 002 Top Panel
Digi 002 Operating Modes Digi 002 is in this mode when the Digi 002 unit Digi 002 can be in any of three states when it is is connected to a computer and Pro Tools LE powered on: Standby mode, Pro Tools mode, or software is running. -
Page 40: The Digi 002 Top Panel
Pro Tools. The Transport and Navigation controls provide access to many of the on-screen navigation features of Pro Tools. This chapter covers each of the Digi 002 sections in relation to its function while in Pro Tools mode. MONO... - Page 41 Views in Pro Tools Mode Digi 002 is in Console View when any of the Console View selectors (Pan, Send, or Insert) are When Digi 002 is used with Pro Tools, many of lit in the Console View area. its controls perform more than one function, depending on which view you are in.
-
Page 42: Fader Section
Channel Strip Controls Fader Section Channel Faders The Digi 002 fader section consists of 8 identical channel strips, each with a touch-sensitive Each channel has its own touch-sensitive, mo- fader, solo and mute switches, a multi-state se- torized fader for controlling levels of audio and lect switch, and a rotary encoder. - Page 43 Meter mode, the LED rings show increasing lev- Press the Channel Select switch on any track els in a clockwise manner, with the last red LED whose Record Ready indicator is flashing to dis- indicating clipping. arm the track for recording. Chapter 4: Digi 002 Top Panel...
- Page 44 Plug-In Flip Mode When you are in Channel View and working with a plug-in insert, the Flip switch moves any plug-in control assignments from the rotary encoders to the faders, allowing Getting Started with Digi 002 & Digi 002 Rack...
-
Page 45: Console/Channel View Section
Send View This view assigns send level controls Console View to the rotary encoders. The Channel Scribble Console View lets you toggle the Digi 002 to Strips show the names of currently assigned show pan position, send controls or insert sends across all channel strips for a given send names for all channels on the control surface. - Page 46 The first two plug-in window is open on-screen, it will update switches focus on particular types of plug-ins, to reflect the plug-in selected on the Digi 002. while the second two address all types of inserts and sends.
- Page 47 The total number tions on the Digi 002, such as Channel View se- of pages is shown in the Status Display when lections. The Escape/Cancel switch also func- you press the flashing Plug-In Page switch.
-
Page 48: Transport And Navigation Controls
Transport and Navigation Controls These Digi 002 controls mirror the operation of on-screen transport and navigation controls in Pro Tools. In addition, Function keys allow you to invoke special control surface commands and move quickly between different display modes. Fader Bank, Nudge, and... - Page 49 Function/Utility Switches These multi-purpose keys control the display of F1 (Utility) Enters Utility mode during Digi 002 Pro Tools tracks on the Digi 002 control surface, stand-alone operation only. This is where you on-screen zoom functions, and other Pro Tools set control surface and input preferences, as well navigation functions.
-
Page 50: Mic/Line/Instrument Input Controls
TO IN 7-8 TO MON line-level signals only. MUTE MONITOR HEADPHONE When Digi 002 is used to control Pro Tools, LEVEL LEVEL these inputs show up as “Mic/Line 1–4” in the Monitor Mute switch default Pro Tools I/O Setup. Monitor... -
Page 51: Keyboard Modifier Switches
Monitor and Headphone Level Controls Keyboard Modifier Switches Monitor Level Control Digi 002 provides a pair of Many keyboard commands in Pro Tools use Monitor Outputs that mirror its Main Outputs modifier keys, which are pressed in combination (or outputs 1–2), which correspond to outputs with other keys or with a mouse action. -
Page 52: Status Indicators And Display Controls
Status Indicators and Display Controls The area above the Transport and Navigation Controls on Digi 002 contains status indicators, an 8-character LED Scribble Strip, and controls for displaying information about Pro Tools sessions. Display Scribble Strips Channel Scribble Strip Display Mode switch... - Page 53 Meter in- The MIDI Data LEDs indicate the presence of dicates that the Encoder LEDs are functioning as MIDI data on the Digi 002 MIDI In or MIDI Out level meters. ports. For stereo tracks or sends, when L and Meter are both lit, the LED rings display levels for the left channel;...
- Page 54 Getting Started with Digi 002 & Digi 002 Rack...
-
Page 55: Chapter 5. The Digi 002 Rack Front Panel
5 The Digi 002 Rack Front Panel The Digi 002 Rack front panel includes controls for Inputs 1–4, options for routing outputs and monitoring alternate input sources, and indica- tors for session sample rate, connections status, and MIDI data. -
Page 56: Mic/Line/Instrument Input Controls
(switchable in pairs, for Inputs 1–2 and Inputs 3–4). The phantom power switches Alternate Input Routing controls are on the back panel of Digi 002 Rack. Headphone Mono Output switch jack Inputs 1–4 accept microphone, instrument (di-... -
Page 57: Status Indicators
Monitor Outputs. ple rate of the current Pro Tools session. Headphone Level Control The Headphone Out- SAMPLE RATE put on Digi 002 Rack also mirrors outputs 1–2 in 88.2 44.1 Pro Tools, and is independent of the Monitor Outputs. - Page 58 Getting Started with Digi 002 & Digi 002 Rack...
-
Page 59: Chapter 6. Digi 002 And Digi 002 Rack Back Panels
The function of each con- The Analog-to-Digital and Digital-to-Analog nector and their associated switches are ex- converters on all Digi 002 and Digi 002 Rack an- plained in this section. alog inputs and outputs, as well as the S/PDIF See Figure 3 on page 52 and Figure 4 on page 52. - Page 60 Operating Level Mic Inputs 1–4 connectors ports switches AC power connector for Inputs 5–8 Footswitch jack Optical I/O Phantom Power switches S/PDIF Digital I/O Figure 4. Digi 002 Rack back panel Getting Started with Digi 002 & Digi 002 Rack...
-
Page 61: Analog Inputs
Input Gain Operating levels for each of these line-level in- knob (on the top panel of Digi 002, and on the puts is switchable between +4 dBu and –10 dBV, front panel of Digi 002 Rack). -
Page 62: Analog Outputs
Monitor Output level is controlled by the Mon- place a transformer-based line level attenu- itor Level knob on the top panel of Digi 002 (or ator between the Digi 002 or Digi 002 Rack the front panel of Digi 002 Rack). - Page 63 Digi 002 unit is powered off. MIDI Connectors Connecting other FireWire Devices to Digi 002 Digi 002 and Digi 002 Rack can act as a MIDI in- or Digi 002 Rack terface. With one MIDI input and two MIDI out-...
- Page 64 The AC power connectors on Digi 002 and Digi 002 Rack accept a standard modular AC power cable. Digi 002 and Digi 002 Rack are auto power-se- lecting (100V to 240V) and will work automati- cally when plugged into an AC power receptacle in any country.
-
Page 65: Chapter 7. Connecting Your Studio
Your studio setup will differ depending on the type of work you do and the equipment in your studio. The illustrations that follow show two possible setups. Figure 5 shows Digi 002 as the hub of a small recording and mastering studio with Pro Tools. Figure 6 shows Digi 002 Rack as part of a small com- posing workstation. - Page 66 ADAT FireWire cable Monitor outputs FireWire drive Powered speakers Digi 002 CD burner Headphones Outboard effects Monitor Figure 5. Digi 002 project studio configuration running Pro Tools on a desktop computer Getting Started with Digi 002 & Digi 002 Rack...
- Page 67 S/PDIF digital I/o microphone Firewire cable Digi 002 Rack headphones MIDI cable keyboard laptop instrument Figure 6. Digi 002 Rack micro studio configuration running Pro Tools on a laptop computer Chapter 7: Connecting Your Studio...
-
Page 68: Monitoring Audio
Connecting Headphones Monitoring Audio To connect headphones: You can use Digi 002 and Digi 002 Rack with a Connect headphones to the Headphone jack variety of audio monitoring setups, including a power amplifier and speakers, self-powered on the Digi 002 or the Digi 002 Rack. The Head- speakers, and headphones. -
Page 69: Connecting Audio Sources To Digi 002 Or Digi 002 Rack
Digi 002 or Digi 002 Rack. You can connect line-level devices to any of Before making any audio connections to Digi 002 or Digi 002 Rack’s Inputs 1–8, as fol- Digi 002 or Digi 002 Rack, turn down lows: Monitor and Headphone levels or mute the Inputs 1–4 Inputs 1–4 have both XLR and 1/4-... - Page 70 Selector switch (located on the top panel of Mic/Line/Instrument Selector switches (located on the front panel of Digi 002, and top panel of Digi 002 Rack) Digi 002, and on the front panel of Digi 002 Rack) for the corresponding input so that it is in If your microphone requires phantom power, the “Line/Inst”...
-
Page 71: Using External Effects Devices
You can send and return signals to ana- log devices using the analog inputs and outputs S/PDIF on the Digi 002 and the Digi 002 Rack. You can also send and return a digital signal to an exter- S/PDIF (Sony/Phillips Digital Interchange For-... -
Page 72: Monitoring And Recording From Alternate Sources
Alternate Sources outputs of the same number (for example, Input 5 and Output 5) of Digi 002 or Digi 002 and Digi 002 Rack provide a pair of ad- Digi 002 Rack. ditional inputs for monitoring and recording from an external sound source such as a CD To set up a send to an external digital effects player or tape deck. -
Page 73: Mirroring The Main Outputs
Output Selector. Press the “Alt Src to 7–8” switch (located on the top panel of Digi 002, and on the front panel of Digi 002 Rack) to route the signal di- rectly to Inputs 7–8 in Pro Tools. -
Page 74: Connecting A Recorder For Mixdowns
Connecting an ADAT Connecting a Recorder for Mixdowns To connect an ADAT to Digi 002 or Digi 002 Rack: Connect the Optical output on the ADAT to After you record and mix your sessions using the Optical In port on the Digi 002 or Digi 002 or Digi 002 Rack, you may want to mix Digi 002 Rack. -
Page 75: Midi Connections
Using the Digi 002 or Digi 002 Rack built-in the MIDI Out port of the MIDI device or con- MIDI ports, a MIDI keyboard controller and troller to the MIDI In port of your Digi 002 or MIDI instruments, you can take full advantage Digi 002 Rack. - Page 76 Getting Started with Digi 002 & Digi 002 Rack...
-
Page 77: Chapter 8. Working With Pro Tools Le
chapter 8 Working with Pro Tools LE This tutorial of Pro Tools LE software introduces Starting a Session its main windows and features, and also in- cludes a step-by-step overview of audio record- To create a new session: ing (see “Basic Recording” on page 81). Launch Pro Tools LE. - Page 78 Ctrl+”=” on Windows to switch between more information see the DigiBase Guide . the Edit and Mix windows. Mix window Edit window Main Counter Rulers Tracks Tracks Main Counter Transport window Figure 7. Main session windows Getting Started with Digi 002 & Digi 002 Rack...
-
Page 79: Setting A Tempo
Rulers Pro Tools LE provides several different rulers to select as the timebase for your session. Timebase Rulers, displayed along the top of the Edit window, include Bars:Beats , Minutes:Sec- onds , and Samples . The current timebase deter- mines the format of the Main counter, and pro- vides the basis for the Edit window Grid. - Page 80 Insert a Click plug-in on the Auxiliary Input track. In the Click plug-in window, choose a click sound from the Librarian pop-up menu (this menu displays “factory default” when you first insert the plug-in). Click/Countoff Options dialog Getting Started with Digi 002 & Digi 002 Rack...
- Page 81 Configure the click parameters as needed for To save a session: your MIDI sound source. Choose File > Save Session, Save Session As, or Save a Session Copy In. See Appendix E, “Configuring Midi Studio Setup (Windows Only)”or Appendix F, Save Session Saves the currently open session “Configuring AMS (Mac OS X Only)”...
-
Page 82: Transport Controls
Operations menu also affects Transport window (Expanded view shown) playback. See the Pro Tools Reference Guide To configure the Transport window: for more information. Choose Display > Transport Window Shows and select view options. Getting Started with Digi 002 & Digi 002 Rack... -
Page 83: Tracks
Click Create. Tracks In the Mix window, audio tracks, Auxiliary In- You can create audio and MIDI tracks for audio puts, Master Faders, and MIDI tracks appear as and MIDI recording, submixing, routing, auto- vertical channel strips. mating, and editing. Track type is indicated by the Track Type icons Pro Tools provides four types of tracks: audio just below the faders. -
Page 84: Regions Lists
Master Faders provide all the same features as audio tracks and Auxiliary Inputs, with the following exceptions: Input Selector A Master Fader’s output assign- ment determines its input, or source. Getting Started with Digi 002 & Digi 002 Rack... -
Page 85: Navigating In A Session
Click in a track or Timebase Ruler. The cursor Drag border to resize Click Audio Regions appears at the selected location and the width of Regions Lists for pop-up menus counters display the current time location. Click in a track or on a Timebase Ruler Drag border to resize height of Regions Lists... -
Page 86: Memory Locations
(Windows) or Shift and Option keys New Memory Location window (Macintosh) while performing an operation To go to a stored memory location: to apply it to all selected tracks. Choose Windows > Show Memory Locations. Getting Started with Digi 002 & Digi 002 Rack... -
Page 87: Importing Audio
To Zoom in or out on any area of a track in the Edit Markers nor Selections, but have Track Height, window: Zoom Settings, or other options enabled, you can use Memory Locations to zoom in and out Click to select the Zoomer. using just the numeric keypad. - Page 88 Audio From Other Movie command. For more information, see the Pro Tools Ref- erence Guide. Browsing in the Workspace Browser DigiBase provides additional options for importing audio. See the DigiBase Guide for more information. Getting Started with Digi 002 & Digi 002 Rack...
-
Page 89: Basic Recording
Input levels for Mic/Line 1–4 are adjustable us- MIDI into Pro Tools LE. ing the gain knobs (located on the top panel of the Digi 002, and on the front panel of the Digi 002 Rack). Input levels for all other inputs Preparing for Recording on Digi 002 or Digi 002 Rack cannot be adjusted in Pro Tools, and need to be set at the source. - Page 90 Transport window. puts, raise the input level to achieve as strong a Return To Zero Fast Forward signal as possible without excessive noise, then set the input gain on Digi 002 or Digi 002 Rack. Rewind Play Go to End Online...
- Page 91 Recording To and From an ADAT the beginning of the session. You can also record You can use Digi 002 or Digi 002 Rack to inter- according to a selection or from the cursor loca- face with an ADAT, either to record tracks from tion in the Edit window.
-
Page 92: Recording Midi
This feature allows you to use a built-in For detailed information on connecting an mixer in the Digi 002 unit or Digi 002 Rack unit ADAT to your system, see “Connecting an to record and monitor up to 18 inputs (8 analog, ADAT”... - Page 93 In the Mix window, click the track’s MIDI Out- To record onto a MIDI track: put Selector and choose the destination (assign- Verify that the MIDI track you want to record ment) for that MIDI track by choosing a MIDI to is record-enabled and receiving MIDI.
-
Page 94: Quickpunch Recording
Monitoring MIDI Instruments Without a Mixer Power on the Digi 002 or Digi 002 Rack unit. To monitor your MIDI instrument’s analog out- put, you can use an Auxiliary Input. Auxiliary Footswitch jack Inputs function as inputs for both internally bussed signals and external audio sources. -
Page 95: Editing
To punch in when recording MIDI: Edit Modes Set your MIDI input routing and click the Pro Tools LE has four Edit modes: Shuffle, Spot, Record button on each MIDI track you want to Slip, and Grid. The Edit mode is selected by punch in. - Page 96 Edit window. Move the cursor near the end of the audio re- gion (notice the cursor displays as a “]”). Audio region Trimming the end of a region Getting Started with Digi 002 & Digi 002 Rack...
- Page 97 Click at the end of the region and drag left to Click the Selector tool, and drag on the wave- shorten the region. form with the Selector to make a one-bar selec- tion. Note that the selection snaps to the specified grid.
-
Page 98: Mixing
In this way, you can try out different edits of a tracks, outputs can be routed to any hardware track, and switch back and forth between playl- output or internal bus path. ists for comparison. Getting Started with Digi 002 & Digi 002 Rack... - Page 99 You can use these signal routing features to set Set the output level of the send. You can set up virtually any mixer architecture for your the send level to zero by Option-clicking the projects, including sends and returns for effects send fader.
-
Page 100: Plug-Ins
Depending on how you configure a non-real-time AudioSuite plug- in, it will either create an entirely new audio file, or alter the original source audio file. Master Fader controlling main outputs Getting Started with Digi 002 & Digi 002 Rack... -
Page 101: Mix Automation
Pro Tools comes with a complete set of DigiRack Automation mode (right) plug-ins, and many more are available from Digidesign and our Development Partners. For more information about plug-ins, see the DigiRack Plug-Ins Guide. Chapter 8: Working with Pro Tools LE... -
Page 102: Final Mixdown
For more information on using dither, refer mix. to the Pro Tools Reference Guide . Inserts and Sends All active inserts, including real-time plug-ins and hardware inserts, are ap- plied to the bounced mix. Getting Started with Digi 002 & Digi 002 Rack... -
Page 103: Chapter 9. Using Digi 002 As A Stand-Alone Mixer
In addition to its function as an integrated front end and control surface for Pro Tools, Digi 002 can operate as a stand-alone digital mixer in a variety of settings. Figure 9 shows Digi 002 as the hub of a small studio setup, with analog audio and digital audio. -
Page 104: Overview
The stand-alone mixing and processing capabilities of Digi 002 are provided by a powerful built-in digital signal processor (DSP). The Digi 002 unit does not need to be connected to a computer to op- erate in Stand-alone mode. See Appendix G, “Digi 002 Stand-Alone Block Diagram” for an overview of signal flow in Stand-alone mode. - Page 105 Sends These EQ bands can be used in conjunction with the built-in hardware high-pass filters Each of the eight channels of Digi 002 can send available on Inputs 1–4. to any or all of the four available sends at the same time.
-
Page 106: Entering Stand-Alone Mode
To put Digi 002 in Stand-alone mode: under In56 (Inputs 5–6). Press the Standalone switch on the right-hand side of the Digi 002 top panel. Digi 002 displays Press the illuminated Channel Select switch “Enter Standalone mode? Yes/No.” repeatedly to toggle Inputs 5–6 to Analog or S/PDIF. - Page 107 Digital Input Format Digital Clock Source You can set Digi 002 to receive S/PDIF input at When you connect an external digital source, the RCA Input connector or the Optical Input you can set Digi 002 to synchronize to external port on the back panel of Digi 002.
-
Page 108: Views In Stand-Alone Mode
In Stand-alone mode, the S/PDIF outputs on the to save the preference settings. back panel of Digi 002 mirror outputs 1–2 at all Press the Escape (Esc) switch twice to exit Util- times. If RCA is chosen in the S/PDIF prefer- ity mode. - Page 109 When you are displaying individual sends in Send view, the Channel Select switches toggles Console View lets you toggle the Digi 002 to dis- the send between pre- and post-fader operation. play either the pan position controls or the send When you first display sends, the send names controls for each channel.
- Page 110 Press the Escape switch to exit Solo Safe pref- erences. Press the far right-hand Channel Select switch to save the preference settings. Press the Escape switch twice to exit Utility mode. Digi 002 channel strip controls in Stand-alone mode Getting Started with Digi 002 & Digi 002 Rack...
- Page 111 View area, the LED rings act as post-fader meters To change the name of an input channel: for each input channel. If Digi 002 is not in Home View, press the Pan When viewing compressor controls in the switch in the upper left-hand corner of the Con- Channel View area, the LED rings act as input, sole View area to return the unit to Home View.
- Page 112 Press the Left and Right Arrow keys in the The Display Scribble Strips show “EQ” and the Navigation Section of Digi 002 to move the cur- number of the selected channel. sor left and right in the Scribble Strip display.
- Page 113 Console View selectors Send Position selectors (A–D) Digi 002 Console and Channel View controls in Stand-alone mode Pan/Send Displaying Parameter Values The Pan/Send view allows you to view the pan The default view for channels, inserts in sends position and the controls for all of the sends on...
-
Page 114: Working With Effects
Working with Effects trols, return to Home View by pressing the Pan switch in the Console View area. In Channel view, the controls for the Digi 002 EQ and Dynamics effects are displayed across While EQ controls are displayed, you can bypass the Channel Scribble Strips. - Page 115 Channel Select switches in this view. When you are finished setting the Dynamics controls, return to Home View by pressing the Pan switch in the Console View area. Table 11. Compressor controls in Digi 002 Stand-alone mode Inpt Thsh Rtio...
-
Page 116: Working With Sends
To display and edit the sends to the Reverb: Working with Sends Press the Send switch in the upper left-hand corner of the Digi 002 unit, in the Console View In Stand-alone mode, each Input channel has area. four fixed sends, with the first two dedicated to the internal Delay and Reverb processing of Press the Send B switch. - Page 117 Escape key to return to the Mas- When you are finished setting the Delay con- ter Fader view. trols, press the Escape key to return to the Mas- ter Fader view. Table 12. Delay controls in Digi 002 Stand-alone mode Display Time Fdbak D —> R...
-
Page 118: Storing Snapshots
Storing Snapshots save the snapshot, or press the Escape switch twice to cancel the operation and return to Digi 002 allows you to store up to 24 stand- Home View. alone mix configurations and recall them at any time. You can use snapshots to create mix tem- To recall a snapshot: plates or to capture a mix in progress. -
Page 119: Appendix A. Windows System Optimizations
appendix a Windows System Optimizations (Windows Only When installing Pro Tools on Windows XP, Advanced Settings there are many system variables that affect per- formance. If you have followed all the Windows The following system optimizations may help configuration instructions in Chapter 2, “Win- Pro Tools perform better on some systems. - Page 120 If performance has not changed, run “msconfig” and return your computer Selec- tive Startup back to Normal Startup. Alterna- tively, try disabling start up items and non- essential processes individually. Getting Started with Digi 002 & Digi 002 Rack...
-
Page 121: Appendix B. Digidesign Asio Driver (Windows Only)
Full-duplex playback of 24- and 16-bit audio are supported at sample rates up to 96 kHz, depend- Compatible Software ing on your Digidesign hardware and ASIO pro- gram used. This version of Digidesign ASIO Driver can be used on Digidesign-qualified Pro Tools systems The Digidesign ASIO Driver will provide up to running on Windows XP. -
Page 122: Installing The Asio Driver
Click the Change/Remove button. Digidesign ASIO Control Panel Choose the Modify button. Click Next. Uncheck the ASIO Driver box. Click Next. When removal is complete, close the Add or Remove Programs window. Getting Started with Digi 002 & Digi 002 Rack... - Page 123 When you play a file from a client audio pro- The Advanced button opens the Hardware Setup gram, the client program divides the file into lit- dialog for the Digidesign hardware that you are tle chunks (buffers) and sends each of these to using.
- Page 124 Getting Started with Digi 002 & Digi 002 Rack...
-
Page 125: Appendix C. Digidesign Wavedriver (Windows Only)
Compatibility Digidesign audio interfaces: • Pro Tools|HD audio interfaces This version of Digidesign WaveDriver can be used on Digidesign-qualified Pro Tools systems • Digi 002 running on Windows XP. • Digi 002 Rack •... -
Page 126: Installing The Wavedriver
In List” on page 119. Click the Change/Remove button. Choose the Modify button. Click Next. Uncheck the WaveDriver box. Click Next. When removal is complete, close the Add or Remove Programs window. Getting Started with Digi 002 & Digi 002 Rack... -
Page 127: Configuring Wavedriver For Windows Media Player And Other Third-Party Wavedriver Programs
Applications to the Open the Sounds and Audio Devices Control WaveDriver Opt-In List Panel. The Digidesign WaveDriver uses an Opt-In list Click the Audio tab. to control third party application access to the Select the Digidesign audio interface in the Digidesign hardware. - Page 128 Getting Started with Digi 002 & Digi 002 Rack...
-
Page 129: Appendix D. Digidesign Coreaudio Driver (Macintosh Only)
CoreAudio compatible applications to record • Up to 18 channels of input and output and play back through the following Digidesign with Digi 002 and Digi 002 Rack audio interfaces. • Up to 2 channels of input and output with •... -
Page 130: What Are The Limitations Of The Digidesign Coreaudio Driver
Digidesign-qualified Pro Tools sys- tems running on Macintosh, or it can be used as a stand-alone driver on Digidesign-qualified Macintosh systems that do not have Pro Tools installed. Getting Started with Digi 002 & Digi 002 Rack... -
Page 131: Removing The Coreaudio Driver
Some applications (such as Apple’s iTunes or QuickTime Player), also require that you config- ure either the Apple Sound Preferences or Apple Audio MIDI Setup to use the Digidesign Core- Audio Driver. Figure 11. Digidesign CoreAudio Setup Appendix D: Digidesign CoreAudio Driver (Macintosh Only) - Page 132 Buffer Size settings in the Pro Tools Playback En- gine dialog. To configure Digidesign CoreAudio Hardware Buffer Size: Launch Digidesign CoreAudio Manager (lo- Hardware Setup dialog (Digi 002 shown) cated in /Applications/Digidesign). Getting Started with Digi 002 & Digi 002 Rack...
- Page 133 Mirror Analog Outs 1 & 2 to Digital Outs (002 the core card. Only) When using Digi 002 or Digi 002 Rack, en- able this option to mirror the main outputs For more information on the Hardware...
- Page 134 Click the Output tab and select Digidesign Launch Audio MIDI Setup (located in HW as the device for sound output. Home/Applications/Utilities). Select the Audio Devices tab. Sound Preferences, Output tab Apple Audio MIDI Setup application, Audio tab Getting Started with Digi 002 & Digi 002 Rack...
- Page 135 From the System Settings Default Output pop- up menu, select Digidesign HW. Leave System Output and Selected Audio Device set to Built-in audio controller. The Digidesign CoreAudio Driver cannot be used for system sounds. Appendix D: Digidesign CoreAudio Driver (Macintosh Only)
- Page 136 Getting Started with Digi 002 & Digi 002 Rack...
-
Page 137: Appendix E. Configuring Midi Studio Setup (Windows Only)
appendix e Configuring Midi Studio Setup (Windows Only) MIDI Studio Setup Window MIDI Studio Setup The MIDI Studio Setup window is organized MIDI Studio Setup (MSS) lets you configure the into three sections. Interface controls are at the MIDI controllers and sound modules that are top of the window. - Page 138 Instrument list, the Properties sec- derived from the XML-based MIDI device files. tion changes to reflect the properties of the se- lected instrument. For more information, see “Patch Name Support” on page 131. Getting Started with Digi 002 and Digi 002 Rack...
-
Page 139: Patch Name Support
Support” on page 131. MIDI devices. These files reside in directories, sorted by manufacturer, in Program Files\ Input Port Common Files\Digidesign\MIDI Patch Names\ Digidesign. The Input Port pop-up menu displays a list of available MIDI interface input ports. The MIDI... - Page 140 Patch Select dialog with patch names Once patch names have been imported into Pro Tools, they are available for that MIDI de- vice in all sessions. Getting Started with Digi 002 and Digi 002 Rack...
-
Page 141: Appendix F. Configuring Ams (Mac Os X Only)
appendix f Configuring AMS (Mac OS X Only) Click the MIDI Devices tab. AMS scans your Audio MIDI Setup system for connected MIDI interfaces. If your MIDI interface is properly connected, it appears Pro Tools recognizes the ports on your MIDI in- in the window with each of its ports numbered. - Page 142 AMS Manu- facturer and Model pop-up menus, you can add them by editing any of the current .middev files in any text editor (such as TextEdit). Getting Started with Digi 002 & Digi 002 Rack...
- Page 143 Click the More Properties arrow to expand the Click the device image. The window expands dialog, then enable the appropriate MIDI chan- to show images for various MIDI devices (such nels (1–16) for the Transmits and Receives op- as keyboards, modules, interfaces, and mixers). tions.
-
Page 144: Patch Name Support
MIDI patch name files (.midnam) can be edited in any text editor, or you can use third party patch librarian and editor soft- ware to create your own custom patch names. Program button, Mix window Getting Started with Digi 002 & Digi 002 Rack... -
Page 145: Appendix G. Digi 002 Stand-Alone Block Diagram
Digi 002 Stand-Alone Block Diagram The diagram on the following pages shows the basic signal flow of Digi 002 in Stand-alone mode. The diagram shows the Digi 002 mixer divided into two sections, with the first page showing Input Channels 1–4, the second page showing... - Page 146 TO MAIN L & ALT MAIN L TO MAIN R & ALT MAIN R TO DELAY SEND A SEND B TO REVERB TO OUTPUT 7 SEND C TO OUTPUT 8 SEND D Getting Started with Digi 002 & Digi 002 Rack...
- Page 147 TO MAIN L & ALT MAIN L TO MAIN R & ALT MAIN R MUTE MUTE SEND EFFECTS RETURN FADERS SEND A DELAY SEND B REVERB SEND C TO OUTPUT 7 TO OUTPUT 8 SEND D Appendix G: Digi 002 Stand-Alone Block Diagram...
- Page 148 Getting Started with Digi 002 & Digi 002 Rack...
-
Page 149: Index
index Numerics 32K clusters 18 channel controls channel select switch 34 4-pin FireWire cable 11, 25 faders 34 mute switch 34 record ready switch 35 ADAT rotary encoders 35 connecting 66 scribble strip 35 recording from Pro Tools LE 83 solo switch 34 recording to Pro Tools LE 83 channel select switch 34, 103... - Page 150 Smart Tool 88 Trimmer 88 Zoomer 88 Edit window 70 editing 87 editing regions 88 EQ 38 in Channel View 38, 104 in Stand-alone mode 96, 97 external effects devices 63, 64 Getting Started with Digi 002 & Digi 002 Rack...
- Page 151 modes Counter mode 45 I/O Setup 17, 29 Display mode 44 importing audio 79 Flip mode 36 input controls 42, 48 Pro Tools mode 31 input levels 81 Stand-alone mode 31 inputs 42, 48, 53, 96 Standby 31 alternate inputs 42, 48 Status Mode 44 analog 53 modifier keys 43...
- Page 152 ADAT tracks 83 system settings 73 regions 76 Clock Source 17, 28 arranging 89 I/O Setup 17, 29 creating 76 Sample Rate 16, 27 editing 88 trimming 88 System Usage window 74 Getting Started with Digi 002 & Digi 002 Rack...
- Page 153 tempo 71 WaveDriver 12 setting 71 Windows tempo events 71 required System settings 8 System Standby 9 track height changing 78 windows 70 Edit window 70 tracks Mix window 70, 90 audio 75, 76 Transport window 70, 74 Auxiliary Inputs 75, 76, 90 creating 75 Windows System Standby 9 Master Faders 75, 76, 92...
Need help?
Do you have a question about the Digi 002 and is the answer not in the manual?
Questions and answers