Table of Contents
Advertisement
Advertisement
Table of Contents

Subscribe to Our Youtube Channel
Related Manuals for DigiDesign Mbox 2 Mini


Summary of Contents for DigiDesign Mbox 2 Mini
-
Page 1: Getting Started
Getting Started ® Mbox 2 Mini Version 7.3... - Page 2 However, there is no guarantee that interference will not occur in a particular © 2007 Digidesign, a division of Avid Technology, Inc. All rights installation. If this equipment does cause harmful interference reserved. This guide may not be duplicated in whole or in part to radio or television reception, which can be determined by without the express written consent of Digidesign.
-
Page 3: Table Of Contents
Installing Pro Tools LE and Connecting Mbox 2 Mini ....... - Page 4 Connecting a Microphone to the Mbox 2 Mini ....... . .
- Page 5 Before You Call Digidesign Technical Support ........
- Page 6 Mbox 2 Mini Getting Started Guide...
-
Page 7: Chapter 1. Installation Quickstart
Mac Installation Overview Overview (Mac OS X Systems Only) (Windows Systems Only) Installation of the Mbox 2 Mini on a Mac in- cludes the following steps: Installing the Mbox 2 Mini on a Windows com- puter includes the following steps: “Mac System Optimization”... - Page 8 Mbox 2 Mini Getting Started Guide...
-
Page 9: Chapter 2. Welcome To Mbox 2 Mini
• Two channels of analog audio input: two analog monitor outputs, and one head- • XLR connector with microphone preamp phone output. Mbox 2 Mini includes one pro- and switchable 48V phantom power. fessional-quality mic preamp and 24-bit analog- • Two 1/4-inch TRS (Tip-Ring-Sleeve) con- to-digital and digital-to-analog converters. -
Page 10: Pro Tools Le Capabilities
Pro Tools LE Capabilities System Requirements Pro Tools LE on Windows or Mac provides the Mbox 2 Mini can be used with a Digidesign- following capabilities with Mbox 2 Mini: qualified Windows or Mac computer running Pro Tools LE software. -
Page 11: Digidesign Registration
Pro Tools systems require one or more Digide- stall Pro Tools LE software, make basic connec- sign-qualified drives. tions to your Mbox 2 Mini interface (to get For a list of Digidesign-qualified hard drives, sound in and out of your interface), and do com- visit the Digidesign website mon tasks (such as recording in Pro Tools). -
Page 12: About Www.digidesign.com
News and Events Get the latest news from Digidesign; sign up for a Pro Tools demo. Cross References point to related sections in this guide and other Digidesign guides. To learn more about these and other resources available from Digidesign, visit the Digidesign website (www.digidesign.com). -
Page 13: Chapter 3. Windows Configuration
Required Optimizations Installation Overview To ensure optimum performance with Pro Tools LE, configure the following settings Installing the Mbox 2 Mini on a Windows com- before you install Pro Tools hardware and soft- puter includes the following steps: ware. “Windows System Optimization” on page 7. - Page 14 Click OK to save your settings and close the Ef- Standby power scheme must be set to Always fects dialog. On. This helps prevent long record or playback passes from stopping due to system resources Click OK. powering down. Restart the computer. Mbox 2 Mini Getting Started Guide...
- Page 15 Recommended Optimizations Under the General tab, choose “Do not use this device (disable)” from the Device Usage Pro Tools can also be affected by other software pop-up menu, and click OK. and hardware drivers installed on your com- Close the Computer Management window. puter.
-
Page 16: Installing Pro Tools Le And Connecting Mbox 2 Mini
• Portable media serial number (required for Hardware Installation.” applications that utilize a copy protection key) To install Pro Tools LE and Mbox 2 Mini: • Plug and play Start Windows, logging in with Administrator • Event log privileges. For details on Administrator privi- •... - Page 17 Click Next. Wizard begins to install drivers automatically, press Cancel. Click Install. Mbox 2 Mini may not function properly if Windows will display several messages dur- connected to a USB hub. Connect Mbox 2 ing installation that can be ignored, includ- Mini to a separate, dedicated USB port.
-
Page 18: Launching Pro Tools Le
For information on which version of Quick- your desktop (or the application icon in the Time is compatible with your version of Pro Tools folder inside the Digidesign folder). Pro Tools, visit the compatibility pages of Enter the authorization code in the dialog... -
Page 19: Configuring Pro Tools Le
Pro Tools sessions. Hardware Buffer Size The Hardware Buffer Size (H/W Buffer Size) con- Playback Engine dialog for Mbox 2 Mini trols the size of the buffer used to handle host From the H/W Buffer Size pop-up menu, select processing tasks such as Real-Time AudioSuite the audio buffer size, in samples. - Page 20 Choose Setup > Playback Engine. from 85 percent for single-processor computers Select Ignore Errors During Playback/Record. to 99 percent for multi-processor computers. Click OK. Increasing the CPU Usage Limit may slow down screen response on slower computers. Mbox 2 Mini Getting Started Guide...
- Page 21 To change the DAE Playback Buffer Size: Choose Setup > Playback Engine. From the DAE Playback Buffer pop-up menu, Hardware Setup dialog for Mbox 2 Mini select a buffer size. Select the sample rate from the Sample Rate Click OK.
-
Page 22: Additional Software On The Pro Tools Installer Disc
The Pro Tools Hardware Setup dialog is set to In- ternal, which supports recording analog signals If you plan to use any MIDI devices with directly into Mbox 2 Mini analog inputs 1–2. Pro Tools, configure your MIDI setup with MIDI Studio Setup. See Appendix A, “Configuring Configuring I/O Setup... -
Page 23: Removing Pro Tools Le
Digidesign ASIO Driver Pro Tools Demo Session The Digidesign ASIO (Audio Sound Input Out- The Pro Tools LE Installer disc includes a demo put) Driver is a single-client multichannel session that you can use to verify that your sys- sound driver that allows third-party audio pro- tem is working. - Page 24 Mbox 2 Mini Getting Started Guide...
-
Page 25: Chapter 4. Mac Configuration
Administrator privileges in Mac OS X, Installation Overview refer to your Apple OS X documentation. Installation of the Mbox 2 Mini on a Mac in- Do not use the Mac OS X automatic Soft- cludes the following steps:... - Page 26 To enable journaling: Launch the Disk Utility application, located in Applications/Utilities. Select the volume in the left column of the Disk Utility window. Click Enable Journaling in the toolbar. Mbox 2 Mini Getting Started Guide...
-
Page 27: Installing Pro Tools Le
Select the install location. For maximum reli- Connect the small end of the included USB ca- ability, install Pro Tools on your startup drive. ble to the USB port on Mbox 2 Mini. Click Continue. With your computer on, connect the other... -
Page 28: Launching Pro Tools Le
To authorize Pro Tools LE software: Standalone Mbox 2 Mini CoreAudio Driver Click the Pro Tools LE icon in the Dock (or The Mbox 2 Mini CoreAudio Driver can be in- double-click the application icon in the stalled as a standalone driver on Mac systems Pro Tools folder inside the Digidesign folder). -
Page 29: Configuring Pro Tools Le
Pro Tools sessions. Hardware Buffer Size Playback Engine dialog for Mbox 2 Mini The Hardware Buffer Size (H/W Buffer Size) con- trols the size of the buffer used to handle host... - Page 30 128 samples of additional buffer- ing on some systems. If this option is disabled, Increasing the CPU Usage Limit may slow the buffer is half the H/W Buffer Size, or at least down screen response on slower computers. Mbox 2 Mini Getting Started Guide...
- Page 31 However, a higher setting can also cause a time lag to occur when starting playback or recording, or longer audible time lag while editing during playback. Hardware Setup dialog for Mbox 2 Mini Chapter 4: Mac Configuration...
- Page 32 Source The Pro Tools Hardware Setup dialog is set to In- ternal, which supports recording analog signals directly into Mbox 2 Mini analog inputs 1–2. Configuring I/O Setup Using the I/O Setup dialog, you can label I/O Setup dialog for Mbox 2 Mini Pro Tools LE input, output, insert, and bus signal paths.
-
Page 33: Removing Pro Tools
If you plan to use any MIDI devices with Clean Uninstall Removes all Pro Tools files, in- Pro Tools LE, configure your MIDI setup with cluding system files, Digidesign plug-ins, and the Apple Audio MIDI Setup (AMS) utility. See MIDI patch names. - Page 34 Mbox 2 Mini Getting Started Guide...
-
Page 35: Chapter 5. Mbox 2 Mini Hardware Overview
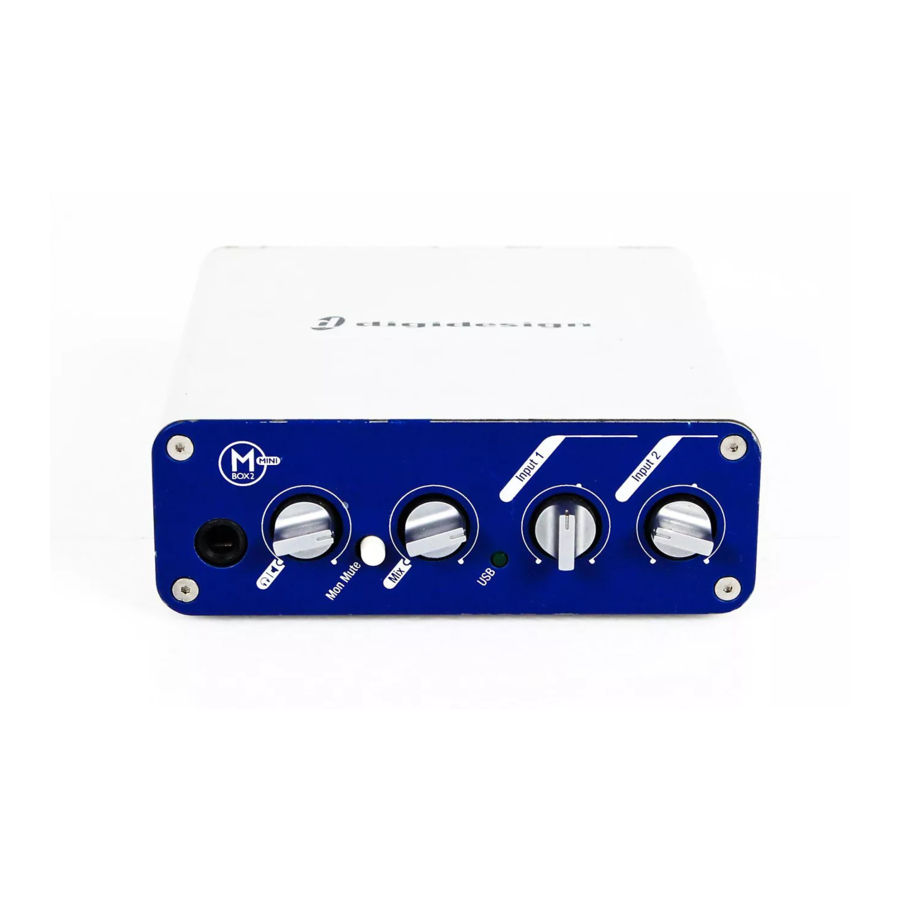
5 Mbox 2 Mini Hardware Overview Mbox 2 Mini Front Panel Features The Mbox 2 Mini front panel has the following features: Headphone/Monitor Input 1 Input 2 Output Level Mix (Ratio) Gain Gain Headphone Output Monitor Mute Figure 1. Mbox 2 Mini front panel... - Page 36 Mix (Ratio) Control USB LED Mbox 2 Mini gives you the ability to monitor The USB LED indicates that the Mbox 2 Mini your analog input signals while recording, with- has received power from its USB connection. out the delay incurred by A/D/A converters and Once the USB light is on, audio can pass in or host-based processing.
-
Page 37: Mbox 2 Mini Back Panel Features
Mbox 2 Mini Back Panel Features The Mbox 2 Mini back panel has the following features: Kensington Line/DI Monitor Input 1 Outputs Lock port Input Mic/DI Phantom Line/DI Power Input 2 port Figure 2. Mbox 2 Mini back panel Input 1 Section Pad Switch The Pad switch engages a –20 dB pad on the in-... - Page 38 The Mbox 2 Mini is compatible with USB 2.0 ports. However, the USB 2.0 bus will switch to the slower USB v.1.1 speed to accommodate Input 2 Section Mbox 2 Mini.
-
Page 39: Chapter 6. Making Hardware Connections
Connecting Headphones stereo system, or an audio mixer. On the front panel of the Mbox 2 Mini is a 1/4- When connecting to a stereo system, connect inch jack to connect headphones. the left channel (often the white plug) to... -
Page 40: Connecting Audio Inputs
Mbox 2 Mini has two audio input sections, labeled Input 1 and Input 2. For stereo There are several ways to use Mbox 2 Mini with inputs, use Input 1 for the left input, and Input a microphone, depending on the type of micro- 2 for the right input. -
Page 41: Connecting Instruments To The Mbox 2 Mini
To use a microphone that has a 1/4-inch TS not harmed by it. (Tip-Sleeve) connector: On the back of the Mbox 2 Mini, plug the 1/4- Although phantom power can be used inch connector from your microphone into one safely with most microphones, it is possible of the Line/DI inputs. - Page 42 On the front of the Mbox 2 Mini, turn the Mix control fully left to Input. On the front of the Mbox 2 Mini, carefully turn the input’s Gain control to the right to in- crease the input level of your guitar.
-
Page 43: Chapter 7. Common Tasks With Pro Tools Le
Pro Tools Help menu. Recording a Pro Tools Session Before you record with Pro Tools and the Mbox 2 Mini, you first create a Pro Tools ses- sion, then prepare an audio track for recording. New Session dialog To create a Pro Tools session: Choose where you want to save your session. - Page 44 Specify 1 Mono Audio Track in Samples, if an Input 1 jack on the back of the Mbox 2 Mini. your source is mono, or 1 Stereo Audio Track in Select In 1–2 on any stereo audio track when Samples, if your source is stereo.
-
Page 45: Importing Audio From A Cd
Click the track’s Record Enable button a sec- ond time to take it out of Record mode. On the front of the Mbox 2 Mini, turn the Mix control fully right to Playback. Click Play in the Transport window or press the Spacebar to start playback. - Page 46 In the Transport window, click Return to Zero to go to the beginning of the track. On the front of the Mbox 2 Mini, turn the Mix control fully right to Playback. Click Play in the Transport window to begin playback.
-
Page 47: Creating An Audio Cd From A Pro Tools Session
Choose File > Bounce to > Disk. Creating an Audio CD from a Pro Tools Session Pro Tools does not create audio CDs directly, but you can create stereo audio files from your Pro Tools sessions that can be used by most CD burning software. - Page 48 CD. Make certain that you configure your CD burning application to create an audio CD rather than a data CD. Entering a name for the bounced file Click Save. Mbox 2 Mini Getting Started Guide...
-
Page 49: Recording Midi In A Pro Tools Session
Track, then click Create. through the MIDI ports on a MIDI interface. Au- dio from your MIDI instrument can be moni- tored through the Mbox 2 Mini or sent to an ex- ternal mixer. Creating a new Mono Instrument track MIDI sound module Select View >... - Page 50 If you are using an external MIDI device and type of instrument you are using: connected its audio output to Mbox 2 Mini for monitoring in Pro Tools, click the Input selector • If you are using an instrument plug-in,...
- Page 51 Play some notes on your MIDI controller and Return to Zero Fast Forward look for the track’s MIDI Velocity meter to move. Remember, MIDI is not audio, and the Play Go to End Rewind MIDI Velocity meter is not registering sound Online Stop Record...
- Page 52 Mbox 2 Mini Getting Started Guide...
-
Page 53: Appendix A. Configuring Midi Studio Setup (Windows Only)
appendix a Configuring MIDI Studio Setup (Windows Only) MIDI Studio Setup Window MIDI Studio Setup The MIDI Studio Setup window is organized MIDI Studio Setup (MSS) lets you configure the into three sections. Interface controls are at the MIDI controllers and sound modules that are top of the window. - Page 54 XML-based MIDI device files. lected in the Instrument list, the Properties sec- For more information, see “MIDI Patch tion changes to reflect the properties of the se- Name Support” on page 49. lected instrument. Mbox 2 Mini Getting Started Guide...
-
Page 55: Midi Patch Name Support
MIDI devices. These files reside in directories, displayed here is the port through which MIDI sorted by manufacturer, in Program Files\ data is sent from the external MIDI device spec- Common Files\Digidesign\MIDI Patch Names\ ified in the Instrument Name field into your Digidesign. MIDI interface. - Page 56 Patch Select dialog names. In the Open dialog, navigate to Program Files\Common Files\Digidesign\MIDI Patch Names\Digidesign\<name of manufacturer>, and select the MIDI Patch Name file (.midnam) for the MIDI device. Mbox 2 Mini Getting Started Guide...
-
Page 57: Appendix B. Configuring Ams (Mac Os X Only)
Applications/Utilities). – or – • In Pro Tools, choose Setup > MIDI > MIDI Studio. Making MIDI input and output connections (Digidesign Command|8 shown) Click MIDI Devices. AMS scans your system Click the arrow for the appropriate input port for connected MIDI interfaces. If your MIDI in-... - Page 58 Manufacturer or Model names for any of your external MIDI devices is not available in the AMS Manufacturer and Model pop-up menus, you can add them by editing the .middev file in any text editor (such as TextEdit). Mbox 2 Mini Getting Started Guide...
-
Page 59: Midi Patch Name Support
MIDI devices. These files reside in directories, sorted by manufacturer, in /Library/Audio/MIDI Patch Names/Digidesign. To import MIDI patch names into Pro Tools: Verify the MIDI Device name in the Audio MIDI Setup window (see “Audio MIDI Setup” on page 51). - Page 60 Done. MIDI patch name files (.midnam) can be edited in any text editor, or you can use third party patch librarian and editor soft- ware to create your own custom patch names. Mbox 2 Mini Getting Started Guide...
-
Page 61: Appendix C. Hard Drive Configuration And Maintenance
Beat Detective in a session. For complete hard drive requirements, see the Digidesign website (www.digidesign.com). Appendix C: Hard Drive Configuration and Maintenance... -
Page 62: Formatting An Audio Drive
IDE/ATA/SATA Hard Drives Disk Management window (Windows XP) A qualified internal IDE/ATA/SATA drive may be used as a dedicated audio drive. For complete information on track count with internal drives, refer to the Digidesign website (www.digidesign.com). Mbox 2 Mini Getting Started Guide... - Page 63 • When prompted, select the partition type. • In the Format window, name the volume. • Choose a file system. For optimum perfor- Digidesign recommends using Primary par- mance, audio drives should be formatted as titions, instead of Extended partitions.
-
Page 64: Partitioning Drives
Avoid distributing audio files within a ses- Click Erase. sion over different partitions on the same drive since this will adversely affect drive The drive appears on the Desktop with the new performance. volume name. Mbox 2 Mini Getting Started Guide... -
Page 65: Defragmenting An Audio Drive
Optimizing (Defragmenting) Drives Defragmenting an Audio Drive To prevent fragmentation, you can optimize your drive, which rearranges your files into a Mac Systems contiguous format. Most optimizing software lets you run a check on a drive to find out the When working with larger files (such as video), percentage of fragmentation. -
Page 66: Using Mac Drives On Windows Systems
Mac and Windows systems, see the Pro Tools Reference Guide. Formatting and Maintaining HFS+ Drives To format and partition any drives as HFS+, con- nect the drives to a Mac computer and use the Apple OS X Disk Utility. Mbox 2 Mini Getting Started Guide... -
Page 67: Hard Disk Storage Space
Hard Disk Storage Space Mono audio tracks recorded with 16-bit resolution at 44.1 kHz (CD quality) require approximately 5 MB of hard disk space per minute. The same tracks recorded with 24-bit resolution require about 7.5 MB per minute. Stereo audio tracks recorded with 16-bit resolution at 44.1 kHz (CD quality) require approximately 10 MB of hard disk space per minute. - Page 68 Mbox 2 Mini Getting Started Guide...
-
Page 69: Appendix D. Troubleshooting
appendix d Troubleshooting Backing Up Your System Backing Up Your Work Configuration It is highly recommended that you back up your After configuring your system and Pro Tools, work on a regular basis, and especially before you should save an image of your system drive making changes to your system configuration. -
Page 70: Common Issues
Try unplugging the USB cable from the Try a complete restart. Turn off your audio in- Mbox 2 Mini USB port and plugging it back in. terfaces, computer peripherals and your com- If the USB LED still does not illuminate, shut... -
Page 71: Before You Call Digidesign Technical Support
Power Saver Features Some automatic power Gather Important Information saver features, such as those that spin down the Digidesign wants to help you resolve problems system hard drive, can affect Pro Tools perfor- as quickly and efficiently as possible. If you have mance. - Page 72 Note any DAE errors or other error codes you en- counter. Additonally, note the ability to repro- duce the problem under different conditions, for example, with another session, or after changing settings (such as the Hardware Buffer Size). Mbox 2 Mini Getting Started Guide...
-
Page 73: Index
Pro Tools LE optimizing 59 Mac 22 partitioning 58 Windows 12 requirements 5 SCSI requirements 56 space requirements 61 connecting Mbox 2 Mini Hardware Buffer Size 13, 23 Mac 21 headphones Windows 10 gain control 29 CoreAudio driver (Mac) 22 output 29... - Page 74 QuickTime see monitoring installing (Windows) 12 Mbox 2 Mini ratio control (Mbox 2 Mini) 30 back panel 31 registration 5 connecting (Mac) 21 removing Pro Tools 27 connecting (Windows) 10 RTAS Processors setting 13, 23 features 3 front panel 29...
- Page 76 DIGIDESIGN TECHNICAL SUPPORT (USA) PRODUCT INFORMATION (USA) INTERNATIONAL OFFICES Visit the Digidesign website 2001 Junipero Serra Boulevard Tel: 650.731.6100 Tel: 800.333.2137 for contact information Daly City, CA 94014-3886 USA Fax: 650.731.6384 Tel: 650.731.6300 Fax: 650.731.6399...
Need help?
Do you have a question about the Mbox 2 Mini and is the answer not in the manual?
Questions and answers