Edimax SP-1101W User Manual
Smart plug switch
Hide thumbs
Also See for SP-1101W:
- Quick installation manual (24 pages) ,
- Quick installation manual (14 pages) ,
- Quick installation manual (15 pages)
Table of Contents
Advertisement
Quick Links
Advertisement
Table of Contents

Related Manuals for Edimax SP-1101W


Summary of Contents for Edimax SP-1101W
- Page 1 SP-1101W User Manual 11-2013 / v1.0...
- Page 2 Copyright @ Edimax Technology Co., Ltd. all rights reserved. No part of this publication may be reproduced, transmitted, transcribed, stored in a retrieval system, or translated into any language or computer language, in any form or by any means, electronic, mechanical, magnetic, optical, chemical, manual or otherwise, without the prior written permission from Edimax Technology Co., Ltd.
-
Page 3: Table Of Contents
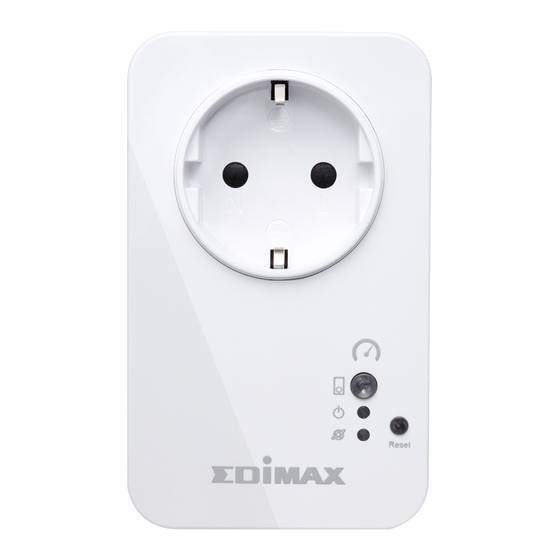
I. Product Information ................1 I-1. Package Contents ................1 I-2. Front Panel ..................1 I-3. LED Status ..................2 I-4. Switch Status Button ................. 2 I-5. Product Label ..................3 I-6. Reset ....................3 II. Hardware Installation ................4 III. -
Page 4: Product Information
I. Product Information I-1. Package Contents Smart Plug Switch Quick Installation Guide CD with User Manual I-2. Front Panel Switch Status Button & LED Power LED Reset Button Network LED... -
Page 5: I-3. Led Status
I-3. LED Status Color Status Description Switch Smart plug output power socket is on. Status Green Smart plug output power socket is off. Power Smart plug is powered on. Green Smart plug is off. Quick Flashing Smart plug is starting up or restarting. Slow Flashing (1 Smart plug is in installation mode and x per second) -
Page 6: Product Label
I-5. Product Label The product label, which is located on the back of the smart plug switch, displays the input/output power and the default password of your smart plug. The password should be changed when you have finished the installation process for security purposes. -
Page 7: Hardware Installation
II. Hardware Installation Follow the instructions below to ensure your smart plug is properly connected and ready for setup. If you have multiple smart plugs to set up, please only plug in and set up one smart plug at a time. Plug the smart plug into a power socket. -
Page 8: Smart Plug Setup
III. Smart Plug Setup III-1 Download EdiPlug App To set up your smart plug with the free EdiPlug smartphone app, please download the EdiPlug app and then follow the setup instructions for iOS or Android. After setup, you can use the EdiPlug app to switch your smart plug switch on/off remotely from any smartphone with an Internet connection, as well as set up automated schedule and email notifications. -
Page 9: Iii-2. Install A Smart Plug
III-2. Install a Smart Plug Follow the instructions below to add a new smart plug to the EdiPlug app on iOS: You must be within Wi-Fi range of the smart plug. If you have multiple smart plugs, please only plug in and set up one plug at a time. - Page 10 Enter your Wi-Fi password and tap “OK”. The next screen will indicate that setup is complete! Your smart plug will now be displayed on the EdiPlug main screen. Slide the switch to switch the your smart plug (and any electrical device you plug into it) on or off.
- Page 11 Android Follow the instructions below to add a new smart plug to the EdiPlug app on Android: You must be within Wi-Fi range of the smart plug. If you have multiple smart plugs, please only plug in and set up one plug at a time.
- Page 12 Enter your Wi-Fi password and tap “OK”. The next screen will indicate that setup is complete! Your smart plug will now be displayed on the EdiPlug main screen. Slide the switch to switch your smart plug (and any electrical device you plug into it) on or off.
-
Page 13: Iii-3 Change Smart Plug Name & Password
III-3 Change Smart Plug Name & Password Select “Edit” from the EdiPlug main screen and then select the smart plug which you wish to edit from the list. Enter a new name and password for your smart plug and tap “Back” to go back to the main screen. - Page 14 Android Select “Edit” from the EdiPlug main screen and then select the smart plug which you wish to edit from the list. Enter a new name and password for your smart plug and tap “Back” to go back to the main screen. Your smart plug will now be displayed under its new name.
-
Page 15: Iii-4 Add An Existing Smart Plug To The Main Screen
III-4 Add an Existing Smart Plug to the Main Screen From the EdiPlug main screen, click the “+” icon in the top-right corner and select a plug from the list. Enter your smart plug password and tap “OK”. Click “Back” icon on the next screen to finish. - Page 16 Android From the EdiPlug main screen, click the “+” icon in the top-right corner and select a plug from the list. Enter your smart plug password and tap “OK”. Click “Back” on the next screen to finish.
-
Page 17: Iii-5 Set The Schedule
III-5 Set the Schedule Select “Edit” from the EdiPlug main screen and then choose the device that you wish to edit. Press “>” to enter the detail settings. Select “Schedule” and then able or disable the control functions by sliding the button to blue or white. - Page 18 On the edit schedule page, areas in gray indicate the switch is “off”, areas in yellow indicate the switch is “on”. Slide arrows right on the time bar to select switch “on” period and left to select switch “off” period. Touch the yellow or gray area to adjust functions at that time.
- Page 19 Press the time bar, as shown in the left picture, to show the detail schedule settings which have been set as shown in the right picture. Android Select “Edit” from the EdiPlug main screen and then choose the device that you wish to edit.
- Page 20 Select “Schedule” and then able or disable the control functions by sliding the button to blue or white. Press “>”on the right of the screen if you want to edit the schedule for that day. On the edit schedule page, areas in gray indicate the switch is “off”, areas in yellow indicate the switch is “on”.
- Page 21 On the editing detail period page, areas in gray indicate the switch is “off”, areas in yellow indicate the switch is “on”. Slide arrows right to switch “on” and left to switch “off”. Swipe where the red arrows are below to go to next or previous hour period.
-
Page 22: Iii-6. Notification
III-6. Notification Select “Edit” from the EdiPlug main screen and then choose the device that you wish to set a notification for. Press “>” to enter the detail settings. Select “Notification” in order to set an email notification. Select the “Gmail”... - Page 23 Other mail service If you choose other mail service, please enter all the items as show as blow and slide “Action Notifications” on to enable notifications. See Table below for explanation of all points. Mail Service Select “User defined” to enter the information manually.
- Page 24 SMTP Select ‘Enable’ when your SMTP server Authentication requires authentication. This information can be provided by your email service provider. Account Input the SMTP account name when your SMTP server requires authentication. This information can be provided by your email service provider.
- Page 25 Other mail service If you choose other mail service, please enter all the items as show as blow and slide “Action Notifications” on to enable notifications. See Table below for explanation of all points. Mail Service Select “User defined” to enter the information manually.
- Page 26 Consult your mail server administrator when in doubt. SMTP Select ‘Enable’ when your SMTP server Authentication requires authentication. This information can be provided by your email service provider. Account Input the SMTP account name when your SMTP server requires authentication. This information can be provided by your email service provider.
-
Page 27: Iii-7 Delete Smart Plug From Main List
III-7 Delete Smart Plug from Main List Select “Edit” from the EdiPlug main screen and then select the box next to the plug you want to delete. Then press “Delete” to delete the plug. Android Select “Edit” from the EdiPlug main screen and press and hold one plug that you want to delete. -
Page 28: Iii-8 Reset To Default
III-8 Reset to Default Select “Edit” from the EdiPlug main screen and then choose the device that you wish to reset to default. Press “>” to enter the detail settings. Then press “Reset to default” in order to reset to default settings. - Page 29 Android Select “Edit” from the EdiPlug main screen and then choose the device that you wish to reset to default. Press “>” to enter the detail settings. Then press “Reset to default” in order to reset to default settings.
-
Page 30: Iii-9 Upgrade Firmware
III-9 Upgrade Firmware Step 1: you can download the latest version utility “FWUpgradeTool” from http://www.edimax.com/ FWUpgradeTool.html to your PC or notebook. Step 2 : Confirm your smart plug already connected to the same network as your PC or netebook. Step 3: Access utility “FWUpgradeTool” and choose one plug you will upgrade and check the status to see if it can be upgraded or whether you already have the latest upgrade installed. -
Page 31: Federal Communication Commission Interference Statement
Federal Communication Commission Interference Statement This equipment has been tested and found to comply with the limits for a Class B digital device, pursuant to Part 15 of FCC Rules. These limits are designed to provide reasonable protection against harmful interference in a residential installation. - Page 32 EU Declaration of Conformity English: This equipment is in compliance with the essential requirements and other relevant provisions of Directive 2006/95/EC, 2011/65/EC. Français: Cet équipement est conforme aux exigences essentielles et autres dispositions de la directive 2006/95/CE, 2011/65/CE. Čeština: Toto zařízení je v souladu se základními požadavky a ostatními příslušnými ustanoveními směrnic 2006/95/ES, 2011/65/ES.
-
Page 33: Declaration Of Conformity
Declaration of Conformity We, Edimax Technology Co., Ltd., declare under our sole responsibility, that the equipment described below complies with the requirements of the European R&TTE directive 2006/95/EC, and directive 2011/65/EC(RoHS) . Equipment: Smart Plug Switch Model No.: SP-1101W The following European standards for essential requirements have been followed: ETSI EN 300 328 V1.7.1: 2006... - Page 34 Notice According to GNU General Public License Version 2 This product includes software that is subject to the GNU General Public License version 2. The program is free software and distributed without any warranty of the author. We offer, valid for at least three years, to give you, for a charge no more than the costs of physically performing source distribution, a complete machine-readable copy of the corresponding source code.
- Page 35 1. You may copy and distribute verbatim copies of the Program’s source code as you receive it, in any medium, provided that you conspicuously and appropriately publish on each copy an appropriate copyright notice and disclaimer of warranty; keep intact all the notices that refer to this License and to the absence of any warranty; and give any other recipients of the Program a copy of this License along with the Program.
- Page 36 Therefore, by modifying or distributing the Program (or any work based on the Program), you indicate your acceptance of this License to do so, and all its terms and conditions for copying, distributing or modifying the Program or works based on it. 6.
Need help?
Do you have a question about the SP-1101W and is the answer not in the manual?
Questions and answers