Edimax SP-2101W User Manual
Smart plug switch
Hide thumbs
Also See for SP-2101W:
- Quick installation manual (14 pages) ,
- Quick installation manual (15 pages)
Table of Contents
Advertisement
Quick Links
Advertisement
Table of Contents

Subscribe to Our Youtube Channel
Related Manuals for Edimax SP-2101W


Summary of Contents for Edimax SP-2101W
- Page 1 SP-2101W User Manual 07-2014 / v1.0...
-
Page 2: Table Of Contents
I. Product Information ................4 I-1. Package Contents .................... 5 I-2. Front Panel ..................... 5 I-3. LED Status ....................... 6 I-4. Switch Status Button ..................6 I-5. Product Label ....................7 I-6. Reset ....................... 7 II. Hardware Installation ................8 III. - Page 3 IV-2-1-3. Schedule ....................29 IV-2-2. Edit Settings ..................31 IV-2-2-1. Name ....................32 IV-2-2-2. Password ....................33 IV-2-2-3. Schedule ....................34 IV-2-2-4. Budget Control ..................36 IV-2-2-4-1. Daily, Weekly & Monthly Control ............37 IV-2-2-4-2. Current Usage Control ................38 IV-2-2-4-1.
-
Page 4: Product Information
I. Product Information IMPORTANT SAFETY INFORMATION In order to ensure the safe operation of the device and its users, please read and act in accordance with the following safety instructions: WARNING: There is risk of fire or electric shock if the device is used inappropriately. If you experience problems with the device, please contact your dealer of purchase for help. -
Page 5: I-1. Package Contents
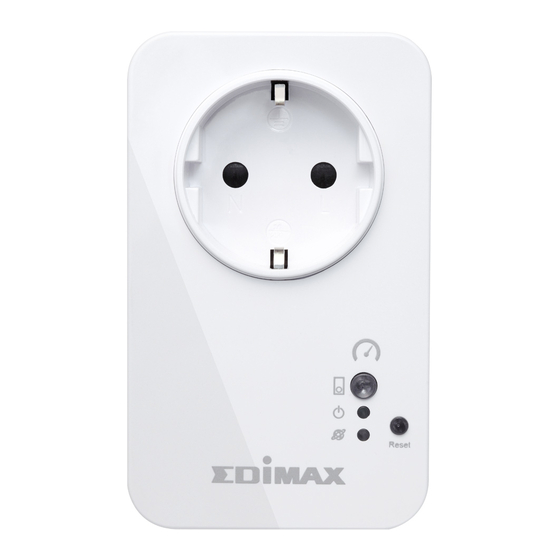
I-1. Package Contents Smart Plug Switch Quick Installation Guide CD with User Manual I-2. Front Panel Switch Status Button & LED Power LED Reset Button Network LED... -
Page 6: I-3. Led Status
I-3. LED Status Color Status Description Switch Smart plug output power socket is on. Status Green Smart plug output power socket is off. Power Smart plug is powered on. Green Smart plug is off. Quick Flashing Smart plug is starting up or restarting. Slow Flashing (1 Smart plug is in installation mode and x per second) -
Page 7: Product Label
I-5. Product Label The product label, which is located on the back of the smart plug switch, displays the input/output power and the default password of your smart plug. The password should be changed when you have finished the installation process for security purposes. -
Page 8: Hardware Installation
II. Hardware Installation Follow the instructions below to ensure your smart plug is properly connected and ready for setup. If you have multiple smart plugs to set up, please only plug in and set up one smart plug at a time. Plug the smart plug into a power socket. -
Page 9: Smart Plug Quick Setup
III. Smart Plug Quick Setup To set up your smart plug with the free EdiPlug smartphone app, please download the EdiPlug app and then follow the setup instructions for iOS or Android. After setup, you can use the EdiPlug app to switch your smart plug switch on/off remotely from any smartphone with an Internet connection, as well as set up automated schedule and email notifications. -
Page 10: Iii-1. Ios
III-1. Follow the instructions below to add a new smart plug to the EdiPlug app on iOS: You must be within Wi-Fi range of the smart plug. If you have multiple smart plugs, please only plug in and set up one plug at a time. - Page 11 Enter your Wi-Fi password and tap “OK”, then wait a moment for your plug to restart. The next screen will indicate that setup is complete. Your smart plug will now be displayed on the EdiPlug main screen. Tap the switch to switch your smart plug (and any electrical device you plug into it) on or off.
-
Page 12: Iii-1-1. Change Smart Plug Name & Password
III-1-1. Change Smart Plug Name & Password Select “Edit” from the EdiPlug main screen and then select the smart plug which you wish to edit from the list. Enter a new name and password for your smart plug and then tap “Back” to go back to the main screen. -
Page 13: Iii-1-2. Add An Existing Smart Plug To The Main Screen
III-1-2. Add an Existing Smart Plug to the Main Screen From the EdiPlug main screen, click the “+” icon in the top-right corner and select a plug from the list. Enter your smart plug’s password and tap “OK”. Click the check icon by your smart plug’s name on the next screen to finish. -
Page 14: Iii-1-3. Power Meter: Main Screen
III-1-3. Power Meter: Main Screen From the EdiPlug main screen, click on a smart plug and the power meter display will open. Use the three icons to browse different categories of further information. For more information, refer to the chapter IV. EdiPlug App. -
Page 15: Iii-1-4. Settings
III-1-4. Settings Select “Edit” from the EdiPlug main screen and then select the smart plug which you wish to edit from the list. You can configure your smart plug’s schedule, budget control, email notifications are other settings from this menu. If you need help, please refer to IV-2-2-3. -
Page 16: Iii-2. Android
III-2. Android III-2-1. Add a new smart plug Follow the instructions below to add a new smart plug to the EdiPlug app on Android: You must be within Wi-Fi range of the smart plug. If you have multiple smart plugs, please only plug in and set up one plug at a time. - Page 17 Enter your Wi-Fi password and tap “OK”, then wait a moment for your plug to restart. The next screen will indicate that setup is complete. Click “Next” and your smart plug will now be displayed on the EdiPlug main screen. Tap the switch to switch your smart plug (and any electrical device you plug into it) on or off.
- Page 18 The smart plug’s network LED should display on and green to indicate a successful network and cloud connection. You can use the EdiPlug app to control your smart plug remotely from any Internet connection.
-
Page 19: Iii-2-2. Change Smart Plug Name & Password
III-2-2. Change Smart Plug Name & Password Select “Edit” from the EdiPlug main screen and then select the smart plug which you wish to edit from the list. Enter a new name and password for your smart plug and tap “Back” to go back to the main screen. -
Page 20: Iii-2-3. Add An Existing Smart Plug To The Main Screen
III-2-3. Add an Existing Smart Plug to the Main Screen From the EdiPlug main screen, click the “+” icon in the top-right corner and select a plug from the list. Enter your smart plug’s password and tap “OK”. Click the check icon by your smart plug’s name on the next screen to finish. -
Page 21: Iii-2-4. Power Meter: Main Screen
III-2-4. Power Meter: Main Screen From the EdiPlug main screen, click on a smart plug and the power meter display will open. Use the three icons to browse different categories of further information. For more information, refer to the chapter IV. EdiPlug App. -
Page 22: Iii-2-5. Settings
III-2-5. Settings Select “Edit” from the EdiPlug main screen and then select the smart plug which you wish to edit from the list. You can configure your smart plug’s schedule, budget control, email notifications are other settings from this menu. Refer to the next chapter EdiPlug App for more information. -
Page 23: Ediplug App
IV. EdiPlug App The EdiPlug app is a powerful tool to control your smart plug and manage its functions such as scheduling and budget control. If you need help with any of the features, refer to the descriptions in the following chapters. The app’s functions are the same for iOS and Android, with a few minor cosmetic differences. - Page 24 To add additional smart plugs, click the “+” icon and refer back to III-2-1. Add a new smart plug. To view a smart plug’s power meter information, click the name of your smart plug in the list and refer to IV-2-1. Power Meter: Main Screen. To edit the settings for a smart plug, click “Edit”...
-
Page 25: Iv-2-1. Power Meter: Main Screen
IV-2. Power Meter: Main Screen Click any of the three icons at the bottom to browse view information about your smart plug: Now, Usage and Schedule. Displays how many Displays how many Amps your smart plug Watts your smart plug is currently using. -
Page 26: Iv-2-1-1. Now
IV-2-1. The “Now” screen provides a summary of the smart plug’s current usage in Amps (A) and Watts (W) as well as the total power used during the last day, week and month. The icon displays a happy face for lower power usage. -
Page 27: Iv-2-1-2. Usage
IV-2-2. Usage The “Usage” screen displays a graph of your smart plug’s power usage with kWh (kilowatts per hour) against time, or currency (represented by a dollar icon) against time. You can adjust the time displayed by clicking the arrow icon and selecting 24 hours, 7 days, 31 days, or annual as shown below:... - Page 28 You can adjust between kWh and $ by clicking the icon in the top right corner and entering the price per 1 kWh. Check with your electricity provider if you are unsure of the price.
- Page 29 IV-2-3. Schedule The “Schedule” screen displays a summary of your smart plug’s existing schedules and allows you to set new or edit existing schedules. Orange blocks on each day’s timeline represent times when the smart plug is scheduled to be on. You can set multiple schedules for each day.
- Page 30 A. Click the arrow icon to the right of any day you wish to set a schedule, and on the next screen click the switch icon to enable scheduling for that day. B. Click “Add New Schedule” to add a new schedule for your selected day. C.
- Page 31 IV-3. Edit Settings Select your plug from the list or click the arrow, and you will see the “Plug Settings” menu. From the plug settings menu you can quickly configure your smart plug’s settings. Select a category and refer to the following chapters for more information if you need help.
- Page 32 IV-3-1. Name You can edit the name used to identify the smart plug in the EdiPlug app. Enter a new name and click “Done” (Android) or “Ok” (iOS) to confirm. If you are using multiple smart plugs, it’s suggested that you name each plug for easy reference, e.g.
- Page 33 IV-3-2. Password You can edit the smart plug’s password which is used to verify access to the smart plug by the EdiPlug app. Enter your desired password twice and click “Done” (Android) or (iOS) to confirm. You can click “Show password” to display the password.
- Page 34 IV-3-3. Schedule The “Schedule” screen displays a summary of your smart plug’s existing schedules and allows you to set new or edit existing schedules. Orange blocks on each day’s timeline represent times when the smart plug is scheduled to be on. You can set multiple schedules for each day.
- Page 35 A. Click the arrow icon to the right of any day you wish to set a schedule, and on the next screen click the switch icon to enable scheduling for that day. B. Click “Add New Schedule” to add a new schedule for your selected day. C.
- Page 36 IV-3-4. Budget Control Your smart plug includes a helpful budget control feature which allows you to regulate the amount of power which a smart plug uses per day, week or month. You can set the limit in kWh or you can enter the cost of your electricity per kWh and set the limit in monetary value i.e.
- Page 37 IV-3-5. Daily, Weekly & Monthly Control Choose whether to set your limits in kWh (kilowatt hours) or using a monetary value by clicking the icon in the top right corner. By default, your smart plug is set to use kWh. Then enter your daily, weekly or monthly limits and click the switch icon to switch this limit on or off.
- Page 38 IV-3-6. Current Usage Control Your smart plug can be set to switch off anytime the power level used by its connected appliance exceeds a specified limit of Watts or Amps. Enter your limit in the box and click “Done” to save.
- Page 39 IV-3-7. Power Prices To set daily, monthly or weekly usage limits in units of your currency (represented by a $ icon), you first need to enter the cost of your electricity per kWh. Then your smart plug can calculate how much money its power usage costs and adhere to your set limits.
- Page 40 IV-3-8. Email Notifications Your smart plug can provide helpful email notifications for different events such as exceeding a set limit or being switched on or off. The smart plug can also send a useful daily, weekly or monthly email report consisting of information about the plug’s usage.
- Page 41 Click the switch icon to switch on email notifications and reveal the menu below. You can switch on/off different types of email notifications according to your preference. The smart plug can send a test email to check everything is set up correctly. If you don’t receive the email, or if any error message is displayed, please check your settings again.
- Page 42 IV-4. Reset You can reset your smart plug back to its factory default settings. This will reset all settings including scheduling, email notifications and time settings. Click “Reset to Default” from the “Plug Settings” menu and confirm that you wish to reset. The smart plug will take a couple of minutes to reset before it’s ready for use again.
- Page 43 Federal Communication Commission Interference Statement This equipment has been tested and found to comply with the limits for a Class B digital device, pursuant to Part 15 of FCC Rules. These limits are designed to provide reasonable protection against harmful interference in a residential installation.
- Page 44 EU Declaration of Conformity English: This equipment is in compliance with the essential requirements and other relevant provisions of Directive 1995/95/EC, 2011/65/EC. Français: Cet équipement est conforme aux exigences essentielles et autres dispositions de la directive 1995/95/CE, 2011/65/CE. Čeština: Toto zařízení je v souladu se základními požadavky a ostatními příslušnými ustanoveními směrnic 1995/95/ES, 2011/65/ES.
-
Page 45: Declaration Of Conformity
Declaration of Conformity We, Edimax Technology Co., Ltd., is hereby confirmed to comply with the requirements set out in the Council Directive on the Approximation of the Laws of the Member States relating to Radio Equipment and Telecommunications Terminal Equipment Directive (1999/5/EC) and Electromagnetic Compatibility Directive (2004/108/EC) and Low Voltage Directive (2006/95/EC). - Page 46 Notice According to GNU General Public License Version 2 This product includes software that is subject to the GNU General Public License version 2. The program is free software and distributed without any warranty of the author. We offer, valid for at least three years, to give you, for a charge no more than the costs of physically performing source distribution, a complete machine-readable copy of the corresponding source code.
- Page 47 1. You may copy and distribute verbatim copies of the Program’s source code as you receive it, in any medium, provided that you conspicuously and appropriately publish on each copy an appropriate copyright notice and disclaimer of warranty; keep intact all the notices that refer to this License and to the absence of any warranty; and give any other recipients of the Program a copy of this License along with the Program.
- Page 48 5. You are not required to accept this License, since you have not signed it. However, nothing else grants you permission to modify or distribute the Program or its derivative works. These actions are prohibited by law if you do not accept this License. Therefore, by modifying or distributing the Program (or any work based on the Program), you indicate your acceptance of this License to do so, and all its terms and conditions for copying, distributing or modifying the Program or works based on it.
Need help?
Do you have a question about the SP-2101W and is the answer not in the manual?
Questions and answers