Table of Contents
Advertisement
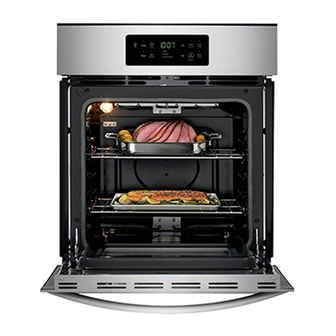
Use and C are Manual
Classic Wall Oven
For use with ECD, ECS, MCD, MCS, PCD and PCS series models
T a b l e o f C o n t e n t s
Important Safety Instructions ............................................. 1-2
Oven Operation ........................................................... 3-11
Care and Cleaning ..................................................... 12-15
Before You Call For Service .......................................... 16-17
Service and Product Warranty ........................................... 18
Notes ........................................................................ 19-20
Place Serial Number Label Here
Part No. 65031 Rev. J
Advertisement
Table of Contents

Related Manuals for Dacor ECD Series


Summary of Contents for Dacor ECD Series
-
Page 1: Table Of Contents
Use and C are Manual Classic Wall Oven For use with ECD, ECS, MCD, MCS, PCD and PCS series models T a b l e o f C o n t e n t s Important Safety Instructions ..........1-2 Oven Operation ............ -
Page 3: Important Safety Instructions
mportant afety nStructIonS Installer: LEavE tHESE iNStRuCtioNS witH tHE danger aPPLiaNCE. Important: to avoid the possibility of explosion or fire, do not Consumer: read thIs use and Care manual store or use combustible, flammable or explosive vapors and Completely before usIng thIs applIanCe. save It liquids (such as gasoline) inside or in the vicinity of this or any for future referenCe. -
Page 4: General Safety Precautions
mportant afety nStructIonS General Safety Precautions to reduce the risk of fire, electric shock, serious injury or death when using your oven, follow basic safety precautions, including the following: warnIng warnIng • if you receive a damaged product, immediately contact •... -
Page 5: Getting Started
peratIon Getting Started Setting The Time Of Day Before using your oven, become familiar with the features and follow these two steps to set the correct time of day: control panel layout (see pages 4 and 5). Press the CloCK key. the time of day will flash, “am” or Below the oven mode touch keys are three touch keys “pm”... -
Page 6: Oven Operation
peratIon Control Panel Control panel - epicure ® models eCd227 and eCd230 Control panel - epicure ® models eCs227 and eCs230 Control panel - epicure ® models eCs127, eCs130 and eCs136 Control panel - millennia ™ models mCd227 and mCd230 Control panel - millennia ™... - Page 7 peratIon Control panel - millennia ™ models mCs127 and mCs130 Control panel - preference ™ models pCd227 and pCd230 Control panel - preference ™ model pCs230 Control panel - preference model pCs130 ™...
-
Page 8: Oven Rack Positions
peratIon Oven Racks and Support three chrome-plated convection racks are provided in the oven. always remember to position the racks prior to heating the oven. also, remove the oven racks prior to self-cleaning to prevent permanent discoloration of the racks. the porcelain rack supports provide six heights for positioning of the oven racks. -
Page 9: Oven Modes
peratIon Oven Modes Oven Mode Selection all oven modes are described below: Follow these steps to manually operate the oven in standard bake, Pure Convection or convection bake mode: standard baKe – in standard bake mode, the bottom heating element provides conventional radiant heat. Position oven rack(s) at the proper height(s). -
Page 10: What Is Pure Convection
peratIon What Is Pure Convection? • wait until the shortest recommended baking time before checking food. For baked goods, a wooden pick placed in the center should come clean when the food is done. Your new oven has the best cooking system available today, Pure Convection. -
Page 11: Broiling Tips
peratIon to operate the oven in standard broil or convection broil broIlIng tIps: modes: always use a broiler pan and grill to provide drainage for excess fat and grease. Doing so will reduce spatter, smoke Close the door tightly. and flare-ups. Press the broIl or ConveCtIon broIl key. -
Page 12: Using The Meat Probe
peratIon Delay Timed Cooking (Continued) Using the Meat Probe to begin cooking immediately and turn off at the desired For many foods, especially roasts and poultry, internal food time: temperature is the best test for properly cooked food. the meat probe takes the guesswork out of roasting by cooking food to the Position oven rack(s) at the proper height(s). -
Page 13: Using The Minute Timer
peratIon Dehydrating/Defrosting setting the oven when using the temperature probe: Pre-heat the oven to the desired temperature. the oven can be used to dehydrate or defrost foods at low heat insert the meat probe into the food. (See Probe Placement). settings in Pure Convection mode. -
Page 14: Care And Cleaning
are and leanIng Porcelain Surfaces warnIng • to avoid electrical shock or burns, turn off all controls and • the oven interior and inner door liners are finished in ensure the oven is cool before cleaning. porcelain enamel. Clean these surfaces with a solution of •... - Page 15 are and leanIng • Soak the filter in hot soapy water. Remove the broiler pan and grill, all cookware, utensils and other loose items from the oven chamber. also, remove all • Dry the filter completely before re-installing. oven racks and the convection fan filter to prevent them from •...
-
Page 16: Adjusting The Oven Temperature
are and leanIng Self-Cleaning (Continued) Adjusting the Oven Temperature about 50 to 60 minutes is required for the oven to reach the Important: self-clean temperature of 850˚F. You may find the temperature in their new oven to be different the self-clean cycle can be stopped at any time by pressing from that of their previously-owned appliance. -
Page 17: Replacing The Oven Light
are and leanIng Replacing the Oven Light Accessories for accessories call your local dacor dealer or visit warnIng www.everythingdacor.com. to prevent electrical shock and/or personal injury: accessory Cookie sheets (3 in a carton): these Full sized cookie • Make certain that the appliance and light bulb are cool and sheets maximize oven rack baking capabilities by allowing the that power to the appliance has been turned off before total usable rack area. -
Page 18: Problem Solution Guide
efore ervIce Problem Solution Guide unnecessary service calls may be expensive, frustrating and time-consuming. Before you call for service, please review the potential problems, possible causes and remedies shown below. also, see the facing page for various oven failure codes that can be displayed on the control panel. -
Page 19: Before You Call For Service
efore ervIce Important: if a failure code is displayed, the oven will beep continuously until the user presses the CANCEL • SECURE key. the oven will not heat after a failure code is displayed. Call a qualified appliance technician to repair the oven. Clock display Cause touch pad is stuck in depressed position. -
Page 20: Product Maintenance
ervIce and roduct arranty Product Maintenance What Is Not Covered No maintenance, other than that in the CARE AND CLEANING • Failure of the product caused by faulty installation, improper section of this use and care manual, should be attempted by usage, or neglect of required maintenance. -
Page 21: Notes
oteS... - Page 22 oteS...
- Page 23 fold here NO POSTAGE NECESSARY IF MAILED IN THE UNITED STATES BUSINESS REPLY MAIL FIRST-CLASS MAIL PERMIT NO. 4507 DIAMOND BAR CA POSTAGE WILL BE PAID BY ADDRESSEE DACOR INC. ATTN: WARRANTY PROCESSING DEPT 1440 BRIDGE GATE DR STE 200 PO BOX 6532 DIAMOND BAR CA 91765-9861...
-
Page 24: Warranty Information
Please visit www.Dacor.com to activate your warranty online. WARRANTY INFORMATION IMPORTANT: Your warranty will not be activated until you activate it online or return this form to Dacor. If you have purchased more than one Dacor product, please return all forms in one envelope or activate the warranty for each product online. Please rest assured that under no conditions will Dacor sell your name or any of the information on this form for mailing list purposes.