Dell 5210n Mono Laser Printer User Manual
Mono laser printer
Hide thumbs
Also See for 5210n Mono Laser Printer:
- Manual (1 page) ,
- Service manual (430 pages) ,
- Quick reference manual (8 pages)
Table of Contents
Advertisement
Quick Links
About Your Printer
Identifying Your Printer
Understanding the Operator Panel
Using the Operator Panel Menus
Identifying Your Printer
The printer is available in two base models. The following table indicates some of the differences between the models.
Input capacity
Output capacity
Standard memory
Maximum memory capacity
NOTE:
The printer model number is shown on the operator panel.
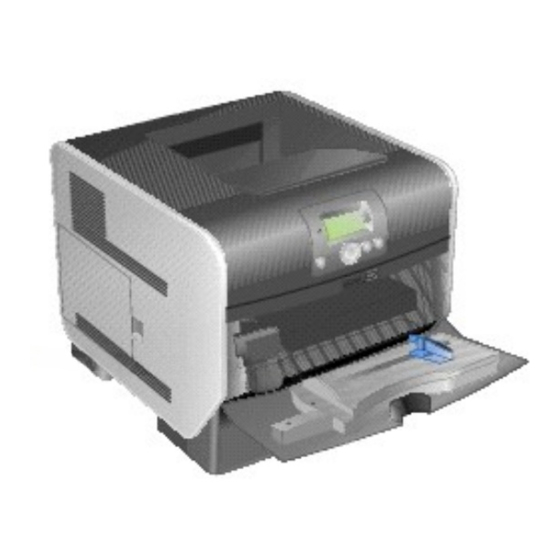
Configured Models
The following illustrations show a standard network and fully configured printer. If you attach print media handling options to the printer, it may look more like
the fully configured model.
Items denoted with an asterisk (*) are options. For more information about installing input options, see
that came with the option.
To purchase any of the options below, go to
Standard Network
Number:
1
2
3
4
Fully Configured
5210n
600 sheets
(500-sheet tray + 100-sheet multipurpose feeder)
250 sheets
64MB
576MB
www.dell.com
or contact your Dell Sales Representative.
Part:
Standard output bin (250 sheets)
Operator panel
Multipurpose feeder (100 sheets)
Standard tray (500 sheets)
5310n
600 sheets
(500-sheet tray + 100-sheet multipurpose feeder)
250 sheets
128MB
640MB
Installing and Removing Options
or the instructions
Advertisement
Table of Contents

Related Manuals for Dell 5210n Mono Laser Printer


Summary of Contents for Dell 5210n Mono Laser Printer
-
Page 1: About Your Printer
Installing and Removing Options or the instructions that came with the option. To purchase any of the options below, go to www.dell.com or contact your Dell Sales Representative. Standard Network Number: Part: Standard output bin (250 sheets) -
Page 2: Understanding The Operator Panel
NOTE: You can install up to four optional paper trays, or three trays and a duplex unit. Number: Part: Output expander (650 sheets) Tray 1/Standard tray (500 sheets) Duplex unit (500 sheets) Envelope feeder (85 envelopes) Tray 2 (250 or 500 sheets) Tray 3 (250 or 500 sheets) Tray 4 (250 or 500 sheets) ... -
Page 3: Using The Operator Panel Menus
used to scroll through text that will not fit on the screen. Select button Initiate action on a selection. Press Select when the cursor appears next to the selection you want such as following a link, submitting a configuration item, or when you want to start or cancel a job. ... -
Page 4: Dell Technical Support Policy
Integration (CFI/DellPlus). Contacting Dell You can access Dell Support at support.dell.com. Select your region on the WELCOME TO DELL SUPPORT page, and fill in the requested details to access help tools and information. You can contact Dell electronically using the following addresses: ... - Page 5 BSD License and Warranty Statements Copyright (c) 1991 The Regents of the University of California. All rights reserved. Redistribution and use in source and binary forms, with or without modification, are permitted provided that the following conditions are met: 1.
-
Page 6: Finding Information
Answers to technical service and support questions The Dell Support website provides several online tools, including: Documentation for my printer Solutions — Troubleshooting hints and tips, articles from technicians, and online courses Upgrades — Upgrade information for components, such as memory Customer Care —... -
Page 7: Gnu General Public License
GNU License GENERAL PUBLIC LICENSE Version 2, June 1991 Copyright (C) 1989, 1991 Free Software Foundation, Inc. 59 Temple Place, Suite 330, Boston, MA 02111-1307 USA Everyone is permitted to copy and distribute verbatim copies of this license document, but changing it is not allowed. Preamble ... - Page 8 2. You may copy and distribute verbatim copies of the Program's source code as you receive it, in any medium, provided that you conspicuously and appropriately publish on each copy an appropriate copyright notice and disclaimer of warranty; keep intact all the notices that refer to this License and to the absence of any warranty;...
-
Page 9: How To Apply These Terms To Your New Programs
Foundation. If the Program does not specify a version number of this License, you may choose any version ever published by the Free Software Foundation. 11. If you wish to incorporate parts of the Program into other free programs whose distribution conditions are different, write to the author to ask for permission. - Page 10 This license, the Lesser General Public License, applies to some specially designated software packages--typically libraries--of the Free Software Foundation and other authors who decide to use it. You can use it too, but we suggest you first think carefully about whether this license or the ordinary General Public License is the better strategy to use in any particular case, based on the explanations below.
- Page 11 A "library" means a collection of software functions and/or data prepared so as to be conveniently linked with application programs (which use some of those functions and data) to form executables. The "Library", below, refers to any such software library or work which has been distributed under these terms. A "work based on the Library" means either the Library or any derivative work under copyright law: that is to say, a work containing the Library or a portion of it, either verbatim or with modifications and/or translated straightforwardly into another language.
- Page 12 portions of the Library, and distribute that work under terms of your choice, provided that the terms permit modification of the work for the customer's own use and reverse engineering for debugging such modifications. You must give prominent notice with each copy of the work that the Library is used in it and that the Library and its use are covered by this License. You must supply a copy of this License.
-
Page 13: How To Apply These Terms To Your New Libraries
YOU ASSUME THE COST OF ALL NECESSARY SERVICING, REPAIR OR CORRECTION. 16. IN NO EVENT UNLESS REQUIRED BY APPLICABLE LAW OR AGREED TO IN WRITING WILL ANY COPYRIGHT HOLDER, OR ANY OTHER PARTY WHO MAY MODIFY AND/OR REDISTRIBUTE THE LIBRARY AS PERMITTED ABOVE, BE LIABLE TO YOU FOR DAMAGES, INCLUDING ANY GENERAL, SPECIAL, INCIDENTAL OR CONSEQUENTIAL DAMAGES ARISING OUT OF THE USE OR INABILITY TO USE THE LIBRARY (INCLUDING BUT NOT LIMITED TO LOSS OF DATA OR DATA BEING RENDERED INACCURATE OR LOSSES SUSTAINED BY YOU OR THIRD PARTIES OR A FAILURE OF THE LIBRARY TO OPERATE WITH ANY OTHER SOFTWARE), EVEN IF SUCH HOLDER OR OTHER PARTY HAS BEEN ADVISED OF THE POSSIBILITY OF SUCH DAMAGES. -
Page 14: Notes, Notices, And Cautions
Trademarks used in this text: Dell and the DELL logo are trademarks of Dell Inc.; Microsoft and Windows are registered trademarks of Microsoft Corporation. Other trademarks and trade names may be used in this document to refer to either the entities claiming the marks and names or their products. Dell Inc. disclaims any proprietary interest in trademarks and trade names other than its own. -
Page 15: Identifying Jams
Clearing Jams Identifying Jams Clearing Printer Jams By carefully selecting print media and loading it properly, you should be able to avoid most paper jams. For more information on avoiding paper jams, see Avoiding Jams. If jams do occur, follow the steps outlined in this section. ... -
Page 16: And 201 Paper Jam Remove Cartridge
Although there are several places a jam can occur, clearing the paper path is fairly easy depending on the jam message or messages displayed on the operator panel. Paper jams can occur in three areas: the front of the printer, inside the printer, and at the rear of the printer. Jams in the front of the printer occur in the input options or the duplex tray. - Page 17 5. Pull the print media up and toward you. NOTE: The print media may be covered with unfused toner, which can stain garments and skin. NOTICE: If the print media does not move immediately when you pull, stop pulling. You need to access the print media from the printer rear door. CAUTION: Do not use any pointed objects to remove the paper.
-
Page 18: Paper Jam Open Rear Door
9. Press the Select button 202 Paper Jam Open Rear Door 1. If the paper is exiting the printer, pull the media straight out, and press the Select button . Otherwise, continue with step 2. Open the printer rear door. CAUTION: The inside of the printer may be hot. -
Page 19: 23X And 24X Jams
23x Paper Jam Open Duplex Rear Door 1. Open the duplex rear door. 2. Remove the jammed media. Depending on the media location, pull the media either up or down. 3. Close the duplex rear door. Make sure it snaps into place. ... -
Page 20: Paper Jam Check Mp Feeder
2. Open the duplex tray, and remove the media by pulling up. 3. Open any optional trays beginning at the top, and remove any jammed media. Pull the print media either up or down. If it does not pull easily one way, try the other way. ... -
Page 21: Paper Jam Check Env Feeder
2. Flex, fan, and restack the media. 3. Load the print media. 4. Slide the side guide toward the inside of the tray until it lightly rests against the edge of the media. 5. Press the Select button 260 Paper Jam Check Env Feeder ... - Page 22 2. Remove all envelopes. If the jammed envelope has entered the printer and cannot be pulled out, remove the envelope feeder. a. Lift the envelope feeder up out of the printer, and then set it aside. b. Remove the envelope from the printer. NOTE: If you cannot remove the envelope, the print cartridge will have to be removed.
-
Page 23: Paper Jam Check Bin
6. Lower the envelope weight. 7. Press the Select button 27x Paper Jam Check Bin x To clear a jam in the output expander: 1. If the paper is exiting into the bin, pull the media straight out, and press the Select button . - Page 24 3. Remove the jammed media. 4. Close the output bin rear doors, and make sure all doors are secure. 5. Press the Select button...
-
Page 25: Licensing Notice
The Dell modified GNU licensed software is free software; you can redistribute it and/or modify it under the terms of the licenses referenced above. These licenses do not provide you any rights to the Dell- or third-party-copyrighted software in this printer. -
Page 26: Installing Drivers For Local Printing
Installing Drivers for Local Printing Windows Macintosh Linux/UNIX A local printer is a printer attached to one computer using a USB or parallel cable. If your printer is attached to a network instead of your computer, go to Installing Drivers for Network Printing. -
Page 27: Creating A Queue In Print Center/Printer Setup Utility (Mac Os X)
In all others, click Start®Settings®Printers. 3. Double-click Add Printer. 4. Click Next. 5. Select Local printer attached to this computer, and then click Next. 6. Select the port you want your printer to use, and then click Next. 7. Select Have Disk. 8. -
Page 28: Before Installing
NOTE: A PPD file provides detailed information about the capabilities of a printer to the Macintosh computer. c. Choose the appropriate language, and click Continue. d. Click Continue after viewing the Readme file. e. Click Continue after viewing the license agreement, and click Agree to accept the terms of the agreement. f. -
Page 29: Linux System Requirements
# rpm -ivh print-drivers-linux-glibc2-x86.rpm 5. Run the following setup script to complete the installation: # /usr/local/dell/setup.dellprint NOTE: Your specific printer driver may not be included in the standard package. Check your printer CD or the Web to determine if there are any driver plugins available. -
Page 30: Removing Remaining Directories
Package removal utilities usually do not remove directories shared by more than one package. After removing all of the printer drivers packages, some directories may need to be removed manually. To see if any directories remain after removing all the packages, check the directory where you installed printer drivers. By default, printer drivers installs in the following location: /usr/local/dell/unix_prt_drivers. -
Page 31: Maintaining The Printer
Maintaining the Printer Moving the Printer Maintaining Printer Supplies Replacing the Toner Cartridge Replacing Maintenance Kit Items Periodically, you need to complete certain tasks to maintain optimum print quality. These tasks are covered in this chapter. If several people are using the printer, you may want to designate a key operator to do the setup and maintenance of the printer. Refer printing problems and maintenance tasks to this key operator. -
Page 32: Ordering Supplies
If you do not have all the original packaging, contact your local service representative to order the repackaging kit. Additional instructions for repackaging the printer are provided in the repackaging kit. Maintaining Printer Supplies Ordering Supplies To order supplies, visit Dell's website: www.dell.com/supplies. Supply item: When to order: For more... -
Page 33: Replacing The Toner Cartridge
Duplex in the Settings® Finishing Duplex printing is available when you install an optional duplex unit. It lets you print on both sides of a sheet of paper. Menu Use your software application or Lets you examine the first copy of a multiple-copy job to be sure it is satisfactory before you print the other printer driver to send a Verify Print copies. - Page 34 3. Pull the print cartridge up and out of the printer. CAUTION: When replacing a toner cartridge, do not leave the new cartridge exposed to direct light for an extended period of time. Extended light exposure can cause print quality problems. 4.
-
Page 35: Replacing Maintenance Kit Items
7. Close the top front cover. 8. Close the multipurpose feeder. Replacing Maintenance Kit Items Replacing the Charge Rolls Order a new charge roll kit when toner fog or background shading appears on printed pages. 1. Turn the printer off, and unplug the printer power cord. 2. - Page 36 3. Push the release latch to the right to open the top front cover. 4. Pull the print cartridge up and out of the printer. 5. Attach the cardboard cover retainer to the hook on the printer. 6.
- Page 37 9. Pull the charge roll to the right and out of the printer. 10. Align the blue tab on the left side of the charge roll with its hole in the arm marked with the corresponding blue arrow, and insert it. Pull the charge roll to the left.
- Page 38 13. Remove the cardboard cover retainer. 14. Reinstall the print cartridge into the printer. 15. Close the top front cover. 16. Close the multipurpose feeder. ...
-
Page 39: Replacing The Transfer Roller
17. Plug the printer power cord into a properly grounded electrical outlet. Replacing the Transfer Roller Order a new transfer roller when light print, toner fog, or background shading appears on printed pages. 1. Turn the printer off, and unplug the printer power cord. 2. - Page 40 7. Lift the transfer roll and pull it straight out of the printer. Set it aside. 8. Remove any packaging from the new transfer roller. 9. Locate the small hole on the right side of the printer, and insert the metal tab on the right side of the transfer roller into the hole. ...
-
Page 41: Replacing The Pick Rollers
12. Close the top front cover. 13. Close the multipurpose feeder. 14. Plug the printer power cord into a properly grounded electrical outlet. Replacing the Pick Rollers 1. Remove the standard tray. 2. Look underneath the printer for the pick roller arm and pull it down. ... - Page 42 3. Press on the end of the tab. 4. Pull the pick roller off the arm. 5. Repeat step 3 step 4 on the other side to remove the other pick roller. 6. Gently release the pick roller arm. 7.
- Page 43 12. Repeat step 10 step 11 to install the other pick roller. 13. Gently release the pick roller arm. 14. Insert the standard tray. ...
-
Page 44: Understanding Paper And Specialty Media Guidelines
Understanding Paper and Specialty Media Guidelines Supported Print Media Selecting Print Media Storing Print Media Avoiding Jams Print media is paper, card stock, transparencies, labels, and envelopes. The printer provides high quality printing on a variety of print media. You must consider a number of things concerning print media before you print. - Page 45 JIS B5 7.17 x 10.1 in. (182 x 257 mm) Letter 8.5 x 11 in. (216 x 279 mm) Legal 8.5 x 14 in. (216 x 356 mm) Executive 7.25 x 10.5 in. (184 x 267 mm) 8.5 x 13 in. (216 x 330 mm) Folio 5.5 x 8.5 in.
- Page 46 Optional 500-sheet drawer 8.27 x 11.7 in. (210 x 297 mm) 5.83 x 8.27 in. (148 x 210 mm) JIS B5 7.17 x 10.1 in. (182 x 257 mm) Letter 8.5 x 11 in. (216 x 279 mm) Legal 8.5 x 14 in. (216 x 356 mm) Executive 7.25 x 10.5 in.
-
Page 47: Selecting Print Media
(37 to 39 lb bond) (37 to 39 lb bond) (37 to 39 lb bond) Labels — maximum Paper 180 g/m2 163 g/m2 180 g/m2 (48 lb bond) (43 lb bond) (48 lb bond) NOTE: Not supported in the multipurpose feeder. Dual-web paper 180 g/m2 163 g/m2... -
Page 48: Paper Weight
The following papers are not recommended for use with the printer: Some chemically treated papers used to make copies without carbon paper, also known as carbonless papers, carbonless copy paper (CCP), or no carbon required (NCR) paper Preprinted papers with chemicals that may contaminate the printer ... -
Page 49: Selecting Transparencies
The printer can automatically feed paper weights from 60 to 176 g/m2 (16 to 47 lb bond) grain long in the integrated and optional 500-sheet trays and paper weights from 60 to 135 g/m2 (16 to 36 lb bond) grain long in the multipurpose feeder and optional 250-sheet trays. Paper lighter than 60 g/m2 (16 lb) might not be stiff enough to feed properly, causing jams. For best performance, use 75 g/m2 (20 lb bond) grain long paper. When using paper narrower than 182 x 257 mm (7.2 x 10.1 in.), make sure the weight is greater than or equal to 90 g/m2 (24 lb bond). Unacceptable paper The following papers are not recommended for use with the printer: Preprinted papers with chemicals that may contaminate the printer Preprinted papers that can be affected by the temperature in the printer fuser ... - Page 50 using with the printer before buying large quantities. See Loading the Multipurpose Feeder Loading the Envelope Feeder for instructions on loading envelopes. NOTE: When using the envelope feeder, you may hear a "thumping" noise. This noise is normal; it occurs when trapped air is forced out of the envelopes before printing.
-
Page 51: Card Stock
Do not use label sheets that have adhesive to the edge of the sheet. Dell recommends zone coating of the adhesive at least 1 mm (0.04 in.) away from edges. Adhesive material contaminates the printer and could void the warranty. -
Page 52: Avoiding Jams
Avoiding Jams Use appropriate print media (paper, transparencies, labels, and card stock) to help ensure trouble-free printing. See Supported Print Media for more information. NOTE: Try a limited sample of any print media you are considering using with the printer before purchasing large quantities. ... -
Page 53: Understanding The Operator Panel Menus
Understanding the Operator Panel Menus Paper Menu Reports Settings Security Network/Ports A number of menus are available to make it easy for you to change printer settings. The diagram shows the menu index on the operator panel, the menus, and items available under each menu. -
Page 54: Substitute Size
Letter* (US) Legal Executive Folio Statement Universal 7 3/4 Envelope 9 Envelope 10 Envelope DL Envelope C5 Envelope Other Envelope MP Feeder Identifies the type of paper installed in the Plain Paper* The multipurpose feeder is only displayed on the operator panel when Size/Type multipurpose feeder. -
Page 55: Paper Texture
Substitute Substitutes the specified paper size if the requested size The Off value indicates no size substitutions are allowed. Size is not loaded. Statement/A5 The All Listed value indicates that all available Letter/A4 substitutions are allowed. All Listed* Paper Texture ... -
Page 56: Custom Types
single-sided job. Off* Vinyl Labels Loading Bond Loading Letterhead Loading Preprinted Loading Colored Loading Card Stock Properly handles preprinted card stock whether the job is a duplexed or Duplex Shown if Card Stock is supported in the specified Loading single-sided job. Off* input source. -
Page 57: Menu Settings Page
user until it is full, and then sends jobs to the designated overflow bin. Link Optional Links all optional output bins as though they were one large bin, while leaving the standard bin individually addressable. Type Assignment Sends each job to the output bin specified for that paper type. -
Page 58: Print Fonts
Print Fonts This menu selection prints a list of the fonts stored in the printer. Menu Purpose: Values: selection: Print Fonts Prints a sample of all the fonts available for the selected printer Prints a sample of all printer fonts available for PCL language. -
Page 59: Finishing Menu
When the timer expires, any partially formatted page still in the printer is printed, and other input ports are examined to see if data exists. 90* is the default setting. Wait Disabled — Disables Wait Timeout. Timeout: Disabled 15...65535 — Specifies the amount of time the printer waits for additional data 15...65535 before it cancels the job. -
Page 60: Quality Menu
Bind how the printing on the back of the sheet (even- Edge* orientation and top edge for landscape orientation). numbered pages) is oriented in relation to the printing on the front (odd-numbered pages). Short Edge Assumes binding along the short edge of the page (top edge for portrait orientation and left edge for landscape orientation). -
Page 61: Utilities Menu
Use this menu selection to change settings that affect print quality and save toner. Menu selection: Purpose: Values: Print Resolution To select printed output resolution. 600 dpi* 1200 Image Quality 1200 dpi 2400 Image Quality Toner Darkness Lightens or darkens printed output and conserves toner. 1–10 8* is the default setting. - Page 62 Displays all fonts stored on the printer hard disk. NOTE: The hard disk is an optional item and is not included in the printer. Contact your local Dell Sales Representative to determine availability. Displays all fonts available to the printer from all sources. Font Name...
- Page 63 Security This menu selection is used to set security levels on individual print jobs requiring a PIN. Menu selection: Purpose: Values: Job Expiration Limits the amount of time a confidential job stays in the printer before it is deleted. Off* 1 hour 4 hours...
- Page 64 NOTE: Changing the Network Buffer menu 3K to maximum User specifies the Network Buffer size. The maximum size depends item automatically resets the printer. size allowed on the amount of memory in the printer, the size of the other link (1k increments) buffers, and whether Resource Save is set to On or Off.
- Page 65 parallel port requires it, regardless of the default printer printer language. language. Printer does not examine the incoming data. The printer uses PCL emulation to process the job if PCL SmartSwitch is On, or uses the default printer language specified in the Setup Menu if PCL SmartSwitch is Off.
- Page 66 Menu Purpose: Values: selection: View Name Displays the assigned AppleTalk name. Selecting View Name displays the AppleTalk name on the operator panel. View Address Displays the assigned AppleTalk address. Selecting View Address displays the AppleTalk address on the operator panel. Activate Activates or deactivates the AppleTalk Activates the AppleTalk feature.
- Page 67 Understanding the Operator Panel Messages The printer operator panel displays messages describing the current state of the printer and indicates possible printer problems you must resolve. This chapter provides a list of all printer messages, explains what they mean, and tells you how to clear the messages. ...
- Page 68 51 Defective flash detected Press the Select button to clear the message and continue printing. You must install different flash memory before you can download any resources to flash. For more information, see Installing Printer Memory. 52 Not enough free space in flash Press the Select button to clear the message and continue printing. memory for resources Downloaded fonts and macros not previously stored in flash memory are deleted.
- Page 69 88 Toner is low Replace the toner cartridge. For more information, see Replacing the Toner Cartridge. Press the Select button to clear the message and continue printing. 200.yy Paper jam 1. Clear the paper path. 2. After clearing the paper path, press the Select button to resume printing.
- Page 70 Cancel not available Wait for the message to clear. Cancelling Wait for the message to clear. Change <src> <Custom Type Name> Press the Select button if you have changed the media. Select Use current to print on media currently in the printer. Change <src> <Custom String> Cancel the current job. Change <src> <size>...
- Page 71 Internal System Error Reload Reload the Bookmarks. Bookmarks Press the Select button to clear the message and continue printing. Internal System Error, Reload Security Reload the Security Certificates. Certificates Press the Select button to clear the message and continue printing. Invalid Network Code Download valid code to the internal print server.
- Page 72 Reattach bins <x> - <y> Turn the printer off and back on. If the error recurs, turn the printer off, unplug the power cord from the wall outlet, and remove the ¡ specified bins, then reattach the bin to the printer, r, and then restart the printer. If the error recurs, turn the printer off, unplug the power cord from the wall outlet, and remove the ¡...
-
Page 73: Installing Drivers For Network Printing
Installing Drivers for Network Printing Printing a Network Setup Page Assigning a Printer IP Address Verifying the IP Settings Windows Macintosh Linux/UNIX NetWare Printing a Network Setup Page If the printer is attached to a network, print a network setup page on the printer to verify the network connection. This page also provides important information to configure the printer for network printing. -
Page 74: Verifying The Ip Settings
8. Press the Down arrow button until appears next to Gateway, and then press the Select button 9. Using the numeric pad, enter the IP gateway. When the address is entered, press the Select button Submitting Selection appears briefly. 10. Press the Select button until the printer returns to Ready. -
Page 75: Installing The Printer Software
NOTE: Use a network cable to connect the printer to access the Dell Printer Configuration Web Tool. This application is not available when the printer is connected to a computer with a USB or parallel cable. ... -
Page 76: Shared Printing
NOTE: Windows XP Professional x64, Windows XP Professional, and Windows NT require that you have administrative access to install printer drivers on your computer. 1. Turn on your computer and insert the Drivers and Utilities CD. The Drivers and Utilities CD should automatically launch. This may take a few seconds. If the CD doesn't launch automatically, browse to the CD drive, and double-click setup.exe. -
Page 77: Share The Printer
However, if you use one of these Microsoft methods, you will not have all the Dell features, such as the Status Monitor, that are installed with the Drivers and Utilities CD. -
Page 78: Mac Os X
If you use the Peer-to-Peer method, the printer driver is fully installed on each client computer. Network clients retain control of driver modifications. The client computer handles the print job processing. 1. In Windows XP, click Start®Control Panel®Printers and Other Hardware®Printers and Faxes. In all others, click Start®Settings®Printers. -
Page 79: Using Ip Printing
1. Open Finder, click Applications, and click Utilities. 2. Double-click Print Center or Printer Setup Utility. 3. Choose Add Printer from the "Printers" menu. 4. Choose AppleTalk from the pop-up menu. NOTE: Look on the network setup page under the "AppleTalk" heading to know which zone or printer to select. 5. - Page 80 Zone. 3. Select the new printer from the list. 4. To know which printer to select, look on the Network Setup page under the "AppleTalk" heading to find the default name of the printer. 5. Click Create. 6. Make sure there is an icon next to the printer name in the Chooser. 7.
- Page 81 # rpm -ivh print-drivers-linux-glibc2-x86.rpm 5. Run the following setup script to complete the installation: # /usr/local/dell/setup.dellprint NOTE: Your specific printer driver may not be included in the standard package. Check your printer CD or the Web to determine if there are any driver plugins available.
-
Page 82: Queue-Based Printing
To see if any directories remain after removing all the packages, check the directory where you installed printer drivers. By default, printer drivers installs in the following location: /usr/local/dell/unix_prt_drivers. NetWare NDPS/iPrint ... - Page 83 Other Third-Party Licenses (Software) The Apache Software License, Version 1.1 Copyright (c) 2000 The Apache Software Foundation. All rights reserved. Redistribution and use in source and binary forms, with or without modification, are permitted provided that the following conditions are met: 1.
-
Page 84: Gnu Library General Public License
"This product includes software developed by the JDOM Project (http://www.jdom.org/)." Alternatively, the acknowledgment may be graphical using the logos available at http://www.jdom.org/images/logos. THIS SOFTWARE IS PROVIDED "AS IS" AND ANY EXPRESSED OR IMPLIED WARRANTIES, INCLUDING, BUT NOT LIMITED TO, THE IMPLIED WARRANTIES OF MERCHANTABILITY AND FITNESS FOR A PARTICULAR PURPOSE ARE DISCLAIMED. - Page 85 Finally, any free program is threatened constantly by software patents. We wish to avoid the danger that companies distributing free software will individually obtain patent licenses, thus in effect transforming the program into proprietary software. To prevent this, we have made it clear that any patent must be licensed for everyone's free use or not licensed at all.
- Page 86 considered independent and separate works in themselves, then this License, and its terms, do not apply to those sections when you distribute them as separate works. But when you distribute the same sections as part of a whole which is a work based on the Library, the distribution of the whole must be on the terms of this License, whose permissions for other licensees extend to the entire whole, and thus to each and every part regardless of who wrote it.
- Page 87 10. Each time you redistribute the Library (or any work based on the Library), the recipient automatically receives a license from the original licensor to copy, distribute, link with or modify the Library subject to these terms and conditions. You may not impose any further restrictions on the recipients' exercise of the rights granted herein.
- Page 88 <signature of Ty Coon>, 1 April 1990 Ty Coon, President of Vice That's all there is to it! wxWindows Library Licence, Version 3 Copyright (C) 1998 Julian Smart, Robert Roebling [, ...] Everyone is permitted to copy and distribute verbatim copies of this licence document, but changing it is not allowed. WXWINDOWS LIBRARY LICENCE TERMS AND CONDITIONS FOR COPYING, DISTRIBUTION AND MODIFICATION ...
-
Page 89: Installing And Removing Options
NOTE: Furniture options may not be available in all regions. Contact your Dell Sales Representative to determine furniture availability. CAUTION: If you are installing options after setting up the printer, turn the printer off, and unplug the power cord before continuing. -
Page 90: Installing A Duplex Unit
2. Place the support unit on top of any previously installed drawers or the table or printer cabinet where you plan to use the printer. The tab, round peg, and square holes on top of any drawer help you position the support unit so the edges are aligned properly. Make sure the support unit is securely in place. -
Page 91: Installing An Output Expander
1. Place the duplex unit on top of any installed drawers or the table or printer cabinet where you plan to use the printer. The tab, round peg, and square holes on top of any drawer help you position the duplex unit so the edges are aligned properly. Make sure it is securely in place. - Page 92 Number Part Labels Bracket and wire bail Support NOTICE: The output expander bin is designed to hold the weight of print media only. Excess weight may cause it to disengage from the support. After you carefully unpack the output expander, install it immediately; otherwise, the edges of the mounting brackets could damage tabletops or fabrics. 1.
-
Page 93: Installing An Envelope Feeder
5. Slide the lower tabs on the tray into the lower slots on the output expander. 6. Rotate the tray up until the upper tabs snap into the upper slots. 7. If you are not attaching any more print media handling options, attach the top cover to the output expander. Installing an Envelope Feeder ... -
Page 94: Installing A Printer Memory Card
If you are installing printer memory sometime after setting up the printer, turn the printer off, and unplug the power cord before continuing. Installing a Printer Memory Card NOTE: Printer memory cards designed for other printers may not work with the printer. Use only Dell printer memory cards to ensure compatibility. 1. Open the side door. NOTICE: Printer memory cards are easily damaged by static electricity. - Page 95 6. Make sure each latch fits over the notch on the end of the card. 7. Close the side door. Removing a Printer Memory Card 1. Open the side door. NOTICE: Printer memory memory cards are easily damaged by static electricity. Touch something metal such as the printer frame before you touch a memory card.
- Page 96 Installing Font ROMs NOTE: Font ROMs may not be available in all regions. Contact your Dell Sales Representative to determine Font ROM availability. Installing Font ROMs NOTE: Font ROMs designed for other printers may not work with the printer.
- Page 97 NOTE: If an option card has been installed, you may need to remove the option card before installing the Font ROM. 2. Unpack the Font ROM. NOTICE: Font ROMs are easily damaged by static electricity. Touch something metal such as the printer frame before you touch a memory card. 3.
- Page 98 1. Open the side door. NOTE: If an option card has been installed, you may need to remove the option card before removing the Font ROM. 2. Squeeze the Font ROM locking clips. NOTICE: Font ROMs are easily damaged by static electricity. Touch something metal such as the printer frame before you touch a memory card. ...
-
Page 100: Sending A Job To Print
Printing Sending a Job to Print Canceling a Print Job Printing the Menu Settings Page Printing a Network Setup Page Printing a Font Sample List Printing a Directory List Printing Confidential and Held Jobs Printing on Specialty Media Loading Standard Trays and Optional Trays Setting the Paper Type and Paper Size Loading the Multipurpose Feeder Loading the Envelope Feeder... -
Page 101: Canceling A Job From The Printer Operator Panel
Canceling a Job From the Desktop ¡ Canceling a Job From a Macintosh Computer Canceling a Print Job From a Computer Running Mac OS 9 ¡ Canceling a Job From a Computer Running Mac OS X ¡ Canceling a Job From the Printer Operator Panel ... -
Page 102: Printing The Menu Settings Page
When you send a job to print, the printer icon for your selected printer appears in the dock. 1. Open Applications® Utilities, and then double-click Print Center or Printer Setup. 2. Double-click the printer you are printing to. 3. In the printer window, select the print job you want to cancel. 4. -
Page 103: Printing Confidential And Held Jobs
3. Press the Down arrow button until appears next to Reports, and then press the Select button 4. Press the Down arrow button until appears next to Print Directory, and then press the Select button The printer returns to Ready. Printing Confidential and Held Jobs ... -
Page 104: Printing And Deleting Held Jobs
Printing and Deleting Held jobs Held jobs (Verify Print, Reserve Print, or Repeat Print) are printed or deleted from the printer operator panel and do not require a PIN number. Verify Print If you send a Verify Print job, the printer prints one copy and holds the remaining copies you requested in printer memory. Use Verify Print to examine the first copy to see if it is satisfactory before printing the remaining copies. -
Page 105: Printing On Specialty Media
The job will print or be deleted according to the type of print job and action you selected. Printing on Specialty Media Media is paper, card stock, transparencies, labels,and envelopes. The last four are sometimes referred to as specialty media. Follow these instructions to print on specialty media. - Page 106 NOTE: Do not remove a tray when a job is printing or when the operator panel indicator light is blinking. Doing so may cause a jam. 2. Squeeze the side guide tab, and slide the guide to the outer edge of the tray. ...
-
Page 107: Setting The Paper Type And Paper Size
NOTE: Do not fill paper above the load line. Overfilling the tray may cause jams. 6. Squeeze the side guide tab, and slide the guide toward the inside of the tray until it lightly rests against the edge of the media. ... -
Page 108: Loading The Multipurpose Feeder
This saves this setting as the new user default, and the printer returns to Ready. Loading the Multipurpose Feeder The multipurpose feeder can hold several sizes and types of print media, such as transparencies, postcards, note cards, and envelopes. It can be used for single-page or manual printing or as an additional tray. - Page 109 3. Slide the width guide to the far right. 4. Flex the sheets or envelopes back and forth to loosen them, then fan them. Do not fold or crease the print media. Straighten the edges on a level surface. NOTE: Hold transparencies by the edges and avoid touching the print side.
- Page 110 Loading paper, transparencies, or envelopes Load paper or transparencies with the left edge of the stack against the stack height label and with the recommended print side face-up. Load envelopes flap side down with the stamp area and flap on the left. The end of the envelope with the stamp area enters the multipurpose feeder first.
-
Page 111: Closing The Multipurpose Feeder
Closing the Multipurpose Feeder 1. Remove print media from the multipurpose feeder. 2. Push the extension tray in. 3. Close the multipurpose feeder Loading the Envelope Feeder The optional envelope feeder can accept a variety of envelope sizes. However, the envelope feeder must be adjusted correctly to ensure trouble-free printing. ... - Page 112 2. Lift the envelope weight back toward the printer. It stays in place. 3. Slide the width guide to the far right. 4. Flex a stack of envelopes back and forth, and then straighten the edges on a level surface. Press down the corners to flatten them. Fan the envelopes.
-
Page 113: Linking Trays
6. Slide the width guide to the left until it lightly touches the stack. Make sure the envelopes do not buckle. 7. Lower the envelope weight to touch the stack. 8. Set the Paper Size and Paper Type for the envelope feeder (envelope Feeder Size and envelope Feeder Type) to the correct value for the print media you loaded. -
Page 114: Identifying And Linking Output Bins
For example, if you have the same size and type of print media loaded in tray 2 and tray 4, the printer selects print media from tray 2 until it becomes empty, and then the printer automatically feeds print media from the next linked tray — tray 4. ... -
Page 115: Linking Output Bins
Linking output bins Linking output bins lets you create a single output source so the printer can automatically switch output to the next available bin. You can also set the output type for media such as card stock or envelope sizes that cannot be sent to an optional output bin. For more information on the values available to configure your output bins, see Understanding the Operator Panel Menus. -
Page 116: Regulatory Notices
Most Dell devices are classified for Class B environments. However, the inclusion of certain options can change the rating of some configurations to Class A. To determine the electromagnetic classification for your device, see the following sections specific for each regulatory agency. Each section provides country-... -
Page 117: Fcc Notices (U.s. Only)
Most Dell devices are classified by the Federal Communications Commission (FCC) as Class B digital devices. To determine which classification applies to your device, examine all FCC registration labels located on the bottom, side, or back panel of your device, on card-mounting brackets, and on the cards themselves. -
Page 118: Ce Notice (European Union)
This Dell device is classified for use in a typical Class B domestic environment. A "Declaration of Conformity" in accordance with the preceding directives and standards has been made and is on file at Dell Inc. Products Europe BV, Limerick, Ireland. -
Page 119: Simplified Chinese Class A Warning Notice (China Only)
Most Dell devices are classified by the Voluntary Control Council for Interference (VCCI) as Class B information technology equipment (ITE). However, the inclusion of certain options can change the rating of some configurations to Class A. ITE, including devices, expansion cards, printers, input/output (I/O) devices, monitors, and so on, integrated into or connected to the device should match the electromagnetic environment classification (Class A or B) of the device. -
Page 120: Vcci Class B Ite Regulatory Mark
If the regulatory label includes the following marking, your device is a Class A product: Class B ITE This is a Class B product based on the standard of the Voluntary Control Council for Interference (VCCI) for information technology equipment. If this equipment is used near a radio or television receiver in a domestic environment, it may cause radio interference. -
Page 121: Nom Information (Mexico Only)
5.3 A / 6.7 A ENERGY STAR® Compliance Any Dell product bearing the ENERGY STAR® emblem on the product or on a start-up screen is certified to comply with Environmental Protection Agency (EPA) ENERGY STAR® requirements as configured when shipped by Dell. ENERGY STAR® Emblem... - Page 122 In the European Union, this label indicates that this product should not be disposed of with household waste. It should be deposited at an appropriate facility to enable recovery and recycling. For information on how to recycle this product responsibly in your country, please visit: www.euro.dell.com/recycling.
- Page 123 Euroopan unionissa tämä merkintä kertoo, että tuote tulee hävittää kotitalousjätteen mukana.. Se tulee hävittää niin, että se voidaan noutaa ja siirtää kierrätykseen. Lisätietoja tämän tuotteen kierrättämisestä maassasi on osoitteessa www.euro.dell.com/recycling. Directive WEEE (Waste from Electrical and Electronic Equipment, Déchets des équipements électroniques et électriques) Dans l'Union européenne, cette étiquette indique que ce produit ne doit pas être mis au rebut avec les déchets ménagers. Il doit être déposé dans un endroit s e chargeant de sa récupération et de son recyclage. Pour obtenir des informations sur le recyclage responsable de ce produit dans votre pays, visitez le site www.euro.dell.com/recycling. WEEE-Richtlinie (Waste from Electrical and Electronic Equipment = Elektronikschrottverordnung) ...
- Page 124 W Unii Europejskiej etykieta ta oznacza, że produktu nie należy wyrzucać wraz z domowymi odpadkami. Produkt powinien zostać przekazany do właściwej firmy usługowej, gdzie będzie możliwa jego utylizacja. Informacje, w jaki sposób odpowiedzialnie zutylizować produkt w danym kraju można znaleźć na stronie internetowej: www.euro.dell.com/recycling. Directiva sobre desperdício de equipamento eléctrico e electrónico (WEEE - Waste Electrical and Electronic Equipment) ...
- Page 125 En la Unión Europea, esta etiqueta indica que este producto no se debe desechar con la basura doméstica, sino que se debe depositar en un lugar adecuado para permitir su recuperación y reciclaje. Para obtener información sobre cómo reciclar este producto de forma responsable en su país, visite: www.euro.dell.com/recycling. WEEE-direktivet (Waste from Electrical and Electronic Equipment) Inom EU indikerar den här etiketten att produkten får inte slängas med hushållsavfall. Den ska lämnas in på en återvinningsstation. Mer information om hur du kan återvinna den här produkten på ett ansvarsfullt sätt i ditt land hittar du på: www.euro.dell.com/recycling.
-
Page 126: Software Overview
1. Click Start®Programs or All Programs®Dell Printers®Dell Laser Printer 5210n / 5310n®Printer Supplies Reorder Application. The Order Supplies window appears. 2. If ordering from the Web, click Visit Dell's cartridge ordering web site. 3. If ordering by phone, call the number that appears under the By Telephone heading. -
Page 127: Dell Printer Software Uninstall
Have you ever sent a print job to the network printer down the hall, only to find it didn't print because of a paper jam or an empty paper tray? One of the features of the Dell Printer Configuration Web Tool is the Email Alert Setup, which sends you, or the key operator, an email when the printer needs supplies or... -
Page 128: Printer Status
If you fill out printer inventory reports requiring the asset tag number of all of the printers in your area, the Dell Printer Configuration Web Tool has a Printer Information feature that makes it easy. Just type the IP address of each printer on the network to display the asset tag number. -
Page 129: Printer Information
Lock the operator panel with a password so that other users don't inadvertently change the printer settings you selected. NOTE: You must be a network administrator to use this feature. Online Help Click Help to visit the Dell website for printer troubleshooting. -
Page 130: Troubleshooting
Troubleshooting Understanding Printer Messages Checking an Unresponsive Printer Solving Printing Problems Solving Option Problems Solving Paper Feed Problems Solving Print Quality Problems Understanding Printer Messages The printer displays three types of messages: status messages, attendance messages, and service messages. Status messages provide information about the current state of the printer. - Page 131 You are using the wrong printer driver or are printing to a file. Verify you are using the printer driver associated with the printer. ¡ If you are using a USB port, make sure you are running Windows XP Professional x64, Windows XP, Windows Server 2003, ¡ Windows 2000, or Windows 98/Me and using a Windows XP, Windows Server 2003, Windows 2000, or Windows 98/Me compatible printer driver. Your print server is not set up properly or is not connected properly. Verify that you have properly configured the printer for network printing.
-
Page 132: Solving Option Problems
Solving Option Problems If an option does not operate correctly after it is installed or if it quits working: Turn the printer off, wait for about 10 seconds, and turn the printer on. If this does not fix the problem, unplug the printer, and check the connection between the option and printer. -
Page 133: Solving Print Quality Problems
The pick rolls may be worn. Replace the pick rolls. See Replacing the Pick Rollers for more information. The Paper Jam message remains after you remove the jammed paper. You have not pressed Go or have not cleared the entire paper path. Clear paper from the entire paper path, and then press the Select button . - Page 134 Enable Enhance Fine Lines. If you are using downloaded fonts, verify the fonts are supported by the printer, the host computer, and the software application. Part or all of the page is printed in black. Check the print cartridge to see if it is installed correctly. The job prints, but the top and side margins are incorrect.
-
Page 135: Minimum Requirements For Setup
Configuring the Optional Wireless Card (Windows) Configuring the Optional Wireless Card (Macintosh) NOTE: The Optional Wireless Card may not be available in all regions. Check with your local Dell Sales Representative to determine availability. Minimum Requirements for Setup The Dell 5210 / 5310 Wireless Option card ... - Page 136 To install the wireless card: 1. Open the side door. NOTICE: Option cards are easily damaged by static electricity. Touch something metal such as the printer frame before you touch an option card. 2. Locate the card connector on the system board. ...
- Page 137 8. Attach the antenna to the option card. Make sure to tighten the connector until the antenna is attached securely, as a loose connection can result in a poor wireless signal. 9. Rotate the antenna until the joint allows it to be pointed up. ...
-
Page 138: Configuration Overview
Configuring the Optional Wireless Card (Windows) Configuration Overview After the internal wireless print server has been installed in a printer, there are two ways the print server can be configured for use on a wireless network: Configuring the print server using the Wireless Setup Utility, or by manual configuration. ... - Page 139 1. Select the appropriate Network Name (SSID). Wireless Configurations Found on Your Computer If existing wireless configurations are found on the computer, select the appropriate Network Name (SSID) from the list, click Next, and go to step If the correct network name is not in the list, select I want to enter a different configuration, click Next, and go to Wireless Networks Available in Your Area.
-
Page 140: Advanced Mode
Advanced Mode The Advanced Mode home screen provides additional options for using the Wireless Setup Utility. Clicking Wizard Mode will revert the Wireless Setup Utility to Wizard Mode. Clicking Options provides the following management options: Select either Wizard Mode or Advanced Mode as the default startup mode for the Utility. ... - Page 141 b. Confirm the password. c. Click Install CA Certificate. d. Enter the path to the correct CA certificate, or click Browse to select the certificate. Click OK to install the certificate, or click Cancel to cancel the action. e. Click OK to return to the Advanced Mode home screen, and continue with step 6 of the advanced mode instructions.
-
Page 142: Manual Configuration
3. Enter the changes, and then click Submit. Manual configuration The Dell 5210/5310 Wireless Option card is shipped with default settings that let you configure it in Ad-Hoc mode by accessing the embedded Web page of the print server. ... - Page 143 Device IP address Computer 169.254.10.40 Print server 169.254.10.41 If the computer IP address is not within the same range as the print server, the IP address will need to changed so that it is within the appropriate range. For information on locating and changing the computer IP address, see the computer or operating system documentation. 6.
-
Page 144: Configuring Your Wireless Print Server
The option to set the Network Name (SSID) and Network Mode (Ad-Hoc or Infrastructure) using the printer operator panel is available for certain printer models. See your printer documentation for information on navigating the printer menus to help locate the appropriate menu option. Menu names pertaining to wireless settings may vary between different printer models. -
Page 145: Certificate Management
6. Once the print server internal Web page loads, in the left-hand column, click Configuration. 7. Under Other Settings, click Network/Ports. 8. Under Network/Ports, click Wireless. 9. Change the listed network settings for the wireless print server to match your wireless network, including: SSID BSS type Channel Number (for Ad-Hoc networks only) -
Page 146: Changing The Wireless Print Server Settings
Once the print server has been configured, insert the Drivers and Utilities CD. Click Network Installation — Install the printer for use on a network. For more information, see Installing Drivers for Network Printing. Installing your network printer on additional network computers ... -
Page 147: Operational Information
The Dell 5210 / 5310 Wireless Option is designed to be interoperable with any wireless LAN product that is based on direct sequence spread spectrum (DSSS) radio technology and orthogonal frequency division multiplexing (OFDM) and to comply with the following standards: ... -
Page 148: Interference Statement
Canada limits for the general population; con-sult SafetyCode 6, obtainable from Health Canada's website http://www.hc-sc.gc.ca/rpb. Europe. EU Declaration of Conformity Hereby, Dell Inc declares that this Dell 5210 / 5310 Wireless Option is in compliance with the essential requirements and other relevant provisions of Directive 1999/5/EC. ﺗﻌﻠﻥ... -
Page 149: Radio Approvals
ә ₩ ә ‒ /EC . Con la presente Dell Inc dichiara che questo Dell 5210 / 5310 Wireless Option e conforme ai requisiti essenziali ed alle altre disposizioni pertinenti stabilite dalla direttiva 1999/5/CE. Dell Inc は、この Dell 5210/5310 ワイヤレスオプションが欧州連合指令 1999/5/EC の該当規制要件に準拠していることを宣言します。... - Page 150 In countries other than the United States and Japan, verify that the Location set-ting from the Regional Options tab in Regional and Language Options (from Control Panel) has been set to the country in which you are using your Dell 5210 / 5310 Wireless Option. This ensures compliance with local regulatory restrictions on trans-mit power and optimizes network performance.
Need help?
Do you have a question about the 5210n Mono Laser Printer and is the answer not in the manual?
Questions and answers