
Related Manuals for Axminster AW19FM


Summary of Contents for Axminster AW19FM
- Page 1 Code: 501253 AW19FM Floor Standing Morticer Axminster Tool Centre, Unit 10 Weycroft Avenue, Axminster, Devon EX13 5PH www.axminster.co.uk...
-
Page 2: Table Of Contents
Index of Contents Page No. Index of Contents Declaration of Conformity What’s in the Box General Instructions for 230V Machines 03-04 Specific Safety Instructions for Morticers Unpacking and Assembly Specifications Illustration and Parts Description 06-07-08-09 Installing the Chisel and Bit Operating Instructions Maintenance Parts Breakdown/List... -
Page 3: What's In The Box
What’s in the Box Quantity Item Model Number 1 No. AW19FM Morticer MS3840 1 No. Cabinet Stand with Shelf and Lockable Drawer 4 No. M12 x 120 Hex Head Bolts and Washers 1 No. " Chisel and Bit 1 No. -
Page 4: General Instructions For 230V Machines
General Instructions for 230V Machines • Clean machines by wiping with a damp soapy cloth. Do not use solvents or cleaners that may damage plastic parts or painted/coated surfaces. Keep water and solvents away from all electrical components, leads and plugs. •... -
Page 5: Unpacking And Assembly
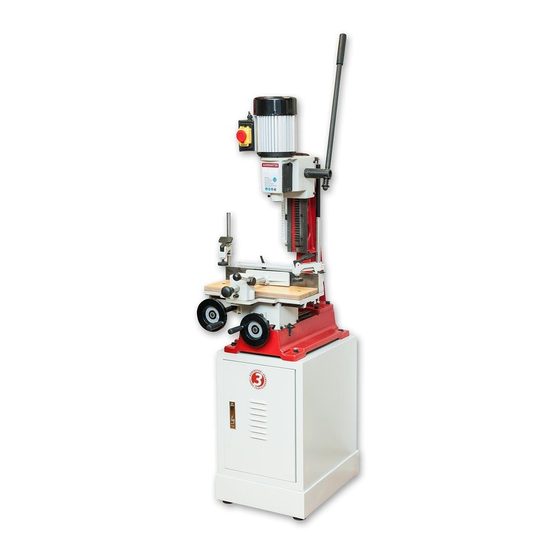
Unpacking and Assembly Remove the morticer and stand from the shipping cartons. Report any shortages or damage to Axminster Power Tools Customer Services Department. (03332 406406) Read the manual thoroughly, familiarising yourself with the correct safety, operating and maintenance procedures before proceeding further. - Page 6 Illustration and Parts Description Motor Fig A Operating handle Chuck access door Gas powered head return spring Workstop assembly Quick action hold down clamp Worktable gib strip adjusters Stand Base casting Traverse slide...
- Page 7 Illustration and Parts Description Fig B Grip sleeve On/Off switch Depth stop scale Chisel mounting Rack flange Chisel and bit Table length stop scale Back fence Morticing table Crossways table control wheel Worktable Lengthways table gib strip control wheel adjusters...
- Page 8 Illustration and Parts Description Fig C Head depth stop Depth stop assembly Head casting Mortice depth stop Table length stop...
- Page 9 Illustration and Parts Description Fig D Table length stops Quick action hold Work stop down clamp Work stop assembly Timber clamp handle Timber clamping face Morticing table Timber clamp assembly...
-
Page 10: Installing The Chisel And Bit
Installing the Chisel and Bit 1. Select the size of mounting bush to suit the chisel being used and fit into the morticing head. 2. Insert the chisel into the bush and tighten the screw just enough to hold the chisel in place. -
Page 11: Operating Instructions
Operating Instructions 1. Set the depth of the mortice with the lower of the two depth stops (Fig C) on page 8. The upward travel of the head can be limited by adjusting the upper stop; this prevents unnecessary movement of the operating handle when cutting shallow mortices. 2. -
Page 12: Maintenance
Chisels and bits should be kept sharp for best performance, a discoloured tip is usually a sign of excessive heat caused by a blunt auger and/or chisel. Bits are best sharpened with a small file and chisels with the special mortice chisel sharpeners available through Axminster Power Tool Centre (03332 406406). - Page 13 Parts Breakdown/List...
- Page 14 Parts Breakdown/List...
- Page 15 Parts Breakdown/List Cabinet Assembly...
- Page 16 Parts Breakdown/List Clamping Bar Assembly...
- Page 17 Parts Breakdown/List Work Stop Assembly...
- Page 18 Notes...
- Page 19 Notes...
- Page 20 Please dispose of packaging for the product in a responsible manner. It is suitable for recycling. Help to protect the environment, take the packaging to the local recycling centre and place into the appropriate recycling bin. Only for EU countries Do not dispose of electric tools together with household waste material.
Need help?
Do you have a question about the AW19FM and is the answer not in the manual?
Questions and answers