
Related Manuals for Axminster SIEG X1 Super Micro Mill Mk2


Summary of Contents for Axminster SIEG X1 Super Micro Mill Mk2
- Page 1 SIEG X1 Super Micro Mill Mk2 Axminster Reference No:X1 A X M I N S T E R Mk2 Part No: 600881 W H I T E 2004 w w w. a x m i n s t e r. c o . u k...
-
Page 2: Table Of Contents
Index of Contents Page No. Index of Contents............................... 2 Declaration of Conformity………….………..……..…………..............2 What’s in the Box………….………..……..…………..................3 General Instructions for 230v Machines..................4 Initial Assembly and Testing......................5,6 Specifications….………..……..…………....................6,7 Definitions................................7 Parts Identification and Description ....................8 Machine Illustration of the Micro-Mill....................9 Parts Identification and Description (Continued)................10 Machine Illustration of the Micro-Mill (Continued)................ -
Page 3: What's In The Box
Having unpacked you machine and its accessories, please check the contents against the equipment list "What’s in the box", if there are any discrepancies, please contact Axminster Power Tool Centre using the procedures laid down in the catalogue. Please dispose of the packaging responsibly, much of the material is bio-degradable. -
Page 4: General Instructions For 240V Machines
General Instructions for 240v Machines Good Working Practices/Safety The following suggestions will enable you to observe good working practices, keep yourself and fellow workers safe and maintain your tools and equipment in good working order. WARNING!! KEEP TOOLS AND EQUIPMENT OUT OF THE REACH OF YOUNG CHILDREN Mains Powered Tools Primary Precautions These machines are supplied with a moulded 13 Amp. -
Page 5: Initial Assembly And Testing
Initial Assembly and Testing Ideally, your mill should be installed close to a correctly rated power supply, in a warm dry environment, well ventilated and illuminated by bright clear natural light, with adequate access all around the machine, and sufficient adjacent storage space for your tools, accessories and material. -
Page 6: Specifications
(WARNING. If the tool post is tilted too far out of the vertical the mill can become unstable if it is not fastened to a solid workbench. Exercise care.) Return the tool post to the vertical. x) If all the above checks are correct, your mill is now ready for use. Enjoy. Specifications Axminster No. SIEG X1 MK2 600881 Rating:... -
Page 7: Definitions
Specifications (Continued) Quill Travel: 30mm Quill Mandrel Taper: Reversing Method: Electrical Draw Bar Thread: Driling Capacity 10mm End Mill Capacity: 10mm Face Mill Capacity: 20mm Overall L x W x H: 430 x 355 x 715mm Weight: 32Kg Definitions ‘X’ Axis. This is the axis described by the work table as it is moved side to side. -
Page 8: Parts Identification And Description
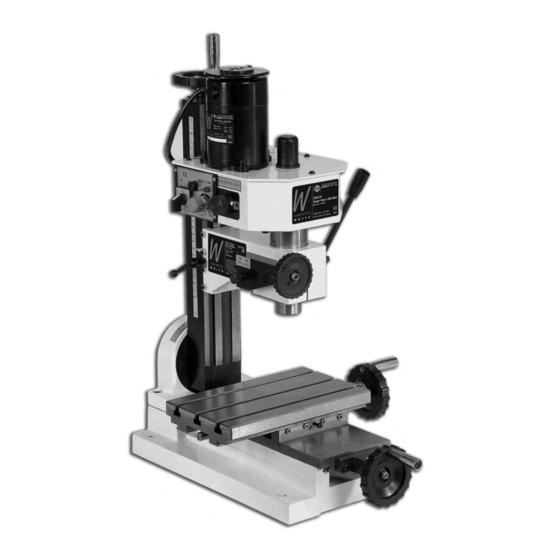
Parts Identification and Description Please take some time to identify the various parts of your machine so that you are familiar with the terminology we will use to enable you to set up and operate your Mill safely and correctly. Base casting This is the ‘Stand’... -
Page 9: Machine Illustration Of The Micro-Mill
Machine Illustration of the Micro-Mill Fig 1 Main tool post Worktable Traverse slide Rise & fall drive screw Worktable control Base casting Worktable Traverse gybe strip drive control adjustors Tilt scale Fig 2 Typ. 4 Tilt housing bolts Rear View 0-45˚... -
Page 10: Parts Identification And Description (Continued)
Parts Identification and Description (Continued) Worktable The Worktable is a machined casting 240mm long by 145mm wide. There is a dovetail section machined in the underside to mate with the traverse slide. There are 3 x 8mm open ended ‘T’ slots machined in the table along its length, to facilitate the fixing of machine vices or clamps. -
Page 11: Machine Illustration Of The Micro-Mill (Continued)
Machine Illustration of the Micro-Mill (Continued) Fig 3 Milling head Motor casting Gearbox Rise & Fall drive screw dog Fine feed control Coarse feed scale Thimble Chuck Feed handle Low ratio High ratio Gear change knob Scale Pointer Normal Fine feed Fig 4 Head clamp Fine feed engage knob... -
Page 12: Parts Identification And Description (Continued)
Parts Identification and Description (Continued) Fine feed The fine feed assembly floats around the splined gear shaft that drives the assembly quill up and down. When the action of the fine feed mechanism is required; pulling out ‘engage’ knob of the fine feed control meshes the gearing (you may have to ‘joggle’... -
Page 13: Machine Illustration Of The Micro-Mill (Continued)
Machine Illustration of the Micro-Mill (Continued) Fig 5 Motor control panel Fuse cap Power on LED Fault LED Forward Speed control /Off/Reverse knob switch... -
Page 14: Machine Illustration Of The Micro-Mill (Continued)
Machine Illustration of the Micro-Mill (Continued) Blind pocket Fig 6 Fig 7 Spindle Draw bar cover Top of draw bar... -
Page 15: General Operating Instructions
General Operating Instructions Warning Do not operate the mill in any function unless the head clamping lever is tightened. Tool Changing Note. The taper socket in the spindle mandrel does not have a ‘drive flat’ and all tooling, including the drill chuck is secured and driven by the taper lock and the draw bar. Make sure the power is switched off or better still remove the power from the machine. -
Page 16: Settings And Adjustments
Settings and adjustments Feed scales The three thimbles that are mounted on the feed shafts of the worktable, the traverse feed and the fine feed control should move freely with the motion of the handles and not slip. The thimbles can be turned, using more force, independently of the handle in order to set a predetermined start or finish point. -
Page 17: Maintenance
Give the motor a good ‘blow through’ to remove any dust, dirt etc, b) Check all the interlocks function correctly. Accessories There are numerous accessories for the machine listed in the Axminster catalogue. Some are illustrated at the rear of this manual. -
Page 18: Illustrated Parts Breakdown For The Micro-Mill Part 1
Illustrated Parts Breakdown of the Micro-Mill Part 1... -
Page 19: Illustrated Parts Breakdown For The Micro-Mill Part 2
Illustrated Parts Breakdown of the Micro-Mill Part 2... -
Page 20: Illustrated Parts Catalogue For The Micro-Mill Part 1
Illustrated Parts Catalogue of the Micro-Mill Part 1... -
Page 21: Illustrated Parts Catalogue For The Micro-Mill Part 2
Illustrated Parts Catalogue of the Micro-Mill Part 2 PC Board Replacement Part No: Part No: 600883... -
Page 22: Micro-Mill Accessories
Micro-Mill Accessories... -
Page 23: Micro-Mill Oiling Points
Micro Mill Oiling Points Top of draw bar cover removed for clarity... - Page 24 Axminster Reference No:X1 Mk2 Part No: 600881 A X M I N S T E R W H I T E Axminster Devon EX13 5PH UK FREEPHONE 0800 371822 www.axminster.co.uk 2004...
Need help?
Do you have a question about the SIEG X1 Super Micro Mill Mk2 and is the answer not in the manual?
Questions and answers