Advertisement
Table of Contents
- 1 Table of Contents
- 2 Instructions
- 3 Upright Guidepost Assembly Diagram
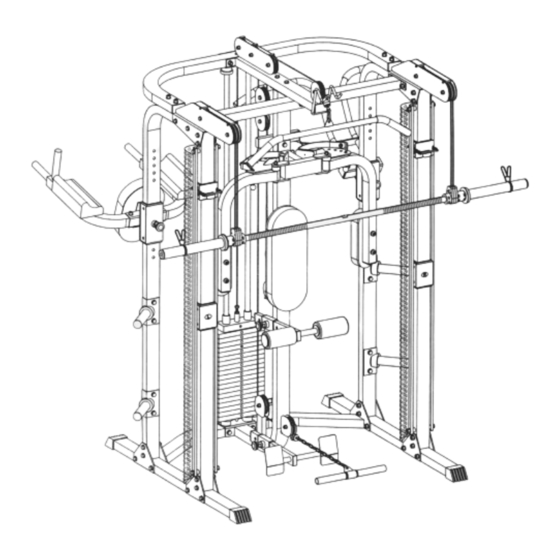
- 4 Main Frame Assembly
- 5 Sensor Weight Bar Installation
- 6 Pec Deck Arms and Cables Installation
- 7 Bolts & Bushings Size Chart
- 8 Caution
- 9 User Instructions for the P-500
- 10 Maintenance
- 11 Warranty Information
- 12 Parts List
- 13 How to Use Spot Blocks
- Download this manual
Advertisement
Table of Contents

Related Manuals for ProSpot Fitness P-500


Summary of Contents for ProSpot Fitness P-500
- Page 1 PnoSP olfitne,ss rM Moder P-5oo Owners Manual 1) Assembly lnstructions/Illustrations 2) Use and Operation of PnoSrorf/zessrM Product 3) Maintenance of your PnoSroty'lzessrM Product 4) Warranty Information 5) Parts List...
- Page 2 Table of Contents Assembly Instructions..1_10 Use and Operation of Your PnoSroffrnessrM product....1 | _12 Periodic Maintenance of your pnoSror/aessrM product....I 3 Warranty Information.
- Page 3 P-500 has a footprint of approximately 8'x 8'. The barbell is approximately 7' long. Locate your PROSPOTlrzessn P-500 away from any source of water. Do not allow any liquid to be near the machine or spilled on any electrical part. Do not insert any object into the electrical box.
- Page 4 Upright Guidepost Assembly Diagram Leat Locki.g Slide. Right Lockihg Sli.te.
- Page 5 (35) as shown. Tighten the bolts securely. 16. Repeat steps 11-13 on the right side of the PROSPOTlirrressrM P-500. '17. Attach the two Rear Uprights (4) and the Top Beam (60) to the two Pulley Support Frames (17) using four bolts (28), eight washers (18) and four nuts (20) as shown.
- Page 6 Insert the Select Pin (65) into the desired hole in the Center Guide Rod (70) as shown. Carefully to lock the pin in place. Place the Guide Rod Top Plate (73) on top of the two Guide Rods (77) and slide the two Guide Rod Cups (74) onto the Guide Rods (77) with downward pressure.
- Page 7 STEP #2: SENSOR WEIGHT BAR INSTALLATION '1. Standing an front of the PROSPOTlrressru P-500. lnsert one end and then the other end of the Sensor Weight Bar (25) into the Knuckles (42 & 44). Slide the knuckles onto the Bar until they rest snugly against the preinstalled sensor retaining collars (45 &...
- Page 8 STEP #2: SENSOR WEIGHT BAR INSTALLATION...
- Page 9 STEP #3: PEC DECK ARMS AND CABLES INSTALLATION '1. Attach one Pec Deck Arm (87) and the Left Pec Deck Adjusting Plate (88) to the Pec Deck Support Frame (62) using a bolt (52), two washers (90) and a nut (92) as shown. Tighten the bolts securely. 2.
- Page 10 STEP #3: PEC DECK ARMS AND CABLES TNSTALLATTON...
- Page 11 P ROS POT fitnes srM P-500 Bolts & Bushings Size Chart QTY:7 QTY:24 QTY:8 QTY:2 QTY:7 QTY:4 QTY:7O QTY:72 QTY:2 QTY:8 8/76 mm 5,/7O mm - - 9 - -...
- Page 12 PROSPoTfitnessrM P-500 #70s #708 QTY:7 QTY:4 QTY:IO QTY:4 QTY:2 QTY:4 #770 # 706 QTY:38 QTY:4 QTY:4 QTY;7 QTY:79 M 7 0 7O,/2O mm QTY:7O6 QTY:53 QTY:8 erY:4 -4+ (O+ u \z 8 m m M 7 2 72/24 mm...
- Page 13 !lRead!! This Page Before Using Your ProSpotlitness rM Product Safe Use of Your ProSpotJitnessrM Product CAUTION: This machine involves the risk of possible iniurv by its user. THE FOLLOWING RULES SHOULD BE CARFULLY FOLLOWED: Consult a physician or other healthcare provider before beginning an exercise program.
- Page 14 Make certain the barbell is level before loading weight plates. Level the barbell by raising up one end of the barbell until level. (The P-500 is designed with a ratcheting feature that allows it to be manually raised from side to side.) Or, level the barbell by grasping it with both hands, making sure the fingertips make contact with the touch sensor strip.
- Page 15 Maintenance of ProSpotfitnes{M Product Intro: Our products are made of durable materials and have been factory tested to assure proper function and reliability. Along with our Equipment Warranty, this gives the owner of our product the confidence of a long lasting relationship r.vith ProSpolffru essrM Inc.
- Page 16 Warranty Information Each PnoSeo/irressrM Product comes with a limited parts replacement wananty. Please refer to the actual wanarty card included with your system for specific coverage. If you have any questions about performance under this limited wananty, please write us at: Pno Srorlirz€.r.r, I n c.
- Page 17 Model P-500 Parts List PROSPOTfitness Assy # Description Assy # Description Left Base Rail Hex Head Bolt M12 x 75 mm VKR Frame Right Base Rail .Tgp Bg€m Lower Cross Brace c!t! ltp Bat Rear Upriqht Pec Deck Support Frame...
- Page 18 (the black box with the ProSpot Fitness @ logo on it). To move Spot Blocks, place your index and middle fingers underneath the finger grip and your thumb on the push- release lever.
Need help?
Do you have a question about the P-500 and is the answer not in the manual?
Questions and answers