Janome Sewing Machine Instruction Book
Hide thumbs
Also See for Sewing Machine:
- Instruction book (138 pages) ,
- Getting started manual (112 pages) ,
- Instruction manual (92 pages)
Table of Contents
Advertisement
Advertisement
Table of Contents

Related Manuals for Janome Sewing Machine


Summary of Contents for Janome Sewing Machine
- Page 1 Instruction book...
- Page 2 IMPORTANT SAFETY INSTRUCTIONS This sewing machine is not a toy. Do not allow children to play with this machine. The machine is not intended for use by children or mentally infirm persons without supervi- sion. This sewing machine is designed and manufactured for household use only.
- Page 3 Use only attachments recommended by the manufacturer as contained in this owner’s manual. 3. Never operate this sewing machine if it has a damaged cord or plug, if it is not working properly, if it has been dropped or damaged, or dropped into water.
-
Page 5: Table Of Contents
TABLE OF CONTENTS 1. ESSENTIAL PARTS ................. 2-3 Name of Parts ....................2 Standard Accessories ..................3 2. GETTING READY TO SEW ............4-18 Connecting the Machine to the Power Supply ..........4 Foot Control ....................5 Extension Table ..................... 6 Accessories Storage Box ................ -
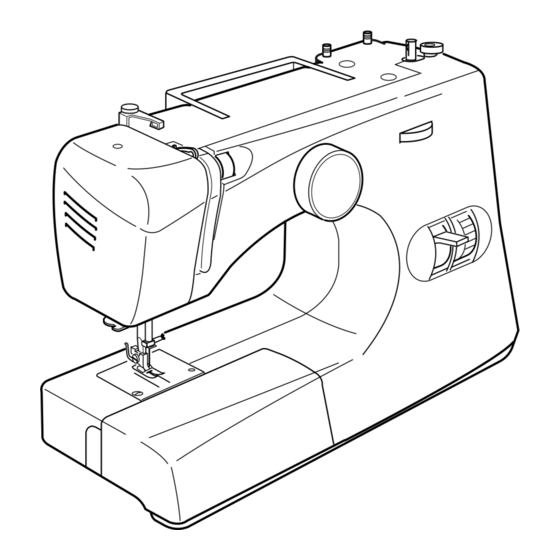
Page 6: Essential Parts
1. ESSENTIAL PARTS Name of Parts q Reverse stitch button w Stitch length dial e Stitch width dial r Bobbin winder stopper t Bobbin winder spindle y Spool pins u Thread tension dial i Bobbin winder thread guide o Thread take-up lever !0 Face plate !1 Thread cutter !2 Needle plate... -
Page 7: Standard Accessories
Standard Accessories q Bobbins w Screwdriver e Needle set r Seam ripper / buttonhole opener t Quilting guide y Mchine oil u Felt i Zipper foot o Buttonhole foot !0 Blind hem foot !1 Zigzag foot (set on the machine) -
Page 8: Getting Ready To Sew
2. GETTING READY TO SEW Connecting the Machine to the Power Supply Before connecting the power cord, make sure the voltage and frequency shown on the machine conform to your electrical power. 1. Turn off the power switch. 2. Insert the machine plug into the machine socket. -
Page 9: Foot Control
If it does not fit fully in the outlet, reverse the plug. If it still does not fit, contact a qualified electrician to install the proper outlet. Do not modify the plug in any way. The foot controller Model KD-1902 (USA and Canada market) or KD-2902 (230V,Europe) is used with the sewing machine. Model Sew Simple 113. -
Page 10: Extension Table
Extension Table The extension table provides added sewing surface and can be easily removed for free arm sewing. Detaching the table: Pull the table away from the machine. Attaching the table: Push the extension table until it snaps into the machine. •Advantages and uses of free arm sewing: —... -
Page 11: Levelling The Machine
Levelling the Machine Turn the adjusting foot to adjust its height so the machine sits stable, without wobbling. -
Page 12: Presser Foot Lifter
Presser Foot Lifter The presser foot lifter raises and lowers your presser foot. You can raise it about 0.6 cm (1/4˝) higher than the normal up position for easy removal of the presser foot or to help you to place heavy fabric under the foot. q Normal up position w Highest position To Attach and Remove the Presser Foot... -
Page 13: Removing Or Inserting The Bobbin Case
Removing or Inserting the Bobbin Case Open the hook cover. q Hook cover Raise the needle by turning the handwheel toward you. Take out the bobbin case by holding the latch. w Latch When inserting the bobbin case, place the horn into the recess of the hook race. -
Page 14: Setting Spool Pins
Setting Spool Pins The spool pins are used for holding the spool of thread in order to feed thread to the machine. To use, pull up the spool pin. Push down for storage. Winding the Bobbin z Release stop motion knob by turning it counterclockwise. -
Page 15: Threading Bobbin Case
If the bobbin is not wound evenly, open the face plate (see page 34) and loose the screw and move the bobbin winder thread guide up or down to adjust. q Screw Threading Bobbin Case z Place the bobbin into the bobbin case. -
Page 16: Threading The Machine
Threading the Machine Raise the take–up lever to its highest position by turning the handwheel toward you. Raise the presser foot. Place a spool on the spool pin as shown, with thread coming from back of the spool. z Draw the thread into thread guide using both hands. -
Page 17: Drawing Up Bobbin Thread
Drawing Up Bobbin Thread z Raise the presser foot and hold the needle thread lightly with your left hand. x Turn the handwheel slowly toward you with your right hand until the needle goes down and continue turning the handwheel until the take– up lever is at its highest position. -
Page 18: Balancing Needle Thread Tension
Balancing Needle Thread Tension z Correct tesion: The thread tension is adjusted depending on the sewing materials, layers of fabric and sewing method. * The ideal straight stitch has threads looked between two layers of fabric, as illustrated (magnifies to show detail). -
Page 19: Changing Needle
Changing Needle CAUTION: Turn off the power switch when changing needles. Raise the needle by turning the handwheel toward you and lower the presser foot. Loosen the needle clamp screw by turning it counterclockwise. Remove the needle from the clamp. Insert the new needle into the clamp with the flat side away from you. -
Page 20: To Drop Or Raise The Feed Dogs
To Drop or Raise the Feed Dogs Remove the extension table from the machine by pulling it to the left. Open the shuttle cover by pulling down the embossed part on the left of the cover. q To drop the feed dogs, push feed lever down in the direction of the arrow as illustrated. -
Page 21: Pattern Selector Dial
Pattern Selector Dial Raise the needle and presser foot. Turn the pattern selector dial to set the letter corresponding to the desired pattern. q Setting mark Note: Do not turn the pattern selector dial while the needle is in the material. Stitch Length Dial Turn the stitch length dial to set the desired stitch length at the setting mark. -
Page 22: Stich Reference Chart
Stitch Reference Chart Stitch Stitch Stitch patterns Presser foot Drop feed length width Straight stitch 1.5-4 Zigzag Blind hem Box stitch Three step zigzag 0.5-3 stich Blind stitch Buttonhole 0.5-1 Single overlock stitch Honeycomb stitch Slant over edge Zigzag stretch stitch Straight stretch stitch Double overlock stitch Free-hand embroidery... -
Page 23: Basic Sewing
3. BASIC SEWING Straight Stitch Machine Setting 1 Stitch Pattern 2 Stitch Length : 1.5-4 3 Stitch Width 4 Thread Tension : 2-6 5 Presser foot : Zigzag foot z Raise the presser foot and position the fabric with its edge lining up with a seam guide line on the needle plate. -
Page 24: Quilting Guide
To change sewing direction Stop the machine and turn the handwheel toward you to bring the needle down into the fabric. Raise the presser foot. Pivot the fabric around the needle to change sewing direction as desired. Lower the presser foot and continue sewing. -
Page 25: Utility Stitches
4. UTILITY STITCHES Basic Zigzag Machine Setting 1 Stitch Pattern 2 Stitch Length : 0.5-4 3 Stitch Width : 3-5 4 Thread Tension : 2-5 5 Presser foot : Zigzag foot Zigzag stitch is widely used for overcasting, sewing on buttons etc. Overcasting Machine Setting 1 Stitch Pattern... -
Page 26: Mending
Mending Machine Setting 1 Stitch Pattern : D, 2 Stitch Length : 1.5-4, (4) 3 Stitch Width 4 Thread Tension : 2-6 5 Presser foot : Zigzag foot To sew fabric sdge select the multi- zigzag stitch. Blind Stitch Machine Setting 1 Stitch Pattern 2 Stitch Length : 1-3... - Page 27 x Position the fabric so that the needle just pierces the edge of the fold when the needle swings to the extreme right. Lower the presser foot. c Turn the guide screw to adjust the guide aligning with the folded edge. Sew along the folded edge guiding the fabric so the needle catches the folded edge.
-
Page 28: Zipper Sewing
Zipper Sewing Machine Setting 1 Stitch Pattern 2 Stitch Length : 1.5-4 3 Stitch Width 4 Thread Tension : 3-6 5 Presser foot : Zipper foot *To snap on the zipper foot Fit the pin on the zipper foot into the groove on the foot holder. - Page 29 *To sew 1 Fold back the left seam allowance. Turn under the right seam allowance to make a 1/8” (0.2 to 0.3cm) fold. Place the zipper teeth next to the fold and pin in place. 2 Attach the zipper foot with the pin of the foot on the right-hand side.
- Page 30 4 Close the zipper and spread the fabric flat with the right side (Top side) of fabric facing up. 5 Move the zipper foot to the left pin. Guide the edge of the foot along the zipper teeth and stitch through the garment and zipper opening.
-
Page 31: Buttonhole
Buttonhole Machine Setting 1 Stitch Pattern : (BH) 2 Stitch Length : 0.5-1 3 Stitch Width 4 Thread Tension : 1-5 5 Presser foot : Buttonhole foot 1 Carefully mark buttonhole length on fabric. Place the fabric under the foot with the buttonhole marking running toward you. - Page 32 3 Set the pattern selector dial at " ". Sew forward until you reach the marking of your buttonhole q. Stop sewing at a left stitch. 4 Set the pattern selector dial at " ". Sew 5 stitches. Stop sewing at a right stitch.
-
Page 33: Corded Buttonhole
Corded Buttonhole Machine Setting 1 Stitch Pattern : (BH) 2 Stitch Length : 0.5-1 3 Stitch Width 4 Thread Tension : 1-5 5 Presser foot : Buttonhole foot z With the buttonhole foot is raised, hook the cord on the cord spur at the back of the buttonhole foot. -
Page 34: Decorative Stitches
5. DECORATIVE STITCHES Embroidery Machine Setting 1 Stitch Pattern 2 Stitch Length : Any 3 Stitch Width : 0 or 5 4 Thread Tension : 1-4 * Presser foot : Removed Drop feed dog (see page 16). Remove the presser foot and attach the darning plate. -
Page 35: Strech Stitches
Stretch Stitches Machine Setting 1 Stitch Pattern : F-J 2 Stitch Length 3 Stitch Width 4 Thread Tension : 1-4 5 Presser foot : Zigzag foot Use this stitch with knitted, tricot or other stretchy fabrics. The stitch enables your seam to stretch without breaking the thread. -
Page 36: Care Of Your Machine
6. CARE OF YOUR MACHINE Cleaning the Feed Dog CAUTION: Turn off the power switch and/or unplug the machine before cleaning the feed dog. Remove the needle and the presser foot. Remove the needle plate set screw and remove the needle plate. With a brush, clean out dust and lint clogging the feed dog teeth. -
Page 37: Dismantling And Assembling Hook Race Unit
Dismantling and Assembling Hook Race Unit CAUTION: Turn off the power switch and/or unplug the machine. To dismantle hook race unit: Raise the needle to its highest position and open the hook cover. Open the hinged latch of bobbin case and take it out of the machine. -
Page 38: Sewing Light
Turn off the power switch and/or unplug the machine. Oil the points as shown at least once a year. Use good quality sewing machine oil. One or two drops of oil is sufficient. Remove excess oil, otherwise it may stain fabric. -
Page 39: Troubleshooting
Troubleshooting Condition Cause Reference The needle 1. The needle thread is not threaded properly. See Page 12 thread breaks. 2. The needle thread tension is too tight. See Page 14 3. The needle is bent or blunt. See Page 15 4. - Page 40 Condition Cause Reference Seam puckering 1. The needle thread tension is too tight. See Page 14 2. The machine is not threaded correctly. See Page 12 3. The needle is too heavy for the fabric See Page 15 being sewn. 4.
Need help?
Do you have a question about the Sewing Machine and is the answer not in the manual?
Questions and answers