Janome Sewing Machine Instruction Book
Hide thumbs
Also See for Sewing Machine:
- Instruction book (138 pages) ,
- Getting started manual (112 pages) ,
- Instruction manual (92 pages)
Table of Contents
Advertisement
Advertisement
Table of Contents

Related Manuals for Janome Sewing Machine


Summary of Contents for Janome Sewing Machine
- Page 1 Instruction Book...
-
Page 2: Important Safety Instructions
Use only attachments recommended by the manufacturer as contained in this owner’s manual. 3. Never operate this sewing machine if it has a damaged cord or plug, if it is not working properly, if it has been dropped or damaged, or dropped into water. -
Page 3: Table Of Contents
SECTION II. GETTING READY TO SEW Serging ..............27 Connecting Machine to Power Supply ......4 Smocking ............28 Before Using Your Sewing Machine ........4 For Your Safety ..............4 SECTION VIII. CARE OF YOUR MACHINE Controlling Sewing Speed ..........4 Replacing the Light Bulb ........ -
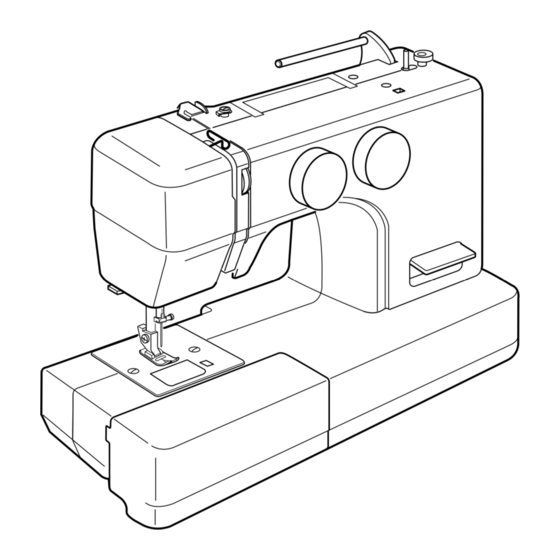
Page 4: Section I. Names Of Parts
@1 Foot holder @2 Setscrew @3 Carrying handle @4 Handwheel @5 Power switch @6 Machine socket @7 Drop feed dogs lever @8 Free-arm @9 Presser foot lifter NOTE: Sewing machine design and specifications are subject to change without prior notice. -
Page 5: Standard Accessories
Standard Accessories w w w w w e e e e e q q q q q q Bobbins w Needles e Blind stitch foot: G r Zipper foot: E t Sliding buttonhole foot y Spool holder (Lrage) u Spool holder (small) i Seam ripper t t t t t r r r r r... -
Page 6: Section Ii. Getting Ready To Sew Connecting Machine To Power Supply
Turn the power switch on q. Before Using Your Sewing Machine Before using your sewing machine for the first time, place a scrap of fabric under the presser foot and run the machine with thread for a few minutes. Wipe away any oil which may appear. -
Page 7: Presser Foot Lifter
Presser Foot Lifter The presser foot lifter raises and lowers the presser foot. You can raise the foot about 1/4˝ (0.6 cm) higher than the normal up position for easy removal of the presser foot, or to help you place heavy fabric under the foot. q Lowered position w Normal up position e Extra up position... -
Page 8: Changing The Needle
Changing the Needle q Needle clamp screw w Needle clamp e Flat side r Gap z Turn off the power switch. Raise the needle to its highest position by turning the handwheel counterclockwise, toward you, and lowering the presser foot. Loosen the needle clamp screw q by turning it counterclockwise. -
Page 9: Selecting Needle And Fabric
Selecting Needle and Fabric For general sewing, use needle sizes 11 or 14. A fine thread and needle should be used for sewing lightweight fabrics, so the fabric will not be marred. Heavy fabrics require a needle large enough to pierce the fabric without fraying the needle thread. Use the blue needle (optional) to eliminate skipped stitches when sewing knits and synthetic fabrics. -
Page 10: Bobbin Winding
Bobbin Winding Setting the spool pin Insert the spool pin into the hole as shown. q Spool pin w Hole Setting the spool Place a spool of thread on the spool pin with the thread coming off the back of spool as illustrated. A: Press the large spool holder q firmly against the spool of thread. -
Page 11: Winding The Bobbin
Winding the bobbin z Hold the thread with both hands and pass the thread under the thread guide. q Thread guide x Insert the thread firmly under the bobbin winding tension disc. w Bobbin winding tension disc c Pass the thread through the hole in the bobbin from the inside to the outside. -
Page 12: Inserting The Bobbin
Inserting the bobbin q End of thread w Notch e Notch r Threading diagram z Place a bobbin in the bobbin holder with the thread running off counterclockwise. x Guide the thread into notch w on the front side of the bobbin holder. -
Page 13: Threading The Machine
Threading the Machine * Raise the thread take-up lever to its highest position by turning the handwheel counterclockwise. * Raise the presser foot lifter. * Place a spool on the spool pin, with the thread coming off the back of spool (refer to page 18). z Draw the end of the thread around the upper thread guide. -
Page 14: Adjust The Needle Thread Tension For A Straight Stitch
Adjust the Needle Thread Tension for a Straight Stitch • Correct tension q Needle thread (Top thread) w Bobbin thread (Bottom thread) e To loosen r To tighten The ideal straight stitch has threads locked between two layers of fabric, as illustrated (magnified to show detail). If you look at the top and bottom of a seam, look to see that the stitches are evenly balanced. -
Page 15: Adjust The Needle Thread Tension For A Zigzag Stitch
Adjust the Needle Thread Tension for a Zigzag Stitch For an ideal zigzag stitch, the bobbin thread does not show on the right side (Top side) of the fabric, and the needle thread shows slightly on the wrong side (Bottom side) of the fabric. -
Page 16: Stitch Pattern Selector Dial
Stitch Pattern Selector Dial Raise the needle and presser foot. Turn the pattern selec- tor dial to set the symbol corresponding to the desired pattern at the setting mark. q Setting mark Stitch Length Control Dial Turn the stitch length control dial to set the desired stitch length at the setting mark. -
Page 17: Section Iii. Straight Stitch Sewing Straight Stitch
SECTION III. STRAIGHT STITCH SEWING Straight Stitch Machine setting q Stitch selector: A or B w Stitch length: 1.5 – 4 e Needle thread tension: 2 – 6 r Presser foot: Zigzag foot: A • Starting to sew Raise the presser foot and position the fabric next to a seam guide line on the needle plate (5/8˝... -
Page 18: Zipper Sewing
Zipper Sewing Machine setting q Stitch selector: w Needle thread tension: 2 – 6 e Presser foot: Zipper foot: E • To snap on the zipper foot q Slit w Pin e To sew left side r To sew right side Fit the pin on the zipper foot into the slit on the foot holder. - Page 19 1/8˝ • To sew (0.4 cm) q 1/8˝ (0.4cm) fabric margin w Zipper teeth e Zipper tape z Attach zipper foot on right-side of pin. Fold back the upper layer seam allowance. Fold back the lower layer seam allowance to leave a 1/8" (0.4 cm) margin of fabric q.
-
Page 20: Section Iv. Zigzag Stitch Sewing Basic Zigzag
SECTION IV. ZIGZAG STITCH SEWING Basic Zigzag Machine setting q Stitch selector: w Stitch length: 0.5 – 3 e Needle thread tension: 2 – 5 r Presser foot : Zigzag foot: A The zigzag stitch is one of the most common and versatile stitches. -
Page 21: Bar Tacking
Bar Tacking Machine setting q Stitch selector: B – C w Stitch length: 0.5 – 1 e Needle thread tension: 1 – 4 r Presser foot: Zigzag foot: A This is similar to a very short satin stitch and is used to reinforce points of strain such as corners, pockets and straps of lingerie. -
Page 22: Section V. Utility Stitches
SECTION V. UTILITY STITCHES Blind Hem Stitch Machine setting q Stitch selector: E or F w Stitch length: 2 – 3 e Needle thread tension: 2 – 6 r Presser foot: Blind hem stitch foot: G Use the same color thread as the fabric. On heavy weight fabrics that ravel, the raw edge should be overcast first. -
Page 23: 4-Step Buttonhole
4-Step Buttonhole Machine setting q Stitch selector: w Stitch length: e Needle thread tension: 1 – 5 r Presser foot: Sliding buttonhole foot * For easier buttonhole foot attachment, move the slider all the way to the front of the foot. For easier removal, move the slider all the way to the back of the foot. -
Page 24: Corded Buttonhole
Corded Buttonhole Machine setting q Stitch selector: w Stitch length: e Needle thread tension: 1 – 5 r Presser foot: Sliding buttonhole foot z With the buttonhole foot raised, hook the filler cord on the spur at the back of the foot. Bring the ends toward you under the foot, clearing the front end. -
Page 25: Section Vi. Decorative Stitches Satin Stitching
SECTION VI. DECORATIVE STITCHES Satin Stitching Machine setting q Stitch selector: w Stitch length: 0.5 – 1 e Needle thread tension: 1 – 4 r Presser foot : Zigzag foot: A The satin stitch is often used to decorate and to overcast the raw edge on blankets, linens, tablecloths, napkins, etc. -
Page 26: Applique
Applique Machine setting q Stitch selector: B – C w Stitch length: 0.5 – 1 e Needle thread tension: 1 – 4 r Presser foot: Zigzag foot: A Baste applique pieces on the fabric, or fuse the applique pieces with iron-on fabric joiner. Stitch around the applique making sure the needle falls along the raw edge of the applique. -
Page 27: Lace Work
Lace Work Machine setting q Stitch selector: w Stitch length: e Needle thread tension: 1 – 4 r Presser foot: Zigzag foot: A Lace adds a fanciful, feminine touch to blouses and lingerie. Table linens and pillows become more elegant when trimmed with lace. -
Page 28: Section Vii. Stretch Stitches Straight Stretch
SECTION VII. STRETCH STITCHES Straight Stretch Machine setting q Stitch selector: A or B w Stitch length: S.S. e Needle thread tension: 2 – 5 r Presser foot: Zigzag foot: A This strong, durable stitch is recommended where both elasticity and strength are necessary in order to insure comfort and durability. -
Page 29: Overcast Stretch Stitching
Overcast Stretch Stitching Machine setting q Stitch selector: E or F w Stitch length: S.S. e Needle thread tension: 2 – 6 r Presser foot: Zigzag foot: A This stitch is for sewing a seam with an overcast finish. It is used when making swim wear, ski pants and other garments which require stretch. -
Page 30: Smocking
Smocking Machine setting q Stitch selector: w Stitch length: S.S. e Needle thread tension: 2 – 6 r Presser foot: Zigzag foot: A NOTE: Loosen the needle thread tension to make gathering easier. • To sew q Wrong side (Bottom side) of fabric w Knotted edge Smocking is a delicate decorative treatment used on children’s clothes or women’s blouses. -
Page 31: Section Viii. Care Of Your Machine
SECTION VII. CARE OF YOUR MACHINE NOTE: * Unplug the machine. * Do not dismantle the machine other than as explained in this section. * Do not store the machine in a high-humidity area, near a heat radiator, or in direct sunlight. * Clean the outside of the machine with a soft cloth and mild soap. -
Page 32: Replacing The Bobbin Holder
Replacing the Bobbin Holder z Insert the bobbin holder into the hook race. x Make sure the knob of the bobbin holder fits next to the stopper on the race. q Knob w Stopper c Replace the bobbin. Attach the needle plate. Tighten the screw firmly with the screwdriver. -
Page 33: Troubleshooting
Troubleshooting Reference Condition Cause 1. The needle thread is not threaded properly. Page 11 The needle thread 2. The needle thread tension is too tight. Page 12 breaks. 3. The needle is bent or blunt. Page 6 4. The needle is incorrectly inserted. Page 6 5. - Page 36 508-800-122 (EN)
Need help?
Do you have a question about the Sewing Machine and is the answer not in the manual?
Questions and answers