Janome Sewing Machine Instruction Book
Hide thumbs
Also See for Sewing Machine:
- Instruction book (138 pages) ,
- Getting started manual (112 pages) ,
- Instruction manual (92 pages)
Table of Contents
Advertisement
Quick Links
Advertisement
Table of Contents

Related Manuals for Janome Sewing Machine


Summary of Contents for Janome Sewing Machine
- Page 1 Instruction book...
-
Page 3: Important Safety Instructions
Use only attachments recommended by the manufacturer as contained in this owner’s manual. 3. Never operate this sewing machine if it has a damaged cord or plug, if it is not working properly, if it has been dropped or damaged, or dropped into water. -
Page 4: Table Of Contents
• Tension is too loose ..........18 SECTION II. GETTING READY TO SEW Connecting machine to power supply ......4 SECTION III. BASIC SEWING Before using your sewing machine ........4 Straight stitch ..............19 For your safety ..............4 • Starting to sew ............19 Controlling sewing speed .......... - Page 5 TABLE OF CONTENTS Eyelet ................34 • To sew ..............34 Zipper sewing ............35–36 • Attaching the zipper foot ........35 • Fabric preparation ..........35 • To sew ............. 35–36 Darning stitch ..............37 • To sew ..............37 •...
-
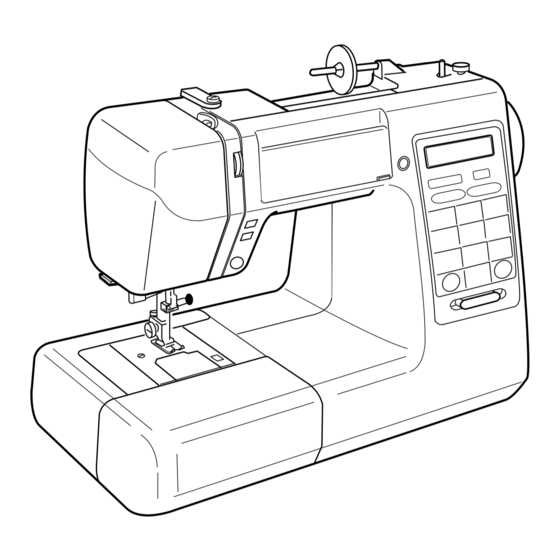
Page 6: Names Of Parts
SECTION I. NAME OF PARTS Names of parts q Extension table (Accessory box) w Needle plate e Needle threader r Thread cutter t Face cover y Thread take-up lever u Upper thread guide i Thread tension dial o Spool pin !0 Large spool holder !1 Flip top stitch chart !2 Screen sharpness adjusting dial... -
Page 7: Standard Accessories
Standard accessories q Bobbin w Spool pin felt e Assorted needle set r Additional spool pin t Straight stitch foot y Zigzag foot (set on the machine) u Satin stitch foot i Zipper foot o Automatic buttonhole foot !0 Overedge foot !1 Blind hem foot !2 Darning foot !3 1/4˝... -
Page 8: Section Ii. Getting Ready To Sew Connecting Machine To Power Supply
4. Turn on the power switch r. Before using your sewing machine Before using your sewing machine for the first time, place a waste fabric under the presser foot and run the machine without thread for a few minutes. Wipe away any oil which may appear. -
Page 9: Speed Control Lever
Speed control lever Sewing speed can be varied by the speed control lever according to your sewing needs. To increase sewing speed, slide the lever to the right. To decrease sewing speed, slide the lever to the left. Machine operating buttons q Up/down needle position button w Auto-lock button e Reverse stitch button... -
Page 10: Cursor Keys
Machine operating buttons (continued) t Cursor keys y Mode key u Stitch width selection key i Stitch length selection key Cursor keys t Cursor keys Use these keys to check and correct pattern combinations before sewing. For editing, use these keys to select editing position. -
Page 11: Memory Key
Machine operating buttons (continued) o Memory key !0 Clear key !1 Function touchpad Memory key o Memory key The memory key will memorize your pattern selection. Press the memory key after you selected your stitch pattern. (You can program up to 50 patterns in memory.) * The following patterns cannot be memorized. -
Page 12: Pattern Selection And Screen Indication
Pattern selection and screen indication You can select these patterns directly by pressing the pattern keys. The following patterns can be selected simply by pressing the pattern keys. z When the power switch is turned on, the mode 1 is set automatically. -
Page 13: Language Selection
Language selection q Power switch w Memory key e English r French t Spanish z Turn on the power switch q while pressing the memory key w. x You can select the language (English, Spanish or French) by pressing the key or number keys. -
Page 14: Presser Foot Lifter
Presser foot lifter q Presser foot lifter w Normal up position e Highest position The presser foot lifter q raises and lowers the presser foot. You can raise it about 1/4˝ (0.6 cm) higher than the normal up position w for easy removal of the presser foot, or to help you place thick material under the foot. -
Page 15: Changing Needle
Changing needle q Needle clamp screw Flat side w Needle clamp Lado plano Needle z Turn off the power switch. Méplat vers Aguja Raise the needle to its highest position by turning the Aiguille handwheel counterclockwise, toward you, and lowering the presser foot. -
Page 16: Selecting Thread And Needles
Selecting Thread and Needles For general sewing, use needle size 11/75 or 14/90. A fine thread and needle should be used for sewing lightweight fabrics, so the fabric will no be marred. Heavy fabrics requires a needle large enough to the fabric without fraying the needle thread. -
Page 17: Bobbin Winding
Bobbin winding • Removing the bobbin q Hook cover plate release button w Hook cover plate Gently slide the hook cover plate release button q to the right and remove the cover plate w. Lift out the bobbin. • Horizontal spool pin q Spool pin w Large spool holder e Small spool holder... -
Page 18: Winding The Bobbin
• Winding the bobbin z Draw the thread from the spool. x Guide the thread around the thread guide. c Thread through the hole in the bobbin from the inside to the outside. v Put the bobbin on the bobbin winder spindle. b Push the bobbin to the right. -
Page 19: Inserting The Bobbin
• Inserting the bobbin q End of thread w Notch e Notch r Threading diagram z Place a bobbin in the bobbin holder with the thread running off counterclockwise. x Guide the thread into the first notch w on the front side of the bobbin holder. -
Page 20: Threading The Machine
Threading the machine • Threading the machine q Up/down needle position button w Spool * Raise the thread take-up lever to its highest position. * Raise the presser foot lifter. * Place a spool on the spool pin, with the thread coming off as shown. -
Page 21: Drawing Up Bobbin Thread
• Drawing up bobbin thread z Raise the presser foot. Hold the needle thread lightly with your left hand. x Press the up/down needle position button q twice to lower and raise the needle to pick up the bobbin thread. q Up/down needle position button c Pull both threads 4˝... -
Page 22: Tension Is Too Loose
• Tension is too loose q Needle thread (Top thread) w Bobbin thread (Bottom thread) e To tighten tension r Right side (Top side) of fabric t Wrong side (Bottom side) of fabric The bobbin thread lays flat on the wrong side of the fabric, because there is not enough needle thread tension to draw the bobbin thread up into the fabric. -
Page 23: Section Iii. Basic Sewing Straight Stitch
SECTION III. BASIC SEWING Straight stitch q Stitch pattern: 01 or 11 w Needle thread tension: 2 to 6 e Presser foot: Zigzag foot: A r Presser foot: Straight stitch foot: H NOTE: When using the straight stitch foot, make sure to use the center needle position. -
Page 24: Using The Seam Guides On The Needle Plate
Using the seam guides on the needle plate q Needle drop position w Edge of fabric e Needle plate guide line The seam guides on the needle plate are engraved to help you measure seam width. The numbers on the needle plate indicate the distance between the center needle position and the edge of the fabric. -
Page 25: Sewing On Heavy Fabrics
Sewing on heavy fabrics q Fabric w Black button The black button w on foot A will lock the foot in a horizon- tal position if you push it in before lowering the presser foot. This ensures even feeding at the beginning of seams and helps when sewing many layers of fabric such as sewing over welt seams when hemming jeans. -
Page 26: To Drop Or Raise The Feed Dog
To drop or raise the feed dog The drop feed dog lever is located underneath the free arm bed on the back side of the machine. q To drop the feed dog, push the lever in the direction of the arrow, as illustrated. w To raise the feed dog, push the lever in the direction of the arrow, as illustrated, and turn the handwheel toward you. -
Page 27: Quiliting With Walking Foot
Quilting with walking foot The walking foot is effective in preventing the fabric (light materials, knits, real and imitation leather etc.) from slipping or puckering, because it sandwiches the material between the upper and the lower feed dog on the machine. The quilting bar can also be attached on the walking foot to make it easier to sew evenly spaced parallel rows of stitches. -
Page 28: Automatic Reverse Stitch
Automatic reverse stitch q Stitch pattern: w Needle thread tension: 2 to 6 e Presser foot: Zigzag foot: A r Presser foot: Straight stitch foot: H t Reverse stitch button This reverse stitch can be used for securing, mending or reinforcement stitches. -
Page 29: Auto-Lock Stitch
Auto-lock stitch q Stitch pattern: w Needle thread tension: 2 to 6 e Presser foot: Zigzag foot: A r Presser foot: Straight foot: H Lower the needle close to the front edge of the fabric and lower the presser foot. The machine will sew several locking stitches in place and continue sewing forward. -
Page 30: Overcasting
Overcasting q Stitch pattern: w Needle thread tension: 3 to 7 e Presser foot: Overedge foot: C NOTE: When using an Overedge foot, make sure to set the stitch width at 5 and 7, otherwise the needle may hit the overedge foot. -
Page 31: Overedge Stitch
Overedge stitch q Stitch pattern: w Thread tension dial: 3 to 7 e Presser foot: Overedge foot: C This stitch pattern combines the straight and the zigzag stitches, using the overedge foot, to stitch and overcast seams in one step. It is ideal for 1/4˝... -
Page 32: Button Sewing
Button sewing q Stitch pattern: w Needle thread tension: 3 to 7 e Presser foot: Satin stitch foot: F r Feed dog: Dropped z Match the buttonholes to the horizontal slot on the z x c v b presser foot. x Lower the foot to hold the button in place. -
Page 33: Automatic Buttonhole
Automatic buttonhole q Stitch pattern: w Thread tension dial: 1 to 5 e Presser foot : Automatic buttonhole foot: R • Preparation for sewing q Groove w Pin Attach the automatic buttonhole foot R. Make sure the groove on the foot holder catches the pin on the foot when lowering the presser foot. -
Page 34: Starting To Sew
t Mark for placement of buttonhole y Starting point u Slider i There should be no gap. o Spring holder !0 Difference c Raise the foot. Insert needle thread through slot in foot. Draw both threads to left under the foot. Insert the fabric under the foot, and lower the needle into the fabric at the buttonhole starting point. -
Page 35: Adjusting The Stitch Width And Density In Buttonholes
Adjusting the stitch width and density in buttonholes • To change the stitch width The stitch width key controls the stitch width. The pre-set buttonhole widths are: square buttonhole 5.0, rounded buttonhole 4.0, keyhole buttonhole 7.0, stretch buttonhole 5.0, knit buttonhole 5.0. Press “+”... -
Page 36: Stretch Buttonhole
Stretch buttonhole q Stitch pattern: w Thread tension dial: 1 to 5 e Presser foot : Automatic buttonhole foot: R * Sewing procedure is the same as automatic buttonhole. Knit buttonhole q Stitch pattern: w Thread tension dial: 1 to 5 e Presser foot: Automatic buttonhole foot: R * Sewing procedure is the same as automatic buttonhole. -
Page 37: Corded Buttonhole
Corded buttonhole q Stitch pattern: w Thread tension dial: 1 to 5 e Presser foot: Automatic buttonhole foot: R z Use the same procedure as the automatic buttonhole procedure. * Set the stitch width to match the thickness of the cord used. -
Page 38: Eyelet
Eyelet q Stitch pattern: w Needle thread tension: 1 to 4 e Presser foot: Satin stitch foot: F The eyelet is used for belt holes etc. • To sew Attach the satin stitch foot F. Depress the foot control to sew. The machine will stop automatically when completed. -
Page 39: Zipper Sewing
Zipper sewing q Stitch selector: w Needle thread tension: 2 to 6 e Presser foot : Zipper foot: E • Attaching the zipper foot q Groove w Pin e To sew left side r To sew right side Fit the pin on the zipper foot into the groove on the foot holder. -
Page 40: Zipper Sewing
Zipper sewing (continued) x Attach the foot with the pin on the right. Sew through all the layers from the end of the zipper opening, guiding the zipper teeth along the edge of the foot. c Stop the machine 5 cm (2˝) before the foot reaches the slider on the zipper tape. -
Page 41: Darning Stitch
Darning stitch q Stitch pattern: w Thread tension dial: 3 to 6 e Presser foot: Automatic buttonhole foot: R • To sew z Pull the button holder to the rear. x Place the garment under the foot. Press the up/down needle position button twice. -
Page 42: Bartacking
Bartacking q Stitch pattern: w Thread tension dial: 3 to 6 e Presser foot: Satin stitch foot: F Tacking is used to reinforce pockets, crotches and belt carriers where extra stretch is needed. Select pattern 19 and attach the satin stitch foot F. The machine will sew a tacking of 5/8˝... -
Page 43: Blind Hem Stitch
Blind hem stitch q Stitch pattern: w Needle thread tension: 1 to 4 e Presser foot : Blind hem foot: G * Stitch pattern 7 can also be used. Use the same color thread as the fabric. On heavy weight fabrics that ravel, the raw edge should be overcast first. -
Page 44: Shell Stitch
Shell stitch q Stitch pattern: w Needle thread tension: 6 to 8 e Presser foot: Satin stitch foot: F Use a lightweight fabric (tricot, for example). Fold the fabric as shown and stitch on the fold. Allow the needle to just clear the folded edge to create a shelled edge. -
Page 45: Section Iv. Decorative Stitching Smocking
SECTION IV. DECORATIVE STITCHING Smocking q Stitch pattern: w Thread tension dial: 3 to 6 e Presser foot : Satin stitch foot: F * Stitch patterns 79 and 80 can also be used. NOTE: Loosen the needle thread tension to make gathering easier. -
Page 46: Scallop Stitch (A)
Scallop stitch (A) q Stitch pattern: w Thread tension dial: 1 to 4 e Presser foot: Zigzag foot: A • To sew z x c z Fold the fabric with right sides together. Sew scallops 3/8˝ (1 cm) from folded edge. x Trim close to stitching leaving 1/8˝... -
Page 47: Patchwork
Patchwork q Stitch pattern: w Thread tension dial: 1 to 4 e Presser foot: Satin stitch foot: F r Presser foot: 1/4˝ seam foot: O * Stitch patterns 36, 37, 44, 45 can also be used. • To sew q Wrong side of fabric w Right side of fabric Place the patchwork pieces right sides together. -
Page 48: Cross Stitch
Cross stitch q Stitch Pattern: w Thread tension dial: 3 to 6 e Presser foot : Satin stitch foot: F * Stitch patterns 61 to 63 can also be used. You can make beautiful designs with this embroidery stitch pattern, in half the time it would take if embroidered by hand. -
Page 49: Twin Needle Stitch
Twin needle stitch q Stitch Pattern: w Thread tension dial: 3 to 6 e Presser foot: Satin stitch foot: F r Twin needle NOTE: • Do not set the stitch width at more than 3, otherwise the needle may hit the needle plate or presser foot and could possibly break. -
Page 50: Adjusting Pattern Balance
Adjusting pattern balance If the decorative stitch patterns, letters , numbers or manual buttonhole stitches are uneven when you sew on a particular fabric, adjust them with the feed balancing dial. q Feed balancing dial w Standard setting mark e Indication line * The machine comes with the feed balancing dial set in the position as shown. -
Page 51: Extender Stitch Combination
Extender stitch combination q Stitch Pattern: w Thread tension dial: 1 to 4 e Presser foot: Zigzag foot: A r Presser foot: Satin stitch foot: F The extender stitch is especially useful for providing straight stitches between combinations of stitch pattern 22 (Blind hem stitch). -
Page 52: Programming Decorative Stitch Patterns
Programming decorative stitch patterns To repeat or continue the same combination of stitches, just press the foot control. z Select the mode 2. x Select stitch pattern 28. c Press memory key. v Select stitch pattern 29. b Press memory key. * You can program up to 50 patterns in memory. -
Page 53: Sewing Letters
Sewing letters (Example: Sun) z Select the mode 3. x Select stitch pattern 29. c Press memory key. v Select stitch pattern 57. b Press memory key. n Select stitch pattern 50. m Press memory key. -
Page 54: Editing Function
Editing function To check and correct pattern combination before sewing: Example: ABCDEFGH have been memorized. z Press key. The cursor will flash under the first letter selection. x Shift the cursor by pressing the key. * The arrow to the right means there are some more letters after “G”, the arrow to the left means there are more letters before “H”. -
Page 55: Adding A Letter Or Space Between Letters
Adding a letter or space between letters z Press key. x Press the key and slide the cursor past the last letter where you would like to add a letter. c Select the stitch pattern 67 (space). v Press memory key to input stitch pattern 67. -
Page 56: Section V. Care Of Your Machine Clean The Hook Race And Feed Dogs
Soft, dry cloth Press the up/down needle position button to raise the needle, then unplug the sewing machine. Remove the cover plate by sliding the cover plate release button to the right. Take out the bobbin. Brush out dust and lint. -
Page 57: Removing The Light Bulb
Removing the light bulb Make sure the power switch is turned off. To change the light bulb, wait until the light bulb has cooled down. z Open face plate cover. x Pull out the light bulb. q Face cover plate w Bulb socket e Light bulb r Base... -
Page 58: Troubleshooting
Troubleshooting Condition Cause Reference The needle thread 1. The needle thread is not threaded properly. See page 16 breaks. 2. The needle thread tension is too tight. See page 17, 18 3. The needle is bent or blunt. See page 11 4. - Page 60 842-800-323 Printed in Taiwan...
Need help?
Do you have a question about the Sewing Machine and is the answer not in the manual?
Questions and answers