
Related Manuals for Epson ELPMBATA


Summary of Contents for Epson ELPMBATA
-
Page 1: Installation Manual
INSTALLATION MANUAL High Security Projector Ceiling Mount MODEL# ELPMBATA Manufactured by: Business Machine Security, Inc. 520 W. Central Ave. Brea, CA 92821 www.LocDown.com... -
Page 2: Table Of Contents
Table of Contents Limited Warranty Information... 3 Contact Business Machine Security... 3 Warning Statement... 3 Parts List...4 Mount Assembly... 5 Securing Receiver Tray to Pipe... 6 Mounting Projector to Grid Plate... 7-9 Locking Grid Plate to Receiver Tray...10 Adjusting Mount... 11 INSTALLATION MANUAL... -
Page 3: Limited Warranty Information
Business Machine Security Limited Warranty Information Business Machine Security, Inc. warrants the original purchaser of Business Machine Security, Inc. products that they be free of defects in material and workmanship for life from the date of purchase. User assumes all risk and liability resulting from the use of the products, whether used singly or in combination with other goods. -
Page 4: Parts List
Parts List Installation Tools Pipe Adhesive (provided) Phillips Head Screwdriver (not provided) Mounting Hardware 4mm X 10mm Pan Head Metric Screw (Qty 4) 4mm X 20mm Pan Head Metric Screw (Qty 4) #10 SAE Flat Washer 3/8” Thick (Qty 4) Spacer (Qty 4) INSTALLATION MANUAL... -
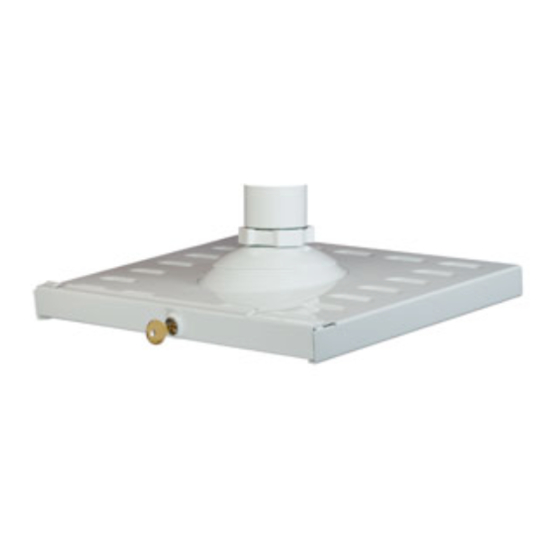
Page 5: Mount Assembly
PARTS LEGEND 1-1/2” Threaded Pipe (Not provided) Pipe Adhesive 1-1/2” Pipe Coupler Tensioning Ring Receiver Tray Grid Plate Pan Head Metric Screw* 4mm X 10mm 4mm X 20mm #10 SAE Flat Washer Screw Lock 3/8” Spacer Projector (Not included) *see pages 7-9 for proper hardware to use for your model projector INSTALLATION MANUAL... -
Page 6: Securing Receiver Tray To Pipe
Securing Receiver Tray to Pipe Twist off the cap from the Pipe Thread Adhesive tube (B). Cut off the tip. Apply it to the inside of the coupler (C) at the top, for about 1/4” or approximately three threads. Screw the coupler (C) clockwise (as viewed from below), with the Receiver Tray (E) already assembled, onto the pre-installed 1-1/2”... -
Page 7: Mounting Projector To Grid Plate
Mounting Projector to Grid Plate 1. Turn the projector (P) upside down and place it flat on a soft cloth or packaging material. Remove or adjust the feet to be as flush as possible to the projector bottom. 2. Place the Grid Plate (F) on the bottom of the projector and line it up so the mounting inserts of the projector (P) can be seen through the holes of the Grid Plate (F). - Page 8 Epson Projector Model# 1700c, 1705c, 1710c, 1715c Epson Projector Model# S5, 77c, 83+, 822+, 400W INSTALLATION MANUAL Mounting Inserts HARDWARE Mounting Inserts: • • 4mm X 10mm Pan Head Metric Screws (Qty 3) Mounting Inserts HARDWARE Mounting Inserts: #10 SAE Flat Washers (Qty 3) •...
- Page 9 Epson Projector Model# 6110i NOTE: For updated information on compatibility with the latest Epson projector models, visit www.epson.com” INSTALLATION MANUAL Mounting Inserts HARDWARE Mounting Inserts: #10 SAE Flat Washers (Qty 4) • • 4mm X 10mm Pan Head Metric Screws (Qty 4)
-
Page 10: Locking Grid Plate To Receiver Tray
Locking Grid Plate to Receiver Tray 1. After the Receiver Tray (E) has been attached to the ceiling and the projector has been attached to the Grid Plate (F), slide the Grid Plate (F) into the Receiver Tray (E). Before completely closing the mount, route the cables that are running down the 1-1/2” Pipe (A) and out the center of the Receiver Tray (E). -
Page 11: Adjusting Mount
Adjusting Mount 1. To align the projector, simply grab a hold of either side of the mount and gently adjust by lifting up and pushing down until you have the proper registration. If you wish to add or lessen the tension, turn the Tension Ring until the desired amount has been achieved.
Need help?
Do you have a question about the ELPMBATA and is the answer not in the manual?
Questions and answers