Table of Contents
Advertisement
MODEL W1752
MINI WOOD LATHE
OWNER'S MANUAL
(FOR MODELS MANUFACTURED SINCE 1/07)
Phone: (360) 734-3482 • Online Technical Support: tech-support@shopfox.biz
COPYRIGHT © JANUARY, 2007 BY WOODSTOCK INTERNATIONAL, INC. REVISED AUGUST, 2010 (TR)
WARNING: NO PORTION OF THIS MANUAL MAY BE REPRODUCED IN ANY SHAPE OR FORM WITHOUT
THE WRITTEN APPROVAL OF WOODSTOCK INTERNATIONAL, INC.
Printed in China
#8952BL
Advertisement
Table of Contents

Subscribe to Our Youtube Channel
Related Manuals for Woodstock SHOP FOX W1752


Summary of Contents for Woodstock SHOP FOX W1752
- Page 1 MODEL W1752 MINI WOOD LATHE OWNER'S MANUAL (FOR MODELS MANUFACTURED SINCE 1/07) Phone: (360) 734-3482 • Online Technical Support: tech-support@shopfox.biz COPYRIGHT © JANUARY, 2007 BY WOODSTOCK INTERNATIONAL, INC. REVISED AUGUST, 2010 (TR) WARNING: NO PORTION OF THIS MANUAL MAY BE REPRODUCED IN ANY SHAPE OR FORM WITHOUT THE WRITTEN APPROVAL OF WOODSTOCK INTERNATIONAL, INC. Printed in China #8952BL...
- Page 2 This manual provides critical safety instructions on the proper setup, operation, maintenance and service of this machine/equipment. Failure to read, understand and follow the instructions given in this manual may result in serious personal injury, including amputation, electrocution or death. The owner of this machine/equipment is solely responsible for its safe use.
-
Page 3: Table Of Contents
Contents INTRODUCTION ........2 ACCESSORIES ........25 Woodstock Technical Support ....2 Lathe Accessories ......25 SAFETY ..........6 MAINTENANCE ........26 Standard Safety Instructions ....6 General .......... 26 Additional Safety for Wood Lathes .... 8 Cleaning ......... 26 Unpainted Cast Iron ...... -
Page 4: Introduction
Close attention to detail, ruggedly built parts and a rigid quality control program assure safe and reliable operation. Woodstock International, Inc. is committed to customer satisfaction. Our intent with this manual is to include the basic information for safety, setup, operation, maintenance, and service of this product. -
Page 5: Specifications
W1752 Owner's Manual (Mfg. 1/07+) MACHINE SPECIFICATIONS Phone #: (360) 734-3482 • Online Tech Support: tech-support@shopfox.biz • Web: www.shopfox.biz MOdEl W1752 MINI WOOd lATHE Motor Type ................. Capacitor Start Horsepower ..................Voltage ................... 110V Phase ....................Single Amps ....................6A Speed ..................1725 RPM Cycle .....................60 Hz Number Of Speeds .................. - Page 6 W1752 Owner's Manual (Mfg. 1/07+) Main Specifications Swing Over Bed ................... 10" Swing Over Tool Rest ................7 " Distance Between Centers ..............15" Spindle Size ................7 " x 1 " Spindle TPI ................. 1" x 8 TPI Outboard Spindle Size ................1" Spindle Bore ..................
-
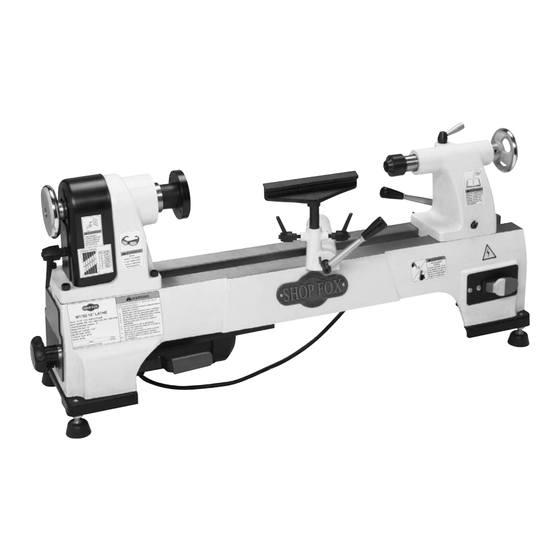
Page 7: Controls And Features
W1752 Owner's Manual (Mfg. 1/07+) Controls and Features Figure 1. W1752 controls and features. A. Belt Tension Lock Knob B. Belt Cover Lock Handle C. Belt Cover D. Headstock E. Faceplate F. Tool Rest Base G. Tool Rest H. Tool Rest Lock Handle Tool Rest Release Lever Tailstock Release Lever K. -
Page 8: Safety
W1752 Owner's Manual (Mfg. 1/07+) SAFETY READ MANUAL BEFORE OPERATING MACHINE. FAILURE TO FOLLOW INSTRUCTIONS BELOW WILL RESULT IN PERSONAL INJURY. Indicates an imminently hazardous situation which, if not avoided, WILL result in death or serious injury. Indicates a potentially hazardous situation which, if not avoided, COULD result in death or serious injury. - Page 9 W1752 Owner's Manual (Mfg. 1/07+) 10. NEVER LEAVE WHEN MACHINE IS RUNNING. Turn power off and allow all moving parts to come to a complete stop before leaving machine unattended. 11. DO NOT USE IN DANGEROUS ENVIRONMENTS. DO NOT use machinery in damp, wet locations, or where any flammable or noxious fumes may exist.
-
Page 10: Additional Safety For Wood Lathes
W1752 Owner's Manual (Mfg. 1/07+) Additional Safety for Wood Lathes READ and understand this USE this and other machinery with caution entire instruction manual and respect. Always consider safety first, before using this machine. as it applies to your individual working Serious personal injury conditions. - Page 11 W1752 Owner's Manual (Mfg. 1/07+) 13. FACEPLATE TURNING. When faceplate turning, use lathe chisels on the downward spinning side of the workpiece only. 14. SANDING/POLISHING. Remove the tool rest when performing sanding or polishing operations on the rotating spindle. 15. MATERIAL REMOVAL RATE. Removing too much material at once may cause workpiece to fly out of the lathe.
-
Page 12: Electrical
W1752 Owner's Manual (Mfg. 1/07+) ELECTRICAL 110V Operation The Model W1752 is wired for 110V operation. Always con- nect this machine to a dedicated circuit (wire, breaker, plug, receptacle) with a verified ground, using the recom- mended circuit size and plugs/receptacles listed at the bottom of this page. -
Page 13: Set Up
The SHOP FOX Model W1752 has been carefully pack- ® of this manual and contact Woodstock aged for safe transporting. If you notice the machine has International, Inc. at (360) 734-3482 or at been damaged, please contact your authorized SHOP tech-support@shopfox.biz... -
Page 14: Machine Placement
W1752 Owner's Manual (Mfg. 1/07+) Machine Placement Cleaning Machine • Floor Load: Some workbenches may require The bed and other unpainted parts of your lathe additional reinforcement to support both are coated with a waxy grease that protects the machine and the operator. Make sure them from corrosion during shipment. -
Page 15: Assembly
W1752 Owner's Manual (Mfg. 1/07+) Assembly To install the tool rest, do these steps: Lock Handles Turn the release lever on the tool rest base so it does not interfere with assembly. Release 2. Thread the tool rest lock handles into the tool rest base (Figure 4) until the threaded ends of the handles Lever are flush with the inside of the shaft. -
Page 16: Test Run
W1752 Owner's Manual (Mfg. 1/07+) Test Run Complete this process once you have familiarized yourself with all instructions in this manual. The test run consists of verifying the following: 1) The motor powers up and runs correctly, and 2) the safety paddle switch works correctly. -
Page 17: Operations
W1752 Owner's Manual (Mfg. 1/07+) OPERATIONS General The Model W1752 will perform many types of operations that are beyond the scope of this manual. Many of these operations can be dangerous or deadly if performed incor- rectly. The instructions in this section are written with the under- standing that the operator has the necessary knowledge and skills to operate this machine. -
Page 18: Changing Speeds
W1752 Owner's Manual (Mfg. 1/07+) Changing Speeds To change speeds, the belt in the headstock must be repositioned. A chart on the pulley cover shows the belt positions needed to make the lathe run at the desired speed. To change speeds, do these steps: Lock Handle Belt Cover... -
Page 19: Adjusting Tool Rest
W1752 Owner's Manual (Mfg. 1/07+) Adjusting Tool Rest The tool rest is equipped with a cam-action clamping system to secure it to the lathe bed. When the lever is engaged, a locking plate lifts up and secures the tool rest Lock Tool Rest base to the bed. -
Page 20: Installing/Removing Live Center
W1752 Owner's Manual (Mfg. 1/07+) To remove the spur center with the knock-out bar, do these steps: 1. UNPLUG LATHE FROM POWER! 2. Hold a clean rag under the spindle or wear a glove to catch the center when you remove it. 3. -
Page 21: Installing/Removing Faceplate
W1752 Owner's Manual (Mfg. 1/07+) Installing/Removing Faceplate The faceplate can be installed only if the spur center has been removed from the headstock spindle. The knock-out bar is included with the lathe for installing and removing the faceplate. To install the faceplate, do these steps: 1. -
Page 22: Selecting Turning Tools
W1752 Owner's Manual (Mfg. 1/07+) Selecting Turning Tools Lathe tools come in a variety of shapes and sizes and usually fall into five major categories. • Gouges—Mainly used for rough cutting, detail cut- ting, and cove profiles. The rough gouge is a hol- low, double-ground tool with a round nose, and the detail gouge is a hollow, double-ground tool with either a round or pointed nose. -
Page 23: Spindle Turning
W1752 Owner's Manual (Mfg. 1/07+) Spindle Turning Spindle turning (Figure 18) is the operation performed when a workpiece is mounted between the headstock and the tailstock. To set up a spindle turning operation, do these steps: 1. Mark both ends of your workpiece by drawing diago- nal lines from corner to corner. -
Page 24: Spindle Turning Tips
W1752 Owner's Manual (Mfg. 1/07+) 6. With the workpiece still attached, insert the spur center into the headstock spindle. Do not press the workpiece too firmly 7. With the live center installed in the tailstock, slide with the tailstock or the bearings will the tailstock toward the workpiece until the live bind and overheat. -
Page 25: Faceplate Turning
W1752 Owner's Manual (Mfg. 1/07+) Faceplate Turning Faceplate turning (Figure 22) is when a workpiece is mounted to the 3" faceplate, which is mounted to the headstock spindle. This type of turning is usually done with open-faced workpieces like bowls. To mount your workpiece to the faceplate, do these steps: 1. -
Page 26: Sanding/Finishing
W1752 Owner's Manual (Mfg. 1/07+) Sanding/Finishing After turning, the workpiece can be sanded, as shown in Figure 25, and finished (in the same manner) before removing it from the lathe. Sandpaper ENTANGLEMENT HAzARD! Wrapping the sandpaper com- pletely around the workpiece can pull your hands into the moving workpiece and may cause injury. -
Page 27: Accessories
If you do not have a dealer in your area, these products are also available through online dealers. Please call or e-mail Woodstock International Inc. Customer Service to get a current listing of dealers at: 1-800- 545-8420 or at sales@woodstockint.com. -
Page 28: Maintenance
W1752 Owner's Manual (Mfg. 1/07+) MAINTENANCE General SHOP FOX Regular periodic maintenance on your ® Model W1752 will ensure its optimum performance. Make a habit of inspecting your machine each time you use it. Check for the following conditions and repair or replace when necessary: Daily Check: •... -
Page 29: Service
W1752 Owner's Manual (Mfg. 1/07+) SERVICE Troubleshooting This section covers the most common problems and corrections with this type of machine. WARNING! DO NOT make any adjustments until power is disconnected and moving parts have come to a complete stop! PROBLEM POSSIBLE CAUSE CORRECTIVE ACTION... - Page 30 W1752 Owner's Manual (Mfg. 1/07+) PROBLEM POSSIBLE CAUSE CORRECTIVE ACTION Vibration noise while 1. Dented fan cover on motor. 1. Replace or adjust fan cover. Inspect motor fan and machine is running; noise replace if damaged. remains constant when speed is changed. Excessive vibration.
-
Page 31: Wiring Diagram W1752
W1752 Owner's Manual (Mfg. 1/07+) Wiring Diagram W1752 COLOR KEY BLACK WHITE GREEN PADDLE SWITCH (viewed from behind) NOTICE This motor wiring diagram is current at the time of printing; however, always use the dia- gram on the inside of the junc- tion box cover when rewiring your motor! Green... -
Page 32: Parts
W1752 Owner's Manual (Mfg. 1/07+) PARTS 21-1 16-1 16-4 27-3 16-2 16-3 27-4 27-5 27-2 27-6 27-1 -30-... -
Page 33: Parts List
W1752 Owner's Manual (Mfg. 1/07+) Parts List PART # DESCRIPTION PART # DESCRIPTION XPAW02.5M HEX WRENCH 2.5MM XPRP61M ROLL PIN 3 X 12 X1752002 TOOL REST RELEASE LEVER X1752038 BELT TENSION LOCK KNOB X1752003 LEVER KNOB X1752039 THUMB SCREW M5-.8 X 15 X1752004 ECCENTRIC SHAFT XPSB40M CAP SCREW M8-1.25 X 35 XPR02M EXT RETAINING RING 14MM XPN03M HEX NUT M8-1.25 XPRP39M ROLL PIN 4 X 20 X1752042 THREADED SHAFT X1752007 TOOL REST X1752043 COMPRESSION SPRING XPLN05M LOCK NUT M10-1.5 X1752044 ULTR-FLEX BELT 7 X 3.4 X 600MM... -
Page 34: Label Placement
MUST maintain the original location and readability of all labels on this machine. If any label is removed or becomes unreadable, REPLACE that label before allowing the machine to enter service again. Contact Woodstock International, Inc. at (360) 734-3482 or www. shopfoxtools.com to order new labels. -
Page 35: Notes
Notes... -
Page 36: Notes
Notes... - Page 37 W1752 Owner's Manual (Mfg. 1/07+)
- Page 38 Fold along dotted lIne place stamp Here Woodstock international inc. p.o. box 2309 bellingham, Wa 98227-2309 Fold along dotted lIne tape along edges--please do not staple...
-
Page 39: Warranty
Woodstock International, Inc. will repair or replace, at its expense and at its option, the Shop Fox machine or machine part, which in normal use has proven to be defective, provided that the original owner returns the product prepaid to a Shop Fox factory service center with proof of their purchase of the product within two years, and provides Woodstock International, Inc. - Page 40 High Quality Machines and Tools Woodstock International, Inc. carries thousands of products designed to meet the needs of today's woodworkers and metalworkers. Ask your dealer about these fine products:...
Need help?
Do you have a question about the SHOP FOX W1752 and is the answer not in the manual?
Questions and answers