Table of Contents
Advertisement
Quick Links
Advertisement
Table of Contents

Related Manuals for Zanussi ZCV663


Summary of Contents for Zanussi ZCV663
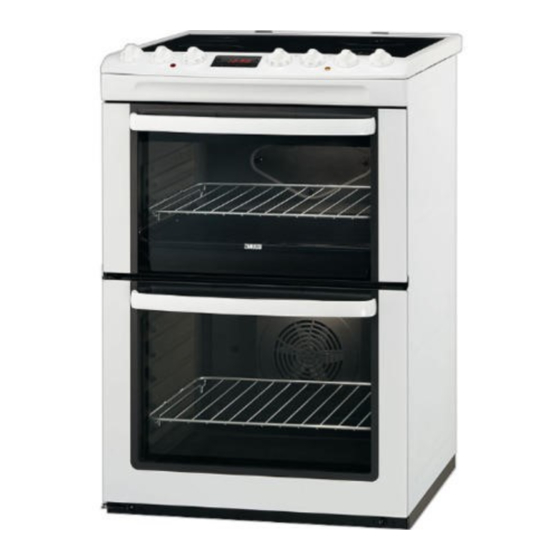
- Page 1 User manual Cooker ZCV663...
-
Page 2: Table Of Contents
Contents Safety information _ _ _ _ _ _ _ _ _ _ _ _ _ _ _ _ _ _ 2 Oven - Helpful hints and tips _ _ _ _ _ _ _ _ _ _ _ _ 10 Product description _ _ _ _ _ _ _ _ _ _ _ _ _ _ _ _ _ 5 Oven - Care and cleaning _ _ _ _ _ _ _ _ _ _ _ _ _ _ 15 Before first use _ _ _ _ _ _ _ _ _ _ _ _ _ _ _ _ _ _ _ 6... - Page 3 • The electrical installation must have an isolation device • Open the door carefully. The use of ingredients with al- which lets you disconnect the appliance from the cohol can cause a mixture of alcohol and air. There is mains at all poles. The isolation device must have a the risk of fire.
- Page 4 Care and cleaning • Bulb lamps used in this appliance are special lamps selected for household appliances use only. They can- • Before maintenance, make sure that the appliance is not be used for the full or partial illumination of a cold.
-
Page 5: Product Description
Product description General overview Control panel and hob Air vents for cooling fan Heating element Rating plate Oven lamp Fan and heating element Shelf positions of the main oven Shelf positions of the top oven Control panel Hob control knobs Main oven temperature control Top oven / Grill control Temperature indicator... -
Page 6: Before First Use
Cooking surface layout Single cooking zone 1200 W Single cooking zone 1800 W Single cooking zone 1200 W Residual heat indicator Single cooking zone 1800 W Accessories To put in the deep roasting pan. • Oven shelf • Deep grill roasting pan For cookware, cake tins, roasts. -
Page 7: Hob - Helpful Hints And Tips
Heat settings Turn the control knob to a necessary heat setting. To complete the cooking process, turn the control Control knob Function knob to the “0” position. Off position Residual heat indicator Heat settings The residual heat indicator comes on when a cooking (1 = lowest heat setting;... - Page 8 you switch off the appliance, the cooling fan continues to The oven power indicator comes on while the appli- operate until the appliance cools down. ance operates. The main oven indicator comes on while the temper- Activating and deactivating the top oven ature in the appliance increases.
-
Page 9: Oven - Clock Functions
Oven function Application For roasting larger joints of meat or poultry on one level. The function is also suit- Thermal Grilling able for gratinating and browning. To roast or roast and bake the food that requires the same cooking temperature, Fan cooking using more than one shelf, without flavour transference. -
Page 10: Oven - Using The Accessories
Push the Selection button again and again until nec- Push any button to stop the signal. essary function indicator flashes. Cancelling the clock functions To set the time for Minute minder , Duration Press the Selection button again and again until the or End , use "+"... -
Page 11: Tips On Baking
Top oven When you use frozen food, the trays in the oven can twist during baking. When the trays get cold again, the distor- The top oven is the smaller of the two ovens. It has 3 shelf tion will be gone. levels. - Page 12 Baking Temperature Approx Cook Time Food Shelf Position [°C] (mins) Biscuits 170 - 190 10 - 20 Bread 200 - 220 30 - 35 Bread rolls/buns 200 - 220 10 -15 Cakes: Small & Queen 160 - 180 18 - 25 Cakes: Sponges 160 - 175 20 - 30...
- Page 13 Temperature Approx Cook Time Food Shelf Position [°C] (mins) Vegetables: Baked Jacket 180 - 190 60 - 90 Potatos Vegetables: Roast Potatos 180 - 190 60 - 90 Yorkshire Pudding Large 220 - 210 25 - 40 Yorkshire Pudding Individ- 210 - 220 15 - 25 Roasting Meat, Poultry...
-
Page 14: Grilling
Temperature Approx Cook Time Food Shelf Position [°C] (mins) Scones 210 - 230 8 - 12 1 / 3 Roasting: Meat, Poultry 160 - 180 see Roasting Chart Roasting • Roast lean meats in a roasting tin with a lid. This well keep the meat more succulent. -
Page 15: Oven - Care And Cleaning
Grilling Food Shelf Position Grill Time (min) Bacon Rashers 5 - 6 Beefburgers 10 - 20 Chicken Joints 20 - 40 Chops - Lamb 2 - 3 15 - 25 Chops - Pork 2 - 3 20 - 25 Fish - Whole/Trout/Makarel 10 - 12 Fillets - Plaice/Cod 4 - 6... - Page 16 • Clean stubborn dirt with a special oven cleaner. • Clean all oven accessories (with a soft cloth with warm water and cleaning agent) after each use and let them dry. • If you have nonstick accessories, do not clean them using an aggressive agents, sharp edged objects or dishwasher.
- Page 17 To replace the glass panels obey the procedure in opposite sequence. Before you lower the trim attach the A trim part to the door. Refer to picture. Oven lamp Warning! There is a danger of electrical shock! Before you change the oven lamp: •...
-
Page 18: What To Do If
What to do if… Warning! Refer to "Safety information" chapter. Problem Possible cause Remedy The hob does not operate The heat setting is not set Set the heat setting The oven does not heat up The oven is not switched on Switch on the oven The oven does not heat up The clock is not set... - Page 19 rect height. Screw it into the solid material or use applica- ble reinforcement. Check that the anti-tilt protection projects minimum 20 mm into the hole in the back of the appliance (B) when you push the appliance (See fig. 2). If the space between the bench cupboards is greater than the width of the appli- ance, you must adjust the side measurement to centre the appliance.
-
Page 20: Environment Concerns
Terminal board Make sure that the links are fitted as shown. Make sure that the cover is securely fastened. To open the cover of terminal board obey the proce- dure in opposite sequence. Do not remove blanking plates. Environment concerns your local council, your household waste disposal service The symbol on the product or on its packaging... -
Page 21: Www.electrolux.com
Your name, address and postcode, your telephone number, clear concise details of the fault, model and serial number of the appliance (found on the rating plate), the Zanussi-Elec- 08445 612 612 purchase date. Please note a valid purchase receipt or... - Page 22 Slavonska avenija 3, 10000 Zagreb Ireland +353 1 40 90 753 Long Mile Road Dublin 12 Italia +39 (0) 434 558500 C.so Lino Zanussi, 26 - 33080 Porcia (PN) Latvija +371 67313626 Kr. Barona iela 130/2, LV-1012, Riga Lietuva +370 5 278 06 03...
- Page 24 www.zanussi.com/shop...
Need help?
Do you have a question about the ZCV663 and is the answer not in the manual?
Questions and answers