Ryobi TSS101L Operator's Manual
English manual
Hide thumbs
Also See for TSS101L:
- User manual (36 pages) ,
- Operator's manual (36 pages) ,
- Repair sheet (7 pages)
Table of Contents
Advertisement
Your miter saw has been engineered and manufactured to our high standard for dependability, ease of operation, and
operator safety. When properly cared for, it will give you years of rugged, trouble-free performance.
WARNING:
To reduce the risk of injury, the user must read and understand the operator's manual before using
this product.
Thank you for purchase.
SAVE THIS MANUAL FOR FUTURE REFERENCE
OPERATOR'S MANUAL
10 in. SLIDING COMPOUND MITER SAW
WITH LASER
TSS100L
Advertisement
Table of Contents

Related Manuals for Ryobi TSS101L


Summary of Contents for Ryobi TSS101L
- Page 1 OPERATOR’S MANUAL 10 in. SLIDING COMPOUND MITER SAW WITH LASER TSS100L Your miter saw has been engineered and manufactured to our high standard for dependability, ease of operation, and operator safety. When properly cared for, it will give you years of rugged, trouble-free performance. WARNING: To reduce the risk of injury, the user must read and understand the operator’s manual before using this product.
-
Page 2: Table Of Contents
Center. You can obtain the location of the Service Center nearest you by contacting a service representative at One World Technologies, Inc., P.O. Box 1207, Anderson, SC 29622-1207, by calling 1-800-525-2579 or by logging on to www.ryobi- tools.com. When you request warranty service, you must also present proof of purchase documentation, which includes the date of purchase (for example, a bill of sale). -
Page 3: General Safety Rules
GENERAL SAFETy RULES SECURE WORK. Use clamps or a vise to hold work WARNING: when practical, it is safer than using your hand and frees both hands to operate the tool. Read and understand all instructions. Failure to follow ... -
Page 4: Specific Safety Rules
GENERAL SAFETy RULES NEVER USE IN AN EXPLOSIVE ATMOSPHERE. STAy ALERT AND EXERCISE CONTROL. Watch what Normal sparking of the motor could ignite fumes. you are doing and use common sense. Do not operate tool when you are tired. Do not rush. ... -
Page 5: Specific Safety Rules
SPECIFIC SAFETy RULES NEVER PERFORM ANy OPERATION FREEHAND. IF THE POWER SUPPLy CORD IS DAMAGED, it must Always place the workpiece to be cut on the miter table be replaced only by the manufacturer or by an authorized and position it firmly against the fence as a backstop. -
Page 6: Symbols
SyMBOLS Some of the following symbols may be used on this tool. Please study them and learn their meaning. Proper interpretation of these symbols will allow you to operate the tool better and safer. SyMBOL NAME DESIGNATION/EXPLANATION Volts Voltage Amperes Current Hertz Frequency (cycles per second) - Page 7 If you do not understand ing, use only identical replacement parts. the warnings and instructions in the operator’s manual, do not use this product. Call Ryobi customer service for assistance. WARNING: The operation of any power tool can result in foreign objects being thrown into your eyes, which can result in severe eye damage.
-
Page 8: Electrical
ELECTRICAL EXTENSION CORDS SPEED AND WIRING Use only 3-wire extension cords that have 3-prong ground- The no-load speed of this tool is approximately 5,000 ing plugs and 3-pole receptacles that accept the tool’s plug. RPM. This speed is not constant and decreases under When using a power tool at a considerable distance from the a load or with lower voltage. -
Page 9: Glossary Of Terms
GLOSSARy OF TERMS Anti-Kickback Pawls (radial arm and table saws) Non-Through Cuts Any cutting operation where the blade does not extend A device which, when properly installed and maintained, is designed to stop the workpiece from being kicked back completely through the thickness of the workpiece. toward the front of the saw during a ripping operation. -
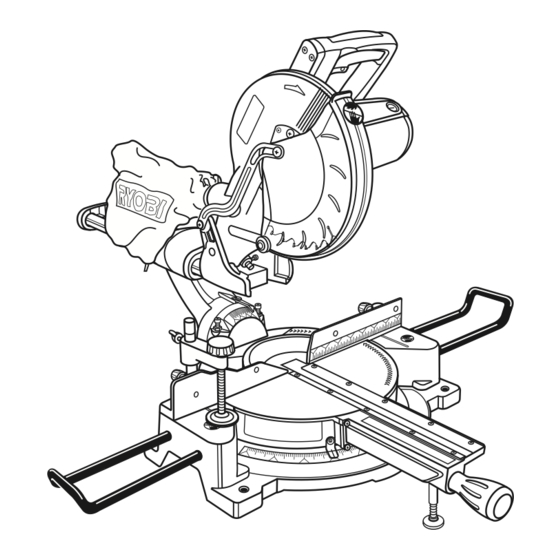
Page 10: Features
FEATURES PRODUCT SPECIFICATIONS Cutting Capacity with Miter at 0°/Bevel 0°: Maximum nominal lumber sizes: ......2 x 12 Blade Arbor .............. 5/8 in. Cutting Capacity with Miter at 45°/Bevel 0°: Blade Diameter ............10 in. Maximum nominal lumber sizes: ......2 x 8 No Load Speed ........ - Page 11 FEATURES KNOW yOUR COMPOUND MITER SAW MITER SCALE See Figure 2. The miter scale has index points provided at 0°, 15°, 22.5°, The safe use of this product requires an understanding of 31.6°, 45°, and 60.° the information on the tool and in this operator’s manual as POSITIVE STOPS ON MITER TABLE well as a knowledge of the project you are attempting.
-
Page 12: Tools Needed
FEATURES SLIDE LOCK KNOB SPindle The slide lock knob locks and unlocks the sliding feature lock Button of this tool. SPINDLE LOCK BUTTON See Figure 4. The spindle lock button locks the spindle and stops the Switch blade from rotating. Depress and hold the lock button while triGGer installing, changing, or removing blade. -
Page 13: Loose Parts List
LOOSE PARTS LIST The following items are included with your Compound Miter Saw: Dust Bag Work Clamp Clamp Brackets (2) Blade Wrench Clamp Bracket Screws (2) Blade Table Extensions (2) Operator’s Manual Blade wrench duSt... -
Page 14: Assembly
ASSEMBLy UNPACKING WARNING: This product requires assembly. Carefully lift saw from the carton by the carrying handle and Do not start the compound miter saw without checking for the saw base, and place it on a level work surface. interference between the blade and the miter fence. - Page 15 ASSEMBLy NOTE: Many of the illustrations in this manual show only portions of the compound miter saw. This is intentional lock “d” so that we can clearly show points being made in the handle illustrations. Never operate the saw without all guards securely in place and in good operating condition.
- Page 16 ASSEMBLy WORK CLAMP See Figure 11. WARNING: In some operations, the work clamp assembly may interfere with the operation of the blade guard assembly. taBle Always make sure there is no interference with the blade eXtenSion guard prior to beginning any cutting operation to reduce the risk of serious personal injury.
- Page 17 ASSEMBLy TO INSTALL / REPLACE THE BLADE SPindle lock See Figures 14 - 15. Button WARNING: A 10 in. blade is the maximum blade capacity of the saw. Never use a blade that is too thick to allow outer blade washer to engage with the flats on the spindle.
- Page 18 ASSEMBLy WARNING: Make sure the spindle lock button is not engaged before reconnecting saw into power source. Never engage spindle lock button when blade is rotating. laSer DANGER: Guide Switch Laser radiation. Avoid direct eye contact with light source. WARNING: Use of controls or adjustments or performance of procedures other than those specified herein may result in hazardous radiation exposure.
- Page 19 ASSEMBLy REMOVING / REPLACING THE THROAT PLATE See Figure 17. WARNING: The throat plate must be below the saw table. If the throat plate is too high or too low, the workpiece can catch on the uneven edges resulting in binding which could result in serious personal injury.
- Page 20 ASSEMBLy SQUARING THE BLADE TO THE FENCE See Figures 18 - 21. Miter Unplug the saw. Fence Pull the saw arm all the way down and engage the lock pin to hold the saw arm in transport position. ...
- Page 21 ASSEMBLy SQUARING THE BLADE TO THE MITER TABLE See Figures 22 - 25. Miter Unplug the saw. Fence Pull the saw arm all the way down and engage the lock pin to hold the saw arm in transport position. Blade ...
-
Page 22: Operation
Any slip can result in contact with the blade of the accessory blades available from the Ryobi dealer. causing serious personal injury. WARNING:... - Page 23 OPERATION TO MAKE NON-SLIDING CUTS croSS cut WARNING: Securely tighten the slide lock knob when making any non-sliding cuts. Failure to tighten the knob could result in the saw head moving during the cutting operation. TO MITER CUT / CROSS CUT See Figures 26 - 27.
- Page 24 OPERATION TO BEVEL CUT See Figures 28 - 29. A bevel cut is made by cutting across the grain of the workpiece indicator indicator with the blade angled to the workpiece. A straight bevel cut Point Screw is made with the miter table set at the zero degree position and the blade set at an angle between 0°...
- Page 25 OPERATION TO COMPOUND MITER CUT coMPound Miter cut See Figures 30 - 31. A compound miter cut is a cut made using a miter angle and a bevel angle at the same time. This type of cut is used to make picture frames, cut molding, make boxes with sloping sides, and for certain roof framing cuts.
- Page 26 OPERATION TO SUPPORT LONG WORKPIECES See Figure 32. Long workpieces need extra supports. Supports should be placed along the workpiece so it does not sag. The support should let the workpiece lay flat on the base of the saw and work table during the cutting operation.
- Page 27 OPERATION Slide cut WARNING: Slide Saw arM Never make a cut by pulling the saw toward you as Forward then PuSh down the blade can climb on top of the workpiece and come Slide lock toward you. Failure to heed this warning could result in knoB serious personal injury.
- Page 28 OPERATION MAKING AN AUXILIARy FENCE See Figure 35. Certain unusual cuts may benefit from a thicker miter fence (auxiliary fence) due to the size and position of the workpiece. The holes provided in the miter fence are there for just this purpose.
- Page 29 OPERATION CUTTING COMPOUND MITERS To aid in making the correct settings, the compound angle setting chart below has been provided. Since compound cuts are the most difficult to accurately obtain, trial cuts should be made in scrap material, and much thought and planning made, prior to making the required cut.
-
Page 30: Cutting Crown Molding
OPERATION CUTTING CROWN MOLDING When cutting crown molding by this method, the bevel angle should be set at 33.85 ° . The miter angle should be set at 31.6 ° The compound miter saw does an excellent job of cutting crown either right or left, depending on the desired cut for the applica- molding. - Page 31 OPERATION CUTTING WARPED MATERIAL See Figures 37 - 38. When cutting warped material, always make sure it is posi- tioned on the miter table with the convex side against the fence as shown in figure 37. If the warped material is positioned the wrong way as shown in figure 38, it will pinch the blade near the completion of the cut.
-
Page 32: Adjustments
ADJUSTMENTS Plug the saw into the power source and make a slight WARNING: cut to score the wood. Release the switch trigger and allow the saw blade to Before performing any adjustment, make sure the tool is stop rotating before raising the blade. unplugged from the power supply. -
Page 33: Adjustments
ADJUSTMENTS TRAVEL PIVOT ADJUSTMENT POSITIVE STOP ADJUSTMENTS See Figure 42. The saw arm should rise completely to the up position NOTE: These adjustments were made at the factory and by itself. normally do not require readjustment. If the saw arm does not raise by itself or if there is play To adjust: in the pivot joints, have saw repaired at the nearest ... -
Page 34: Maintenance
MAINTENANCE BRUSH REPLACEMENT WARNING: See Figure 43. When servicing, use only identical replacement parts. The saw has externally accessible brush assemblies that Use of any other parts may create a hazard or cause should be periodically checked for wear. product damage. Proceed as follows when replacement is required: ... - Page 35 NOTES...
-
Page 36: Parts Ordering / Service
HOW TO OBTAIN CUSTOMER OR TECHNICAL SUPPORT: To obtain Customer or Technical Support please contact us at 1-800-525-2579. RYOBI is a registered trademark of Ryobi Limited used under license. ® ONE WORLD TECHNOLOGIES, INC. 1428 Pearman Dairy Road, Anderson, SC 29625 Phone 1-800-525-2579 www.ryobitools.com...
Need help?
Do you have a question about the TSS101L and is the answer not in the manual?
Questions and answers